Product
Socket for Jira Is Now Available
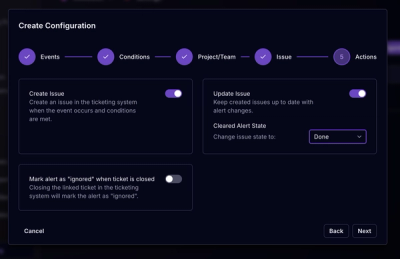
Socket for Jira lets teams turn alerts into Jira tickets with manual creation, automated ticketing rules, and two-way sync.
By Jeppe Hasseriis - Apr 20, 2026
Native Javascript Module to display beautiful popups. With react support!
The plugin can be used as a Common JS module, an AMD module, or a global.
Install with npm, use with Browserify
> npm install popups
and in your code
var popupS = require('popups');

popupS.alert({
    content: 'Hello World!'
});
For the basic styling and fade in and out to be working, you have to include the popupS.css in yout header.
<link rel="stylesheet" href="popupS.css">
You can include popupS.js directly in a script tag. For the basic styling and fade in and out to be working, you have to include the popupS.css.
<link rel="stylesheet" href="popupS.css">
<script src="popupS.js"></script>

<script>
    popupS.alert({
        content: 'Hello World!'
    });
</script>
For both files
popupS.jsandpopupS.cssis a minified productive version in it's corresponding folder.
Create a popup window:
popupS.window({
    mode: 'alert',
    content: 'Hey'
});

// or

popupS.alert({
    content: 'Hello'
});
Here are multiple ways to create popupS:
popupS.alert({
    title:   'I am an',
    content: 'Alert'
});
Confirm configuration involves the use of callbacks to be applied.
popupS.confirm({
    content:     '<b>Do you like what you see?</b>',
    labelOk:     'Yes',
    labelCancel: 'No',
    onSubmit: function() {
        console.log(':)');
    },
    onClose: function() {
        console.log(':(');
    }
});
Prompts are used for asking a single question.
popupS.prompt({
    content:     'What is your name?',
    placeholder: '>>>',
    onSubmit: function(val) {
        if(val) {
            popupS.alert({
                content: 'Hello, ' + val
            });
        } else {
            popupS.alert({
                content: ':('
            });
        }
    }
});
With Modals you are in full control.
popupS.modal({
    title:   'Himalaya',
    content: {
        tag: 'img#himalaya.picture',
        src: 'http://static.hdw.eweb4.com/media/wallpapers_1920x1080/nature/1/1/himalaya-nature-hd-wallpaper-1920x1080-6944.jpg'
    }
});
there is some magic sugar involved. learn more about it here
It can also work in asynchronous mode and retrieve content from external pages.
popupS.ajax({
    title:   'Himalaya',
    ajax: {
        url: 'http://static.hdw.eweb4.com/media/wallpapers_1920x1080/nature/1/1/himalaya-nature-hd-wallpaper-1920x1080-6944.jpg'
    }
});
popupS.window({
    mode: 'alert'|'confirm'|'prompt'|'modal'|'modal-ajax',
    title: 'Title',
    content : 'Text'|'<div>html</div>'|{tag : 'span#id.class'},
    className : 'additionalClass',  // for additional styling, gets append on every popup div
    placeholder : 'Input Text',     // only available for mode: 'prompt'
    ajax : {                        // only available for mode: 'modal-ajax'
        url : 'http://url.com',
        post : true,
        str : 'post=true'
    },
    onOpen: function(){},      // gets called when popup is opened
    onSubmit: function(val){}, // gets called when submitted. val as an paramater for prompts
    onClose: function(){}      // gets called when popup is closed
});
popupS.window({
    additionalBaseClass: '',            // classNames, that gets appended to the base
    additionalButtonHolderClass: '',    // classNames, that gets appended to the button holder
    additionalButtonOkClass: '',        // classNames, that gets appended to the ok button
    additionalButtonCancelClass: '',    // classNames, that gets appended to the cancel button
    additionalCloseBtnClass: '',        // classNames, that gets appended to the close button
    additionalFormClass: '',            // classNames, that gets appended to the form
    additionalOverlayClass: '',         // classNames, that gets appended to the overlay
    additionalPopupClass: '',           // classNames, that gets appended to the popup
    appendLocation: document.body,      // DOM Element, where the popup should sit
    closeBtn: '×',                // HTML String, to use for the close button
    flagBodyScroll: false,              // should the body be scrollable
    flagButtonReverse: false,           // should the buttons be reversed
    flagCloseByEsc: true,               // ability to clse with the esc key
    flagCloseByOverlay: true,           // ability to close with click on the overlay
    flagShowCloseBtn: true,             // should the close button be displayed
    labelOk: 'OK',                      // label for the ok button
    labelCancel: 'Cancel',              // label for the cancel button
    loader: 'spinner',                  // classname for spinner to use, take a look at the included css file for the possiblities
    zIndex: 10000                       // default z-index
});
The plugin is using some special magic to generating DOM Elements.
popupS.alert({
    content: {

        tag: 'div#id.class.class2',
        css: {
            width: '100px'
        },
        html: '<h1>Hello</h1>',
        children:[
            {
                tag: 'label',
                text: 'test',
                htmlFor: 'input',
                css: {
                    width: '50%'
                }
            },
            {
                tag: 'input#input',
                type: 'checkbox',
                css: {
                    width: '50%'
                }
            }
        ]

    }
});
All attributes, that can be applied via javascript are availabe to use. For example, as you can see in the example above: Instead of using the regular "for"-attribute on the label element, we have to use the "htmlFor"-attribute.
Note: If an assigned attribute is not an valid HTML attribute, it gets assigned as an 'data-'* atribute.
FAQs
Native Javascript Modal/Popup system. With react support!
The npm package popups receives a total of 969 weekly downloads. As such, popups popularity was classified as not popular.
We found that popups demonstrated a not healthy version release cadence and project activity because the last version was released a year ago. It has 1 open source maintainer collaborating on the project.
Did you know?

Socket for GitHub automatically highlights issues in each pull request and monitors the health of all your open source dependencies. Discover the contents of your packages and block harmful activity before you install or update your dependencies.
Product
Socket for Jira lets teams turn alerts into Jira tickets with manual creation, automated ticketing rules, and two-way sync.

Company News
Socket won two 2026 Reppy Awards from RepVue, ranking in the top 5% of all sales orgs. AE Alexandra Lister shares what it's like to grow a sales career here.

Security News
NIST will stop enriching most CVEs under a new risk-based model, narrowing the NVD's scope as vulnerability submissions continue to surge.