
Security News
Another Round of TEA Protocol Spam Floods npm, But It’s Not a Worm
Recent coverage mislabels the latest TEA protocol spam as a worm. Here’s what’s actually happening.
By Philipp Burckhardt - Nov 14, 2025
progressive-acrylic
Advanced tools
Advanced layered acrylic glass effects for web elements. Create iOS/Windows-style acrylic blur overlays with multiple customizable layers: blur, luminosity, tint, and noise.
![]()
🎨 Advanced layered acrylic glass and progressive (guassian) blur effects for web elements. Create iOS/Windows-style acrylic blur overlays with multiple customizable layers: blur, luminosity, tint, and noise.
I created an interactive editor since it might be challenging for beginners to use the library directly.
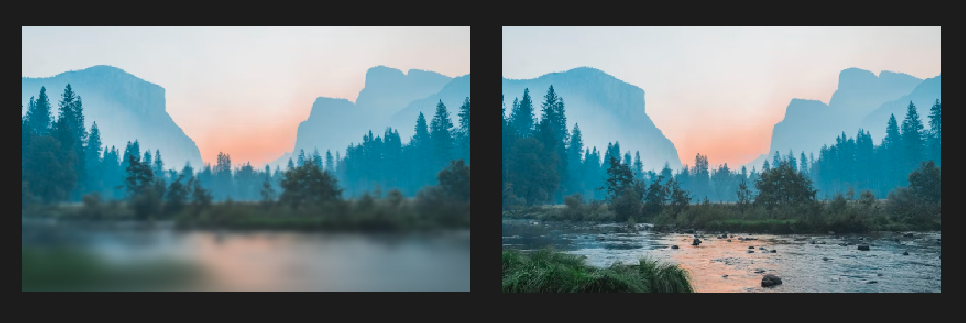
Progressive Acrylic aims to bring sophisticated acrylic glass and progressive blur effects to web interfaces, inspired by both iOS and Windows design languages. The library provides a powerful yet easy-to-use solution for creating layered blur effects that can enhance the visual hierarchy and depth of web applications.

The project focuses on:
This project started as an iOS-style progressive blur implementation, inspired by projects like Glur which creates beautiful progressive blur effects in SwiftUI.
Progressive blur creates a natural feathering effect where the blur intensity gradually increases, mimicking the depth of field effect seen in iOS interfaces.
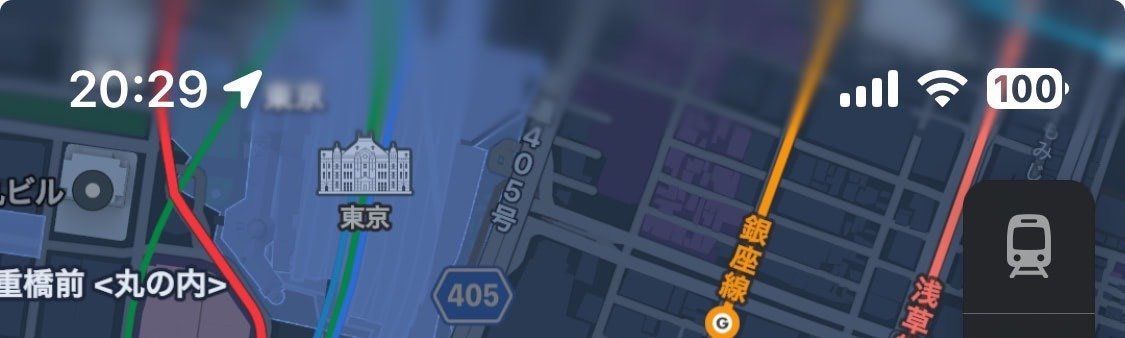
Multiple progressive blur layers working together
Later, the project evolved to implement Microsoft Windows Acrylic design language, following the official Windows Acrylic Material guidelines. The Windows acrylic system uses a sophisticated 4-layer approach that combines blur, luminosity adjustments, color tinting, and noise texture to create the distinctive frosted glass appearance.
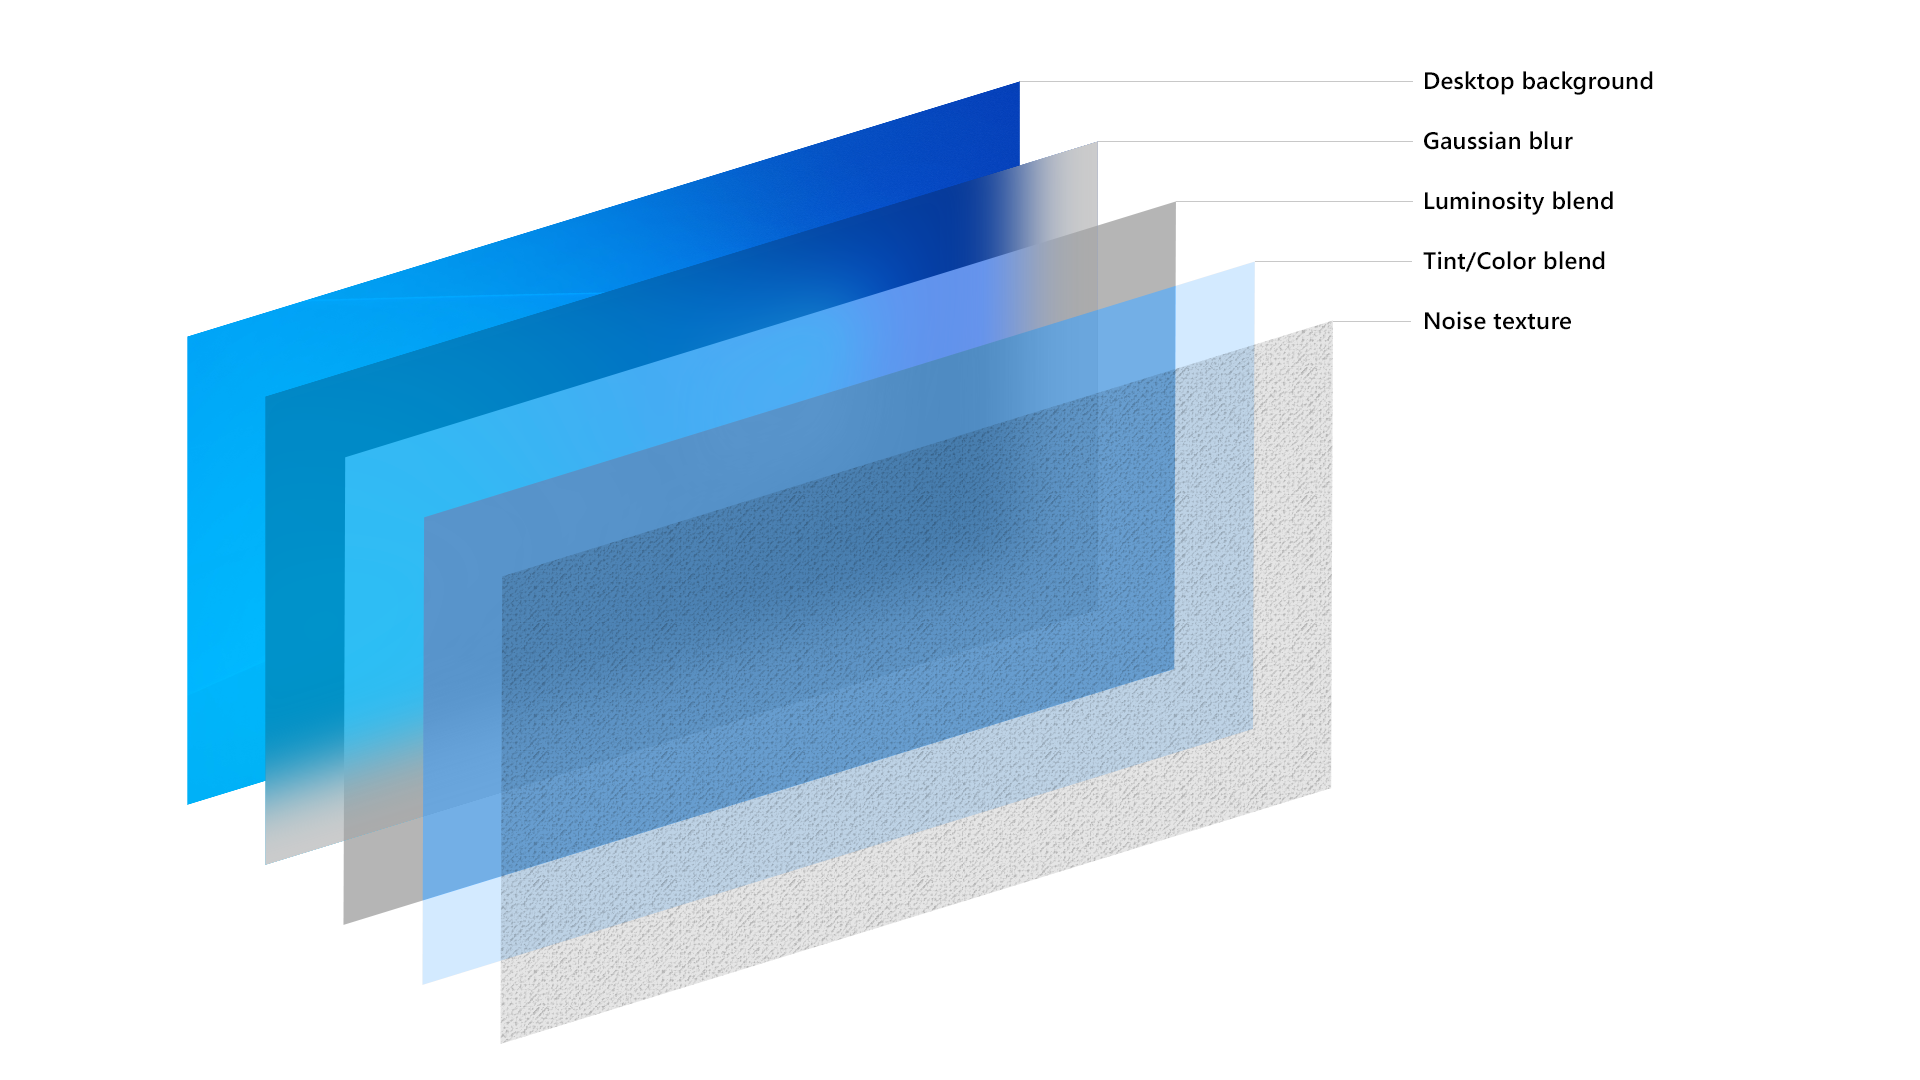
The Windows Acrylic layer system: Desktop background → Gaussian blur → Luminosity blend → Tint/Color blend → Noise texture
The layer architecture directly follows Microsoft's design specifications, implementing the same background source, blur effects, exclusion blending, color tinting, and noise patterns that make Windows Acrylic so distinctive and visually appealing.
npm install progressive-acrylic
<div class="image-container">
  <div class="blur-overlay" id="myBlur"></div>
</div>

<script src="./progressive-acrylic.js"></script>
<script>
  progressiveAcrylic(document.getElementById('myBlur'), {
    blur: {
      enabled: true,
      direction: 'bottom',
      height: '50%',
      maxBlur: 200
    },
    tint: {
      enabled: true,
      color: '#ffffff',
      opacity: 0.1
    }
    ...
  });
</script>
progressiveAcrylic(target, options)The main function for creating layered acrylic effects.
| Parameter | Type | Default | Description |
|---|---|---|---|
target | HTMLElement | - | Target DOM element for blur overlay |
options | Object | {} | Configuration options |
{
  blur: { /* Blur layer settings */ },
  luminosity: { /* Luminosity layer settings */ },
  tint: { /* Tint layer settings */ },
  noise: { /* Noise layer settings */ }
}
| Option | Type | Default | Range/Values | Description |
|---|---|---|---|---|
enabled | Boolean | true | true/false | Enable/disable blur layer |
direction | String | 'bottom' | 'top', 'bottom', 'left', 'right' | Blur fade direction |
height | String | '60%' | '10%' - '100%' | Height of blur area |
layers | Number | 8 | 3 - 20 | Number of blur layers (more = smoother) |
maxBlur | Number | 40 | 0 - 1000 | Maximum blur amount in pixels |
startOpacity | Number | 0 | 0 - 1 | Starting opacity of gradient |
endOpacity | Number | 1 | 0 - 1 | Ending opacity of gradient |
position | String | 'bottom' | 'top', 'bottom' | Vertical position of blur area |
curve | Array | [0.25, 0.46, 0.45, 0.94] | Cubic-bezier values, 'linear', 'ease-in', 'ease-out', 'ease-in-out' | Distribution curve for layers |
| Option | Type | Default | Range/Values | Description |
|---|---|---|---|---|
enabled | Boolean | false | true/false | Enable/disable luminosity layer |
brightness | Number | 1.1 | 0 - 2 | Brightness adjustment |
contrast | Number | 1.05 | 0 - 2 | Contrast adjustment |
saturate | Number | 1.2 | 0 - 3 | Saturation adjustment |
opacity | Number | 0.8 | 0 - 1 | Layer opacity |
blendMode | String | 'normal' | CSS blend modes | Mix blend mode |
| Option | Type | Default | Range/Values | Description |
|---|---|---|---|---|
enabled | Boolean | false | true/false | Enable/disable tint layer |
color | String | '#ffffff' | Hex color | Solid color (when no gradient) |
gradient | Object | null | Gradient object | Linear gradient configuration |
opacity | Number | 0.1 | 0 - 1 | Layer opacity |
blendMode | String | 'overlay' | CSS blend modes | Mix blend mode |
gradient: {
  direction: 'to bottom',  // CSS gradient direction
  colors: [
    { color: '#ffffff', stop: 0, opacity: 0.3 },
    { color: '#000000', stop: 100, opacity: 0.7 }
  ]
}
| Option | Type | Default | Range/Values | Description |
|---|---|---|---|---|
enabled | Boolean | false | true/false | Enable/disable noise layer |
opacity | Number | 0.3 | 0 - 1 | Layer opacity |
blendMode | String | 'multiply' | CSS blend modes | Mix blend mode |
progressiveAcrylic(element, {
  blur: {
    enabled: true,
    direction: 'top',
    height: '40%',
    layers: 6,
    maxBlur: 130,
    startOpacity: 0,
    endOpacity: 1,
    position: 'top',
    curve: [0.62, 0.123, 0.92, 0.002]
  },
  luminosity: {
      enabled: true,
      brightness: 1,
      contrast: 1.2,
      saturate: 1.3,
      opacity: 1,
      blendMode: 'normal'
  },
  tint: {
      enabled: true,
      color: '#000000',
      opacity: 0.75,
      blendMode: 'normal'
  },
  noise: {
      enabled: false,
      opacity: 0.3,
      blendMode: 'multiply'
  }
});
progressiveAcrylic(element, {
  blur: {
    enabled: true,
    direction: 'bottom',
    height: '100%',
    layers: 4,
    maxBlur: 200,
    startOpacity: 1,
    endOpacity: 1,
    position: 'bottom',
    curve: 'linear'
  },
  luminosity: {
      enabled: true,
      brightness: 1.1,
      contrast: 1,
      saturate: 1.2,
      opacity: 1,
      blendMode: 'normal'
  },
  tint: {
      enabled: false,
      color: '#ffffff',
      opacity: 0.15,
      blendMode: 'normal'
  },
  noise: {
      enabled: true,
      opacity: 1,
      blendMode: 'overlay'
  }
});
progressiveAcrylic(element, {
  blur: {
    enabled: true,
    direction: 'bottom',
    height: '33%',
    layers: 3,
    maxBlur: 300,
    curve: [0.09, 0.93, 0.7, 0.01]
  },
  luminosity: {
    enabled: false
  },
  tint: {
    enabled: false
  },
  noise: {
    enabled: false
  }
});
progressiveAcrylic(element, {
  blur: {
    enabled: true,
    maxBlur: 150,
    height: '60%'
  },
  tint: {
    enabled: true,
    gradient: {
      direction: 'to bottom',
      colors: [
        { color: '#ffffff', stop: 0, opacity: 0.3 },
        { color: '#000000', stop: 50, opacity: 0.1 },
        { color: '#0066cc', stop: 100, opacity: 0.5 }
      ]
    },
    opacity: 1,
    blendMode: 'overlay'
  }
});
Control how blur layers are distributed using cubic-bezier curves.
// iOS-style smooth animation
curve: [0.25, 0.46, 0.45, 0.94]

// Bounce effect
curve: [0.68, -0.55, 0.265, 1.55]

// Extreme ease-out
curve: [0.16, 1, 0.3, 1]

// Sharp start, smooth end
curve: [0.7, 0, 0.84, 0]
const acrylic = progressiveAcrylic(element, initialOptions);

// Update settings
acrylic.update({
  blur: { maxBlur: 300 },
  tint: { opacity: 0.2 }
});

// Destroy effect
acrylic.destroy();
// Header blur
progressiveAcrylic(headerElement, {
  blur: { direction: 'top', position: 'top', height: '30%' },
  tint: { enabled: true, color: '#000000', opacity: 0.3 }
});

// Footer blur
progressiveAcrylic(footerElement, {
  blur: { direction: 'bottom', position: 'bottom', height: '40%' },
  luminosity: { enabled: true, brightness: 1.2 }
});
Ensure your HTML structure supports backdrop-filter:
.image-container {
  position: relative;
  background-image: url('your-image.jpg');
  background-size: cover;
  background-position: center;
  width: 100%;
  height: 400px;
}

.blur-overlay {
  position: absolute;
  top: 0;
  left: 0;
  width: 100%;
  height: 100%;
}
| Browser | Chrome | Firefox | Safari | Edge |
|---|---|---|---|---|
| Version | 76+ | 103+ | 14+ | 79+ |
Backdrop-filter is required for blur effects to work.
MIT License - see LICENSE file for details.
Contributions welcome!
Thanks to grilly86 for noise textures generated using Base64 Noise Generator
Thanks to chrisbanes/haze for cubic bezier system inspiration
Thanks to joogps/Glur for general inspiration
FAQs
Advanced layered acrylic glass effects for web elements. Create iOS/Windows-style acrylic blur overlays with multiple customizable layers: blur, luminosity, tint, and noise.
The npm package progressive-acrylic receives a total of 0 weekly downloads. As such, progressive-acrylic popularity was classified as not popular.
We found that progressive-acrylic demonstrated a healthy version release cadence and project activity because the last version was released less than a year ago. It has 1 open source maintainer collaborating on the project.
Did you know?

Socket for GitHub automatically highlights issues in each pull request and monitors the health of all your open source dependencies. Discover the contents of your packages and block harmful activity before you install or update your dependencies.
Security News
Recent coverage mislabels the latest TEA protocol spam as a worm. Here’s what’s actually happening.

Security News
PyPI adds Trusted Publishing support for GitLab Self-Managed as adoption reaches 25% of uploads

Research
/Security News
A malicious Chrome extension posing as an Ethereum wallet steals seed phrases by encoding them into Sui transactions, enabling full wallet takeover.