Company News
Socket Has Acquired Secure Annex
Socket has acquired Secure Annex to expand extension security across browsers, IDEs, and AI tools.
By Feross Aboukhadijeh - Apr 28, 2026
react-native-mparticle
Advanced tools
![]()
![]()
React Native allows developers to use a single code base to deploy features to multiple platforms. With the mParticle React Native library, you can leverage a single API to deploy your data to hundreds of integrations from your iOS and Android apps.
| Method | Android | iOS |
|---|---|---|
| Custom Events | ✓ | ✓ |
| Page Views | ✓ | ✓ |
| Identity | ✓ | ✓ |
| eCommerce | ✓ | ✓ |
| Consent | ✓ | ✓ |
Download and install the mParticle React Native library from npm:
npm install react-native-mparticle --save
This library supports Expo projects using the Expo Config Plugin. The plugin automatically configures the native iOS and Android projects during expo prebuild.
npx expo install react-native-mparticle
app.json or app.config.js:{
"expo": {
"plugins": [
[
"react-native-mparticle",
{
"iosApiKey": "YOUR_IOS_API_KEY",
"iosApiSecret": "YOUR_IOS_API_SECRET",
"androidApiKey": "YOUR_ANDROID_API_KEY",
"androidApiSecret": "YOUR_ANDROID_API_SECRET"
}
]
]
}
}
npx expo prebuild --clean
npx expo run:ios
# or
npx expo run:android
| Option | Type | Required | Description |
|---|---|---|---|
iosApiKey | string | Yes | iOS API key from mParticle dashboard |
iosApiSecret | string | Yes | iOS API secret from mParticle dashboard |
androidApiKey | string | Yes | Android API key from mParticle dashboard |
androidApiSecret | string | Yes | Android API secret from mParticle dashboard |
logLevel | string | No | Log level: 'none', 'error', 'warning', 'debug', 'verbose' |
environment | string | No | Environment: 'development', 'production', 'autoDetect' |
dataPlanId | string | No | Data plan ID for validation |
dataPlanVersion | number | No | Data plan version |
iosKits | string[] | No | iOS kit pod names (e.g., ['mParticle-Rokt']) |
androidKits | string[] | No | Android kit artifact names (e.g., ['android-rokt-kit']) |
useEmptyIdentifyRequest | boolean | No | Use empty user identify request at init (default: true) |
{
  "expo": {
    "plugins": [
      [
        "react-native-mparticle",
        {
          "iosApiKey": "YOUR_IOS_API_KEY",
          "iosApiSecret": "YOUR_IOS_API_SECRET",
          "androidApiKey": "YOUR_ANDROID_API_KEY",
          "androidApiSecret": "YOUR_ANDROID_API_SECRET",
          "environment": "development",
          "logLevel": "verbose",
          "iosKits": ["mParticle-Rokt", "mParticle-Amplitude"],
          "androidKits": ["android-rokt-kit", "android-amplitude-kit"]
        }
      ]
    ]
  }
}
iOS:
AppDelegate (supports both Swift and Objective-C)pre_install hook in Podfile for dynamic framework linkingAndroid:
MainApplication (supports both Kotlin and Java)build.gradle| Expo SDK | React Native | iOS AppDelegate | Android MainApplication |
|---|---|---|---|
| 53+ | 0.79+ | Swift | Kotlin |
| 50-52 | 0.73-0.78 | Objective-C++ | Kotlin |
| 49 | 0.72 | Objective-C++ | Java |
| ≤48 | ≤0.71 | Objective-C | Java |
The plugin automatically detects the language and generates appropriate code for each platform.
The npm install step above will automatically include our react framework and the core iOS framework in your project. However depending on your app and its other dependecies you must integrate it in 1 of 3 ways
A. Static Libraries are the React Native default but since mParticle iOS contains swift code you need to add an exception for it in the from of a pre-install command in the Podfile.
pre_install do |installer|
  installer.pod_targets.each do |pod|
    if pod.name == 'mParticle-Apple-SDK'
      def pod.build_type;
        Pod::BuildType.new(:linkage => :dynamic, :packaging => :framework)
      end
    end
  end
end
Then run the following command
bundle exec pod install
B&C. Frameworks are the default for Swift development and while it isn't preferred by React Native it is supported. Additionally you can define whether the frameworks are built staticly or dynamically.
Update your Podfile to be ready to use dynamically linked frameworks by commenting out the following line
# :flipper_configuration => flipper_config,
Then run either of the following commands
USE_FRAMEWORKS=static bundle exec pod install
or
USE_FRAMEWORKS=dynamic bundle exec pod install
The mParticle SDK is initialized by calling the startWithOptions method within the application:didFinishLaunchingWithOptions: delegate call.
Preferably the location of the initialization method call should be one of the last statements in the application:didFinishLaunchingWithOptions:.
The startWithOptions method requires an options argument containing your key and secret and an initial Identity request.
Note that you must initialize the SDK in the
application:didFinishLaunchingWithOptions:method. Other parts of the SDK rely on theUIApplicationDidBecomeActiveNotificationnotification to function properly. Failing to start the SDK as indicated will impair it. Also, please do not use GCD'sdispatch_asyncto start the SDK.
For more help, see the iOS set up docs.
import mParticle_Apple_SDK

func application(_ application: UIApplication, didFinishLaunchingWithOptions launchOptions: [UIApplicationLaunchOptionsKey: Any]?) -> Bool {

        //override point for customization after application launch.
        let mParticleOptions = MParticleOptions(key: "<<<App Key Here>>>", secret: "<<<App Secret Here>>>")

        //optional- Please see the Identity page for more information on building this object
        let request = MPIdentityApiRequest()
        request.email = "email@example.com"
        mParticleOptions.identifyRequest = request
        //optional
        mParticleOptions.onIdentifyComplete = { (apiResult, error) in
            NSLog("Identify complete. userId = %@ error = %@", apiResult?.user.userId.stringValue ?? "Null User ID", error?.localizedDescription ?? "No Error Available")
        }
        //optional
        mParticleOptions.onAttributionComplete = { (attributionResult, error) in
                    NSLog(@"Attribution Complete. attributionResults = %@", attributionResult.linkInfo)
        }
        MParticle.sharedInstance().start(with: mParticleOptions)
        return true
}
Your import statement should be this:
#if defined(__has_include) && __has_include(<mParticle_Apple_SDK/mParticle.h>)
    #import <mParticle_Apple_SDK/mParticle.h>
#elif defined(__has_include) && __has_include(<mParticle_Apple_SDK_NoLocation/mParticle.h>)
    #import <mParticle_Apple_SDK_NoLocation/mParticle.h>
#else
    #import "mParticle.h"
#endif
Next, you'll need to start the SDK:
- (BOOL)application:(UIApplication *)application
        didFinishLaunchingWithOptions:(NSDictionary *)launchOptions {

    MParticleOptions *mParticleOptions = [MParticleOptions optionsWithKey:@"REPLACE ME"
                                                                   secret:@"REPLACE ME"];

    //optional - Please see the Identity page for more information on building this object
    MPIdentityApiRequest *request = [MPIdentityApiRequest requestWithEmptyUser];
    request.email = @"email@example.com";
    mParticleOptions.identifyRequest = request;
    //optional
    mParticleOptions.onIdentifyComplete = ^(MPIdentityApiResult * _Nullable apiResult, NSError * _Nullable error) {
        NSLog(@"Identify complete. userId = %@ error = %@", apiResult.user.userId, error);
    };
    //optional
    mParticleOptions.onAttributionComplete(MPAttributionResult * _Nullable attributionResult, NSError * _Nullable error) {
        NSLog(@"Attribution Complete. attributionResults = %@", attributionResult.linkInfo)
    }

    [[MParticle sharedInstance] startWithOptions:mParticleOptions];

    return YES;
}
See Identity for more information on supplying an MPIdentityApiRequest object during SDK initialization.
npm start
and build your workspace from xCode.
Copy your mParticle key and secret from your workspace's dashboard and construct an MParticleOptions object.
Call start from the onCreate method of your app's Application class. It's crucial that the SDK be started here for proper session management. If you don't already have an Application class, create it and then specify its fully-qualified name in the <application> tag of your app's AndroidManifest.xml.
For more help, see the Android set up docs.
package com.example.myapp;

import android.app.Application;
import com.mparticle.MParticle;

class MyApplication : Application() {
    fun onCreate() {
        super.onCreate()
        val options: MParticleOptions = MParticleOptions.builder(this)
            .credentials("REPLACE ME WITH KEY", "REPLACE ME WITH SECRET")
            //optional
            .logLevel(MParticle.LogLevel.VERBOSE)
            //optional
            .identify(identifyRequest)
            //optional
            .identifyTask(
                BaseIdentityTask()
                    .addFailureListener { errorResponse -> }
                    .addSuccessListener{ result -> }
            )
            //optional
            .attributionListener(this)
            .build()
        MParticle.start(options)
    }
}
Warning: Don't log events in your
Application.onCreate(). Android may instantiate yourApplicationclass in the background without your knowledge, including when the user isn't using their device, and lead to unexpected results.
import MParticle from 'react-native-mparticle';
To log basic events:
MParticle.logEvent('Test event', MParticle.EventType.Other, {
  'Test key': 'Test value',
});
To log commerce events:
const product = new MParticle.Product('Test product for cart', '1234', 19.99);
const transactionAttributes = new MParticle.TransactionAttributes(
  'Test transaction id'
);
const event = MParticle.CommerceEvent.createProductActionEvent(
  MParticle.ProductActionType.AddToCart,
  [product],
  transactionAttributes
);

MParticle.logCommerceEvent(event);
const promotion = new MParticle.Promotion(
  'Test promotion id',
  'Test promotion name',
  'Test creative',
  'Test position'
);
const event = MParticle.CommerceEvent.createPromotionEvent(
  MParticle.PromotionActionType.View,
  [promotion]
);

MParticle.logCommerceEvent(event);
const product = new MParticle.Product(
  'Test product that was viewed',
  '5678',
  29.99
);
const impression = new MParticle.Impression('Test impression list name', [
  product,
]);
const event = MParticle.CommerceEvent.createImpressionEvent([impression]);

MParticle.logCommerceEvent(event);
To log screen events:
MParticle.logScreenEvent('Test screen', { 'Test key': 'Test value' });
To set, remove, and get user details, call the User or Identity methods as follows:
MParticle.User.setUserAttribute('User ID', 'Test key', 'Test value');
MParticle.User.setUserAttribute(
  'User ID',
  MParticle.UserAttributeType.FirstName,
  'Test first name'
);
MParticle.User.setUserAttributeArray('User ID', 'Test key', [
  'Test value 1',
  'Test value 2',
]);
MParticle.User.setUserTag('User ID', 'Test value');
MParticle.User.removeUserAttribute('User ID', 'Test key');
MParticle.Identity.getUserIdentities(userIdentities => {
  console.debug(userIdentities);
});
var request = new MParticle.IdentityRequest();
Setting user identities:
var request = new MParticle.IdentityRequest();
request.setUserIdentity(
  'example@example.com',
  MParticle.UserIdentityType.Email
);
MParticle.Identity.getCurrentUser(currentUser => {
  console.debug(currentUser.userID);
});
var request = new MParticle.IdentityRequest();

MParticle.Identity.identify(request, (error, userId) => {
  if (error) {
    console.debug(error); //error is an MParticleError
  } else {
    console.debug(userId);
  }
});
var request = new MParticle.IdentityRequest();
request.email = 'test email';

MParticle.Identity.login(request, (error, userId) => {
  if (error) {
    console.debug(error); //error is an MParticleError
  } else {
    console.debug(userId);
  }
});
var request = new MParticle.IdentityRequest();

MParticle.Identity.logout(request, (error, userId) => {
  if (error) {
    console.debug(error);
  } else {
    console.debug(userId);
  }
});
var request = new MParticle.IdentityRequest();
request.email = 'test email 2';

MParticle.Identity.modify(request, (error, userId) => {
  if (error) {
    console.debug(error); //error is an MParticleError
  } else {
    console.debug(userId);
  }
});
var attributions = MParticle.getAttributions();
In order to listen for Attributions asynchronously, you need to set the proper field in MParticleOptions as shown in the Android or the iOS SDK start examples.
Check if a kit is active
var isKitActive = MParticle.isKitActive(kitId);
Check and set the SDK's opt out status
var isOptedOut = MParticle.getOptOut();
MParticle.setOptOut(!isOptedOut);
The method MParticle.logPushRegistration() accepts 2 parameters. For Android, provide both the pushToken and senderId. For iOS, provide the push token in the first parameter, and simply pass null for the second parameter.
MParticle.logPushRegistration(pushToken, senderId);
MParticle.logPushRegistration(pushToken, null);
Add a GDPRConsent
var gdprConsent = GDPRConsent()
  .setConsented(true)
  .setDocument('the document')
  .setTimestamp(new Date().getTime()) // optional, native SDK will automatically set current timestamp if omitted
  .setLocation('the location')
  .setHardwareId('the hardwareId');

MParticle.addGDPRConsentState(gdprConsent, 'the purpose');
Remove a GDPRConsent
MParticle.removeGDPRConsentStateWithPurpose('the purpose');
Add a CCPAConsent
var ccpaConsent = CCPAConsent()
  .setConsented(true)
  .setDocument('the document')
  .setTimestamp(new Date().getTime()) // optional, native SDK will automatically set current timestamp if omitted
  .setLocation('the location')
  .setHardwareId('the hardwareId');

MParticle.addCCPAConsentState(ccpaConsent);
Remove CCPAConsent
MParticle.removeCCPAConsentState();
Apache 2.0
FAQs
React Native module for mParticle
The npm package react-native-mparticle receives a total of 7,314 weekly downloads. As such, react-native-mparticle popularity was classified as popular.
We found that react-native-mparticle demonstrated a healthy version release cadence and project activity because the last version was released less than a year ago. It has 10 open source maintainers collaborating on the project.
Did you know?

Socket for GitHub automatically highlights issues in each pull request and monitors the health of all your open source dependencies. Discover the contents of your packages and block harmful activity before you install or update your dependencies.
Company News
Socket has acquired Secure Annex to expand extension security across browsers, IDEs, and AI tools.

Research
/Security News
Socket is tracking cloned Open VSX extensions tied to GlassWorm, with several updated from benign-looking sleepers into malware delivery vehicles.
Product
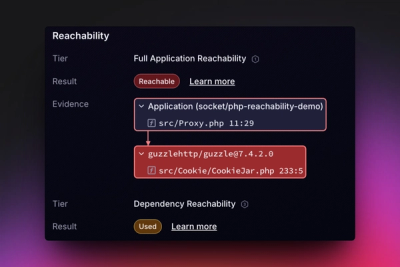
Reachability analysis for PHP is now available in experimental, helping teams identify which vulnerabilities are actually exploitable.