Rave By Flutterwave React Native Component
This is the react native SDK for Rave By Flutterwave.
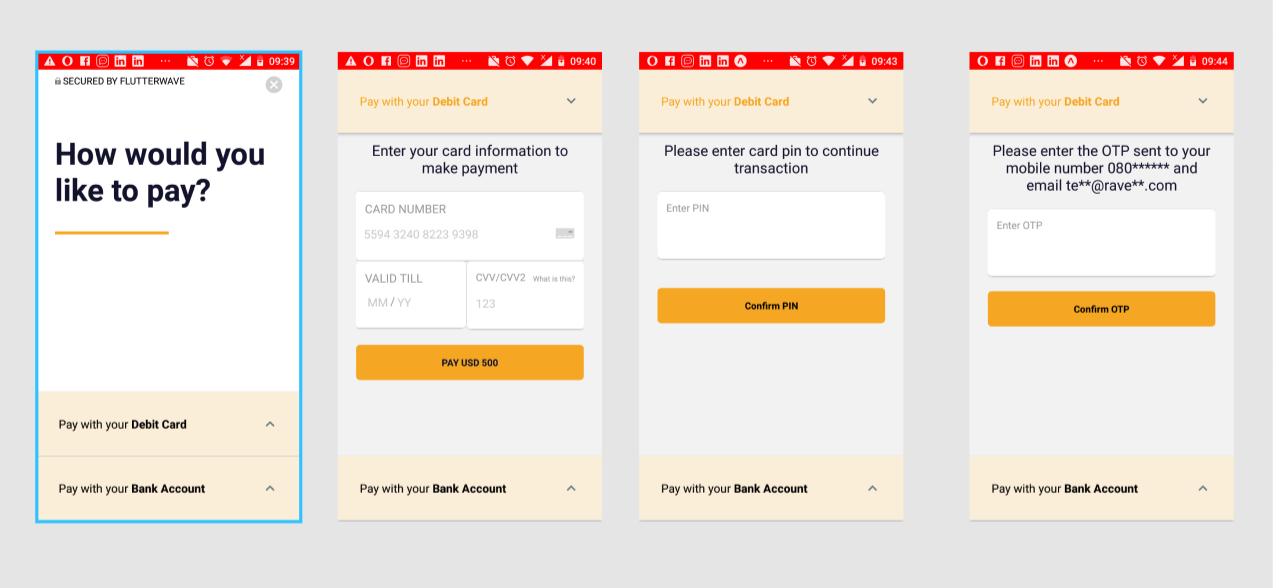
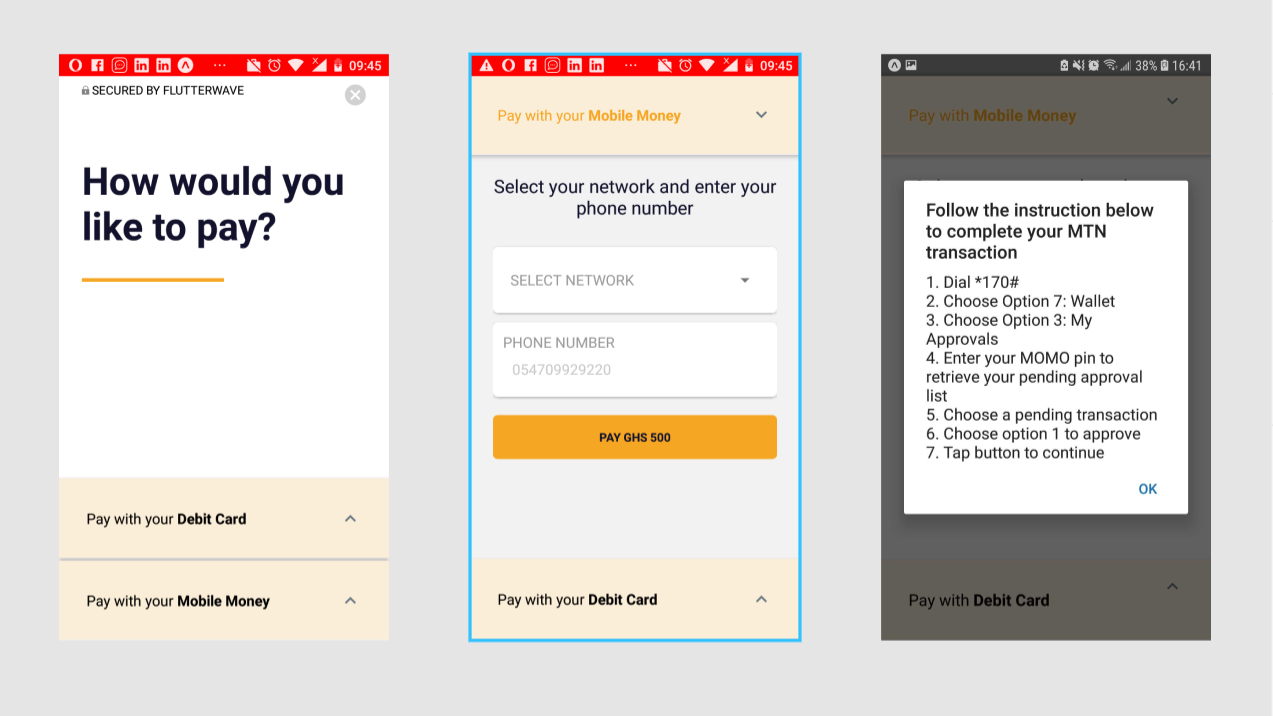
Table Of Content
Getting Started
Prerequisites
Installations
To use rave react native SDK in your application, you need to have Node and npm downloaded and installed on your machine.
-
Click Here to download and install Node to your machine. npm is always automatically installed when you install Node.
-
To ensure you have Node and npm installed, enter the following command into your terminal/command prompt: node -v and npm -v respectively.
-
To run react native on your machine you can use npm install -g expo-cli to install Expo CLI a command line utility to get you started quickly or use this command npm install -g react-native-cli to install the react native CLI.
Deployment
To Implement Rave By Flutterwave easily with React Native
-
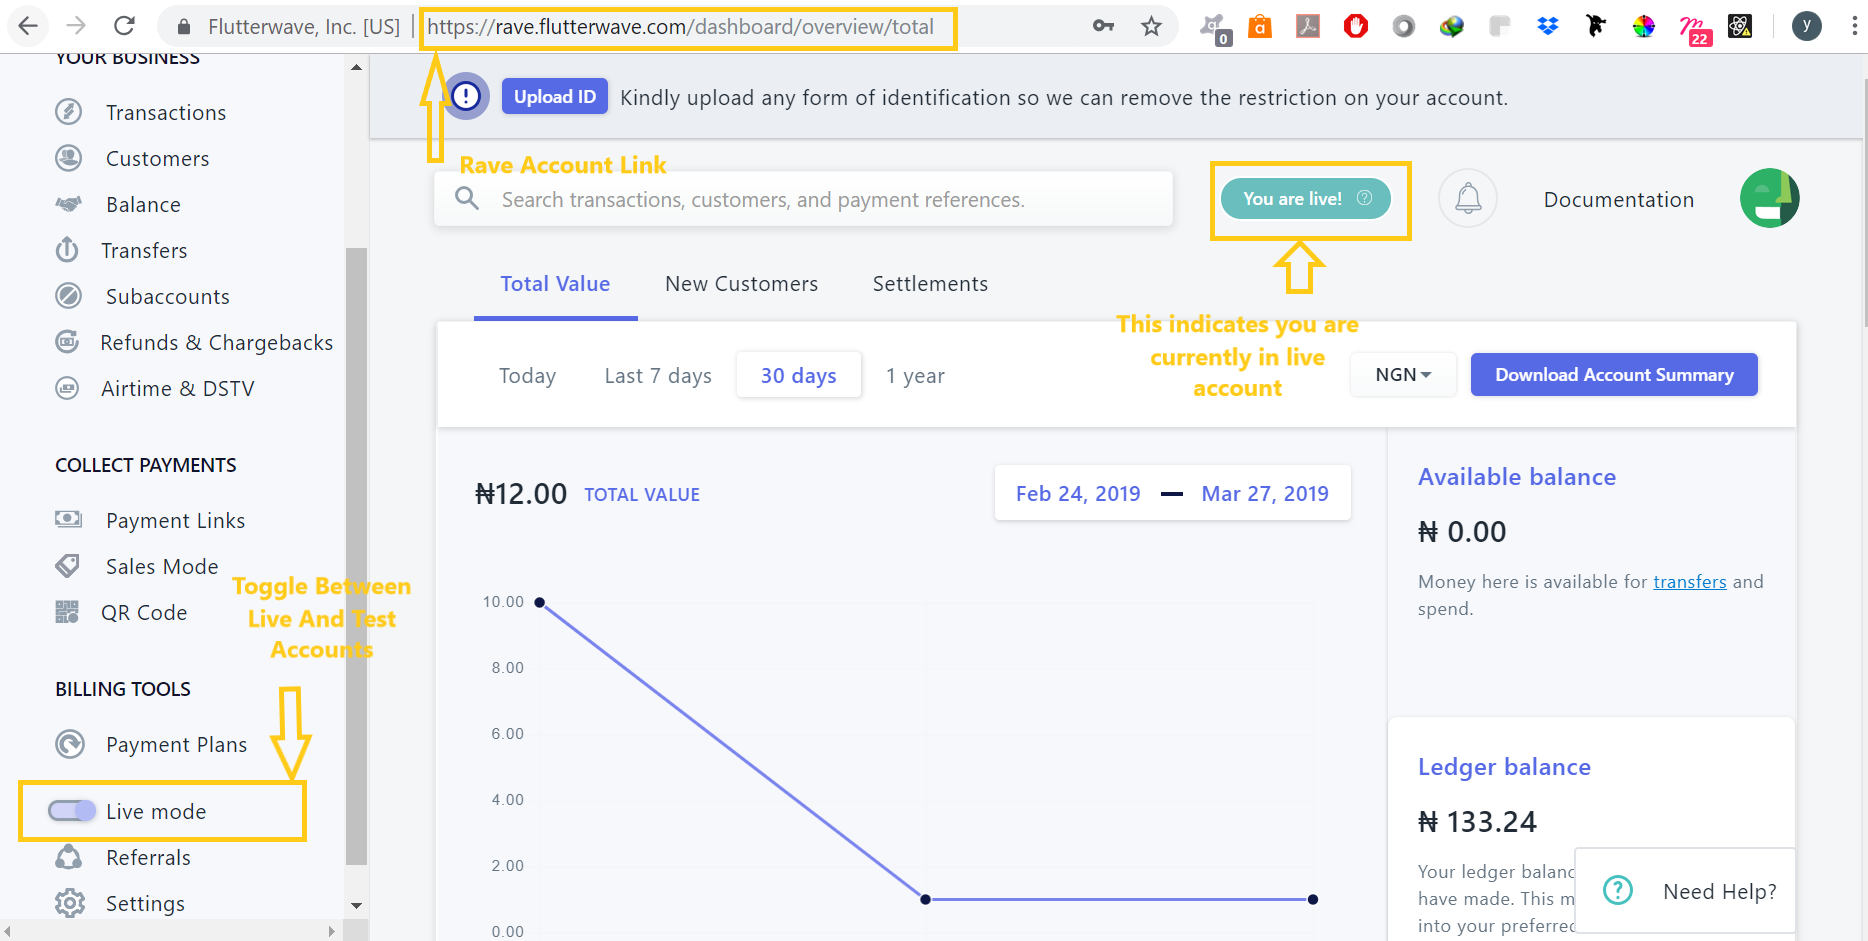
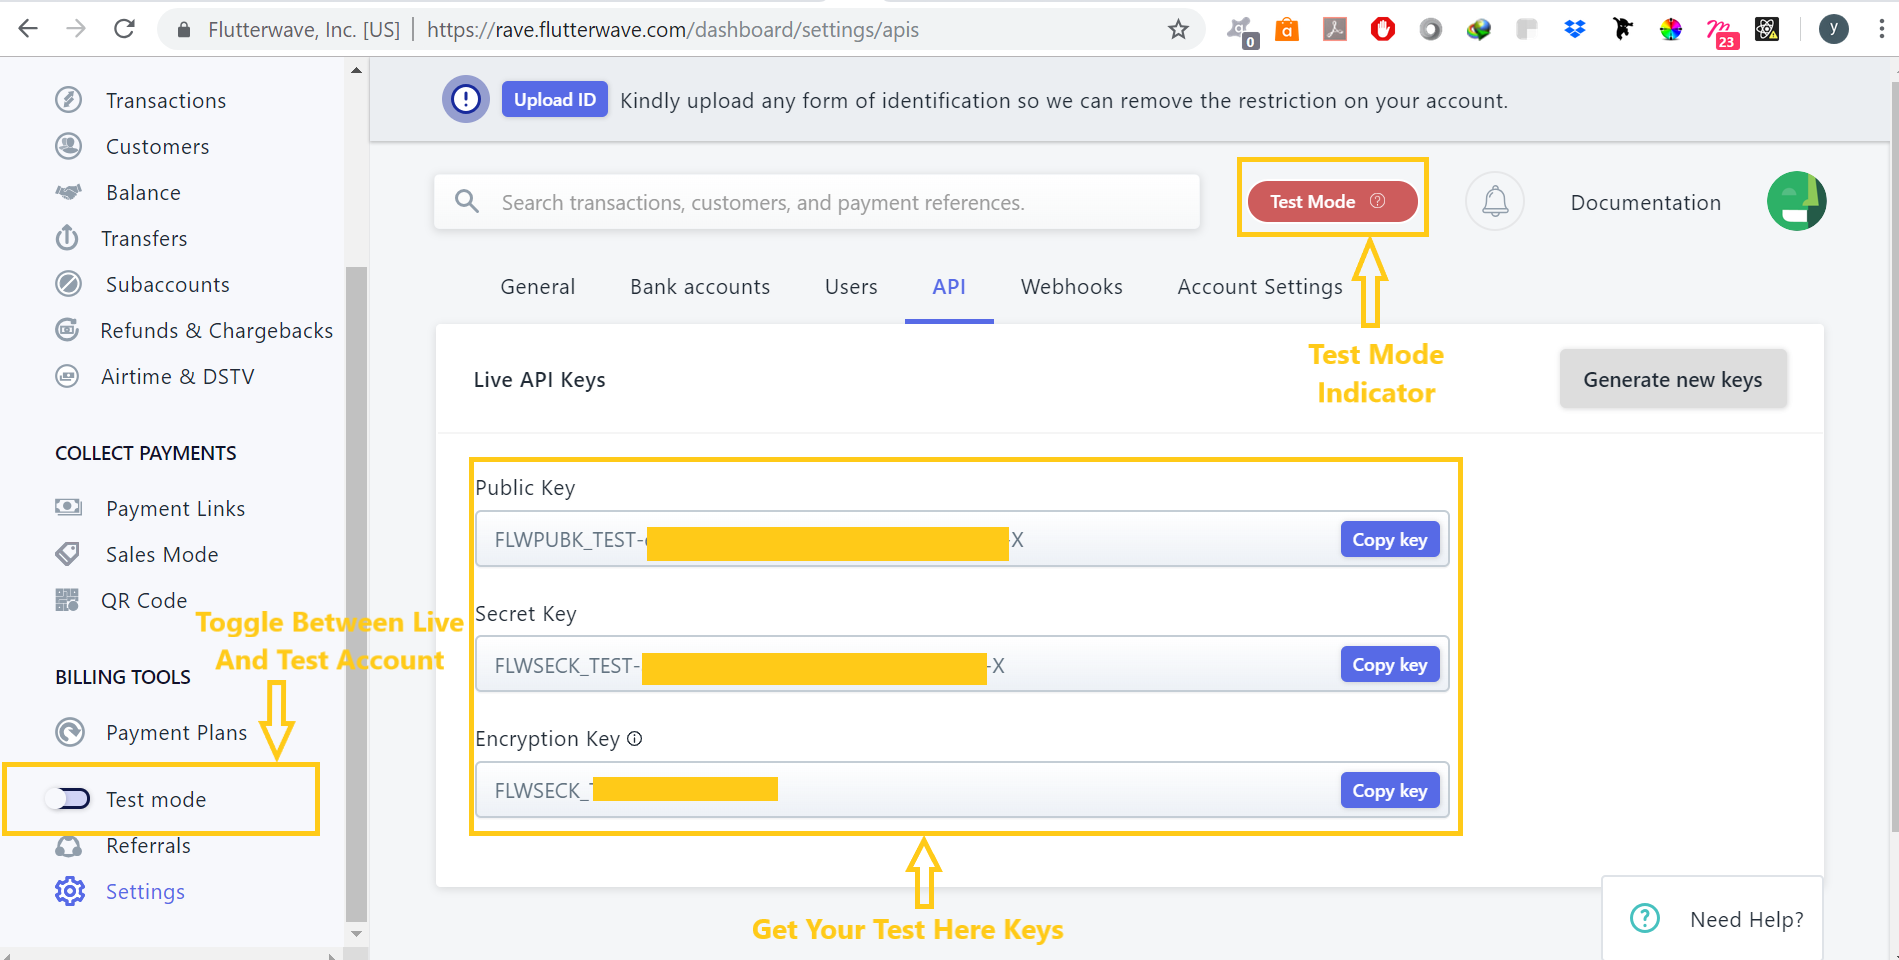
You can get your Public, Secret and your Encryption Keys on your account by clicking this link >>> Flutterwave Rave Live.
-
To get your TEST public, secret and encryption keys click on the Live Mode Toggle button to switch to Test account and Test Mode Toggle button to switch to live.
-
This is shown in the screenshots displayed below.
How It Works
This is a simple demonstration of how to set up a simple react native app and integrate rave react native SDK into it.
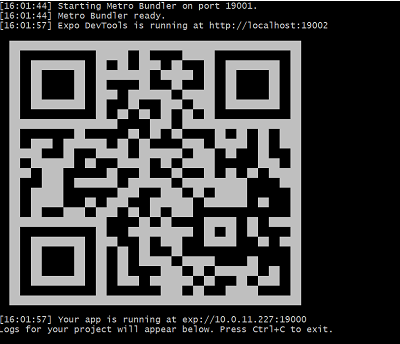
Using the Expo CLI command line utility, enter the following command to get started:
-
Install the Expo client or mobile application from Apple Store or Playstore
-
Open the Expo client app you installed on your mobile phone, then scan the barcode displaying on the terminal on your PC.
-
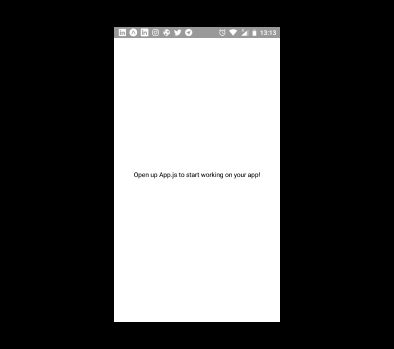
If successfully scanned and built, your app should load up on your mobile phone with the result in the image below;
Integrating Rave React Native
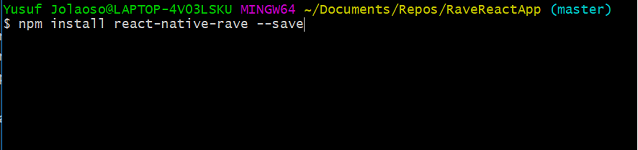
You can pull in react-native-rave into app with the steps below:
- Change directory into your current project directory from your terminal and enter this command:
npm install react-native-rave --save
OR
yarn add react-native-rave
Note: To use Yarn on your machine Click Here
Next use any of the payment options by following the processes below.
Payment Options
The payment options include:
- Card Payments
- Account Payments
- Mpesa
- Ghana Mobile Money Payments
- Uganda Mobile Money Payments
- Zambia Mobile Money Payments
- Rwanda Mobile Money Payments
- USSD Payments
Usage
Payments
1. import Rave Component
import Rave from 'react-native-rave';
2. Set your success, failure and close methods
constructor(props) {
super(props);
this.onSuccess = this.onSuccess.bind(this);
this.onFailure = this.onFailure.bind(this);
this.onClose = this.onClose.bind(this);
}
onSuccess(data) {
console.log("success", data);
}
onFailure(data) {
console.log("error", data);
}
onClose() {
}
3. Use component (ensure to set currency for the desired payment method to display)
Note: Rave allows merchants can also set paymentOption to account, in order to accept only the Account payment methods.
Note: Leaving paymentOption empty sets the default payment method to card only.
render() {
  return (
    <Rave
        amount="500"
        country="NG"
        currency="NGN"
        paymentOption="card,account"
        email="test@mail.com"
        firstname="Oluwole"
        lastname="Adebiyi"
        publickey="FLWPUBK-**************************-X"
        encryptionkey="****************"
        meta={[{ metaname: "color", metavalue: "red" }, { metaname: "storelocation", metavalue: "ikeja" }]}
        onSuccess={res => this.onSuccess(res)}
        onFailure={e => this.onFailure(e)}
        onClose={e => this.onClose(e)}
        />
  );
}
Mpesa
Note: Rave allows merchants to set payment method to Mpesa only by setting paymentOption to mpsesa, only the mpesa payment option would be available. Merchants can also set paymentOption to card,mpsesa in order to accept both card and Mpsesa as payment methods.
Note: Leaving paymentOption empty sets the default payment method to card only.
1. import Rave Component
import Rave from 'react-native-rave';
2. Set your success and failure methods
constructor(props) {
super(props);
this.onSuccess = this.onSuccess.bind(this);
this.onFailure = this.onFailure.bind(this);
this.onClose = this.onClose.bind(this);
}
onSuccess(data) {
console.log("success", data);
}
onFailure(data) {
console.log("error", data);
}
onClose() {
}
3. Use component with the mpesa payment props
render() {
  return (
    <Rave
        amount="10"
        country="KE"
        currency="KES"
        paymentOption:"card,mpesa"
        email="test@mail.com"
        firstname="Oluwole"
        lastname="Adebiyi"
        publickey="FLWPUBK-**************************-X"
        encryptionkey="****************"
        meta={[{ metaname: "color", metavalue: "red" }, { metaname: "storelocation", metavalue: "ikeja" }]}
        onSuccess={res => this.onSuccess(res)}
        onFailure={e => this.onFailure(e)}
        onClose={e => this.onClose(e)}
        />
  );
}
Ghana Mobile Money
Note: By setting paymentOption to mobilemoneygh, only the Ghana mobile money payment option would be available. Merchants can also set paymentOption to card,mobilemoneygh in order to accept both card and Ghana mobile money as payment methods.
'Note:' Leaving paymentOption empty sets the default payment method to card only.
1. import Rave Component
import Rave from 'react-native-rave';
2. Set your success and failure methods
constructor(props) {
super(props);
this.onSuccess = this.onSuccess.bind(this);
this.onFailure = this.onFailure.bind(this);
this.onClose = this.onClose.bind(this);
}
onSuccess(data) {
console.log("success", data);
}
onFailure(data) {
console.log("error", data);
}
onClose() {
}
3. Use component with the Ghana Mobile Money payment props
render() {
  return (
    <Rave
        amount="10"
        country="GH"
        currency="GHS"
        paymentOption:"card,mobilemoneygh"
        email="test@mail.com"
        firstname="Oluwole"
        lastname="Adebiyi"
        publickey="FLWPUBK-**************************-X"
        encryptionkey="****************"
        meta={[{ metaname: "color", metavalue: "red" }, { metaname: "storelocation", metavalue: "ikeja" }]}
        onSuccess={res => this.onSuccess(res)}
        onFailure={e => this.onFailure(e)}
        onClose={e => this.onClose(e)}
        />
  );
}
Uganda Mobile Money
Note: By setting paymentOption to mobilemoneyuganda, only the Uganda mobile money payment option would be available. Merchants can also set paymentOption to card,mobilemoneyuganda in order to accept both card and Uganda mobile money as payment methods.
'Note:' Leaving paymentOption empty sets the default payment method to card only.
1. import Rave Component
import Rave from 'react-native-rave';
2. Set your success and failure methods
constructor(props) {
super(props);
this.onSuccess = this.onSuccess.bind(this);
this.onFailure = this.onFailure.bind(this);
this.onClose = this.onClose.bind(this);
}
onSuccess(data) {
console.log("success", data);
}
onFailure(data) {
console.log("error", data);
}
onClose() {
}
3. Use component with the Uganda Mobile Money payment props
render() {
  return (
    <Rave
        amount="10"
        country="NG"
        currency="UGX"
        paymentOption:"card,mobilemoneyuganda"
        email="test@mail.com"
        firstname="Oluwole"
        lastname="Adebiyi"
        publickey="FLWPUBK-**************************-X"
        encryptionkey="****************"
        meta={[{ metaname: "color", metavalue: "red" }, { metaname: "storelocation", metavalue: "ikeja" }]}
        onSuccess={res => this.onSuccess(res)}
        onFailure={e => this.onFailure(e)}
        onClose={e => this.onClose(e)}
        />
  );
}
Zambia Mobile Money
Note: By setting paymentOption to mobilemoneyzambia, only the Rwanda mobile money payment option would be available. Merchants can also set paymentOption to card,mobilemoneyzambia in order to accept both card and Zambia mobile money as payment methods.
'Note:' Leaving paymentOption empty sets the default payment method to card only.
1. import Rave Component
import Rave from 'react-native-rave';
2. Set your success and failure methods
constructor(props) {
super(props);
this.onSuccess = this.onSuccess.bind(this);
this.onFailure = this.onFailure.bind(this);
this.onClose = this.onClose.bind(this);
}
onSuccess(data) {
console.log("success", data);
}
onFailure(data) {
console.log("error", data);
}
onClose() {
}
3. Use component with the Zambia Mobile Money payment props
render() {
  return (
    <Rave
        amount="10"
        country="NG"
        currency="ZMW"
        paymentOption:"card,mobilemoneyzambia"
        email="test@mail.com"
        firstname="Oluwole"
        lastname="Adebiyi"
        publickey="FLWPUBK-**************************-X"
        encryptionkey="****************"
        meta={[{ metaname: "color", metavalue: "red" }, { metaname: "storelocation", metavalue: "ikeja" }]}
        onSuccess={res => this.onSuccess(res)}
        onFailure={e => this.onFailure(e)}
        onClose={e => this.onClose(e)}
        />
  );
}
Rwanda Mobile Money
Note: By setting paymentOption to mobilemoneygh, only the Rwanda mobile money payment option would be available. Merchants can also set paymentOption to card,mobilemoneygh in order to accept both card and Rwanda mobile money as payment methods.
'Note:' Leaving paymentOption empty sets the default payment method to card only.
1. import Rave Component
import Rave from 'react-native-rave';
2. Set your success and failure methods
constructor(props) {
super(props);
this.onSuccess = this.onSuccess.bind(this);
this.onFailure = this.onFailure.bind(this);
this.onClose = this.onClose.bind(this);
}
onSuccess(data) {
console.log("success", data);
}
onFailure(data) {
console.log("error", data);
}
onClose() {
}
3. Use component with the Rwanda Mobile Money payment props
render() {
  return (
    <Rave
        amount="10"
        country="NG"
        currency="RWF"
        paymentOption:"card,mobilemoneygh"
        email="test@mail.com"
        firstname="Oluwole"
        lastname="Adebiyi"
        publickey="FLWPUBK-**************************-X"
        encryptionkey="****************"
        meta={[{ metaname: "color", metavalue: "red" }, { metaname: "storelocation", metavalue: "ikeja" }]}
        onSuccess={res => this.onSuccess(res)}
        onFailure={e => this.onFailure(e)}
        onClose={e => this.onClose(e)}
        />
  );
}
USSD Payments
Note: This is still in development.
Parameters Table
| publickey | This is the publickey gotten from your Rave Dashboard | String | Required |
| encryptionkey | This is the encryption key that can be gotten from your Rave Dashboard | String | Required |
| amount | This is the amount to be charged from card/account | String | Required |
| paymentOption | This is the payment method you want available to the customer eg. card, mobilemoneygh, mobilemoneyuganda, mobilemoneyzambia | String | (if none passed, defaults to card) |
| email | This is the email of the customer | String | Required |
| phone | This is the phone number of the customer | String | Not Required |
| firstname | This is the firstname of the customer | String | Required |
| lastname | This is the lastname of the customer | String | Required |
| threeDsOverride | This can be used to force the authentication model to be 3DSecure | Number | Not Required (It expects 1 to be passed as its value) |
| onSuccess | This is the function that receives data for a successful transaction | Function | Required |
| onFailure | This is the function that receives data for a failed transaction | Function | Required |
| onClose | This is the function that closes the payment window, it controls the screen that displays after payment | Function | Required |
| country | This is the country you are transacting from eg. NG, GH,KE, ZA | String | Required (if none passed defaults to NG) |
| currency | This is the currency you want to charge the customer eg. NGN, GHS, KES, UGX, USD, GBP, EUR, ZAR, ZMW, RWF | String | (if none passed defaults to NGN) |
| txref | This is a unique reference for the transaction | String | Not Required (will be generated automatically) |
| paymentplan | This is the payment plan ID which will subscribe a user to a plan | Number | Not Required |
| primarycolor | This is to override the primary colour of the component | String | Not Required |
| secondarycolor | This is to override the secondary colour of the component | String | Not Required |
| meta | This is additional information that can be sent to the server eg [{ metaname: "color", metavalue: "red" }, { metaname: "storelocation", metavalue: "ikeja" }] | Array of Objects | Not Required |
| subaccounts | This is can be used to implement subaccount or split payments flow and it needs to be passed as an array of objects to the payload e.g [{ id: "RS_AFSHH367289NEESI2GH23", transaction_charge_type: "flat_subaccount", transaction_charge: "200" }, { id: "RS_AFSHH367289NEESIGSHJ78D", transaction_charge_type: "flat_subaccount", transaction_charge: "100" }] | Array of Objects | Not Required |
Sample Transaction Verification Method Using Nodejs BackEnd
NOTE: For best practices, it is always advisable to verify transactions to be sure the response data returned corresponds with what was initially passed and also to get the full data of a transaction.
Below shows sample code on how this can be done using Nodejs Backend
Prerequisites
expressbody-parserrequest
How it works
- Create your backend project directory
- From inside your backend project directory, open your terminal and run
npm init to create your package.json file.
- Install the packages above
npm install express --save, npm install body-parser --save and npm install request --save.
- Create your
index.js file and copy the code snippet below to set this up.
var express = require("express");
var bodyParser = require("body-parser");
var app = express();
var request = require("request");
var port = process.env.PORT || 3000;


app.use(bodyParser.urlencoded({
    extended: false
}))
app.use(bodyParser.json())


app.post('/api', function(req, res){
    console.log(req.body.txref);
    request.post(
        {
            url:'https://ravesandboxapi.flutterwave.com/flwv3-pug/getpaidx/api/v2/verify',
            json: {
            txref:req.body.txref, // This is the transaction you get from your react native app
            SECKEY: "PASS-YOUR-RAVE-SECRET-HERE"
                },
            headers: {
                'Content-Type': 'application/json'
            }
        },
      function(error, response, body){
        if (error) {
            return console.error('Error Occurred:', error);
        }
        console.log(response.statusCode);
        console.log(body);
        res.send(body);
      });
});

app.listen(port, err => {
    if(err) {
        console.error(err);
    }else {
        console.log('App listening on port %s', port);
    }
})
-
Save the file above. Run node index.js command from your terminal to serve your verify api. You should now see App listening on port 3000 on your terminal which means your app is running to receive data from your react native app.
-
Now you can go back to your react native app directory and create a file where you link this to your app, e.g you can create a directory constant and create a file inside it called api.js.
-
You will need to link the backend verify api with your app on this file api.js by adding the code snippet below:
export const fetchResponse = (transRef) => {

    var url = "http://192.168.88.48/api"; // you will need to pass your backend verify api here
    var request = {
        method : "POST",
        body: JSON.stringify({
            "txref": transRef
        }),
        headers: {
            'Content-Type': 'application/json',
        }
    }
    fetch(url, request)
    .then(res => console.log('Success:', JSON.stringify(res.json())))
    .catch(error => console.log('Error:', JSON.stringify(error)));
}
- Now you can go to react native
App.js file to pass the transaction reference from the successful charge response to this function fetchResponse(transRef), as shown in the code snippet below.
import React from 'react';
import Rave from 'react-native-rave';
import { StyleSheet, Text, View } from 'react-native';
import { fetchResponse } from './constants/api';

export default class App extends React.Component {

  constructor(props) {
    super(props);
    this.onSuccess = this.onSuccess.bind(this);
    this.onFailure = this.onFailure.bind(this);
  }

  onSuccess(data) {
    console.log("success", data);
    if ((typeof data.data) == "object") {
      if((typeof data.data.txRef) != "undefined"){
        fetchResponse(data.data.txRef);
      }else{
        fetchResponse(data.data.tx.txRef);
      }
    }else{
      fetchResponse(data.txRef);
    }
  }

  onFailure(data) {
    console.log("error", data);
  }

    render() {
    return ( <Rave amount = "100"
      country = "NG"
      currency = "NGN"
      email = "dodez@xgmailoo.com"
      firstname = "Oluwole"
      lastname = "Adebiyi"
      publickey = "FLWPUBK-*********************************-X"
      encryptionkey = "**********************"
      paymenttype = "card"
      meta = {
        [{
          metaname: "color",
          metavalue: "red"
        }, {
          metaname: "storelocation",
          metavalue: "ikeja"
        }]
      }
      onSuccess = {
        res => this.onSuccess(res)
      }
      onFailure = {
        e => this.onFailure(e)
      }
      />
    );
  }
}

const styles = StyleSheet.create({
  container: {
    flex: 1,
    backgroundColor: '#fff',
    alignItems: 'center',
    justifyContent: 'center',
  },
});
- The above steps and code sample just shows and explains how you can handle this with nodejs backend. Please note that you can implement this with any backend language of your choice.
NOTE:
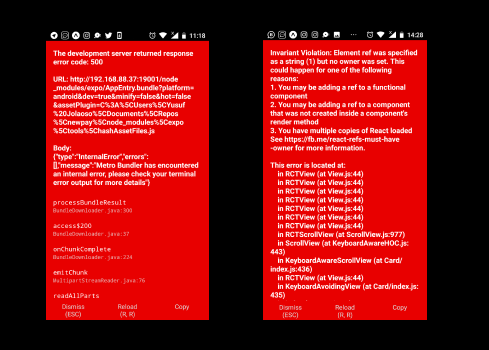
If you encounter any of the error above when trying to load the rave react native SDK in your App, and it occurs in newer versions of react native.
FIX:
- To fix the issue, simply open your react native app node modules folder and locate rave react native module.
- Next thing you need to do is to locate the node modules folder inside the rave react native module folder.
- After locating it, simply delete it and the issue would be resolved.
See Screenshots Below:

Setting Up a Simple Webhook with NodeJs and ngrok to receive Rave Webhook request
Note: You might need to set up a webhook for all your transactions but mostly for mpesa and ghana mobile money to receive webhook request from Rave to verify transactions that occurs on your mobile application.
-
Ensure you have node and npm, if not refer to this for guide.
-
Next register and download ngrok here.
-
Extract the downloaded ngrok zip file.
-
Set your extracted ngrok file to be globally available i.e set it to the environment variable by following these steps:
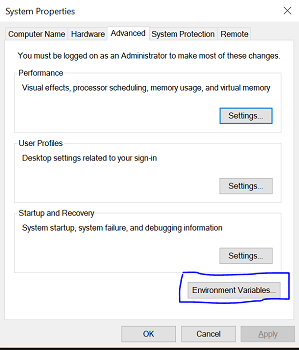
- For Windows Users - On the search box on the taskbar of your desktop, search for System (control panel).
- Click the advanced settings and then click on the environment settings, like this:
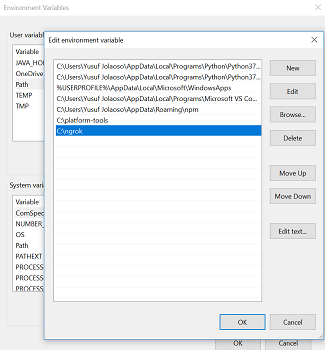
- Next copy the ngrok file path and add it to the enviroment variable by selecting the path option and clicking on the edit option like this:
-
For MacOS users, to have ngrok up and running on your machine, follow the process:
- Download
ngrok here
- Extract/Unzip it to your Applications directory
- Create a symlink to ngrok with these commands from your terminal:
ln -s /project/ngrok ngrok
- now cd into your project directory and reference it like this from your terminal
- /project/ngrok
[your-port-number]
-
To ensure this is successfully done, enter the command ngrok -v in your Terminal. It should return the version of ngrok you are currently running.
-
Next create a new project directory, change directory into it and create a new project file like this:
mkdir test-webhookcd test-webhooktouch app.js
-
Next run npm init command to initialize your package.json file
-
From your project directory install the following npm dependencies:
npm install body-parser --savenpm install express --savenpm install express-winston --savenpm install winson --savenpm install -g nodemon - an npm package for debugging node applications.
Or Simply: npm install body-parser express express-winston winston --save

-
Next, we add the following code into our app.js file.
'use strict';

var express = require('express'); // required to create http server

var bodyParser = require('body-parser'); // required to parse incoming request bodies

var app = express().use(bodyParser.json()); // creates http server

var winston = require('winston'); // data logger

var expressWinston = require('express-winston'); // required to create middleware that log http requests

expressWinston.requestWhitelist.push('body');

var port = process.env.PORT || 3000 // setting the port the server should listen to

process.env.SECRET_HASH = "your-rave-secret-hash" // making the secret hash you set in your dashboard available to the environment variable

app.set('port', port);


/*

using expressWinston to parse webhook http requests to display in the console
and also write into a .txt file called combined.log.

*/

app.use(expressWinston.logger({
    transports: [
        new winston.transports.Console({
            json: true,
            colorize: true
        }),
        new winston.transports.File({
            filename: 'combined.log',
            level: 'info'
        })
    ]
}));


//  Set the port the server is listening to

app.listen(port, () => console.log('Webhook is listening to port: ' + port));

app.get('/', (req, res) => res.send('Hello World!'))


/*

Set your webhook url that will be listening for webhook requests from rave server.
This is required to receive requests from rave server, verify the data received from the server
and give your customer value.

*/

app.post("/webhook-url", function (req, res) {
    /* It is a good idea to log all events received. Add code *
     * here to log the signature and body to db or file       */

    // retrieve the signature from the header
    var hash = req.headers["verif-hash"];

    if (!hash) {
        // discard the request,only a post with rave signature header gets our attention
        res.send({
            status: "error"
        });
        process.exit(0)
        // console.log("no hash sent");
    }

    // Get signature stored as env variable on your server
    const secret_hash = process.env.SECRET_HASH;

    // check if signatures match

    if (hash !== secret_hash) {
        // silently exit, or check that you are passing the write hash on your server.
        res.send({
            status: "error"
        });
        process.exit(0)
        // console.log("has is not equal sent");
    }

    // Retrieve the request's body
    var request_json = req.body;

    // Give value to your customer but don't give any output
    // Remember that this is a call from rave's servers and
    // Your customer is not seeing the response here at all

    res.send(200);
});
-
Now let's make our webhook url from our local server available to public on the internet with ngrok, we are using this method for this project.
Note: This can also be achieved by making your webhook url available to live cloud services like heroku, AWS, netlify and so on.
-
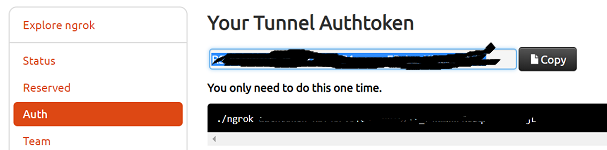
First, we need to login to your ngrok dashboard to get your authorization token, from here:
-
Then from the terminal change directory into the project directory and run the following command:
ngrok authtoken <your-authorization-token>ngrok http <the-port-number-your-node-app-is-listening-to>

-
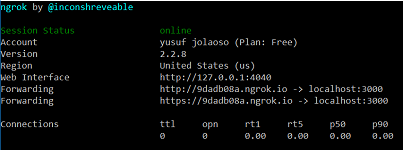
If successfully setup, your webhook url should be up live with this result:
-
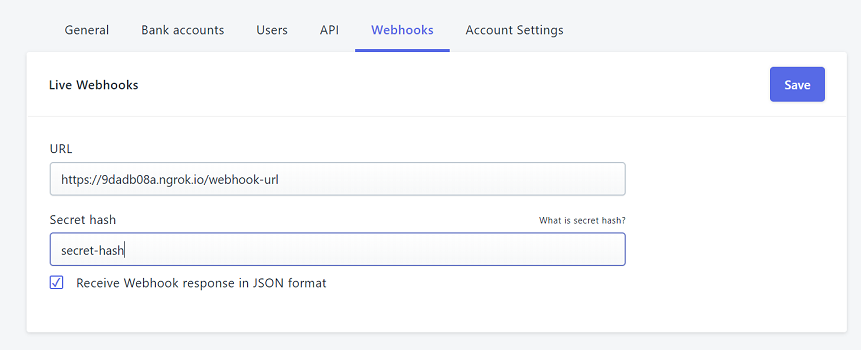
Now we add our webhook url to our rave dashboard here:
-
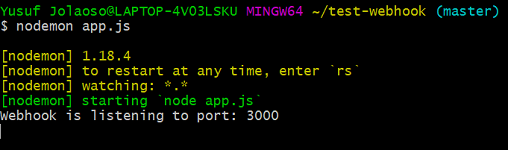
Then from the terminal we need to run nodemon app.js to start our application and ensure it is listening to the port like this:
-
Our webhook is now up and running to receive webhook requests from rave.
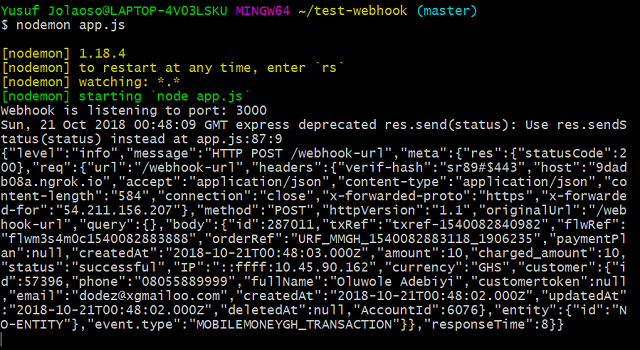
Example of a Webhook request sent by Rave to our Node App running on ngrok from a Ghana Mobile Money Transaction
Contributions
- You can contribute to this project by forking it.
- In case of any found bug, you are welcome to report the issue or fix and send a PR.


