Product
Socket for Jira Is Now Available
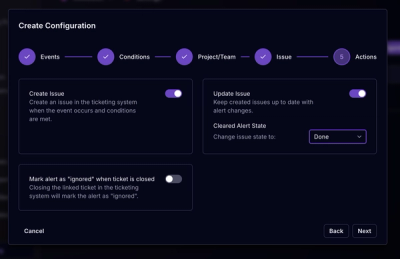
Socket for Jira lets teams turn alerts into Jira tickets with manual creation, automated ticketing rules, and two-way sync.
By Jeppe Hasseriis - Apr 20, 2026
vuetify3-dialog
Advanced tools
Vue 3 & Vuetify 3 plugin to create dialogs, toasts and bottom-sheets with Promises.
Lite Vue plugin working with Vuetify, allowing you to show dialogs or snackbars programatically.
Inspired by vuetify-dialog (@yariksav)
First, run npm install vuetify3-dialog.
⚠️You must have Vuetify installed on your project. If you don't have installed yet, please follow this link : Install Vuetify
Then, install this plugin in your app entry point (main.js or main.ts) like following :
//main.js

import { createApp } from 'vue'
import App from './App.vue'
import vuetifyInstance from './plugins/vuetify' //Or wherever you have your vuetify instance
import {Vuetify3Dialog} from 'vuetify3-dialog'

const app = createApp(App)
app.use(vuetifyInstance); //You must use Vuetify before Vuetify3Dialog
        ...
app.use(Vuetify3Dialog, {
  defaults: {
    //You can pass default options for dialogs, dialog's card, snackbars or bottom-sheets here
  }
})
app.mount('#app')
You can now use the plugin in your components. There are three main variables available in all your project : $dialog, $notify, and $banner. Each of them have methods to create full personalized dialogs, snackbars, or banners, and other ones to create simple components with a message and a title, by specifying level of severity. Let's see how to use them.
You can create a fully personalized dialog with the following method :
this.$dialog.create({
  title: "My title",
  text: "My dialog message",
  buttons: [
    { title: 'My first button', key: 'button1', /* any v-btn api option */ },
    ...
  ],
  cardOptions: {
    //any v-card api options
  },
  dialogOptions: {
    //any v-dialog api options
  }
}).then((anwser) => {
  //Do something with the anwser corresponding to the key of the clicked button
})
You can pass a custom component to render inside the dialog, with it props binded! Here's how to do it :
this.$dialog.create({
  ..., //other options
  customComponent: {
    component: MyCustomComponent,
    props: { myComponentProp: 'Hello world!' }
  },
}).then(() => {
})
[!WARNING]
⚠ If you declare a persistent dialog option, take care that your component emit acloseDialogevent when you want to close it.
this.$dialog also have a confirm method, which is a shortcut for the previous method with only two buttons : "Yes" and "No".
this.$dialog.confirm({title: "My title", text: "My dialog message", cancelText: "No", confirmationText: "Yes", cancelButtonOptions: ..., confirmationButtonOptions: ...})
.then((anwser) => {
  //Do something with the boolean anwser
})
You can also create a simple dialog with a message and a title, by precizing level of severity :
this.$dialog.info({
  title: "My title",
  text: "My dialog message",
  cardOptions: ...,
  buttonOptions: ...
}).then(() => {
  //Do something when the user close the dialog
})
There is 4 levels of severity : info, success, warning and error.
Usefull links:
You can create a fully personalized snackbar with the following method :
//message, timeout, level, variant, rounded, position
this.$notify.create({
  text: "My snackbar message",
  htmlContent: "<b>My snackbar message</b>", // optional (included in 1.5.3)
  level: 'success',
  location: 'top right',
  notifyOptions: {
    //any v-snackbar api options
  }
})
.then(() => {
  //Do something with the anwser corresponding to the key of the clicked button
})
You can also create a simple snackbar with a message and a title, by precizing level of severity :
this.$notify.info(
  "My snackbar message",
  { variant: 'outlined' } // any v-snackbar api options
).then(() => {
  //Do something when the user close the snackbar
})
There is 4 levels of severity : info, success, warning and error.
Usefull links:
You can create banners with different severity levels:
// Basic banner
this.$banner.create({
  text: "This is an informational message",
  bannerOptions: {
    // any v-banner api options
  }
}).then(() => {
  // Called when banner is closed
})
Shortcut methods for different severity levels:
// Info banner (default)
this.$banner.create({ text: "Informational message" })

// Success banner
this.$banner.success("Operation completed successfully!")

// Warning banner
this.$banner.warning("This action cannot be undone!")

// Error banner
this.$banner.error("Critical error occurred!")
All banner methods support optional banner options:
this.$banner.create({
  text: "Custom banner",
  level: 'info', // 'info', 'success', 'warning', or 'error'
  closable: true, // default: true
  bannerOptions: {
    // any v-banner api options
    lines: 'two',
    icon: 'mdi-information',
    // ...
  }
})
Features:
Automatic positioning as first child of v-main
HTML content sanitization for security
Multiple banners can coexist
Responsive design
Accessibility compliant
Usefull links:
[!WARNING]
⚠ This feature requires Vuetify 3.4.0 or higher
You can create a fully personalized bottom sheet with a contained list or a card dialog. To stay consistent, these two features cannot be used at same time.
Here is an example with a list :
this.$bottomSheet.create({
  title: "My title",
  text: "My bottom sheet message",
  bottomSheetOptions: {
    // any v-bottom-sheet api options
  },
  items: [
    { title: "Item 1", value: "item1", ... /* any v-list-item api option */ },
    { title: "Item 2", value: "item2" },
    { title: "Item 3", value: "item3" }
  ]
}).then((anwser) => {
  //Do something with the anwser corresponding to the value of the clicked item
})
Here is an example with a card :
this.$bottomSheet.create({
  bottomSheetOptions: {
    // any v-bottom-sheet api options
  },
  dialogOptions: {
    //same arguments as $dialog.create()
    title: "My bottom-sheet card dialog",
    text: "Hello world!",
    buttons: [
      { title: 'My first button', key: 'button1', /* any v-btn api option */ },
      ...
    ]
  }
}).then((anwser) => {
  //Do something with the anwser corresponding to the key of the clicked button
})
If you want to use this plugin in an SFC component, some methods are available. Working principle is the same as previous methods, and arguments are the same.
<script setup>
import { createDialog, warnDialog, confirmDialog } from 'vuetify3-dialog'
import { createNotification, notifySuccess } from 'vuetify3-dialog'
import { createBottomSheet } from 'vuetify3-dialog'
import { createBanner, successBanner, errorBanner } from 'vuetify3-dialog'

if(true){
  createDialog({ title: "My title", text: "My dialog message" })
  .then((anwser) => {
    //Do something with the anwser corresponding to the key of the clicked button
  })

  notifySuccess("My snackbar message").then(() => {})

  createBottomSheet({ title: "My bottomsheet title", text: "My bottomsheet message" })
  .then(() => {})

  // Banner examples
  createBanner({ text: "Informational message" })
  successBanner("Operation completed!")
  errorBanner("Critical error occurred!")
}
</script>
If you want to contribute to this project, you can clone it and run npm install to install dependencies.
Then, you need to test your changes. A demo project is located at cypress/test-server of this repository. You can launch it with npm run test-server.
If you have the following error : [vite] Internal server error: Failed to resolve entry for package "vuetify3-dialog". The package may have incorrect main/module/exports specified in its package.json., make sure you have run npm run build before to build the plugin and make it available for the demo project.
Finally, when you will have finish your changes, make sure all tests are passing with npm run test, thanks in advance !
FAQs
Vue 3 & Vuetify 3 plugin to create dialogs, toasts and bottom-sheets with Promises.
The npm package vuetify3-dialog receives a total of 1,088 weekly downloads. As such, vuetify3-dialog popularity was classified as popular.
We found that vuetify3-dialog demonstrated a healthy version release cadence and project activity because the last version was released less than a year ago. It has 1 open source maintainer collaborating on the project.
Did you know?

Socket for GitHub automatically highlights issues in each pull request and monitors the health of all your open source dependencies. Discover the contents of your packages and block harmful activity before you install or update your dependencies.
Product
Socket for Jira lets teams turn alerts into Jira tickets with manual creation, automated ticketing rules, and two-way sync.

Company News
Socket won two 2026 Reppy Awards from RepVue, ranking in the top 5% of all sales orgs. AE Alexandra Lister shares what it's like to grow a sales career here.

Security News
NIST will stop enriching most CVEs under a new risk-based model, narrowing the NVD's scope as vulnerability submissions continue to surge.