RedisUI.Dashboard
A modern Redis UI for ASP.NET Core with enhanced features, built as a fork of RedisUI.


🚀 Installation
Install via NuGet:
dotnet add package RedisUI.Dashboard
🔥 What’s New in RedisUI.Dashboard
UI

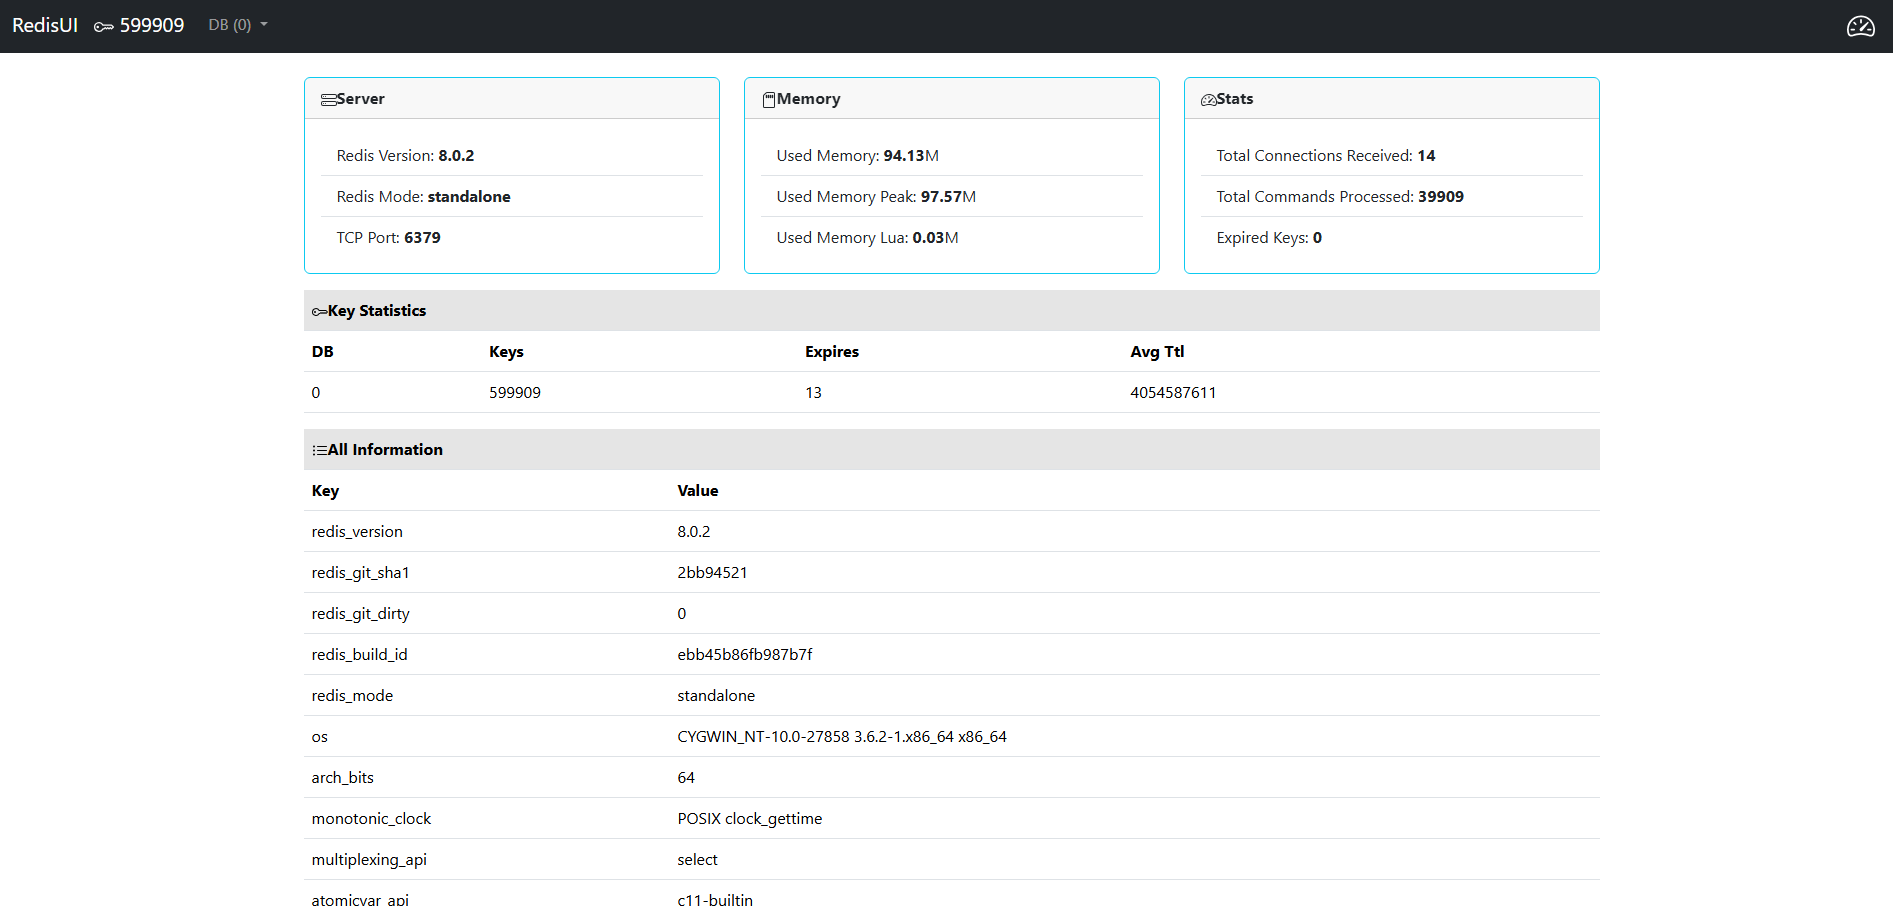
Server Statistics
This project has received major updates focused on interactivity, scalability, and developer control. Key highlights:
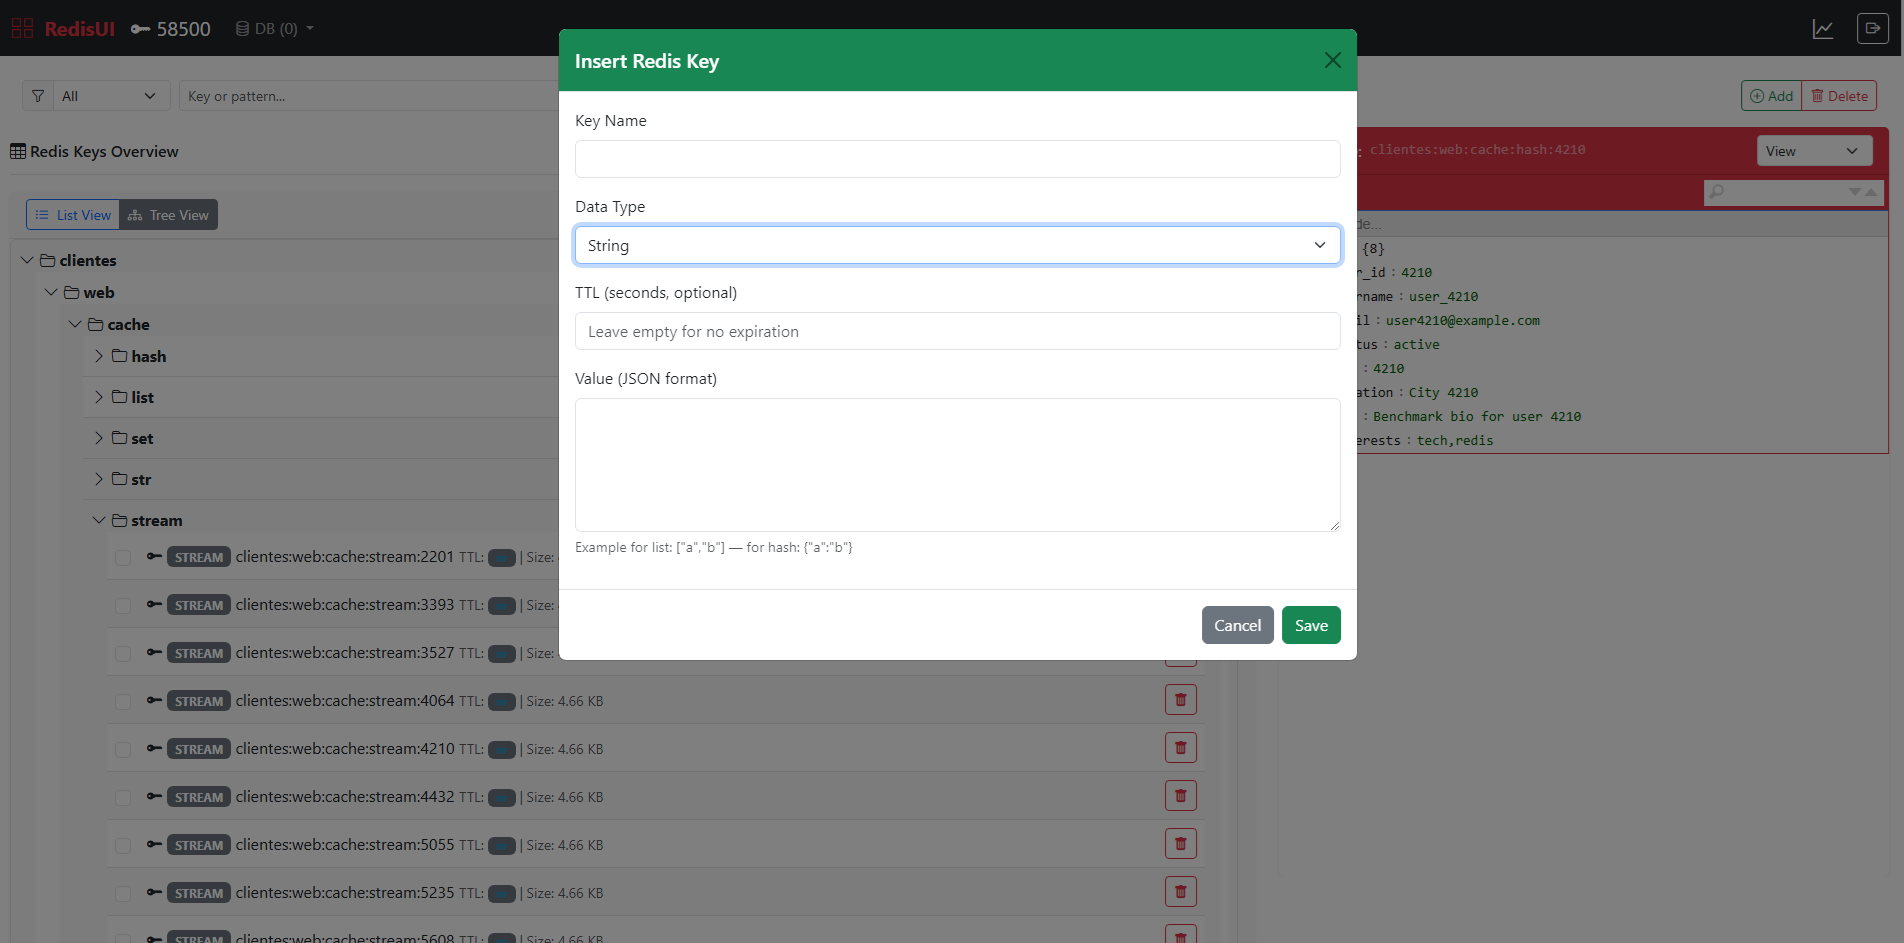
- ✅ AJAX-powered UI actions: Redis key operations (
GET, SET, DEL, EXPIRE) are now handled asynchronously using fetch, improving responsiveness without full page reloads.
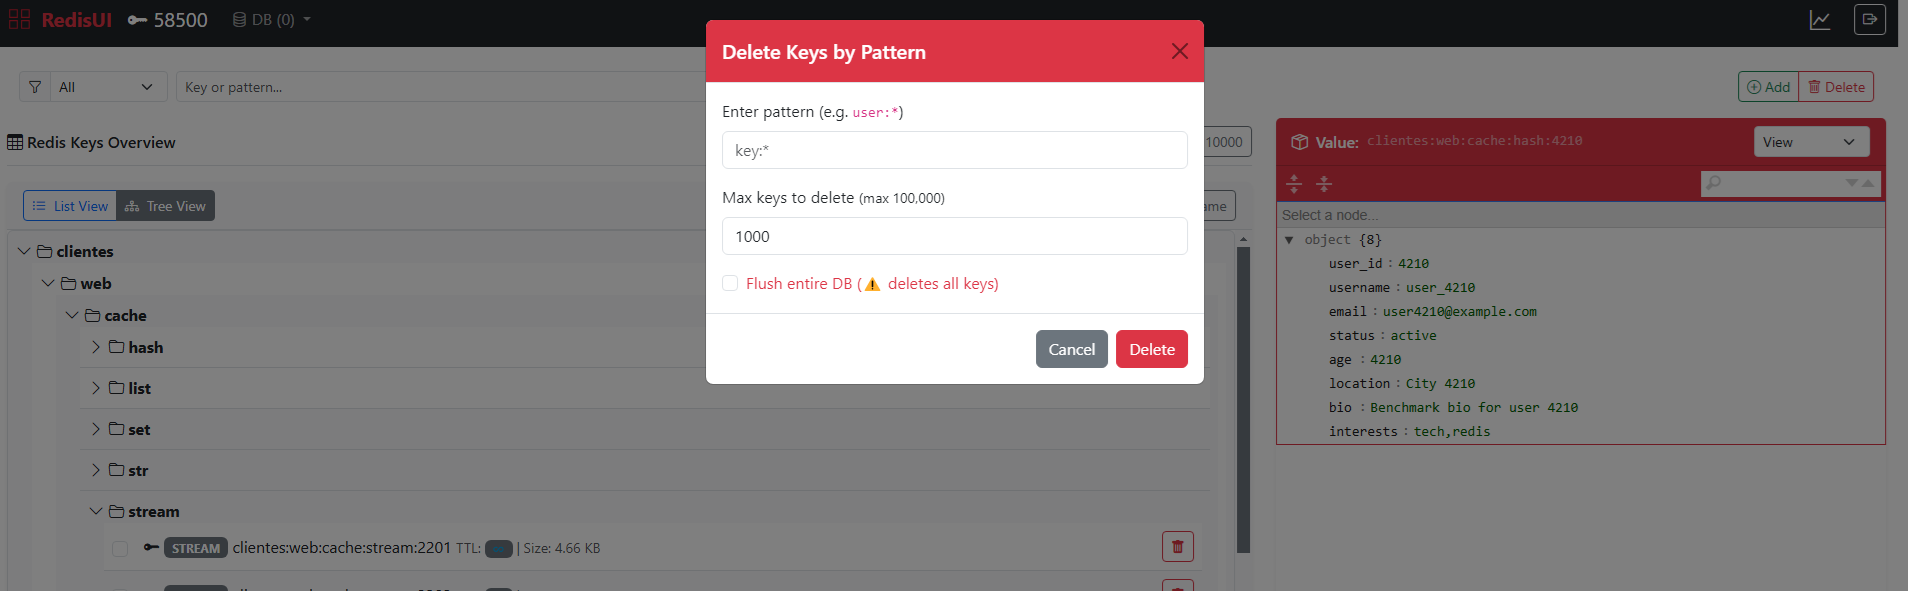
- ✅ Bulk key operations: Added mass delete, TTL updates, and key renaming using batch processing with confirmation modals and logging.
- ✅ Redis
FlushDB support: A secure, confirmable button allows full database flush directly from the UI.
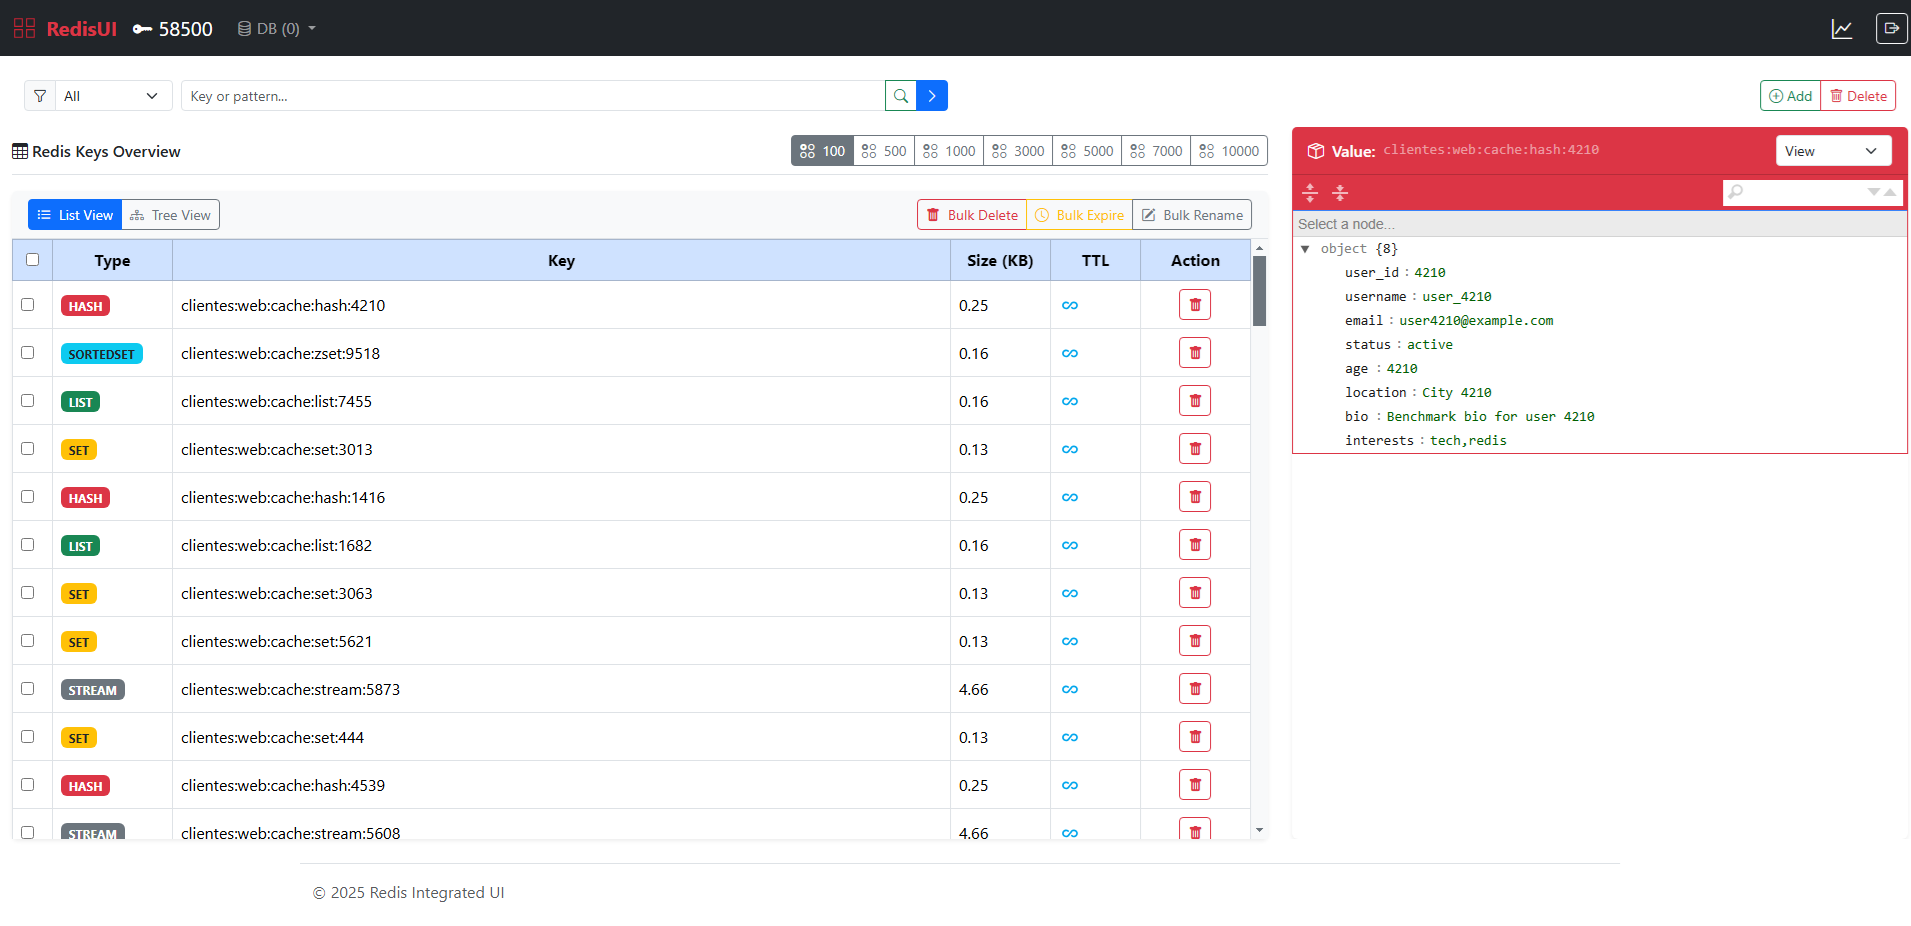
- ✅ Live filtering of keys: Enhanced input-based key filtering using SCAN with client-side prefix grouping (TreeView/ListView).
- ✅ Logout for Basic Auth: Clear session via a dedicated logout endpoint with UI cleanup and 401 handling.
- ✅ New icons & visuals: Integrated Bootstrap Icons for each Redis data type, improving UX clarity.
- ✅ Improved key explorer: TreeView now supports dynamic folders, expandable paths, zebra-style lists, and TTL badges.
- ✅ Highlighting & JSON viewer: Enhanced JSON inspection with highlight.js and Monokai styling for readability.
- ✅ Custom configuration system: The
RedisUISettings class enables easy override of UI scripts, styles, and layout behavior.
- ✅ Support for Redis core types: Fully supports String, Hash, List, Set, Sorted Set, and Stream types.
- ✅ Optimized SCAN performance: Pagination and lazy rendering prevent UI freezes on large datasets.
- ✅ Extended .NET compatibility: Supports
net6.0, net7.0, net8.0, and .NET 9 preview builds.
- ✅ Security & Auth: Plug-and-play support for
Basic, Claims, Role, IP Whitelist, and environment-based filters.
RedisUI.Dashboard is now more modular, responsive, and production-ready—ideal for devs managing modern Redis workloads.
🔧 Custom JS and CSS for RedisUI Viewer
You can customize the appearance, behavior, and integration path of the Redis UI by providing your own configuration. This includes support for custom Bootstrap/CDN links, JSON editor libraries, and even authentication filtering.
Example
app.UseRedisUI(new RedisUISettings
{
Path = "/redis-admin",
ConnectionString = "localhost",
AuthorizationFilter = new DashboardBasicAuthorizationFilter("admin", "password"),
CssLink = "https://cdn.jsdelivr.net/npm/bootstrap@5.3.2/dist/css/bootstrap.min.css",
BootstrapIcons = "https://cdn.jsdelivr.net/npm/bootstrap-icons@1.10.5/font/bootstrap-icons.css",
JsLink = "https://cdn.jsdelivr.net/npm/bootstrap@5.3.2/dist/js/bootstrap.bundle.min.js",
HighlightTheme = "https://cdnjs.cloudflare.com/ajax/libs/highlight.js/11.9.0/styles/monokai.min.css",
HighlightJs = "https://cdnjs.cloudflare.com/ajax/libs/highlight.js/11.9.0/highlight.min.js",
HighlightJson = "https://cdnjs.cloudflare.com/ajax/libs/highlight.js/11.9.0/languages/json.min.js",
JsonEditorCss = "https://cdn.jsdelivr.net/npm/jsoneditor@9.10.0/dist/jsoneditor.min.css",
JsonEditorJs = "https://cdn.jsdelivr.net/npm/jsoneditor@9.10.0/dist/jsoneditor.min.js"
});
## 🔐 Dashboard Authorization Filters
You can protect the Redis dashboard endpoint using different types of authorization filters by configuring the `CacheOptions:Dashboard` section in your `appsettings.json`.
### 📆 Supported Authentication Modes
| Mode | Description |
| ------- | ------------------------------------------------------------------------- |
| `basic` | Uses HTTP Basic Auth with username/password. |
| `jwt` | Requires the user to have a specific role from a JWT token. |
| `claim` | Requires a specific claim (type + value) to be present in the user token. |
| `ip` | Restricts access to specific IP addresses. |
| `env` | Allows access only in Development or Staging environments. |
### ⚙️ Example Configuration (`appsettings.json`)
#### ✅ Basic Auth
```json
"CacheOptions": {
"Provider": "Redis",
"RedisConnection": "localhost:6379",
"Dashboard": {
"Enabled": true,
"Path": "/redis-admin",
"AuthenticationMode": "basic",
"Username": "admin",
"Password": "secret"
}
}
✅ Claim-based Authorization
"Dashboard": {
  "Enabled": true,
  "AuthenticationMode": "claim",
  "ClaimType": "role",
  "ClaimValue": "Admin"
}
✅ IP Whitelist
"Dashboard": {
  "Enabled": true,
  "AuthenticationMode": "ip",
  "AllowedIps": [ "127.0.0.1", "::1", "192.168.0.100" ]
}
✅ JWT Role Check
"Dashboard": {
  "Enabled": true,
  "AuthenticationMode": "jwt",
  "Role": "Administrator"
}
✅ Environment-based (Dev/Staging only)
"Dashboard": {
  "Enabled": true,
  "AuthenticationMode": "env"
}
🧩 Custom Filter Injection
If you want to plug in a fully custom implementation, you can manually assign your own IRedisAuthorizationFilter in Program.cs:
app.UseRedisUI(new RedisUISettings
{
    Path = "/redis-admin",
    AuthorizationFilter = new MyCustomRedisAuthFilter()
});
🌐 Authorization Filter Factory (Automatic Selection)
To make filter setup easier and based on configuration, you can use the built-in factory to instantiate the correct filter automatically:
public static class DashboardAuthorizationFactory
{
    public static IRedisAuthorizationFilter Create(CacheDashboardOptions options, IWebHostEnvironment env)
    {
        return options.AuthenticationMode?.ToLower() switch
        {
            "basic" => new DashboardBasicAuthorizationFilter(options.Username, options.Password),
            "jwt"   => new DashboardJwtAuthorizationFilter(options.Role),
            "claim" => new DashboardClaimAuthorizationFilter(options.ClaimType, options.ClaimValue),
            "ip"    => new DashboardIpWhitelistAuthorizationFilter(options.AllowedIps),
            "env"   => new DashboardEnvironmentAuthorizationFilter(env),
            _       => new DashboardBasicAuthorizationFilter(options.Username, options.Password)
        };
    }
}
Usage inside UseCacheDashboard extension:
public static IApplicationBuilder UseCacheDashboard(this IApplicationBuilder app, IConfiguration configuration)
{
    var options = configuration.GetSection("CacheOptions").Get<CacheOptions>();

    if (options is { Provider: "Redis", Dashboard.Enabled: true })
    {
        var env = app.ApplicationServices.GetRequiredService<IWebHostEnvironment>();

        app.UseRedisUI(new RedisUISettings
        {
            Path = options.Dashboard.Path,
            ConnectionString = options.RedisConnection,
            AuthorizationFilter = DashboardAuthorizationFactory.Create(options.Dashboard, env)
        });
    }

    return app;
}
Extra: Example mapping CacheOptions
using System.Globalization;
public class CacheOptions : IAppOptions
{
public string Provider { get; set; } = "Redis";
public string RedisConnection { get; set; } = string.Empty;
public string SqlConnection { get; set; } = string.Empty;
public string Prefix { get; set; } = string.Empty;
public Dictionary<string, string> ExpirationTimes { get; set; } = new();
public CacheDashboardOptions Dashboard { get; set; } = new();
public TimeSpan GetExpiration(string key)
{
key = key.Replace(":", "__");
return ExpirationTimes.TryGetValue(key, out var value) &&
TimeSpan.TryParse(value, CultureInfo.InvariantCulture, out var timeSpan)
? timeSpan
: TimeSpan.FromMinutes(30);
}
}
public class CacheDashboardOptions
{
public bool Enabled { get; set; } = false;
public string Path { get; set; } = "/redis-admin";
public string Role { get; set; } = "Admin";
public string Username { get; set; } = "admin";
public string Password { get; set; } = "secret";
public string AuthenticationMode { get; set; } = "basic";
public string ClaimType { get; set; } = string.Empty;
public string ClaimValue { get; set; } = string.Empty;
public List<string> AllowedIps { get; set; } = new();
}
Extra: Example auto register Options:
public static IServiceCollection AddAllConfigurations(this IServiceCollection services, IConfiguration configuration)
{
    var assembly = typeof(IAppOptions).Assembly;

    var optionsTypes = assembly.GetTypes()
        .Where(t => typeof(IAppOptions).IsAssignableFrom(t) && t.IsClass && !t.IsAbstract);

    foreach (var type in optionsTypes)
    {
        var method = typeof(OptionsConfigurationServiceCollectionExtensions)
            .GetMethods(BindingFlags.Static | BindingFlags.Public)
            .First(m => m.Name == "Configure" && m.GetParameters().Length == 2)
            .MakeGenericMethod(type);

        method.Invoke(null, new object[] { services, configuration.GetSection(type.Name) });
    }

    return services;
}
These filters give you flexibility to secure your Redis UI in the way that best matches your application's security model.
👉 You can review the updated source and commits at github.com/frankyjquintero/RedisUI
Redis Integrated UI


Redis Integrated UI is a .NET project designed to simplify the integration of a Redis User Interface (UI) page into your web applications. With this project, users can easily incorporate a Redis UI page, enabling them to interact with Redis keys and view Redis server statistics seamlessly.
Features
-
Integration Ease: Simplifies the process of integrating a Redis UI page into web applications.
-
Redis Key Management: Provides functionality to interact with Redis keys conveniently.

-
Server Statistics: Displays statistics related to the Redis server for monitoring and analysis purposes.

Getting Started
To integrate the Redis UI into your application, follow these steps:
- Install RedisUI from the NuGet Gallery.
PM> Install-Package RedisUI
- Add the middleware to your project.
using RedisUI;

app.UseRedisUI();
- Run your project and browse /redis path. easy peasy!
Settings
- The
Path is "/redis" by default, set a new path.
app.UseRedisUI(new RedisUISettings
{
    Path = "/myredisui",
});
- The
ConnectionString is "localhost" by default, set the connection string.
app.UseRedisUI(new RedisUISettings
{
    ConnectionString = "1.1.1.1:6379",
});
- Use
ConfigurationOptions for detailed settings.
ConfigurationOptions options = new ConfigurationOptions
{
EndPoints = { { "my-redis.cloud.redislabs.com", 6379 } },
User = "default",
Password = "secret",
Ssl = true,
SslProtocols = System.Security.Authentication.SslProtocols.Tls12
};
app.UseRedisUI(new RedisUISettings
{
    ConfigurationOptions = options
});
- The UI is using Bootstrap 5.3.2 version from CDN, you can get it from locally via setting properties below:
app.UseRedisUI(new RedisUISettings
{
    CssLink = "..\\mypath\\bootstrap.min.cs",
    JsLink = "..\\mypath\\bootstrap.js"
});
Authorization
You can limit access to Redis data in the production environment.
- Add a new authorization filter and implement
IRedisAuthorizationFilter
using RedisUI;

public class MyAuthorizationFilter : IRedisAuthorizationFilter
{
    private readonly bool _isDevelopment;

    public MyAuthorizationFilter(bool isDevelopment)
    {
        _isDevelopment = isDevelopment;
    }

    public bool Authorize(HttpContext context)
    {
        return _isDevelopment || (context.User.Identity != null && context.User.Identity.IsAuthenticated);
    }
}
app.UseRedisUI(new RedisUISettings
{
    AuthorizationFilter = new MyAuthorizationFilter(app.Environment.IsDevelopment())
});
Contributing
Contributions are welcome! If you'd like to contribute to Redis Integrated UI, please follow these guidelines:
- Fork the repository.
- Create your feature branch (
git checkout -b feature/YourFeature).
- Commit your changes (
git commit -am 'Add some feature').
- Push to the branch (
git push origin feature/YourFeature).
- Create a new Pull Request.
License
This project is licensed under the MIT License.
Contact
For any inquiries or support regarding Redis Integrated UI, feel free to contact the project maintainer: