Security News
Crates.io Users Targeted by Phishing Emails
The Rust Security Response WG is warning of phishing emails from rustfoundation.dev targeting crates.io users.
A package for building chatbots easily without needing of any high system resources.
The "chatbot-webraft" Python module is a powerful tool that allows users to create their own chatbots with custom datasets in an easy and efficient manner. It is designed to work with CSV datasets and provides a variety of model types to choose from, ensuring that users can select the best model for their specific needs. The module requires no high-end servers and can be used with or without training, making it a flexible and cost-effective solution for chatbot development. With the "chatbot-webraft" module, users can quickly and easily develop their own chatbots, customizing the dataset and model type to fit their specific requirements. Whether you're a beginner or an experienced developer, the "chatbot-webraft" module provides a simple and intuitive way to create custom chatbots with Python due to its easy to use syntax.
One of the best features of Chatbot-Webraft is its ability to generate code scripts in specific programming languages from text. This means that you can use your preferred programming language, or even write your own code, and Chatbot-Webraft will convert it into a script that is ready to use. Whether you are an experienced developer or just starting out, this feature makes it easy to build chatbots quickly and efficiently.
In summary, Chatbot-Webraft is a must-have tool for anyone looking to create chatbots. With its wide range of features, including multiple model types, easy customization, and code generation capabilities, Chatbot-Webraft is the perfect tool for anyone looking to build chatbots with ease and efficiency.
PLEASE NOTE THAT THIS MODULE IS IN BETA AND CHATBOTS CREATED WITH IT MAY RESPOND WITH UNEXPECTED ANSWERS
from chatbot_webraft import chatbot
chatbot.create_model("my-model")
chatbot.dataset(CSV_FILE_NAME,'input','label',"my-model"")
chatbot.add_data("my-model"",["input1","input2"],["output1","output2"])
input = "hi" / input = input("Enter: ")
print(chatbot.model_load(MDDEL_TYPE,input,"my-model",MDDEL_TYPE))/chatbot.model_load(MDDEL_TYPE,input,"my-model",MDDEL_TYPE)
print(codewriter("python",input,"my-model","pywriter") / chatbot.model_load("pywriter",input,"my-model","pywriter")
Inbuilt model types: nlpm (Generative, Best) , spimx (better), spimxr (more good), spim (good), rasv (not that good)
You can use other model types by downloading them from here and define path where modeltype (.wrmodel) file is stored to MODEL_TYPE
NLPM: A generative model type (framework) , works best for generative bots . (BETA)
NLPM USAGE: chatbot.model_load("nlpm",input,"my-model",MODELTYPE) - Replace MODELTYPE with the other modeltype that suites you the best , i.e - spim , spimx , rasv , spim (do not replace MODELTYPE with 'nlpm' rather replace with others)
There is also a transformer modified framework that uses Tokenizers from prebuilt transfomer model i.e - BERT . Note that it needs very high system for running and takes a lot of time to load. USE - chatbot.model_load("bert",input,"my-model","bert) (It doesnt need training)
#Import library
from chatbot_webraft import chatbot

#set model name
model = "my-model"

#create model
chatbot.create_model(model)

#load CSV dataset , Mention input column (question) and label column (answer)
chatbot.dataset(CSV_FILE_NAME,INPUT_COLUMN,LABEL_COLUMN,model)


#run in loop
while True:
 prompt = input("You: ")
 #run model and parse input
 print("Bot: ",chatbot.model_load("spimx",prompt,model,"spimx"))
#Import libraries
from chatbot_webraft import chatbot
import discord
client = discord.Client(intents=discord.Intents.all())


model = "my-model" #set model name
chatbot.create_model(model) #create model
chatbot.dataset(CSV_FILE_NAME,INPUT_COLUMN,LABEL_COLUMN,model) #load CSV dataset .. Mention input column (question) and label column (answer)
chatbot.add_data(model,["hey","what about you"],["hello bro","im fine ,you?"]) #add more data to model (Not saved , only in memory). Data that you may want to add later.
@client.event
async def on_message(message):
    if message.author == client.user:
        return

    prompt = message.content

    await message.reply(chatbot.model_load("spim",prompt,model,"spim")) #run model and parse output
client.run(BOT_TOKEN)
 #Import library
from chatbot_webraft import chatbot

#set model name
model = "my-model"

#create model
chatbot.create_model(model)

#load CSV dataset , Mention input column (question) and label column (answer)
chatbot.dataset(CSV_FILE_NAME,INPUT_COLUMN,LABEL_COLUMN,model)


#run in loop
while True:
  prompt = input("You: ")
  #run model and parse input
  print("Bot: ",chatbot.model_load("pywriter",prompt,model,"pywriter")) #Or codewriter("python",prompt,model,"pywriter")
In versions < 1.0.0 you can now train / finetune your own language models through minimal code.
Here is a basic example of pre training on chat data (using language data is advised): Before trying, download the sample dataset given below. (after the code)
from chatbot_webraft.yourmodel import TransformerModel
import torch

d_model = 128 # Adjust according to your needs and system specs

dataset_name = "sample.csv"  # Replace with your correct dataset path

input_set = "input"

label_set = "label"

batch_size = 16 # Adjust according to your needs and system specs

heads = 16 # Adjust according to your needs and system specs

num_layers = 6 # Adjust according to your needs and system specs

device = torch.device("cuda" if torch.cuda.is_available() else "cpu")

epochs = 40

path = "path/to/folder/" # Eg. D:/Softwares/AI/Trainer/

model_name= path+"yourmodelname" # Eg. chatllm
transformer_model = TransformerModel(d_model, dataset_name, input_set, label_set, batch_size, heads, num_layers, device, epochs, model_name, max_len=256)
transformer_model.train() # Finally training

question = "hi"

print(transformer_model.inference(question)) # Doing Inference
You can also do inference already trained model but you require to initialise transformer model with that checkpoint and use same parameters (i.e. d_model, heads, num_layers, max_len)
checkpoint = torch.load(path+model_name+"_final.pth",map_location=device)
transformer = checkpoint['transformer']
transformer_model = TransformerModel(d_model, dataset_name, input_set, label_set, batch_size, heads, num_layers, device, epochs, model_name, max_len=256,transformer=transfromer)
You can also fine tune the model by just changing the dataset_name at initialising of new model and doing transformer_model.finetune().
Download Sample csv dataset from here , Dont forget to put the file in your project directory
Change CSV_FILE_NAME to "sample.csv" , INPUT_COLUMN to "input" , LABEL_COLUMN to "label" in the code
Error 1 - This error indicates that the model name used in specific function is not same as the modelname set with chatbot.createmodel()
Error 2 - This error indicates that the codewriter couldn't convert specific text to code due to lack of resources
Error 3 - This error indicates that the file being set in any of these functions: chatbot.dataset() , chatbot.model_load() doesn't exist
FAQs
A package for building chatbots easily without needing of any high system resources.
We found that chatbot-webraft demonstrated a healthy version release cadence and project activity because the last version was released less than a year ago. It has 1 open source maintainer collaborating on the project.
Did you know?

Socket for GitHub automatically highlights issues in each pull request and monitors the health of all your open source dependencies. Discover the contents of your packages and block harmful activity before you install or update your dependencies.

Security News
The Rust Security Response WG is warning of phishing emails from rustfoundation.dev targeting crates.io users.

Product
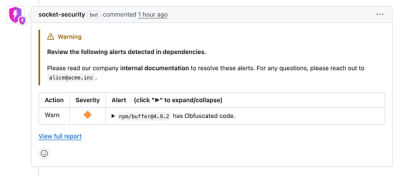
Socket now lets you customize pull request alert headers, helping security teams share clear guidance right in PRs to speed reviews and reduce back-and-forth.

Product
Socket's Rust support is moving to Beta: all users can scan Cargo projects and generate SBOMs, including Cargo.toml-only crates, with Rust-aware supply chain checks.