Configurun
Configurun is a cross-platform PySide6-based package that implements an application for managing, creating and (remotely) running python configurations.
The app automatically generates editable GUIs based on an existing argparse.Argumentparser or a python-@dataclass, making it easy to view and edit parameters in an orginized manner - even when the amount of parameters is large.
Configurun was designed mainly with machine-learning tasks in mind, but can be used for any python script or framework that takes arguments as an input.
The Configurun-app is especially useful for scripts/experiments that require a lot of arguments to be tweaked across many experiment-runs. It also makes the process of running experiments remotely much easier by enabling the user to edit, add and schedule tasks on any running Configurun server-instance reachable via a network connection, or locally.
Configurun was created in tandem with pyside6-utils.
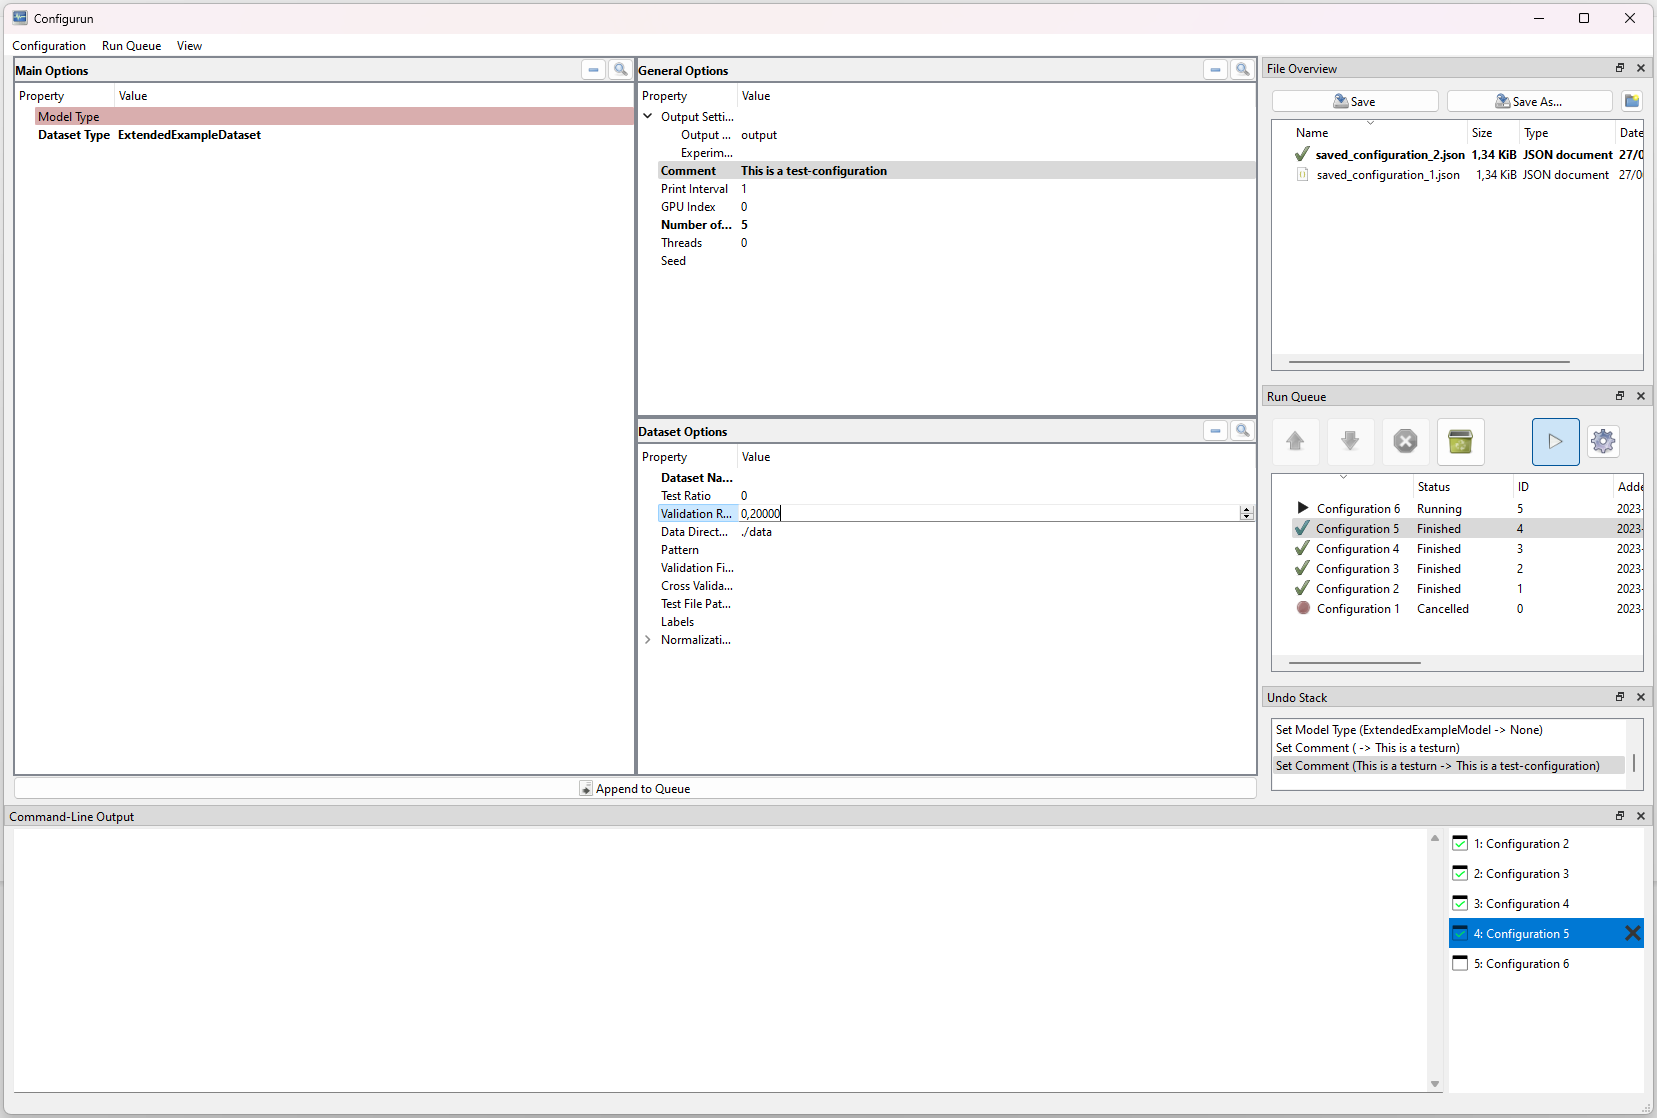
Table of contents
Features
Configuration Editor
The configuration editor is automatically generated using either (groups of) @dataclass-class or an ArgumentParser-instance. Editors are specifically created for each option-property based on the provided types (and extra constraints).
Help-messages are displayed on hover, required arguments are highlighted when not filled in, etc.
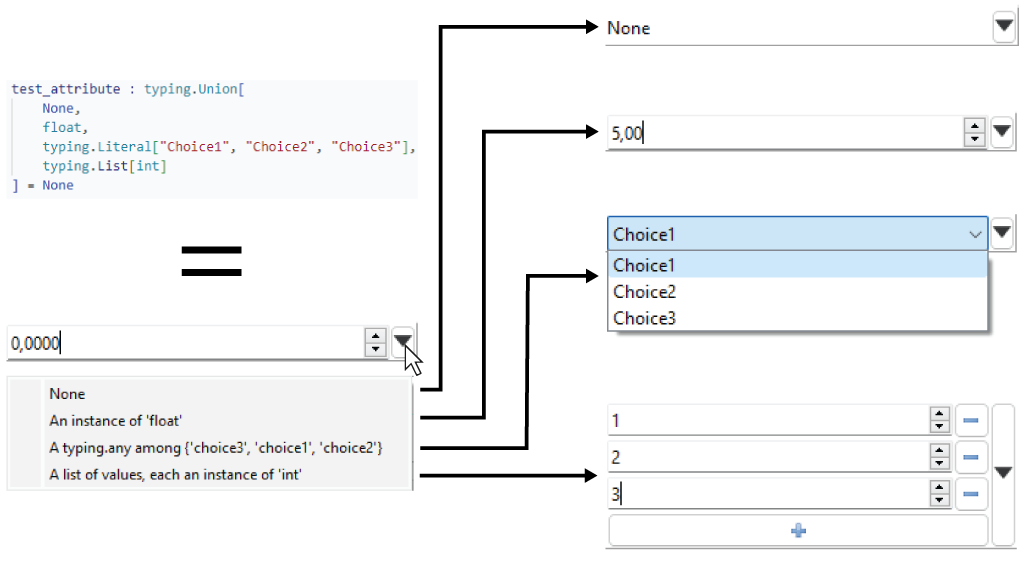
More complex typehints using List / Union / Literal are supported and are automatically built into widgets that allow the user to add/remove items and switch input-types:
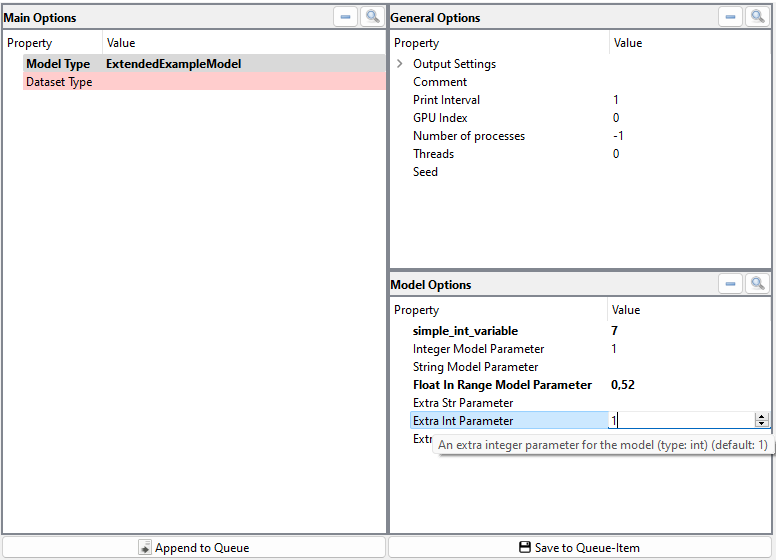
We can also define our own option-source-method to dynamically create new option-groups based on the current configuration. This can be useful if we want to group options together, and only show certain groups when an attribute of another group is set to a certain value. E.g: only show ExtendedExampleModel-options if property model_type in MainOptions is set to "ExtendedExampleModel".
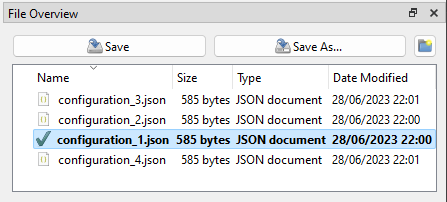
Configurations can be saved and loaded, a file-explorer view for the current workspace is made available.:
Run Queue
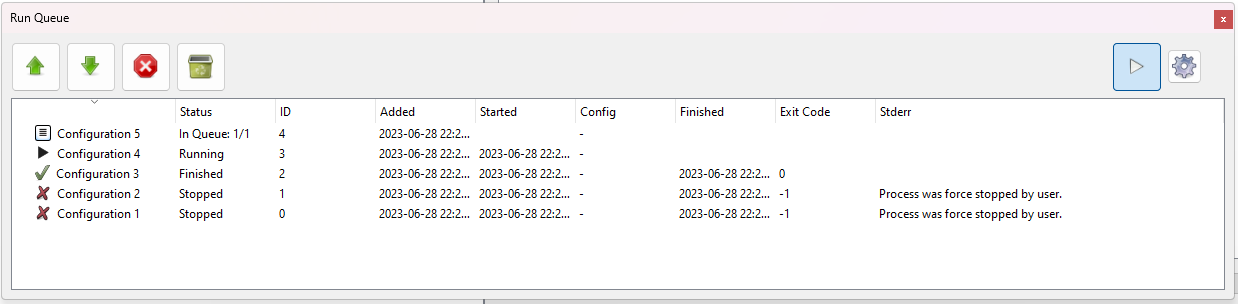
The run-queue window manages the currently running items. This could either be locally when using a local-app, or remotely, when using a client-app and a server-instance on which the actual Run-Queue is running. The Run-Queue allows us to add/remove items, pause/resume items, change the queue-order of items, and start autoprocessing, which will automatically start the next item in the queue when the current item is finished. We can set the number of processors as well, to run multiple items in parallel.
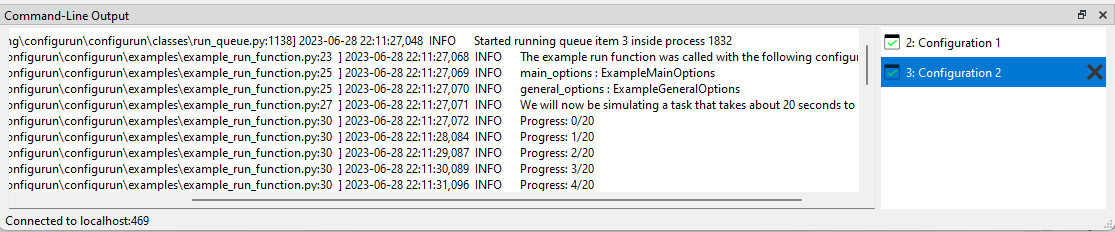
Configurations are passed to the user-provided target-function in separate processes. The stdout/stderr of each of the items is captured and displayed as a selectable console-output-view in the command-line-output window:
Remote-processing
Instead of using the local-app to manage and run the configurations on your own machine, we can use the client-app to connect to a server-instance on a remote machine. The client-app works analogous to the local-app and allows us to create and manage new configuration, but the Run-Queue runs on the connected remote Configurun-server:
Installation
This package can downloaded from this repository, or can be installed directly from PyPi by using pip:
pip install configurun
How to run?
Creating the app is done via the configurun.create-module. We can create 3 different types of apps:
- Local app - For running everything locally on your machine
- Client app - For running the configurations on a remote machine, connects to a
server-instance
- Server instance - Command-line instance that listens to connections from
client-apps. If login is succesful, accepts control of the RunQueue from the client-app.
On the client-side, the options_source should be set - the template of the settings used to create the configuration-editor.
On the server/running-machine, the target_function should be set - the function that actually runs the task/experiment (example).
Local App
A local app is an all-in-one app that can be used to create and run configurations locally on your machine.
To run the example app, we can either call run_example_app() from configurun.examples or run the following code to construct the app ourselves:
import os
from configurun.app import run_local
from configurun.examples import example_target_function, example_deduce_new_option_classes
if __name__ == "__main__":
run_local(
target_function=example_target_function,
options_source=example_deduce_new_option_classes,
workspace_path = os.path.join(
os.getcwd(),
"LocalExampleWorkspace"
)
)
In this example, example_target_function runs a dummy task that logs to a file for 20 seconds. We can specify our own target-function to run our own scripts.
We can specify our own options source to create our own options-class for the configuration-editor, for example by using an existing ArgumentParser-object.
Client App
We can create a client-app and use it to login to running server-instances. We can then use the client-app analogous to the local-app to create new confiugrations and add/run/manage configurations on the remote machine.
import os
from configurun.app import run_client
from configurun.examples import example_deduce_new_option_classes
if __name__ == "__main__":
run_client(
options_source=example_deduce_new_option_classes,
workspace_path=os.path.join(os.getcwd(), "ClientExampleWorkspace"),
)
Server-instance
The server-instance is a command-line app that listens to connections from client-instance(s) to receive new configurations and commands to manage its RunQueue. The actual target-functions are ran on this machine.
NOTE: after authentication, pickle/dill is used to transmit data, which indirectly enables arbitrary code execution on the server-side if the password is known. Please run the server on trusted network environments only. Run at your own risk!
import os
from configurun.server import run_server
from configurun.examples.example_target_function import example_target_function
if __name__ == "__main__":
run_server(
target_function=example_target_function,
workspace_path=os.path.join(os.getcwd(), "ServerExampleWorkspace"),
password="password",
port=5454
)
Option-source
When creating an app using the create-module, we can define a custom source, using the options_source=..., so we can construct the UI using our own options.
We can use the following types as an options-source:
Custom Options (@dataclass)
NOTE: Using @dataclass-fields results in more control over the final UI, for a more thorough example, please see this section and/or the example implementations in configurun/examples/example_options/example_options.py.
NOTE: When implementing custom option-classes, don't forget to add the @dataclass-decorator, and always inherit from BaseOptions
UI-supported type-hints include str, int, float, datatime, typing.Literal (and more) and combinations using typing.List, typing.Union / |. For example:
import os
import typing
from dataclasses import dataclass
from configurun.configuration.base_options import BaseOptions
from configurun.app import run_local
from configurun.examples import example_target_function
@dataclass
class MyCustomOptions(BaseOptions):
simple_int : int = 1
complex_property : typing.List[typing.Union[int, str]] | None = None
if __name__ == "__main__":
run_local(
target_function=example_target_function,
options_source=MyCustomOptions,
workspace_path = os.path.join(os.getcwd(), "ExampleDataclassOptions")
)
Custom Options (ArgumentParser)
We can use a ArgumentParser-object as an options source, this will internally convert the argument parser into a @dataclass-object, which is then used as an options-class. Whenever possible, arguments are also parsed to the UI (e.g. required=True, help="Will be displayed on hover" etc.).
import argparse
import os
from configurun.app import run_local
from configurun.examples import example_target_function
parser = argparse.ArgumentParser()
parser.add_argument("--required_arg", type=str, required=True, help="Required argument help")
if __name__ == "__main__":
run_local(
target_function=example_target_function,
options_source=parser,
workspace_path = os.path.join(os.getcwd(), "ExampleArgparseOptions")
)
Custom Options (Callable)
We define an option-class as a class that has the @decorator and inherits from the BaseOptions-class.
A configuration is a collection of option-instances, which are grouped toghether in a Configuration()-wrapper, which enables us to access the attributes of all enclosed options-instances using the configuration[attribute] / configuration.<attribute> / option_class.get(attribute, default). For more information, see this section.
As an options-source, we can create a callable which takes the current Configuration-instance as an argument and returns 1 or more new options-classes (not instances) which is called every time a setting is changed. If the types-change, the UI will be updated to reflect the new templates.
This can be useful if we want to group options together, and only show certain groups when an attribute of another group is set to a certain value. For example:
import os
import typing
from dataclasses import dataclass
from configurun.app import run_local
from configurun.examples import example_target_function
from configurun.configuration import BaseOptions, Configuration
@dataclass
class AlwaysTheSame(BaseOptions):
base_int : int = 1
@dataclass
class CustomOptionsDefault(BaseOptions):
simple_int : int = 1
@dataclass
class CustomOptionsUnderConditions(BaseOptions):
simple_int : int = 2
some_more_options : str = 'Some string'
def deduce_new_option_classes(configuration: Configuration)\
-> typing.Dict[str, typing.Type[BaseOptions | None]]:
if configuration.options is None or len(configuration.options) == 0:
pass
elif configuration.base_int == 2 and configuration.simple_int != 1:
return {
'always_the_same' : AlwaysTheSame,
'custom_options' : CustomOptionsUnderConditions
}
return {
'always_the_same' : AlwaysTheSame,
'custom_options' : CustomOptionsDefault
}
if __name__ == '__main__':
run_local(
target_function=example_target_function,
options_source=deduce_new_option_classes,
workspace_path = os.path.join(os.getcwd(), "ExampleCallableOptions")
)
Target Function
The target function is the function that does all the work. This is the function that is being called when an item starts "running" in the Run-Queue.
It takes a single argument: a Configuration-instance.
The configuration-object contains all settings as set by the user when "add to queue" was pressed.
This example uses the example-configuration from the Configuration section, we simply print the values of the configuration to the console:
def target_function(configuration: Configuration):
print(configuration.simple_int)
print(configuration.some_other_int)
If you have replaced an argparse.Argumentparser, this is the place where you insert the user-provided settings to the script that uses the ArgumentParser-object. For example:
def target_function(configurtion : Configuration):
your_framework_that_used_parsed_args(configuration)
Of course you can also directly pass the your_framework_that_used_parsed_args(...)-function as the target function when creating the app:
if __name__ == '__main__':
	local_app(
		target_function=your_framework_that_used_parsed_args,
		options_source=deduce_new_option_classes,
		workspace_path = os.path.join(os.getcwd(), "ExampleCallableOptions")
	)
This example uses the deduce_new_option_classes-function from callable option source example .
Configuration
Configurun works with configuration-objects. A configuration is a collection of option-instances (=@dataclass-instances that inherit from BaseOptions), which are grouped toghether in a Configuration-wrapper.
We can think of the option-instances as the different groups of options we want to edit and use in our run (e.g. GeneralOptions(), LogOptions(), ModelOptions(), etc.).
In the simplest case, we have 1 single option-instance which contains all the options, for example: AllOptions().
The Configuration-wrapper enables us to access the attributes of all enclosed options-instances using configuration[attribute]/configuration.<attribute>/option_class.get(attribute, default).
An example of how to use a Configuration-instance:
from dataclasses import dataclass
from configurun.configuration import Configuration
from configurun.configuration import BaseOptions
@dataclass
class GeneralOptionsClass(BaseOptions):
simple_int : int = 1
@dataclass
class OtherOptionClass(BaseOptions):
some_other_int : int = 2
config = Configuration()
config.options['general_options'] = GeneralOptionsClass()
config.options['other_options'] = OtherOptionClass()
print(config['simple_int'])
print(config.simple_int)
print(config.get('simple_int', -1)))
print(config['some_other_int'])
print(config.some_other_int)
print(config.get('some_other_int', -1)))
Option metadata
The UI is mainly built around the field() functionality of python-dataclass, which allows the display-model to make use of the default values, type hints and other information.
While typehints (e.g. int, str, typing.List[int], etc.) are enough to create the editors, we can also provide additional information in the metadata-attribute of field() to further constrain the editors and provide additional information to the user.
For example:
from configurun.configuration import base_options
from dataclasses import field, dataclass
from pyside6_utils.classes.constraints import Interval, ConstrainedList
@dataclass
class TestOptions(BaseOptions):
test_int_list_property : typing.List[int] | None = field(
default=None,
metadata=dict(
display_name="Test property",
help="This is a test property that can also be none",
required=True,
constraints = [
ConstrainedList([Interval(type=int, left=1, right=None, closed="both")]),
None
]
)
)
For more examples, please see the example-options.
The following metadata-keys are supported:
"display_name" | str | Name to display for this attribute in the view - defaults to the variable name itself |
"display_path" | str | Path to display this attribute - we can group/structure items when using a treeview - defaults to no parents |
"help" | str | Help-message which will be shown when the user hovers over this item - empty by default |
"constraints" | List[sklearn_param_validation constraints] | Additional constraints on which the editor will be determined to apply to the field * , if none provided, use typehint of the field |
"required" | bool | Whether this field is required to be filled in - if true - a red background will appear if the value is not set |
"editable" | bool | Whether this field is editable - if false - the editor will be disabled |
*=Constraints are (almost entirely) sourced from the sklearn.utils._validation module and provides a way to constrain the dataclass fields such that the user can only enter valid values. They are also packed into this package under classes.constraints. The following constraints are supported:
type | The type of the value should match the type of the constraint | based on type |
Options / Container | The value should be one of the options provided in the constraint | QComboBox |
StrOptions | The value should be one of the str-options provided in the constraint | QComboBox |
Interval | The value should be within the interval provided in the constraint | QSpinBox or QDoubleSpinBox (limited) |
None | None is a valid value for this field, same as typing.Optional | Adds reset-button to editor |
Range | The value should be within the range provided in the constraint | QSpinBox (limited) |
ConstrainedList | *(Custom - not part of Sklearn) Indicates a list of of values of a constrained type | Based on type of list |
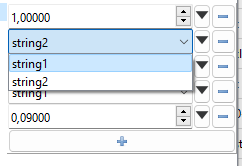
*=For example, ConstrainedList([Interval(float, 0.0, 1.0), StrOptions(["string1", "string2"])]) indicates a list of values that should either be a float between 0.0 and 1.0, or the string "string1" or "string2". The editor for this field would be constructed as a WidgetList to which the user can add WidgetSwitcher. The WidgetSwitcher would then have two widgets, one with a QSpinBox and one with a QComboBox as the editor. NOTE: the same editor would be parsed from a Typing.List[typing.Union[float, Typing.Literal["string1", "string2"]]] typehint, minus the bounded-interval constraint on the float:
SSH-tunneling
This section contains a quick tutorial on how to use SSH-tunnels to connect to a remote server-instance in case we're not running client and server on the same machine/network.
No-hop
A SSH-tunnel can be used to forward localhost:5454 on the client-instance-side to <remote>:5454 on the server side so we connect to the server instance without permanently port forwarding any ports on the server-side.
If we can directly SSH into the target machine, we can connect the ports as follows (assuming we're using the default 5454-port in both the server and client configuration):
ssh -L 5454:localhost:5454 user@remote_host
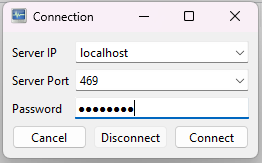
On the client-side, we can then connect to the server-instance by using localhost:5454 as the host and the password we set in the server-instance.
Hopping
If we cannot directly access the remote-machine, we can use a 2-step SSH-tunnel to connect to the server-instance.
This example assumes we have:
remote1: directly accessible from our machineremote2: only accessible from remote1- Using default Configurun-port
5454 on both the client and server-side
We can then connect to remote2 from our machine using the following command:
ssh -J <username1>@<remote1>, <username2>@<remote2> -L 5454:localhost:5454
This example forwards localhost:5454->remote2:5454, so we can connect to the server-instance on remote2 by using localhost:5454 as the host and the password we set in the server-instance.