ONVIF Python

This project provides a comprehensive and developer-friendly Python library for working with ONVIF-compliant devices. It is designed to be reliable, easy to integrate, and flexible enough to support a wide range of ONVIF profiles and services.
ONVIF (Open Network Video Interface Forum) is a global standard for the interface of IP-based physical security products, including network cameras, video recorders, and related systems.
Behind the scenes, ONVIF communication relies on SOAP (Simple Object Access Protocol) — an XML-based messaging protocol with strict schema definitions (WSDL/XSD). SOAP ensures interoperability, but when used directly it can be verbose, complex, and error-prone.
This library simplifies that process by wrapping SOAP communication into a clean, Pythonic API. You no longer need to handle low-level XML parsing, namespaces, or security tokens manually — the library takes care of it, letting you focus on building functionality.
Library Philosophy
[!NOTE]
This library will be continuously updated as ONVIF versions are updated. It uses a built-in WSDL that will always follow changes to the ONVIF WSDL Specifications. You can also use your own ONVIF WSDL file by adding the wsdl_dir argument; see ONVIFClient Parameters.
-
WYSIWYG (What You See is What You Get): Every ONVIF operation in the library mirrors the official ONVIF specification exactly. Method names, parameter structures, and response formats follow ONVIF standards without abstraction layers or renamed interfaces. What you see in the ONVIF documentation is exactly what you get in Python.
-
Device Variety Interoperability: Built to handle the real-world diversity of ONVIF implementations across manufacturers. The library gracefully handles missing features, optional operations, and vendor-specific behaviors through comprehensive error handling and fallback mechanisms. Whether you're working with high-end enterprise cameras or budget IP cameras, the library adapts.
-
Official Specifications Accuracy: All service implementations are generated and validated against official ONVIF WSDL Specifications. The library includes comprehensive test suites that verify compliance with ONVIF standards, ensuring that method signatures, parameter types, and behavior match the official specifications precisely.
-
Modern Python Approach: Designed for excellent IDE support with full type hints, auto-completion, and immediate error detection. You'll get TypeError exceptions upfront when accessing ONVIF operations with wrong arguments, instead of cryptic SOAP faults later. Clean, Pythonic API that feels natural to Python developers while maintaining ONVIF compatibility.
-
Minimal Dependencies: Only depends on essential, well-maintained libraries (zeep for SOAP, requests for HTTP). No bloated framework dependencies or custom XML parsers. The library stays lightweight while providing full ONVIF functionality, making it easy to integrate into any project without dependency conflicts.
Who Is It For?
- Individual developers exploring ONVIF or building hobby projects
- Companies building video intelligence, analytics, or VMS platforms
- Security integrators who need reliable ONVIF interoperability across devices
Requirements
- Python: 3.9 or higher
- Dependencies:
Installation
From official PyPI:
pip install --upgrade onvif-python
Or clone this repository and install locally:
git clone https://github.com/nirsimetri/onvif-python
cd onvif-python
pip install .
Usage Example
[!TIP]
You can view the complete documentation automatically generated by DeepWiki via the onvif-python AI Wiki link. We currently do not have an official documentation site. Help us create more examples and helpful documentation by contributing.
Below are simple examples to help you get started with the ONVIF Python library. These demonstrate how to discover and connect to ONVIF-compliant devices and retrieve basic device information.
1. Discover ONVIF Devices (Optional)
Use ONVIFDiscovery (applied at >=v0.1.6) to automatically find ONVIF devices on your local network:
from onvif import ONVIFDiscovery
discovery = ONVIFDiscovery(timeout=5)
devices = discovery.discover()
devices = discovery.discover(search="Profile/Streaming")
for device in devices:
print(f"Found device at {device['host']}:{device['port']}")
print(f" Scopes: {device.get('scopes', [])}")
print(f" XAddrs: {device['xaddrs']}")
2. Initialize the ONVIFClient
Create an instance of ONVIFClient by providing your device's IP address, port, username, and password:
from onvif import ONVIFClient
client = ONVIFClient("192.168.1.17", 8000, "admin", "admin123")
client = ONVIFClient(
"192.168.1.17", 8000, "admin", "admin123",
wsdl_dir="/path/to/custom/wsdl"
)
3. Create Service Instance
ONVIFClient provides several main services that can be accessed via the following methods:
client.devicemgmt() — Device Managementclient.events() — Eventsclient.imaging() — Imagingclient.media() — Mediaclient.ptz() — PTZ (Pan-Tilt-Zoom)client.analytics() — Analytics
and so on, check Implemented ONVIF Services for more details
Example usage:
device = client.devicemgmt()
media = client.media()
4. Get Device Information
Retrieve basic information about the device, such as manufacturer, model, firmware version, and serial number using devicemgmt() service:
info = device.GetDeviceInformation()
print(info)
5. Get RTSP URL
Retrieve the RTSP stream URL for live video streaming from the device using media() service:
profile = media.GetProfiles()[0]
stream = media.GetStreamUri(
ProfileToken=profile.token,
StreamSetup={"Stream": "RTP-Unicast", "Transport": {"Protocol": "RTSP"}}
)
print(stream)
Explore more advanced usage and service-specific operations in the examples/ folder.
Helper Methods
Every ONVIF service provides three essential helper methods to improve the development experience and make working with ONVIF operations more intuitive:
1. type(type_name)
Creates and returns an instance of the specified ONVIF type for building complex request parameters (applied at >=v0.1.9).
Usage:
device = client.devicemgmt()
new_user = device.type('CreateUsers')
new_user.User.append({
"Username": 'new_user',
"Password": 'new_password',
"UserLevel": 'User'
})
device.CreateUsers(new_user)
hostname = device.type('SetHostname')
hostname.Name = 'NewHostname'
device.SetHostname(hostname)
time_params = device.type('SetSystemDateAndTime')
time_params.DateTimeType = 'NTP'
time_params.DaylightSavings = True
time_params.TimeZone.TZ = 'UTC+02:00'
now = datetime.now()
time_params.UTCDateTime.Date.Year = now.year
time_params.UTCDateTime.Date.Month = now.month
time_params.UTCDateTime.Date.Day = now.day
time_params.UTCDateTime.Time.Hour = now.hour
time_params.UTCDateTime.Time.Minute = now.minute
time_params.UTCDateTime.Time.Second = now.second
device.SetSystemDateAndTime(time_params)
2. operations()
Lists all available operations for the current service (applied at >=v0.2.0).
Returns:
- List of operation names that can be called on the service
Usage:
device = client.devicemgmt()
media = client.media()
ptz = client.ptz()
print("Device Management Operations:")
for op in device.operations():
print(f" - {op}")
print("\nMedia Operations:")
for op in media.operations():
print(f" - {op}")
print("\nPTZ Operations:")
for op in ptz.operations():
print(f" - {op}")
if 'ContinuousMove' in ptz.operations():
print("PTZ continuous movement is supported")
3. desc(method_name)
Provides comprehensive documentation and parameter information for any ONVIF operation (applied at >=v0.2.0).
Returns:
doc: Method documentation from WSDLrequired: List of required parameter namesoptional: List of optional parameter namesmethod_name: The method nameservice_name: The service name
Usage:
device = client.devicemgmt()
info = device.desc('GetDeviceInformation')
print(info['doc'])
print("Required params:", info['required'])
print("Optional params:", info['optional'])
methods = device.operations()
for method in methods[:5]:
info = device.desc(method)
print(f"{method}: {len(info['required'])} required, {len(info['optional'])} optional")
[!TIP]
These helper methods are available on all ONVIF services (devicemgmt(), media(), ptz(), events(), imaging(), analytics(), etc.) and provide a consistent API for exploring and using ONVIF capabilities across different device types and manufacturers.
[!IMPORTANT]
If you're new to ONVIF and want to learn more, we highly recommend taking the official free online course provided by ONVIF at Introduction to ONVIF Course. Please note that we are not endorsed or sponsored by ONVIF, see Legal Notice for details.
ONVIF CLI
[!NOTE]
The CLI is automatically installed when you install the onvif-python see Installation. This feature has been available since onvif-python version >=0.1.1.


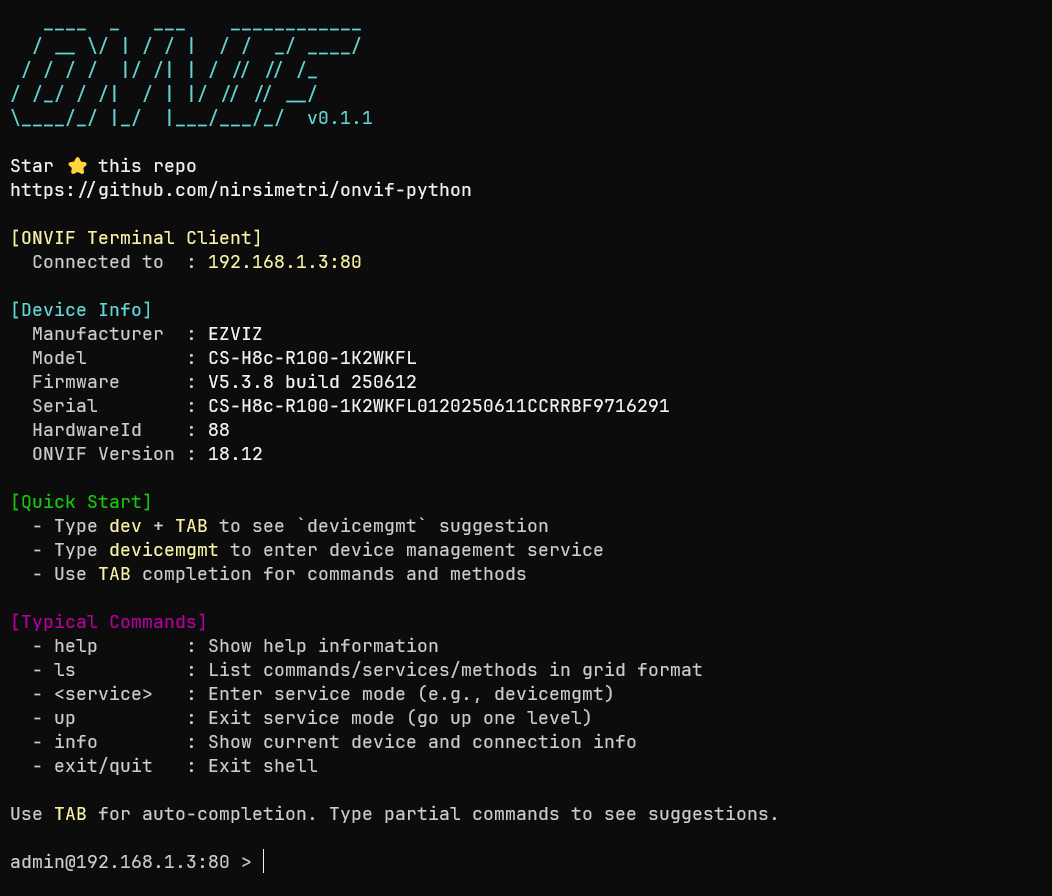
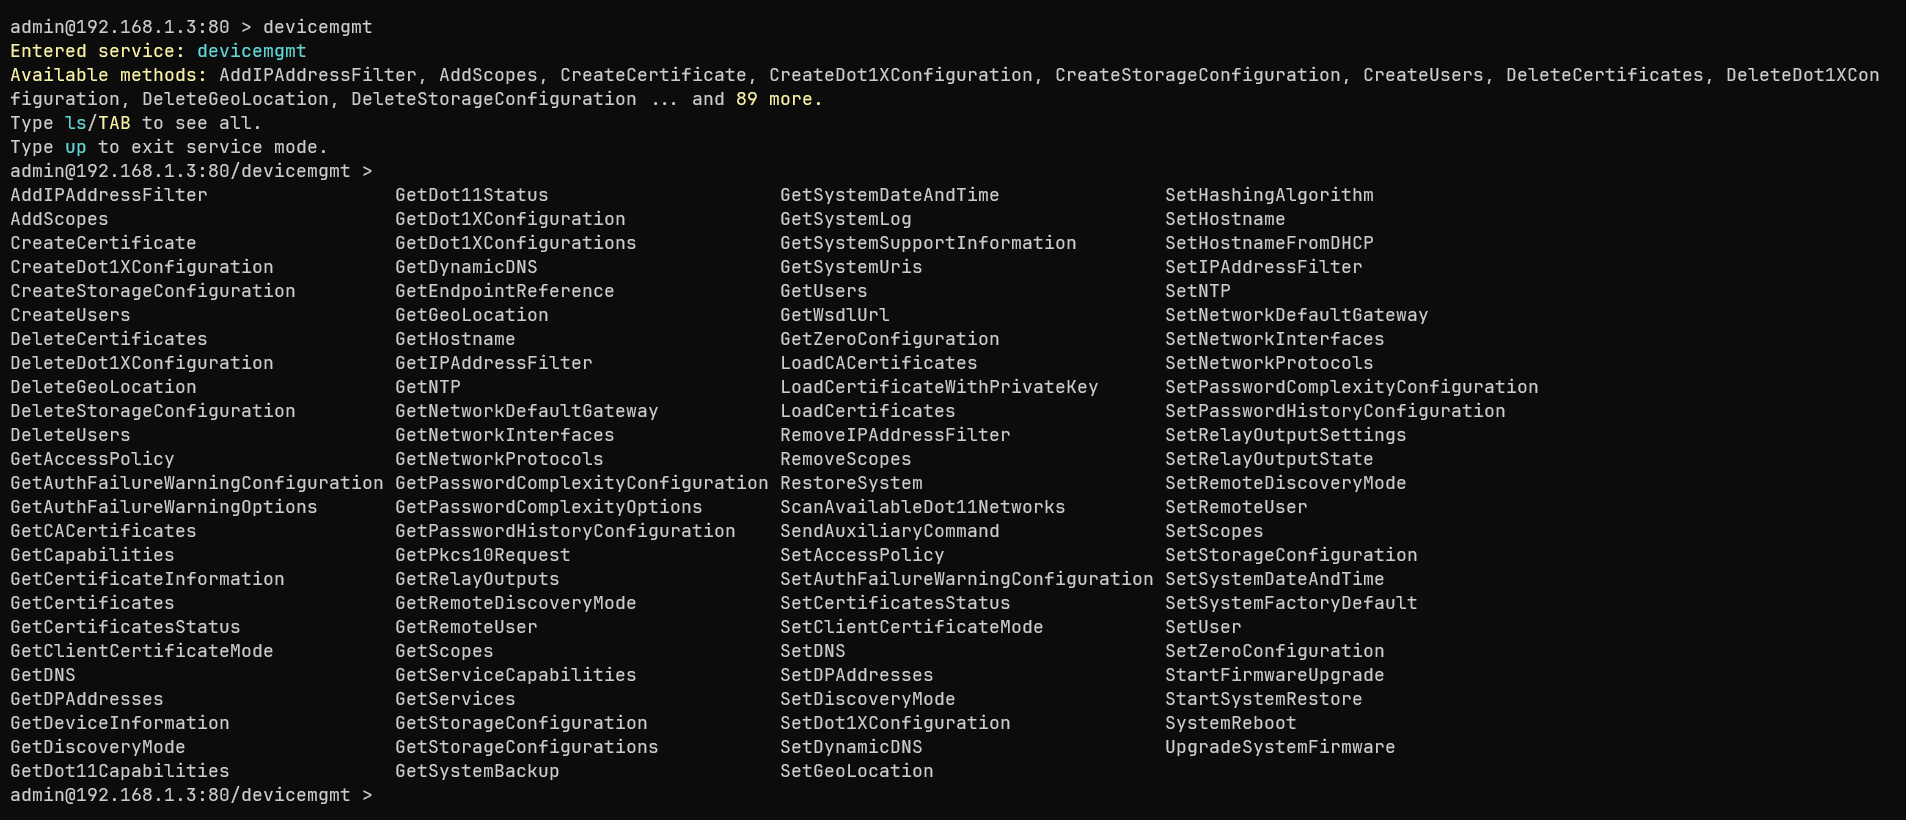
This library includes a powerful command-line interface (CLI) for interacting with ONVIF devices directly from your terminal. It supports both direct command execution and an interactive shell mode, providing a flexible and efficient way to manage and debug ONVIF devices.
Features
- Device Discovery: Automatic ONVIF device discovery on local network using WS-Discovery protocol.
- Interactive Shell: A user-friendly shell with tab completion, command history, and colorized output.
- Direct Command Execution: Run ONVIF commands directly from the terminal for scripting and automation.
- Automatic Discovery: Automatically detects available services on the device.
- Connection Management: Supports HTTP/HTTPS, custom timeouts, and SSL verification.
- Data Management: Store results from commands and use them as parameters in subsequent commands.
- Cross-Platform: Works on Windows, macOS, Linux, and Raspberry Pi.
Screenshoot
|
|
|
Onboarding
|
List available operations
|
|---|
Help Command
1. Direct CLI
usage: onvif [-h] [--host HOST] [--port PORT] [--username USERNAME] [--password PASSWORD] [--discover] [--filter FILTER] [--search SEARCH] [--page PAGE]
[--per-page PER_PAGE] [--timeout TIMEOUT] [--https] [--no-verify] [--no-patch] [--interactive] [--debug] [--wsdl WSDL]
[--cache {all,db,mem,none}] [--health-check-interval HEALTH_CHECK_INTERVAL] [--output OUTPUT] [--version]
[service] [method] [params ...]
ONVIF Terminal Client — v0.2.10
https://github.com/nirsimetri/onvif-python
positional arguments:
service ONVIF service name (e.g., devicemgmt, media, ptz)
method Service method name (e.g., GetCapabilities, GetProfiles)
params Method parameters as Simple Parameter or JSON string
options:
-h, --help show this help message and exit
--host HOST, -H HOST ONVIF device IP address or hostname
--port PORT, -P PORT ONVIF device port (default: 80)
--username USERNAME, -u USERNAME
Username for authentication
--password PASSWORD, -p PASSWORD
Password for authentication
--discover, -d Discover ONVIF devices on the network using WS-Discovery
--filter FILTER, -f FILTER
Filter discovered devices by types or scopes (case-insensitive substring match)
--search SEARCH, -s SEARCH
Search ONVIF products database by model or company (e.g., 'c210', 'hikvision')
--page PAGE Page number for search results (default: 1)
--per-page PER_PAGE Number of results per page (default: 20)
--timeout TIMEOUT Connection timeout in seconds (default: 10)
--https Use HTTPS instead of HTTP
--no-verify Disable SSL certificate verification
--no-patch Disable ZeepPatcher
--interactive, -i Start interactive mode
--debug Enable debug mode with XML capture
--wsdl WSDL Custom WSDL directory path
--cache {all,db,mem,none}
Caching mode for ONVIFClient (default: all). 'all': memory+disk, 'db': disk-only, 'mem': memory-only, 'none': disabled.
--health-check-interval HEALTH_CHECK_INTERVAL, -hci HEALTH_CHECK_INTERVAL
Health check interval in seconds for interactive mode (default: 10)
--output OUTPUT, -o OUTPUT
Save command output to file. Supports .json, .xml extensions for format detection, or plain text. XML format automatically enables
debug mode for SOAP capture.
--version, -v Show ONVIF CLI version and exit
Examples:
onvif --search c210
onvif -s "axis camera"
onvif --search hikvision --page 2 --per-page 5
onvif --discover --username admin --password admin123 --interactive
onvif media GetProfiles --discover --username admin
onvif -d -i
onvif --discover --filter ptz --interactive
onvif -d -f "C210" -i
onvif -d -f "audio_encoder" -u admin -p admin123 -i
onvif devicemgmt GetCapabilities Category=All --host 192.168.1.17 --port 8000 --username admin --password admin123
onvif ptz ContinuousMove ProfileToken=Profile_1 Velocity={'PanTilt': {'x': -0.1, 'y': 0}} -H 192.168.1.17 -P 8000 -u admin -p admin123
onvif devicemgmt GetDeviceInformation --host 192.168.1.17 --port 8000 --username admin --password admin123 --output device_info.json
onvif media GetProfiles --host 192.168.1.17 --port 8000 --username admin --password admin123 --output profiles.xml
onvif ptz GetConfigurations --host 192.168.1.17 --port 8000 --username admin --password admin123 --output ptz_config.txt --debug
onvif --host 192.168.1.17 --port 8000 --username admin --password admin123 --interactive
onvif -H 192.168.1.17 -P 8000 -i
onvif media GetProfiles --host camera.example.com --port 443 --username admin --password admin123 --https
2. Interactive Shell
ONVIF Interactive Shell — v0.2.10
https://github.com/nirsimetri/onvif-python
Basic Commands:
capabilities, caps - Show device capabilities
services - Show available services with details
info - Show connection and device information
exit, quit - Exit the shell
shortcuts - Show available shortcuts
Navigation Commands:
<service> - Enter service mode (e.g., devicemgmt, media)
<service> <argument> - Enter service mode with argument (e.g. pullpoint SubscriptionRef=<value>)
cd <service> - Enter service mode (alias)
ls - List commands/services/methods in grid format
up - Exit current service mode (go up one level)
pwd - Show current service context
clear - Clear terminal screen
help <command> - Show help for a specific command
Service Mode Commands:
desc <method> - Show method documentation
type <method> - Show input/output types from WSDL
Method Execution:
<method> - Execute method without parameters
<method> {"param": "value"} - Execute method with JSON parameters
<method> param=value - Execute method with simple parameters
Data Management:
store <name> - Store last result with a name
show <name> - Show stored data
show <name>[0] - Show element at index (for lists)
show <name>.attribute - Show specific attribute
show - List all stored data
rm <name> - Remove stored data by name
cls - Clear all stored data
Using Stored Data in Methods:
Use $variable syntax to reference stored data in method parameters:
- $profiles[0].token - Access list element and attribute
- $profiles[0].VideoSourceConfiguration.SourceToken
Example:
GetProfiles - Get profiles
store profiles - Store result
show profiles[0].token - Show first profile token
GetImagingSettings VideoSourceToken=$profiles[0].VideoSourceConfiguration.SourceToken
Debug Commands:
debug - Show last SOAP request & response (if --debug enabled)
Tab Completion:
Use TAB key for auto-completion of commands, services, and methods
Type partial commands to see suggestions
Examples:
192.168.1.17:8000 > caps
192.168.1.17:8000 > dev<TAB>
192.168.1.17:8000 > cd devicemgmt
192.168.1.17:8000/devicemgmt > Get<TAB>
192.168.1.17:8000/devicemgmt > GetServices {"IncludeCapability": true}
192.168.1.17:8000/devicemgmt > GetServices IncludeCapability=True
192.168.1.17:8000/devicemgmt > store services_info
192.168.1.17:8000/devicemgmt > up
192.168.1.17:8000 >
Usage
1. Interactive Mode
The interactive shell is recommended for exploration and debugging. It provides an intuitive way to navigate services, call methods, and view results.
To start the interactive shell, provide the connection details:
onvif --host 192.168.1.17 --port 8000 --username admin --password admin123 -i
If you omit the username or password, you will be prompted to enter them securely.
Interactive Shell Commands:
help | Show help information |
ls | List available services or methods in the current context |
cd <service> | Enter a service mode (e.g., cd devicemgmt) |
up | Go back to the root context |
pwd | Show the current service context |
desc <method> | Show documentation for a method |
store <name> | Store the last result with a variable name |
show <name> | Display a stored variable |
exit / quit | Exit the shell |
[!IMPORTANT]
You can see all the other commands available in the interactive shell by trying it out directly. The interactive shell runs periodic background health checks to detect connection loss. It uses silent TCP pings to avoid interrupting your work and will automatically exit if the device is unreachable, similar to an SSH session.
Command Chaining with &&:
The CLI supports chaining multiple commands in a single line using the && operator, allowing you to execute sequential operations efficiently:
192.168.1.17:8000 > media && GetProfiles && store profiles
192.168.1.17:8000 > devicemgmt && GetDeviceInformation && store device_info
192.168.1.17:8000 > media && GetProfiles && store profiles && up && imaging && GetImagingSettings VideoSourceToken=$profiles[0].VideoSourceConfiguration.SourceToken
This feature is particularly useful for:
- Quick operations without entering service mode
- Scripting repetitive tasks
- Testing workflows
- Automating multi-step procedures
2. Device Discovery (WS-Discovery)
The CLI includes automatic ONVIF device discovery using the WS-Discovery protocol. This feature allows you to find all ONVIF-compliant devices on your local network without knowing their IP addresses beforehand (applied at >=v0.1.2).
Discover and Connect Interactively:
onvif --discover --username admin --password admin123 --interactive
onvif -d -u admin -p admin123 -i
onvif --discover --filter "C210" --interactive
onvif -d -f ptz -u admin -p admin123 -i
onvif -d -i
Discover and Execute Command:
onvif media GetProfiles --discover --username admin --password admin123
onvif media GetProfiles -d -u admin -p admin123
How Device Discovery Works:
- Automatic Network Scanning: Sends a WS-Discovery Probe message to the multicast address
239.255.255.250:3702
- Device Detection: Listens for ProbeMatch responses from ONVIF devices (default timeout: 4 seconds)
- Interactive Selection: Displays a numbered list of discovered devices with their details:
- Device UUID (Endpoint Reference)
- XAddrs (ONVIF service URLs)
- Device Types (e.g., NetworkVideoTransmitter)
- Scopes (name, location, hardware, profile information)
- Connection: Once you select a device, the CLI automatically connects using the discovered host and port
Example Discovery Output:
Discovering ONVIF devices on network...
Network interface: 192.168.1.100
Timeout: 4s

Found 2 ONVIF device(s):

[1] 192.168.1.14:2020
    [id] 3fa1fe68-b915-4053-a3e1-a8294833fe3c
    [xaddrs] [http://192.168.1.14:2020/onvif/device_service]
    [types] [tdn:NetworkVideoTransmitter]
    [scopes] [name/C210] [hardware/C210] [Profile/Streaming] [location/Hong Kong]

[2] 192.168.1.17:8000
    [id] 7d04ff31-61e6-11f0-a00c-6056eef47207
    [xaddrs] [http://192.168.1.17:8000/onvif/device_service]
    [types] [dn:NetworkVideoTransmitter] [tds:Device]
    [scopes] [type/NetworkVideoTransmitter] [location/unknown] [name/IPC_123465959]

Select device number 1-2 or q to quit: 1

Selected: 192.168.1.14:2020
Notes:
- Discovery only works on the local network (same subnet)
- Some networks may block multicast traffic (check firewall settings)
- The
--host and --port arguments are not required when using --discover
- You can still provide
--username and --password upfront to avoid prompts
3. Direct Command Execution
You can also execute a single ONVIF command directly. This is useful for scripting or quick checks.
Syntax:
onvif <service> <method> [parameters...] -H <host> -P <port> -u <user> -p <pass>
Example:
onvif devicemgmt GetCapabilities Category=All -H 192.168.1.17 -P 8000 -u admin -p admin123
onvif ptz ContinuousMove ProfileToken=Profile_1 Velocity='{"PanTilt": {"x": 0.1, "y": 0}}' -H 192.168.1.17 -P 8000 -u admin -p admin123
onvif devicemgmt GetDeviceInformation --host 192.168.1.17 --port 8000 --username admin --password admin123 --output device_info.json
onvif media GetProfiles -H 192.168.1.17 -P 8000 -u admin -p admin123 -o profiles.xml
4. ONVIF Product Search
The CLI includes a built-in database of ONVIF-compatible products that can be searched to help identify and research devices before connecting (applied at >=v0.2.0).
Basic Search:
onvif --search "C210"
onvif -s "axis camera"
onvif --search "hikvision"
onvif -s "dahua"
onvif --search "ptz"
onvif -s "thermal"
Paginated Results:
onvif --search "hikvision" --page 2 --per-page 5
onvif -s "axis" --page 1 --per-page 10
onvif --search "camera" --per-page 20
Search Database Information:
The product database contains comprehensive information about tested ONVIF devices:
| ID | Unique product identifier |
| Test Date | When the device was last tested/verified |
| Model | Device model name and number |
| Firmware | Tested firmware version |
| Profiles | Supported ONVIF profiles (S, G, T, C, A, etc.) |
| Category | Device type (Camera, NVR, etc.) |
| Type | Specific device classification |
| Company | Manufacturer name |
Example Output:
Found 15 product(s) matching: hikvision
Showing 1-10 of 15 results

ID  | Test Date           | Model             | Firmware | Profiles | Category | Type    | Company
----|---------------------|-------------------|----------|----------|----------|---------|---------
342 | 2024-08-15 17:53:12 | DS-2CD2143G2-IU   | V5.7.3   | S,G,T    | Camera   | device  | Hikvision
341 | 2024-08-14 14:22:05 | DS-2DE2A404IW-DE3 | V5.6.15  | S,G,T    | Camera   | device  | Hikvision
...

Page 1 of 2
Navigation: Next: --page 2
CLI Parameters
All ONVIFClient parameters (like --timeout, --https, --cache, etc.) are available as command-line arguments. Use onvif --help to see all available options.
ONVIFClient Parameters
The ONVIFClient class provides various configuration options to customize the connection behavior, caching strategy, security settings, and debugging capabilities. Below is a detailed description of all available parameters:
Basic Parameters
host | str | ✅ Yes | - | IP address or hostname of the ONVIF device (e.g., "192.168.1.17") |
port | int | ✅ Yes | - | Port number for ONVIF service (common ports: 80, 8000, 8080) |
username | str | ✅ Yes | - | Username for device authentication (use digest authentication) |
password | str | ✅ Yes | - | Password for device authentication |
Connection Parameters
timeout | int | ❌ No | 10 | Connection timeout in seconds for SOAP requests |
use_https | bool | ❌ No | False | Use HTTPS instead of HTTP for secure communication |
verify_ssl | bool | ❌ No | True | Verify SSL certificates when using HTTPS (set to False for self-signed certificates) |
Caching Parameters
cache | CacheMode | ❌ No | CacheMode.ALL | WSDL caching strategy (see Cache Modes below) |
Feature Parameters
apply_patch | bool | ❌ No | True | Enable zeep patching for better xsd:any field parsing and automatic flattening, applied at (>=v0.0.4) |
capture_xml | bool | ❌ No | False | Enable XML capture plugin for debugging SOAP requests/responses, applied at (>=v0.0.6) |
wsdl_dir | str | ❌ No | None | Custom WSDL directory path for using external WSDL files instead of built-in ones (e.g., /path/to/custom/wsdl), applied at (>=v0.1.0) |
Cache Modes
The library provides four caching strategies via the CacheMode enum:
CacheMode.ALL | In-memory + disk cache (SQLite) | Production servers, multi-device apps | Fast | High | High |
CacheMode.DB | Disk cache only (SQLite) | Batch jobs, CLI tools | Medium | Medium | Low |
CacheMode.MEM | In-memory cache only | Short-lived scripts, demos | Medium | None | Medium |
CacheMode.NONE | No caching | Testing, debugging | Slow | None | Low |
Recommendation: Use CacheMode.ALL (default) for production applications to maximize performance.
Usage Examples
Basic Connection:
from onvif import ONVIFClient
client = ONVIFClient("192.168.1.17", 80, "admin", "password")
Secure Connection (HTTPS):
from onvif import ONVIFClient
client = ONVIFClient(
"your-cctv-node.viewplexus.com",
443,
"admin",
"password",
timeout=30,
use_https=True
)
Performance Optimized (Memory Cache):
from onvif import ONVIFClient, CacheMode
client = ONVIFClient(
"192.168.1.17",
80,
"admin",
"password",
cache=CacheMode.MEM
)
No Caching and No Zeep Patching (Testing):
from onvif import ONVIFClient, CacheMode
client = ONVIFClient(
"192.168.1.17",
80,
"admin",
"password",
cache=CacheMode.NONE,
apply_patch=False
)
Debugging Mode (XML Capture):
from onvif import ONVIFClient
client = ONVIFClient(
"192.168.1.17",
80,
"admin",
"password",
capture_xml=True
)
device = client.devicemgmt()
info = device.GetDeviceInformation()
services = device.GetCapabilities()
if client.xml_plugin:
print("Last Request XML:")
print(client.xml_plugin.last_sent_xml)
print("\nLast Response XML:")
print(client.xml_plugin.last_received_xml)
print(f"\nLast Operation: {client.xml_plugin.last_operation}")
print(f"\nTotal captured operations: {len(client.xml_plugin.history)}")
for item in client.xml_plugin.history:
print(f" - {item['operation']} ({item['type']})")
client.xml_plugin.save_to_file(
request_file="last_request.xml",
response_file="last_response.xml"
)
client.xml_plugin.clear_history()
XML Capture Plugin Methods:
last_sent_xml - Get the last SOAP request XMLlast_received_xml - Get the last SOAP response XMLlast_operation - Get the name of the last operationhistory - List of all captured requests/responses with metadataget_last_request() - Method to get last requestget_last_response() - Method to get last responseget_history() - Method to get all historysave_to_file(request_file, response_file) - Save XML to filesclear_history() - Clear captured history
Custom WSDL Directory:
from onvif import ONVIFClient
client = ONVIFClient(
"192.168.1.17",
80,
"admin",
"password",
wsdl_dir="/path/to/custom/wsdl"
)
device = client.devicemgmt()
media = client.media()
ptz = client.ptz()
Production Configuration
from onvif import ONVIFClient, CacheMode
client = ONVIFClient(
host="your-cctv-node.viewplexus.com",
port=443,
username="admin",
password="secure_password",
timeout=15,
cache=CacheMode.ALL,
use_https=True,
verify_ssl=True,
apply_patch=True,
capture_xml=False,
wsdl_dir=None
)
Notes
- Authentication: This library uses WS-UsernameToken with Digest authentication by default, which is the standard for ONVIF devices.
- Patching: The
apply_patch=True (default) enables custom zeep patching that improves xsd:any field parsing. This is recommended for better compatibility with ONVIF responses.
- XML Capture: Only use
capture_xml=True during development/debugging as it increases memory usage and may expose sensitive data in logs.
- Custom WSDL: Use
wsdl_dir parameter to specify a custom directory containing WSDL files. The directory should have a flat structure with WSDL files directly in the root (e.g., /path/to/custom/wsdl/devicemgmt.wsdl, /path/to/custom/wsdl/media.wsdl, etc.).
- Cache Location: Disk cache (when using
CacheMode.DB or CacheMode.ALL) is stored in ~/.onvif-python/onvif_zeep_cache.sqlite.
Service Discovery: Understanding Device Capabilities
[!WARNING]
Before performing any operations on an ONVIF device, it is highly recommended to discover which services are available and supported by the device. This library automatically performs comprehensive service discovery during initialization using a robust fallback mechanism.
Why discover device services?
- Device Diversity: Not all ONVIF devices support every service. Available services may vary by manufacturer, model, firmware, or configuration.
- Error Prevention: Attempting to use unsupported services can result in failed requests, exceptions, or undefined behavior.
- Dynamic Feature Detection: Devices may enable or disable services over time (e.g., after firmware updates or configuration changes).
- Optimized Integration: By checking available services, your application can adapt its workflow and UI to match the device's actual features.
How service discovery works in this library:
The ONVIFClient uses a 3-tier discovery approach to maximize device compatibility:
- GetServices (Preferred) - Tries
GetServices first for detailed service information
- GetCapabilities (Fallback) - Falls back to
GetCapabilities if GetServices is not supported
- Default URLs (Final Fallback) - Uses standard ONVIF URLs as last resort
from onvif import ONVIFClient
client = ONVIFClient("192.168.1.17", 8000, "admin", "admin123")
if client.services:
print("Service discovery: GetServices (preferred)")
print("Discovered services:", len(client.services))
print("Service map:", client._service_map)
elif client.capabilities:
print("Service discovery: GetCapabilities (fallback)")
print("Available capabilities:", client.capabilities)
else:
print("Service discovery: Using default URLs")
Why this approach?
- GetServices provides the most accurate and detailed service information, but it's optional in the ONVIF specification
- GetCapabilities is mandatory for all ONVIF-compliant devices, ensuring broader compatibility
- Default URLs guarantee basic connectivity even with non-compliant devices
[!TIP]
The library handles service discovery automatically with intelligent fallback. You typically don't need to call discovery methods manually unless you need detailed capability information or want to refresh the service list after device configuration changes.
Tested Devices
This library has been tested with a variety of ONVIF-compliant devices. For the latest and most complete list of devices that have been verified to work with this library, please refer to:
If your device is not listed right now, feel free to contribute your test results or feedback via Issues or Discussions at onvif-products-directory. Your contribution will be invaluable to the community and the public.
[!IMPORTANT]
Device testing contributions must be made with a real device and use the scripts provided in the onvif-products-directory repo. Please be sure to contribute using a device model not already listed.
Supported ONVIF Profiles
This library fully supports all major ONVIF Profiles listed below. Each profile represents a standardized set of features and use cases, ensuring interoperability between ONVIF-compliant devices and clients. You can use this library to integrate with devices and systems that implement any of these profiles.
ONVIF profiles list
| Profile_S | Document | Video streaming, PTZ, audio, multicasting | Network video transmitters (cameras) and receivers (recorders, VMS) | ✅ Yes |
| Profile_G | Document | Recording, search, replay, video storage | Video recorders, storage devices | ✅ Yes |
| Profile_T | Document | Advanced video streaming (H.265, analytics metadata, motion detection) | Modern cameras and clients | ✅ Yes |
| Profile_C | Document | Access control, door monitoring | Door controllers, access systems | ✅ Yes |
| Profile_A | Document | Advanced access control configuration, credential management | Access control clients and devices | ✅ Yes |
| Profile_D | Document | Access control peripherals (locks, sensors, relays) | Peripheral devices for access control | ✅ Yes |
| Profile_M | Document | Metadata, analytics events, object detection | Analytics devices, metadata clients | ✅ Yes |
For a full description of each profile and its features, visit ONVIF Profiles.
Implemented ONVIF Services
[!NOTE]
For details about the available service functions and methods already implemented in this library, see the source code in onvif/services/. Or if you want to read in a more proper format visit onvif-python AI Wiki.
Below is a list of ONVIF services implemented and supported by this library, along with links to the official specifications, service definitions, and schema files as referenced from the ONVIF Developer Specs. This table provides a quick overview of the available ONVIF features and their technical documentation for integration and development purposes.
ONVIF services list
Service Bindings in ONVIF
ONVIF services are defined by WSDL bindings. In this library, there are two main patterns:
1. Single Binding Services
Most ONVIF services use a single binding, mapping directly to one endpoint. These are accessed via simple client methods, and the binding/xAddr is always known from device capabilities.
Examples:
client.devicemgmt()
client.media()
client.ptz()
...
✅ These are considered fixed and always accessed directly.
2. Multi-Binding Services
Some ONVIF services have multiple bindings in the same WSDL. These typically include:
- A root binding (main entry point)
- One or more sub-bindings, discovered or created dynamically (e.g. after subscription/configuration creation)
Examples:
-
Events
- Root:
EventBinding
- Sub-bindings:
PullPointSubscriptionBinding (created via CreatePullPointSubscription)SubscriptionManagerBinding (manages existing subscriptions)NotificationProducerBinding
Usage in library:
client.events()
client.pullpoint(subscription)
client.subscription(subscription)
client.notification()
-
Security (Advanced Security)
- Root:
AdvancedSecurityServiceBinding
- Sub-bindings:
JWTBindingAuthorizationServerBindingKeystoreBindingDot1XBindingTLSServerBindingMediaSigningBinding
Usage in library:
client.security()
client.jwt()
client.authorizationserver(xaddr)
client.keystore(xaddr)
client.dot1x(xaddr)
client.tlsserver(xaddr)
client.mediasigning(xaddr)
-
Analytics
- Root:
AnalyticsEngineBinding
- Sub-bindings:
Usage in library:
client.analytics()
client.ruleengine()
Summary
- Single binding services: Always accessed directly (e.g.
client.media()).
- Multi-binding services: Have a root + sub-binding(s). Root is fixed; sub-bindings may require dynamic creation or explicit xAddr (e.g.
client.pullpoint(subscription), client.authorizationserver(xaddr)).
Future Improvements (Stay tuned and star ⭐ this repo)
Related Projects
-
onvif-products-directory:
This project is a comprehensive ONVIF data aggregation and management suite, designed to help developers explore, analyze, and process ONVIF-compliant product information from hundreds of manufacturers worldwide.
-
(soon) onvif-rest-server:
A RESTful API server for ONVIF devices, enabling easy integration of ONVIF device management, media streaming, and other capabilities into web applications and services.
-
(soon) onvif-mcp:
A Model Context Protocol (MCP) server for ONVIF, providing a unified API and context-based integration for ONVIF devices, clients, and services. It enables advanced automation, orchestration, and interoperability across ONVIF-compliant devices and clients.
References
Legal Notice
This project is an independent open-source implementation of the ONVIF specifications. It is not affiliated with, endorsed by, or sponsored by ONVIF or its member companies.
- The name “ONVIF” and the ONVIF logo are registered trademarks of the ONVIF organization.
- Any references to ONVIF within this project are made strictly for the purpose of describing interoperability with ONVIF-compliant devices and services.
- Use of the ONVIF trademark in this repository is solely nominative and does not imply any partnership, certification, or official status.
- This project includes WSDL/XSD/HTML files from the official ONVIF specifications.
- These files are © ONVIF and are redistributed here for interoperability purposes.
- The WSDL files in the
wsdl/ folder are distributed under the ONVIF Contributor License Agreement and Apache License 2.0. See LICENSE.md for details.
- All rights to the ONVIF specifications are reserved by ONVIF.
If you require certified ONVIF-compliant devices or clients, please refer to the official ONVIF conformant product list. For authoritative reference and the latest official ONVIF specifications, please consult the ONVIF Official Specifications.
License
This project is licensed under the MIT License. See LICENSE for details.


