
Security News
The Code You Didn't Write Is Still Yours to Defend
AI agents are pulling packages into environments no scanner is watching, creating exposure before security teams can see it.
By Brad Arkin - Jun 23, 2026
@alivepush/react-native-xg
Advanced tools
react-native-xg封装了信鸽的推送API,集成了ios,android(包括华为,小米,魅族)的推送功能.
com.tencent.xinge:xinge:3.2.4-beta,对应的版本号可以在android/build.gradle中查看


$ npm install @alivepush/react-native-xg --save
$ react-native link @alivepush/react-native-xg
Libraries ➜ Add Files to [your project's name]node_modules ➜ react-native-xg and add RNReactNativeXg.xcodeprojlibRNReactNativeXg.a to your project's Build Phases ➜ Link Binary With LibrariesCmd+R)<android/app/src/main/java/[...]/MainActivity.javaimport com.alivepush.xg.RNReactNativeXgPackage; to the imports at the top of the filenew RNReactNativeXgPackage() to the list returned by the getPackages() methodandroid/settings.gradle:
include ':react-native-xg'
project(':react-native-xg').projectDir = new File(rootProject.projectDir, 	'../node_modules/react-native-xg/android')
android/app/build.gradle:
compile project(':react-native-xg')
修改build.gradle配置文件
android {
    defaultConfig {
        manifestPlaceholders = [
            //可选填,可以通过代码进行设置
            XG_ACCESS_ID : "",
            //可选填,可以通过代码进行设置
            XG_ACCESS_KEY: "",
            //可选填,如果需要使用华为推送就必须填写
            HW_APPID     : "",
            //可选填,如果需要使用小米推送就必须填写
            PACKAGE_NAME : ""
        ]
    }
}
import React,{Component} from "react"
import {View} from "react-native"
import xg from '@alivepush/react-native-xg'

class App extends Component{
    render(){
        //do something
    }
    componentDidMount(){
        /*
          默认开启第三方推送服务
          如果accessid和accesskey已经配置过了,可以直接传递null
          如:

          xg.register("miAppId","miAppKey","mzAppId","mzAppKey",null,null,debug,(token,code)=>{
              console.log(`code=${code},token=${token}`);
          })

        */
        xg.register("miAppId","miAppKey","mzAppId","mzAppKey","access_id","access_key",debug,(token,code)=>{
            console.log(`code=${code},token=${token}`);
        })
    }
}
import React,{Component} from "react"
import {View} from "react-native"
import xg from '@alivepush/react-native-xg'

class App extends Component{
    render(){
        //do something
    }
    componentDidMount(){

        //开启日志
        //PS:当发布到生产环境时最好不要开启日志
        //这里其实可以根据环境变量来确定是否开启日志
        //xg.enableDebug(process.env.NODE_ENV==="development");
        xg.enableDebug(true);

        //设置access id
        xg.setAccessId("ACCESS_ID");

        //设置access key
        xg.setAccessKey("ACCESS_KEY");

        //如果需要监听注册的回调有两种方式
        //第一种:xg.addListener("registerresult",()=>{})
        //第二种:xg.registerPush(()=>{});
        //这里我们使用第一种
        const listener=xg.addListener("registerresult",(...args)=>{
            listener.remove();
            console.log("注册结果",args);
        })

        //开始注册
        xg.registerPush();

        //如果我们是点击通知栏触发的app启动需要监听`fetchLastClickMessage`
        xg.fetchLastClickMessage(message=>{
            //可以处理通知栏过来的消息
        });
    }
}
FAQs
react-native-xg封装了信鸽的推送API,集成了ios,android(包括华为,小米,魅族)的推送功能.
We found that @alivepush/react-native-xg demonstrated a not healthy version release cadence and project activity because the last version was released a year ago. It has 1 open source maintainer collaborating on the project.
Did you know?

Socket for GitHub automatically highlights issues in each pull request and monitors the health of all your open source dependencies. Discover the contents of your packages and block harmful activity before you install or update your dependencies.
Security News
AI agents are pulling packages into environments no scanner is watching, creating exposure before security teams can see it.

Security News
GitHub Actions checkout now blocks risky pull_request_target checkouts by default to help prevent pwn request supply chain attacks.
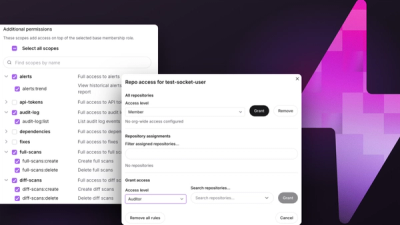
Product
Socket now supports Custom Roles and Repository Access Permissions so organizations can control who can access specific repositories and actions.