
Security News
Federal Audit Finds NIST Wasted Funds With No Plan to Clear NVD Backlog
Federal audit finds NIST lacked a plan to clear the NVD backlog, wasted funds on duplicate work, and delayed use of CISA data.
By Sarah Gooding - Jun 03, 2026
@appifex/provision
Advanced tools
App store provisioning and submission:
xcrun altool --upload-package@googleapis/androidpublisherYou need an Apple Developer Program membership ($99/year).
Go to developer.apple.com/account/resources/identifiers:
com.yourcompany.myapp)Go to appstoreconnect.apple.com → Apps → + → New App:
appstoreconnect.apple.com/apps/123456789/...In App Store Connect → your app → TestFlight tab:
Internal Testers)Go to App Store Connect → Users and Access → Integrations → App Store Connect API:
.p8 file (you can only download it once!).p8 file somewhere safe (e.g. ~/.appstoreconnect/AuthKey_XXXX.p8)chmod 600 /path/to/AuthKey.p8xcode-select --install # provides xcrun altool
xcrun altool --version # verify availability
The TestFlight upload pipeline uses xcrun altool --upload-package (ships with Xcode)
plus the App Store Connect REST API — no community asc CLI required.
Run dtc setup and answer Yes to "Configure Apple TestFlight?":
◆  Configure Apple TestFlight?
│  Yes
│
◆  Apple Team ID
│  A1B2C3D4E5
│
◆  Bundle ID
│  com.example.petapp
│
◆  App Store Connect App ID (numeric)
│  123456789
│
◆  App Store Connect Key ID
│  ABC123DEF4
│
◆  App Store Connect Issuer ID
│  12345678-abcd-efgh-ijkl-123456789012
│
◆  Path to .p8 key file
│  ~/.appstoreconnect/AuthKey_ABC123DEF4.p8
This saves credentials to ~/.dtc/config.json under the apple key.
# Archive a project and submit to TestFlight (full flow)
dtc provision submit --project ./my-app

# Archive with a specific scheme
dtc provision submit --project ./my-app --scheme PetApp

# Submit a pre-built .ipa directly (skip archive)
dtc provision submit --ipa ./build/PetApp.ipa
When Apple TestFlight is configured and all tests pass, the pipeline automatically archives and submits to TestFlight as the final step (SwiftUI projects only):
dtc run --prompt "Pet adoption app" --platform swiftui --out ./pet-app
# Pipeline: design → spec → tests → codegen → build → validate → fix → report → deliver → provision
The dtc_provision_submit MCP tool is available in Claude Code:
dtc_provision_submit({ projectDir: "/path/to/app" })                    # archive + submit
dtc_provision_submit({ projectDir: "/path/to/app", scheme: "PetApp" })  # with scheme
dtc_provision_submit({ ipaPath: "/path/to/App.ipa" })                   # pre-built IPA
import { runTestFlightUploadPhase } from '@appifex/provision'
import { runXcodeArchivePhase } from '@appifex/build'
import { createRunner } from '@appifex/runner'
import { ProgressEmitter, loadConfig } from '@appifex/core'

const config = await loadConfig('~/.dtc')
const runner = createRunner(config.runner, { cwd: './my-app' })
const emitter = new ProgressEmitter()

// Archive (reads package.json version, computes next build number via ASC REST)
const archive = await runXcodeArchivePhase({
  runner,
  config,
  projectDir: './my-app',
  scheme: 'PetApp',
})
if (archive.skipped) {
  console.log('Archive skipped:', archive.reason)
  process.exit(0)
}

// Upload + assign to internal TestFlight group
const result = await runTestFlightUploadPhase({
  runner,
  config,
  emitter,
  ipaPath: archive.ipaPath,
  buildNumber: archive.buildNumber,
  marketingVersion: archive.marketingVersion,
})
console.log(result.status, (result as any).buildId)
Register at Google Play Console ($25 one-time fee). Create your app listing.
play-console-uploader)~/.config/gcloud/play-console-key.json)keytool -genkey -v -keystore release.keystore -alias release \
-keyalg RSA -keysize 2048 -validity 10000
The Play Console API requires at least one manual upload before API uploads work. Upload your first AAB manually via Play Console → Internal Testing → Create new release.
Run dtc setup and answer Yes to "Configure Google Play Console?":
◆  Configure Google Play Console?
│  Yes
│
◆  Service account JSON key path
│  ~/.config/gcloud/play-console-key.json
│
◆  Package name (application ID)
│  com.example.petapp
│
◆  Release keystore path (.jks)
│  ~/.android/release.keystore
│
◆  Keystore password
│  [hidden]
│
◆  Key alias
│  release
│
◆  Key password
│  [hidden]
│
◆  Play Console track
│  Internal Testing
This saves credentials to ~/.dtc/config.json under the android key.
# Build AAB and submit to Play Console (auto-detects Android from project)
dtc provision submit --project ./my-app

# Submit a pre-built .aab directly (skip build)
dtc provision submit --aab ./app/build/outputs/bundle/release/app-release.aab
The CLI auto-detects the platform from the project directory (build.gradle.kts → Android, otherwise iOS).
When Google Play Console is configured and all tests pass, the pipeline automatically builds a release AAB and submits to the configured Play Console track:
dtc run --prompt "Pet adoption app" --platform kotlin-compose --out ./pet-app
# Pipeline: design → spec → tests → codegen → build → validate → fix → report → deliver → provision
The dtc_provision_submit MCP tool auto-detects the platform:
dtc_provision_submit({ projectDir: "/path/to/app" })                        # auto-detect + submit
dtc_provision_submit({ projectDir: "/path/to/app", platform: "android" })   # explicit Android
dtc_provision_submit({ aabPath: "/path/to/app.aab" })                       # pre-built AAB
import { PlayConsoleClient } from '@appifex/provision'
import { bundleKotlin } from '@appifex/build'
import { createRunner } from '@appifex/runner'

const runner = createRunner({ type: 'local' })

// Build release AAB
const bundle = await bundleKotlin(runner, {
  projectDir: './my-app',
  keystorePath: '~/.android/release.keystore',
  keystorePassword: 'mypass',
  keyAlias: 'release',
  keyPassword: 'keypass',
})

// Submit to Play Console
const client = new PlayConsoleClient({
  serviceAccountKeyPath: '~/.config/gcloud/play-console-key.json',
})
await client.submitToTrack({
  packageName: 'com.example.petapp',
  aabPath: bundle.aabPath!,
  track: 'internal',
})
FAQs
Apple ASC / Play Console provisioning client scaffolding
We found that @appifex/provision demonstrated a healthy version release cadence and project activity because the last version was released less than a year ago. It has 2 open source maintainers collaborating on the project.
Did you know?

Socket for GitHub automatically highlights issues in each pull request and monitors the health of all your open source dependencies. Discover the contents of your packages and block harmful activity before you install or update your dependencies.
Security News
Federal audit finds NIST lacked a plan to clear the NVD backlog, wasted funds on duplicate work, and delayed use of CISA data.
Research
/Security News
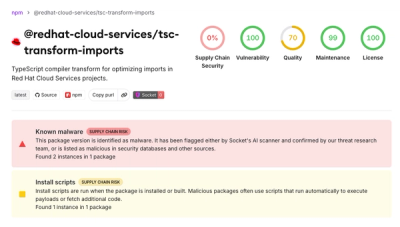
A mini Shai-Hulud campaign compromised Red Hat Cloud Services npm packages to steal developer and CI/CD secrets during installation.
Research
/Security News
The North Korean malware loader hides in a Packagist-listed package and its GitHub branch to fetch and execute remote code in a likely Contagious Interview-style lure.