Guard
Authing 是一个企业级身份认证提供商,其集成了 OAuth、LDAP、OIDC 等多种身份认证和授权解决方案。
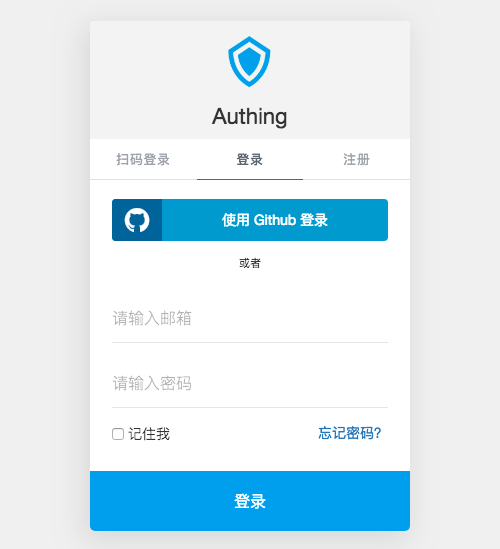
Guard 套件是 Authing 提供的浏览器端单点登录解决方案,开发者可基于此框架在浏览器端实现单点登录的页面及逻辑。
Guard 提供的表单拥有以下基本功能:
- 邮箱密码登录注册
- 手机验证码登录
- 用户名密码登录
- 忘记密码以及重置密码
- 记住账号功能(加密信息存储到浏览器本地)
- 社会化登录(微信、Github)
- 小程序扫码登录
- 响应式特性
- SSO(支持 SAML、LDAP、OIDC)
点击体验 或 在 jsfiddle 上尝试。
安装
通过 CDN 安装
<script src="https://cdn.jsdelivr.net/npm/@authing/guard@0.2.1/dist/Guard.umd.min.js"></script>
通过 NPM 安装
$ npm install @authing/guard --save
接着你可以使用以下方式引入 Guard:
import Guard from '@authing/guard';
快速生成登录表单 UI
Guard 套件可以用于快速生成登录表单,这里以一个简单的 HTML 为例:
<!DOCTYPE html>
<html>
<head>
<meta charset="utf-8">
<meta http-equiv="X-UA-Compatible" content="IE=edge">
<title>Guard Example</title>
<meta name="viewport" content="width=device-width, initial-scale=1">
<script src="https://fe-static.authing.cn/vue.min.js"></script>
<script src="https://cdn.jsdelivr.net/npm/@authing/guard/dist/Guard.umd.min.js"></script>
</head>
<body>
<div id="my-form"></div>
<script>
const clientId = "5cc2a350e056c76eea71db8a";
const guard = new Guard(clientId, undefined, {
logo: "https://usercontents.authing.cn/client/logo@2.png",
title: "Authing",
mountId: "my-form",
qrcodeScanning: {
redirect: false,
}
});
guard.on("authenticated", data => {
console.log(data);
});
guard.on("register", data => {
console.log(data);
});
guard.on("scanned-success", data => {
console.log(data);
});
</script>
</body>
</html>
API
new Guard(appId, domain, options)
初始化一个新的 Guard 实例,需要传入你在 Authing 对应应用中的 appId 和域名信息。
- appId {String}: Authing SSO 类应用的 appId;
- domain {String}: Authing 中配置的 域名. 通常是 <appDomain>.authing.cn;
- options {Object}: 允许你自定义表单的 UI,相关参数请参考 自定义
示例
var appId = "YOUR_AUTHING_SSO_APPID";
var domain = "example.authing.cn";
var guard = new Guard(appId, domain, {
isSSO: true
});
guard.on('authenticated', (userInfo) => {
console.log('用户登录成功', userInfo);
});
guard.on('authenticated-error', (error) => {
console.log('用户登录失败', error);
})
如果你想获取其他事件,请参考这里。
authing 对象
如果你想获取 authing 对象以调用用户管理接口,请使用如下代码:
authenticated 事件是 Authing 对象初始化后的回调事件。
guard.on('authing-load', (authing) => {
console.log('Authing 实例初始化成功', authing);
});
show(mountId)
显示登录表单,同时允许覆盖初始化时的配置。
- mountId {String}: 指定 Guard 将在何处显示,接受一个 html 元素 id,不含 # 号,不指定则直接生成在网页中间。
示例
guard.show();
guard.show('mountId');
hide()
隐藏表单
示例
guard.hide();
on(event, callback)
Guard 会在以下生命周期中触发相应事件:
| 事件名称 | 事件说明 | 事件参数 | 事件参数说明 |
|---|
| authing-load | Authing Client ID 验证通过,加载完成 | authing | authing 对象,可直接操作 login,register等方法 |
| authing-unload | Authing Client ID 验证失败 | error | 错误信息 |
| social-load | 社会化登录列表加载完成 | oauthList | 完整的 OAuth 列表,若用户未在后台配置过则为空 |
| social-unload | 社会化登录列表加载失败 | error | 错误信息 |
| login/authenticated | 用户登录成功 | user | 用户数据 |
| login-error/authenticated-error | 用户登录失败 | error | 错误信息,包含字段缺失/非法或服务器错误等信息 |
| register | 用户注册成功 | user | 用户数据 |
| register-error | 用户注册失败 | error | 错误信息,包含字段缺失/非法或服务器错误等信息 |
| email-sent | 忘记密码邮件发送成功 | data | 发送的结果 |
| email-sent-error | 忘记密码邮件发送失败 | error | 错误信息 |
| reset-password | 重置密码成功 | data | 重置密码结果 |
| reset-password-error | 重置密码失败 | error | 错误信息 |
| scanned-success | 扫码登录成功 | user | 用户数据 |
| scanned-error | 扫码登录失败 | error | 错误信息 |
| scanning-interval-starting | 开始监听扫码事件 | interval | 用户可使用 clearInterval 停止监听 |
| form-closed | Login Form 关闭事件 | null | 用户按下 ESC 或点击右上方的关闭按钮后会触发此事件 |
自定义
UI 定制
以下是完整的参数列表:
| 参数名称 | 是否必填 | 默认值 | 类型 | 参数说明 | 回调参数 |
|---|
| clientId | clientId 与 appId 二选一 | 无 | String | 用户池 ID | - |
| appId | clientId 与 appId 二选一 | 无 | String | - | |
| domain | 否 | 无 | String | SSO 类应用云上域名 | - |
| protocol | 否 | oauth | String | SSO 应用类型,可选值为 oauth、oidc、saml | - |
| mountId | 否 | 无 | String | 指定 Authing form 将在何处显示,接受一个 html 元素 id,不含#号。不指定则默认全屏弹出 Modal 登录框 | - |
| title | 否 | Authing | String | 产品名称 | - |
| logo | 否 | [Authing LOGO] | String | 产品logo,默认为 Authing 的官方 Logo | - |
| forceLogin | 否 | false | Boolean | 是否将注册和登录合并,合并后如果用户不存在将自动注册 | - |
| hideQRCode | 否 | false | Boolean | 是否隐藏小程序扫码登录,在开发者在 Authing 控制台开启小程序扫码登录后,若此项为 true 将不显示小程序扫码登录 | - |
| hideUP | 否 | false | Boolean | 是否隐藏用户名-密码登陆,隐藏后将不显示用户名-密码登录框 | - |
| hideUsername | 否 | false | Boolean | 是否隐藏注册时的用户名填写,隐藏后将不显示用户名输入框 | - |
| hideRegister | 否 | false | Boolean | 是否隐藏注册框,隐藏后将不显示注册框 | |
| hideSocial | 否 | false | Boolean | 是否隐藏社会化登录,在开发者在 Authing 控制台开启社会化登录后,若此项为 true 将隐藏全部社会化登录 | - |
| hideClose | 否 | false | Boolean | 是否隐藏登录框右上角的关闭按钮,如果隐藏,用户将不能通过点击按钮或按 ESC 关闭登录框 | - |
| placeholder | 否 | {} | Object | 定制输入框的 paceholder | - |
| placeholder.username | 否 | 请输入用户名 | String | 定制输入框的 paceholder | - |
| placeholder.email | 否 | 请输入邮箱 | String | 用户名输入框的 paceholder | - |
| placeholder.password | 否 | 请输入密码 | String | 邮箱输入框的 paceholder | - |
| placeholder.confirmPassword | 否 | 请确认密码 | String | 密码输入框的 paceholder | - |
| placeholder.verfiyCode | 否 | 请输入验证码 | String | 验证码输入框的 paceholder | - |
| placeholder.newPassword | 否 | 请输入新密码 | String | 新密码输入框的 paceholder | - |
| placeholder.phone | 否 | 请输入手机号 | String | 手机号输入框的 paceholder | - |
| placeholder.phoneCode | 否 | 4 位验证码 | String | 手机验证码输入框的 paceholder | - |
| qrcodeScanning | 否 | {} | Object | 小程序扫码登录的配置项 | - |
| qrcodeScanning.redirect | 否 | true | Boolean | 是否执行跳转(在用户后台配置的URL),若值为false,用户数据会通过 onSuccess 回调函数返回 | - |
| qrcodeScanning.interval | 否 | 1500 | Number | 每隔多少秒检查一次是否扫码,默认1500 | - |
| qrcodeScanning.tips | 否 | 使用 微信 或小程序 身份管家 扫码登录 | String | 提示信息,可写HTML | - |
| host | 否 | {} | Object | 小程序扫码登录的配置项 | - |
| host.user | 否 | [Authing 官方链接] | String | GraphQL 链接,默认 Authing 官方链接,此处用于私有部署 Authing 的用户使用 | - |
| host.oauth | 否 | [Authing 官方链接] | String | GraphQL 链接,默认 Authing 官方链接,此处用于私有部署 Authing 的用户使用 | - |
| SSOHost | 否 | https://sso.authing.cn | SSO 类应用的通讯地址,默认 Authing 官方链接,此处用于私有部署 Authing 的用户使用 | - | |
| isSSO | 否 | false | Boolean | 用于标识当前是否为 SSO 模式,如果只是想简单生成登录表单,使用默认 false 即可 | - |
| nonce | 否 | [Random] | Number | 随机数,用于防范网络攻击 | - |
| timpstamp | 否 | 当前时间戳 | Number | 初始化时的时间戳,用于防范网络攻击 | - |
浏览器兼容性
兼容 Chrome、Safari、Firefox 和 Edge。
问题报告
如果你遇到问题,请打开 Issue 提出问题。
开发者信息
Authing
License
This project is licensed under the MIT license. See the LICENSE file for more info.