Product
Introducing Reports: An Extensible Reporting Framework for Socket Data
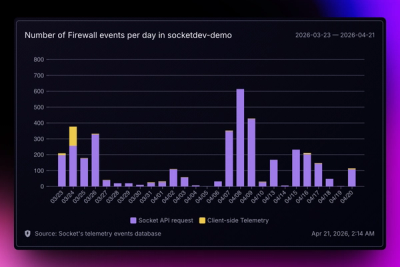
Explore exportable charts for vulnerabilities, dependencies, and usage with Reports, Socket’s new extensible reporting framework.
By André Staltz - Apr 21, 2026
@effect/vitest
Advanced tools
Welcome to your guide on testing Effect-based applications using vitest and the @effect/vitest package. This package simplifies running tests for Effect-based code with Vitest.
In this guide, we'll walk you through setting up the necessary dependencies and provide examples of how to write Effect-based tests using @effect/vitest.
First, ensure you have vitest installed (version 1.6.0 or later).
pnpm add -D vitest
Next, install the @effect/vitest package, which integrates Effect with Vitest.
pnpm add -D @effect/vitest
The main entry point is the following import:
import { it } from "@effect/vitest"
This import enhances the standard it function from vitest with several powerful features, including:
| Feature | Description |
|---|---|
it.effect | Automatically injects a TestContext (e.g., TestClock) when running a test. |
it.live | Runs the test with the live Effect environment. |
it.scoped | Allows running an Effect program that requires a Scope. |
it.scopedLive | Combines the features of scoped and live, using a live Effect environment that requires a Scope. |
it.flakyTest | Facilitates the execution of tests that might occasionally fail. |
it.effectHere's how to use it.effect to write your tests:
Syntax
import { it } from "@effect/vitest"

it.effect("test name", () => EffectContainingAssertions, timeout: number | TestOptions = 5_000)
it.effect automatically provides a TestContext, allowing access to services like TestClock.
To write a test, place your assertions directly within the main effect. This ensures that your assertions are evaluated as part of the test's execution.
Example (Testing a Successful Operation)
In the following example, we test a function that divides two numbers, but fails if the divisor is zero. The goal is to check that the function returns the correct result when given valid input.
import { it, expect } from "@effect/vitest"
import { Effect } from "effect"

// A simple divide function that returns an Effect, failing when dividing by zero
function divide(a: number, b: number) {
  if (b === 0) return Effect.fail("Cannot divide by zero")
  return Effect.succeed(a / b)
}

// Testing a successful division
it.effect("test success", () =>
  Effect.gen(function* () {
    const result = yield* divide(4, 2) // Expect 4 divided by 2 to succeed
    expect(result).toBe(2) // Assert that the result is 2
  })
)
ExitWhen you need to handle both success and failure cases in a test, you can use Effect.exit to capture the outcome as an Exit object. This allows you to verify both successful and failed results within the same test structure.
Example (Testing Success and Failure with Exit)
import { it, expect } from "@effect/vitest"
import { Effect, Exit } from "effect"

// A function that divides two numbers and returns an Effect.
// It fails if the divisor is zero.
function divide(a: number, b: number) {
  if (b === 0) return Effect.fail("Cannot divide by zero")
  return Effect.succeed(a / b)
}

// Test case for a successful division, using `Effect.exit` to capture the result
it.effect("test success as Exit", () =>
  Effect.gen(function* () {
    const result = yield* Effect.exit(divide(4, 2)) // Capture the result as an Exit
    expect(result).toStrictEqual(Exit.succeed(2)) // Expect success with the value 2
  })
)

// Test case for a failure (division by zero), using `Effect.exit`
it.effect("test failure as Exit", () =>
  Effect.gen(function* () {
    const result = yield* Effect.exit(divide(4, 0)) // Capture the result as an Exit
    expect(result).toStrictEqual(Exit.fail("Cannot divide by zero")) // Expect failure with the correct message
  })
)
When writing tests with it.effect, a TestContext is automatically provided. This context gives access to various testing services, including the TestClock, which allows you to simulate the passage of time in your tests.
Note: If you want to use the real-time clock (instead of the simulated one), you can switch to it.live.
Example (Using TestClock and it.live)
Here are examples that demonstrate how you can work with time in your tests using it.effect and TestClock:
Using it.live to show the current time: This will display the actual system time, since it runs in the live environment.
Using it.effect without adjustments: By default, the TestClock starts at 0, simulating the beginning of time for your test without any time passing.
Using it.effect and adjusting time: In this test, we simulate the passage of time by advancing the clock by 1000 milliseconds (1 second).
import { it } from "@effect/vitest"
import { Clock, Effect, TestClock } from "effect"

// Effect to log the current time
const logNow = Effect.gen(function* () {
  const now = yield* Clock.currentTimeMillis // Fetch the current time from the clock
  console.log(now) // Log the current time
})

// Example of using the real system clock with `it.live`
it.live("runs the test with the live Effect environment", () =>
  Effect.gen(function* () {
    yield* logNow // Prints the actual current time
  })
)

// Example of using `it.effect` with the default test environment
it.effect("run the test with the test environment", () =>
  Effect.gen(function* () {
    yield* logNow // Prints 0, as the test clock starts at 0
  })
)

// Example of advancing the test clock by 1000 milliseconds
it.effect("run the test with the test environment and the time adjusted", () =>
  Effect.gen(function* () {
    yield* TestClock.adjust("1000 millis") // Move the clock forward by 1000 milliseconds
    yield* logNow // Prints 1000, reflecting the adjusted time
  })
)
If you need to temporarily disable a test but don't want to delete or comment out the code, you can use it.effect.skip. This is helpful when you're working on other parts of your test suite but want to keep the test for future execution.
Example (Skipping a Test)
import { it } from "@effect/vitest"
import { Effect, Exit } from "effect"
import { expect } from "@effect/vitest"

function divide(a: number, b: number) {
  if (b === 0) return Effect.fail("Cannot divide by zero")
  return Effect.succeed(a / b)
}

// Temporarily skip the test for dividing numbers
it.effect.skip("test failure as Exit", () =>
  Effect.gen(function* () {
    const result = yield* Effect.exit(divide(4, 0))
    expect(result).toStrictEqual(Exit.fail("Cannot divide by zero"))
  })
)
When you're developing or debugging, it's often useful to run a specific test without executing the entire test suite. You can achieve this by using it.effect.only, which will run just the selected test and ignore the others.
Example (Running a Single Test)
import { it } from "@effect/vitest"
import { Effect, Exit } from "effect"
import { expect } from "@effect/vitest"

function divide(a: number, b: number) {
  if (b === 0) return Effect.fail("Cannot divide by zero")
  return Effect.succeed(a / b)
}

// Run only this test, skipping all others
it.effect.only("test failure as Exit", () =>
  Effect.gen(function* () {
    const result = yield* Effect.exit(divide(4, 0))
    expect(result).toStrictEqual(Exit.fail("Cannot divide by zero"))
  })
)
When adding new failing tests, you might not be able to fix them right away. Instead of skipping them, you may want to assert it fails, so that when you fix them, you'll know and can re-enable them before it regresses.
Example (Asserting one test fails)
import { it } from "@effect/vitest"
import { Effect, Exit } from "effect"

function divide(a: number, b: number): number {
  if (b === 0) return Effect.fail("Cannot divide by zero")
  return Effect.succeed(a / b)
}

// Temporarily assert that the test for dividing by zero fails.
it.effect.fails("dividing by zero special cases", ({ expect }) =>
  Effect.gen(function* () {
    const result = yield* Effect.exit(divide(4, 0))
    expect(result).toStrictEqual(0)
  })
)
By default, it.effect suppresses log output, which can be useful for keeping test results clean. However, if you want to enable logging during tests, you can use it.live or provide a custom logger to control the output.
Example (Controlling Logging in Tests)
import { it } from "@effect/vitest"
import { Effect, Logger } from "effect"

// This test won't display the log message, as logging is suppressed by default in `it.effect`
it.effect("does not display a log", () =>
  Effect.gen(function* () {
    yield* Effect.log("it.effect") // Log won't be shown
  })
)

// This test will display the log because a custom logger is provided
it.effect("providing a logger displays a log", () =>
  Effect.gen(function* () {
    yield* Effect.log("it.effect with custom logger") // Log will be displayed
  }).pipe(
    Effect.provide(Logger.pretty) // Providing a pretty logger for log output
  )
)

// This test runs using `it.live`, which enables logging by default
it.live("it.live displays a log", () =>
  Effect.gen(function* () {
    yield* Effect.log("it.live") // Log will be displayed
  })
)
it.scopedThe it.scoped method is used for tests that involve Effect programs needing a Scope. A Scope ensures that any resources your test acquires are managed properly, meaning they will be released when the test completes. This helps prevent resource leaks and guarantees test isolation.
Example (Using it.scoped to Manage Resource Lifecycle)
import { it } from "@effect/vitest"
import { Console, Effect } from "effect"

// Simulating the acquisition and release of a resource with console logging
const acquire = Console.log("acquire resource")
const release = Console.log("release resource")

// Defining a resource that requires proper management
const resource = Effect.acquireRelease(acquire, () => release)

// Incorrect usage: This will result in a type error because it lacks a scope
it.effect("run with scope", () =>
  Effect.gen(function* () {
    yield* resource
  })
)

// Correct usage: Using 'it.scoped' to manage the scope correctly
it.scoped("run with scope", () =>
  Effect.gen(function* () {
    yield* resource
  })
)
it.flakyTestit.flakyTest is a utility designed to manage tests that may not succeed consistently on the first attempt. These tests, often referred to as "flaky," can fail due to factors like timing issues, external dependencies, or randomness. it.flakyTest allows for retrying these tests until they pass or a specified timeout is reached.
Example (Handling Flaky Tests with Retries)
Let's start by setting up a basic test scenario that has the potential to fail randomly:
import { it } from "@effect/vitest"
import { Effect, Random } from "effect"

// Simulating a flaky effect
const flaky = Effect.gen(function* () {
  const random = yield* Random.nextBoolean
  if (random) {
    return yield* Effect.fail("Failed due to randomness")
  }
})

// Standard test that may fail intermittently
it.effect("possibly failing test", () => flaky)
In this test, the outcome is random, so the test might fail depending on the result of Random.nextBoolean.
To handle this flakiness, we use it.flakyTest to retry the test until it passes, or until a defined timeout expires:
// Retrying the flaky test with a 5-second timeout
it.effect("retrying until success or timeout", () =>
  it.flakyTest(flaky, "5 seconds")
)
FAQs
A set of helpers for testing Effects with vitest
The npm package @effect/vitest receives a total of 451,122 weekly downloads. As such, @effect/vitest popularity was classified as popular.
We found that @effect/vitest demonstrated a healthy version release cadence and project activity because the last version was released less than a year ago. It has 3 open source maintainers collaborating on the project.
Did you know?

Socket for GitHub automatically highlights issues in each pull request and monitors the health of all your open source dependencies. Discover the contents of your packages and block harmful activity before you install or update your dependencies.
Product
Explore exportable charts for vulnerabilities, dependencies, and usage with Reports, Socket’s new extensible reporting framework.
Product
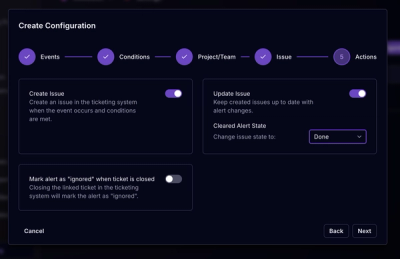
Socket for Jira lets teams turn alerts into Jira tickets with manual creation, automated ticketing rules, and two-way sync.

Company News
Socket won two 2026 Reppy Awards from RepVue, ranking in the top 5% of all sales orgs. AE Alexandra Lister shares what it's like to grow a sales career here.