Table of Contents
0.1. Lenddo React-Native Demo App
An android sample app to demonstrate react-native Lenddo data sdk that allows you to collect information in order for Lenddo to verify the user's information and enhance its scoring capabilities. And with implementation instruction for new react-native application. You can check the demo application from this link for more information regarding the implementaion stated below.
0.2. Pre-requisites
Before incorporating the React-Native Data SDK into your app, you should be provided with the following information:
Please ask for the information above from your Lenddo representative. If you have a dashboard account, these values can also be found there.
There may be also other partner specific values that you are required to set.
0.3. To run Sample App
- Update
index.android.bundle whenever you modify your code in App.js
react-native bundle --platform android --dev false --entry-file index.js --bundle-output android/app/src/main/assets/index.android.bundle --assets-dest android/app/src/main/res
Make sure an emulator is running or a device is connected
react-native run-android
react-native run-ios
0.3.1. Installing nodejs dependecies for Sample App
npm install @lenddo/react-native-sdk --save
npm install react-native-check-box --save
npm install react-native-material-textfield --save
npm install react-native-tab-view --save
npm install react-native-gesture-handler --save
0.4. Data SDK implementation instruction
0.4.1. Android
0.4.1.1. Adding Lenddo react-native-sdk into your react-native dependencies
npm install @lenddo/react-native-sdk --save
0.4.1.2. Gradle setup
- In
android/setting.gradle
...

include ':app', ':react-native-sdk'
project(':react-native-sdk').projectDir = new File(rootProject.projectDir, '../node_modules/@lenddo/react-native-sdk/android/app')
- In
android/app/build.gradle
...
dependencies {
    ...
    compile project(':react-native-sdk')
}
0.4.1.3. Required Permissions
React-Native Data Sdk will use information stored on the users' android phone. It is advisable for all permissions to be added to your app to enable LenddoData to extract the necessary information for verification and scoring. The optimal permissions are already defined for you in the Libraries’ AndroidManifest.xml and are automatically added to your app using gradle when you rebuild the app after adding our SDK.
Below is the list of required permissions.
    <uses-permission android:name="android.permission.INTERNET" />
    <uses-permission android:name="android.permission.ACCESS_NETWORK_STATE" />
    <uses-permission android:name="android.permission.READ_PHONE_STATE" />
    <uses-permission android:name="android.permission.READ_CONTACTS" />
    <uses-permission android:name="android.permission.READ_CALENDAR" />
    <uses-permission android:name="com.android.browser.permission.READ_HISTORY_BOOKMARKS" />
    <uses-permission android:name="android.permission.ACCESS_FINE_LOCATION" />
    <uses-permission android:name="android.permission.ACCESS_COARSE_LOCATION" />
    <uses-permission android:name="android.permission.RECEIVE_BOOT_COMPLETED" />
    <uses-permission android:name="android.permission.READ_EXTERNAL_STORAGE" />
If you do not want the all default permissions added, you manually have to remove permissions by editing the lenddosdk/src/main/AndroidManifest.xml and comment out permissions you do not wish to grant, however please note that the following permissions at the minimum are required for the operation of the SDK and should NOT be removed:
<uses-permission android:name="android.permission.INTERNET" />
<uses-permission android:name="android.permission.ACCESS_NETWORK_STATE" />
<uses-permission android:name="android.permission.READ_PHONE_STATE" />
It is also important that these permissions are consistent with the privacy policy of your app.
0.4.1.4. Required gradle declaration
In your app-level build.gradle file, it is a good practice to set/ use targetSdkVersion, compileSdkVersion and buildToolsVersion of api 26:
apply plugin: 'com.android.application'

android {
    compileSdkVersion 26
    buildToolsVersion "26.0.2"

    defaultConfig {
        applicationId "com.your.reverse.domain.sample-app"
        minSdkVersion 16
        targetSdkVersion 26
        versionCode 1
        versionName "1.0.0"
        multiDexEnabled true
        ndk {
            abiFilters "armeabi-v7a", "x86"
        }
    }
}
In your top-level build.gradle file, make sure to include kotlin dependency (It is required by the sdk).
buildscript {
    ext.kotlin_version = '1.2.10'
    repositories {
        google()
        jcenter()
        maven { url 'https://maven.google.com' }
    }
    dependencies {
        classpath 'com.android.tools.build:gradle:3.0.1'
        classpath 'com.google.gms:google-services:4.0.1'
        classpath "org.jetbrains.kotlin:kotlin-gradle-plugin:$kotlin_version"
        // NOTE: Do not place your application dependencies here; they belong
        // in the individual module build.gradle files
    }
}
0.4.1.5. Initializing React-Native Lenddo Data SDK
In your Application class initialize Lenddo core info as shown below (Lenddo React-Native Demo app).
package lenddo.com.lenddoconnect;
import com.lenddo.mobile.core.LenddoCoreInfo;
import com.lenddo.mobile.datasdk.AndroidData;
import com.lenddo.mobile.datasdk.models.ClientOptions;
public class MainApplication extends Application implements ReactApplication {
@Override
public void onCreate() {
super.onCreate();
LenddoCoreInfo.initCoreInfo(getApplicationContext());
ClientOptions clientOptions = new ClientOptions();
clientOptions.enableLogDisplay(true);
AndroidData.setup(getApplicationContext(), clientOptions);
}
}
0.4.1.6. Register native module in Application class in your android project
package lenddo.com.lenddoconnect;
import com.lenddo.mobile.data.RNDataSdkWrapperPackage;
public class MainApplication extends Application implements ReactApplication {
private final ReactNativeHost mReactNativeHost = new ReactNativeHost(this) {
@Override
public boolean getUseDeveloperSupport() {
return BuildConfig.DEBUG;
}
@Override
protected List<ReactPackage> getPackages() {
return Arrays.<ReactPackage>asList(
new MainReactPackage(),
new RNCollapsingToolbarPackage(),
new RNNestedScrollViewPackage(),
new RNDataSdkWrapperPackage()
);
}
@Override
protected String getJSMainModuleName() {
return "index";
}
};
@Override
public ReactNativeHost getReactNativeHost() {
return mReactNativeHost;
}
@Override
public void onCreate() {
super.onCreate();
SoLoader.init(this, false);
LenddoCoreInfo.initCoreInfo(getApplicationContext());
AndroidData.setup(getApplicationContext());
}
@Override
protected void attachBaseContext(Context base) {
super.attachBaseContext(base);
MultiDex.install(this);
}
}
0.4.1.7. Setting Partner Script Id
On your App.js, setup Partner Script Id dynamically via RNDataSdkWrapper's setPartnerScriptId method. And make sure to setup your Partner Script Id before calling RNDataSdkWrapper's startAndroidData method.
RNDataSdkWrapper.setPartnerScriptId(this.state.scoring.partnerScriptId);
0.4.1.8. Registering data gathering callback
On your App.js, setup Lenddo sdk with callback to capture response from gathering of data and sending data into our api. You should call RNDataSdkWrapper's setupWithCallback before startAndroidData. As shown in Lenddo React-Native Demo app.
import { RNDataSdkWrapper , RNClientOptions } from '@lenddo/react-native-sdk';
export default class RNDataSDKDemo extends PureComponent {
startAndroidData() {
RNDataSdkWrapper.setupWithCallback(
(result, logMsg, statusCode) => {console.log('result: ' + result);
console.log('logMsg: ' + logMsg);
console.log('statusCode: ' + statusCode);
this.setState({dataSendingCallback: logMsg});
RNDataSdkWrapper.statisticsEnabled(
(statisticsEnabled) => {
if(statisticsEnabled){
this.setState({startDataText : 'STOP&CLEAR DATA SDK'})
} else{
this.setState({startDataText: 'START LENDDO DATA SDK'})
}
});
});
RNDataSdkWrapper.startAndroidData(this.state.scoring.applicationId);
}
Other setup method available are setupWithClientOptions and the default setup method (please refer to the Lenddo React-Native Demo app)
Note whenever you desire to use setupWithClientOptions and setupWithCallback at the same time, make sure you call setupWithClientOptions first. And also to make sure to call setup methods just once.
0.4.1.8.1. Capturing callback via EventEmitter
You can also use EventEmitter for capturing datasdk callbacks, by just using React-Native Callback class it only captures: success, error and failed state, it does not include start state. Refer to the source code below.
componentWillMount() {
DeviceEventEmitter.addListener('onDataSendingStart',(params) => {
console.log("onDataSendingStart")
console.log(params)
if (params.method == 'registerDataSendingCompletionCallback') {
}
}
)
DeviceEventEmitter.addListener('onDataSendingSuccess',(params) => {
console.log("onDataSendingSuccess")
console.log(params)
}
)
DeviceEventEmitter.addListener('onDataSendingError',(params) => {
console.log("onDataSendingError")
console.log(params)
}
)
DeviceEventEmitter.addListener('onDataSendingFailed',(params) => {
console.log("onDataSendingFailed")
console.log(params)
}
)
}
0.5. Onboarding SDK implementation instruction
0.5.1. Android
0.5.1.1. Adding Lenddo react-native-sdk into your react-native dependencies
npm install @lenddo/react-native-sdk --save
0.5.1.2. Gradle setup
- In
android/setting.gradle
...

include ':app', ':react-native-sdk'
project(':react-native-sdk').projectDir = new File(rootProject.projectDir, '../node_modules/@lenddo/react-native-sdk/android/app')
- In
android/app/build.gradle
...
dependencies {
    ...
    compile project(':react-native-sdk')
}
0.5.1.3. Required Permissions
React-Native Onboarding Sdk will require internet access and an optional camera access that is required for only psychometics and assisted enable.
    <uses-permission android:name="android.permission.INTERNET" />
    <uses-permission android:name="android.permission.CAMERA" />
0.5.1.4. Required gradle declaration
In your app-level build.gradle file, it is a good practice to set/ use targetSdkVersion, compileSdkVersion and buildToolsVersion of api 26:
apply plugin: 'com.android.application'

android {
    compileSdkVersion 26
    buildToolsVersion "26.0.2"

    defaultConfig {
        applicationId "com.your.reverse.domain.sample-app"
        minSdkVersion 16
        targetSdkVersion 26
        versionCode 1
        versionName "1.0.0"
        multiDexEnabled true
        ndk {
            abiFilters "armeabi-v7a", "x86"
        }
    }
}
0.5.1.5. Initializing React-Native Lenddo Onboarding SDK
In your Application class initialize Lenddo core info as shown below (Lenddo React-Native Demo app).
package lenddo.com.lenddoconnect;
import com.lenddo.mobile.core.LenddoCoreInfo;
import com.lenddo.mobile.datasdk.AndroidData;
import com.lenddo.mobile.datasdk.models.ClientOptions;
public class MainApplication extends Application implements ReactApplication {
@Override
public void onCreate() {
super.onCreate();
LenddoCoreInfo.initCoreInfo(getApplicationContext());
AndroidData.setup(getApplicationContext());
}
}
0.5.1.6. Register native module in Application class in your android project
package lenddo.com.lenddoconnect;
import com.lenddo.mobile.onboarding.RNOnboardingSdkWrapperPackage;
public class MainApplication extends Application implements ReactApplication {
private final ReactNativeHost mReactNativeHost = new ReactNativeHost(this) {
@Override
public boolean getUseDeveloperSupport() {
return BuildConfig.DEBUG;
}
@Override
protected List<ReactPackage> getPackages() {
RNOnboardingSdkWrapperPackage rnOnboardingSdkWrapperPackage = new RNOnboardingSdkWrapperPackage();
return Arrays.<ReactPackage>asList(
new MainReactPackage(),
new RNCollapsingToolbarPackage(),
new RNNestedScrollViewPackage(),
rnOnboardingSdkWrapperPackage
);
}
@Override
protected String getJSMainModuleName() {
return "index";
}
};
@Override
public ReactNativeHost getReactNativeHost() {
return mReactNativeHost;
}
@Override
public void onCreate() {
super.onCreate();
SoLoader.init(this, false);
LenddoCoreInfo.initCoreInfo(getApplicationContext());
AndroidData.setup(getApplicationContext());
}
@Override
protected void attachBaseContext(Context base) {
super.attachBaseContext(base);
MultiDex.install(this);
}
}
0.5.1.7. Launching Lenddo Onboarding
On your App.js, call RNOnboardingSdkWrapper's startAuthorize method. But before calling the said method make sure you have setup necessary fields as state on the succeeding instructions.
RNOnboardingSdkWrapper.startAuthorize();
0.5.1.8. Setting Partner Script Id and other form data fields
On your App.js, setup Partner Script Id dynamically via RNOnboardingSdkWrapper's setPartnerScriptId method. And make sure to setup your Partner Script Id before calling RNOnboardingSdkWrapper's startAuthorize method.
import {Platform} from 'react-native';
import { RNOnboardingSdkWrapper, RNFormDataCollector} from '@lenddo/react-native-sdk';
RNFormDataCollector.refreshFormDataCollector()
RNFormDataCollector.setApplicationId(this.state.formData.applicationId)
RNFormDataCollector.setFirstName(this.state.formData.firstName)
RNFormDataCollector.setMiddleName(this.state.formData.middleName)
RNFormDataCollector.setLastName(this.state.formData.lastName)
RNOnboardingSdkWrapper.setPartnerScriptId(this.state.formData.partnerScriptId);
0.5.1.9. Registering onboarding callback
On your App.js, setup Lenddo onboarding sdk with callback to capture response from your startAuthorize call, by using RTCDeviceEventEmitter to capture onboarding progress and listen to WebView's backpress. As shown in Lenddo React-Native Demo app.
import { RNOnboardingSdkWrapper, RNFormDataCollector} from '@lenddo/react-native-sdk';
export default class RNDataSDKDemo extends PureComponent {
componentDidMount() {
BackHandler.addEventListener('hardwareBackPress', this.handleBackPress);
}
componentWillUnmount() {
BackHandler.removeEventListener('hardwareBackPress', this.handleBackPress);
}
componentWillMount() {
DeviceEventEmitter.addListener('onAuthorizeStarted',(params) => {
console.log("onAuthorizeStarted")
console.log(params)
}
)
DeviceEventEmitter.addListener('onAuthorizeComplete',(params) => {
console.log("onAuthorizeComplete")
console.log(params)
}
)
DeviceEventEmitter.addListener('onAuthorizeCanceled',(params) => {
console.log("onAuthorizeCanceled")
console.log(params)
}
)
DeviceEventEmitter.addListener('onAuthorizeError',(params) => {
console.log("onAuthorizeError")
console.log(params)
}
)
DeviceEventEmitter.addListener('onAuthorizeFailure',(params) => {
console.log("onAuthorizeFailure")
console.log(params)
}
)
}
handleBackPress = () => {
RNOnboardingSdkWrapper.onBackPressed()
return true;
}
onPressStartOnboarding() {
RNFormDataCollector.refreshFormDataCollector()
RNFormDataCollector.setApplicationId(this.state.formData.applicationId)
RNFormDataCollector.setFirstName(this.state.formData.firstName)
RNFormDataCollector.setMiddleName(this.state.formData.middleName)
RNFormDataCollector.setLastName(this.state.formData.lastName)
RNOnboardingSdkWrapper.setPartnerScriptId(this.state.formData.partnerScriptId)
RNOnboardingSdkWrapper.startAuthorize()
}
0.5.1.10. Additional yet optional onboarding setup
On your App.js, setup Lenddo onboarding sdk with additional options to be use.
0.5.1.10.1. Setup endpoint and back popup dialog
You can customize endpoint and back popup dialog via sample code snippet below
    RNOnboardingSdkWrapper.setAuthorizeApiEndpoint('https://authorize-api%s.partner-service.link')
    RNOnboardingSdkWrapper.setApiRegion('kr')
    RNOnboardingSdkWrapper.customizeBackPopup('Title', 'Message', 'OK', 'Cancel')
0.5.1.10.2. Adding native email signin and facebook login(optional)
If your work flow includes email signin and facebook login, you can use native application for this feature.
0.5.1.10.2.1. Include GoogleSignInHelper and FacebookSignInHelper into your wrapper package
public class MainApplication extends Application implements ReactApplication {
private final ReactNativeHost mReactNativeHost = new ReactNativeHost(this) {
@Override
public boolean getUseDeveloperSupport() {
return BuildConfig.DEBUG;
}
@Override
protected List<ReactPackage> getPackages() {
RNOnboardingSdkWrapperPackage rnOnboardingSdkWrapperPackage = new RNOnboardingSdkWrapperPackage();
rnOnboardingSdkWrapperPackage.setGoogleSignInHelper(new GoogleSignInHelper());
rnOnboardingSdkWrapperPackage.setFacebookSignInHelper(new FacebookSignInHelper());
return Arrays.<ReactPackage>asList(
new MainReactPackage(),
new RNCollapsingToolbarPackage(),
new RNNestedScrollViewPackage(),
rnOnboardingSdkWrapperPackage,
new RNDataSdkWrapperPackage()
);
}
@Override
protected String getJSMainModuleName() {
return "index";
}
};
}
0.5.1.10.2.2. Enabling using Gmail SignIn and Facebook Login in App.js
After adding the signin helper class, enable the use of this via code snippet below
    RNOnboardingSdkWrapper.setEnableNativeFacebook(true)
    RNOnboardingSdkWrapper.setEnableNativeGoogle(true)
0.5.2. iOS
0.5.2.1. Adding Lenddo react-native-sdk into your react-native dependencies
npm install @lenddo/react-native-sdk --save
react-native link @lenddo/react-native-sdk
0.5.2.2. Adding Lenddo react-native-sdk through manual installation
- In XCode, in the project navigator, right click
Libraries ➜ Add Files to [your project's name]
- Go to
node_modules ➜ @lenddo/react-native-sdk/ios and add RNLenddoEFLLibrary.xcodeproj
- In XCode, in the project navigator, select your project. Add
libRNLenddoEFLLibrary.a to your project's Build Phases ➜ Link Binary With Libraries
- Run your project (
Cmd+R)<
0.5.2.3. Common issue on installing Lenddo react-native-sdk
You might encounter auto-linking of ‘LenddoEFLSdk.framework’ file, as shown in the picture below
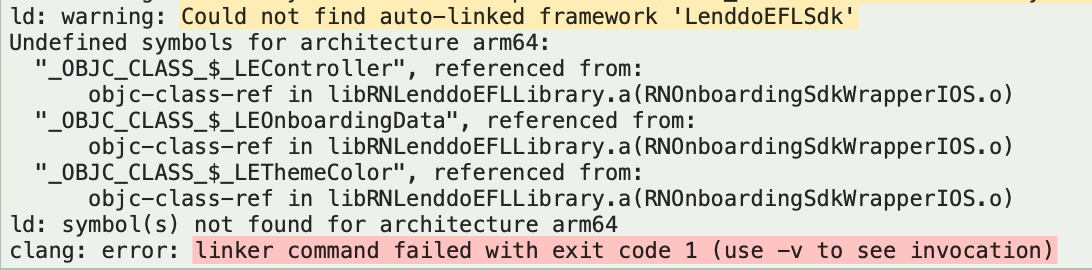
To manual link of @lenddo/react-native-sdk’s LenddoEFLSdk.framework into your project
- In Xcode, select the project, then select the main target (under
Targets), then go to the Build Settings tab, and find the Framework Search Paths section. Add ../node_modules/\@lenddo/react-native-sdk/ios/Frameworks (non-recursive) for each of your configurations (e.g. Debug and Release). Note: a \ (backslash) is required before @
- Find the LenddoEFLSdk.framework file in
../node_modules/@lenddo/react-native-sdk/ios/Frameworks and drag it into Xcode under the Frameworks section. In the dialog that pops up, uncheck Copy items if needed, choose Create groups, and ensure your main target is checked under Add to targets.
- In Xcode, select the project, then select the main target (under
Targets), then go to the "General" tab and find the Embedded Binaries section. Click the + icon and select LenddoEFLSdk.framework which appears under Frameworks then click Add.
- In Xcode do
Product -> Clean.
Note: Make sure to enable ALWAYS_EMBED_SWIFT_STANDARD_LIBRARIES to Yes for every build
0.5.2.4. Invoking Lenddo Onboarding
On your App.js, call RNOnboardingSdkWrapperIOS's showAuthorizeWithFormData to launch Lenddo Onboarding
import {Platform} from 'react-native';
import {RNOnboardingSdkWrapperIOS} from '@lenddo/react-native-sdk';
if (Platform.OS === 'ios') {
RNOnboardingSdkWrapperIOS.showAuthorizeWithFormData(this.state.formData, (error, events) => {
if (error) {
console.error(error);
} else {
console.log(JSON.stringify(events));
}
})
}
formData is an model object that contain key-value variable to setup and initialize onboarding. You must copy-paste the object and add values on your app. You may delete some variables that you might not need and set it to there default values. There are few variables that are required and will be discussed further below.
this.state = {
      formData: {
        partnerScriptId: 'YOUR_PARTNER_SCRIPT_ID',
        secret: '',

        applicationId: 'YOUR_APPLICATION_ID',
        firstName: '',
        middleName: '',
        lastName: '',

        email: '',
        workEmail: '',
        birthday: '',

        mobilePhone: '',
        homePhone: '',

        employerName: '',
        employmentStartDate: '',
        employmentEndDate: '',

        motherFirstName: '',
        motherLastName: '',
        motherMiddleName: '',

        addressLine1: '',
        addressLine2: '',
        city: '',
        administrativeDivision: '',
        countryCode: '',
        postalCode: '',

        workAddressLine1: '',
        workAddressLine2: '',
        workCity: '',
        workAdministrativeDivision: '',
        workCountryCode: '',
        workPostalCode: '',

        themeColor: ''
      },
    }
0.5.2.5. Variables Definition
partnerScriptId
secret
- Are LenddoEFL partner identifiers and are tagged required, please refer to your LenddoEFL representative if you don't have it yet.
applicationId
- An identifier for your LenddoEFL Onboarding session and is tagged required. This variable must be unique for each onboarding session you completed.
themeColor
- Will be base color for the navigation bar of LenddoEFL Onboarding screen (Default theme would be black). Sample is shown below:
class ThemeColor  {
  constructor(red, green, blue, alpha) {
    this.red = red;
    this.green = green;
    this.blue = blue;
    this.alpha = alpha;
  }
}

formData.theme = new ThemeColor(0x00, 0xff, 0x00, 1);
0.5.2.6. Registering onboarding callback
On your App.js, setup LenddoEFL onboarding callback to capture response from your showAuthorizeWithFormData call, by using RCTNativeEventEmitter to capture onboarding progress. As shown in LenddoEFL React-Native Demo app.
import {Platform, NativeEventEmitter} from 'react-native';
import {RNOnboardingSdkWrapperIOS} from '@lenddo/react-native-sdk';
const OnboardingEventEmitter = Platform.OS == 'ios' ? new NativeEventEmitter(RNOnboardingSdkWrapperIOS) : DeviceEventEmitter;
export default class RNLenddoEFLSDKDemo extends PureComponent {
componentWillMount() {
OnboardingEventEmitter.addListener('onAuthorizeStarted',(params) => {
console.log("onAuthorizeStarted")
console.log(params)
}
)
OnboardingEventEmitter.addListener('onAuthorizeComplete',(params) => {
console.log("onAuthorizeComplete")
console.log(params)
}
)
OnboardingEventEmitter.addListener('onAuthorizeCancelled',(params) => {
console.log("onAuthorizeCancelled")
console.log(params)
}
)
OnboardingEventEmitter.addListener('onAuthorizeError',(params) => {
console.log("onAuthorizeError")
console.log(params)
}
)
if (Platform.OS == 'android') {
OnboardingEventEmitter.addListener('onAuthorizeFailure',(params) => {
console.log("onAuthorizeFailure")
console.log(params)
}
)
}
)
}
0.5.2.7. Applying localization
The SDK Wrapper requires Use Base Internationalization enable where some text within the onboarding session screen, like back text and strings for the cancel dialog should be declared.
Localizable.strings file is where you add translation data as key-value pairs.
Earlier versions of XCode used to generate a Localizable.strings file by default, and we were able to easily duplicate the Localizable.strings file for other languages.
Recent versions of XCode doesn’t create Localizable.strings file by default.
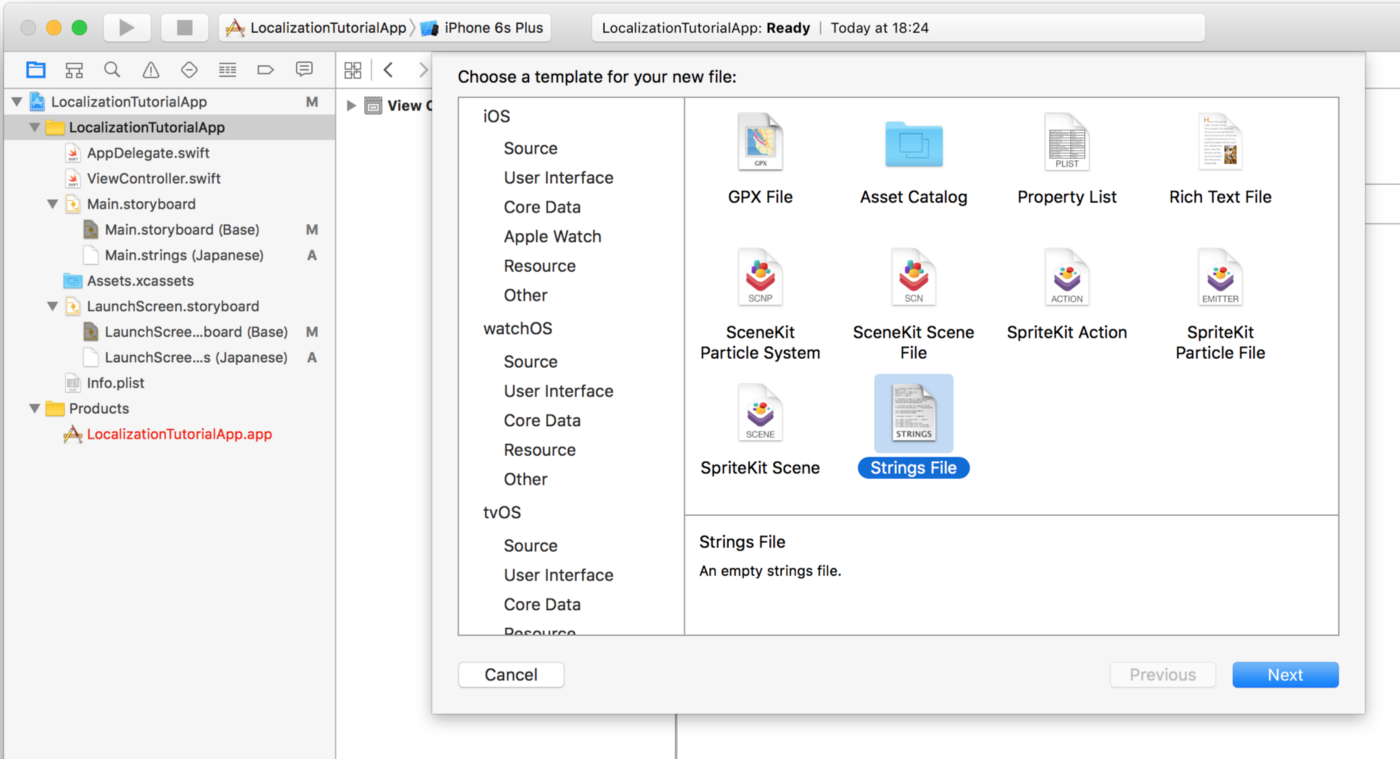
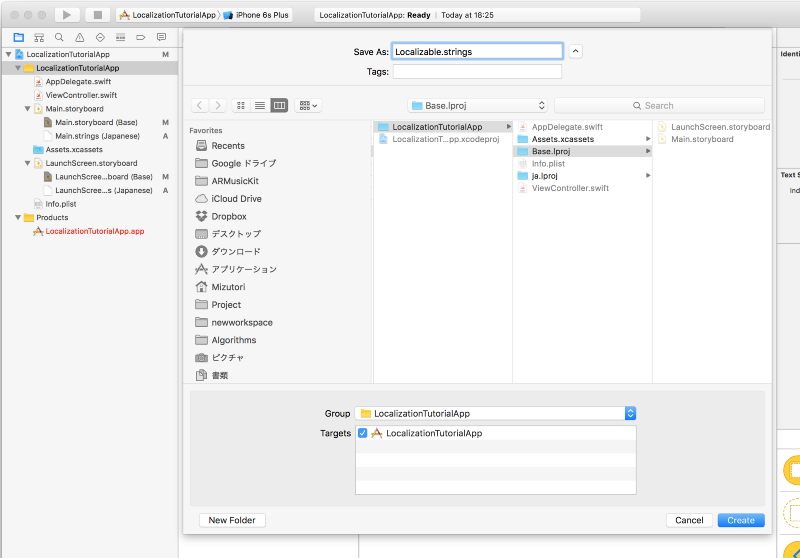
To add Localizable.strings file, go to File->New->File , choose Strings File under Resource tab of iOS, name it Localizable.strings , and create the file and create it under Base.lproj folder.
Now, you have a Localizable.strings file for Base language as below. and then you must add the key-value pair below the image.
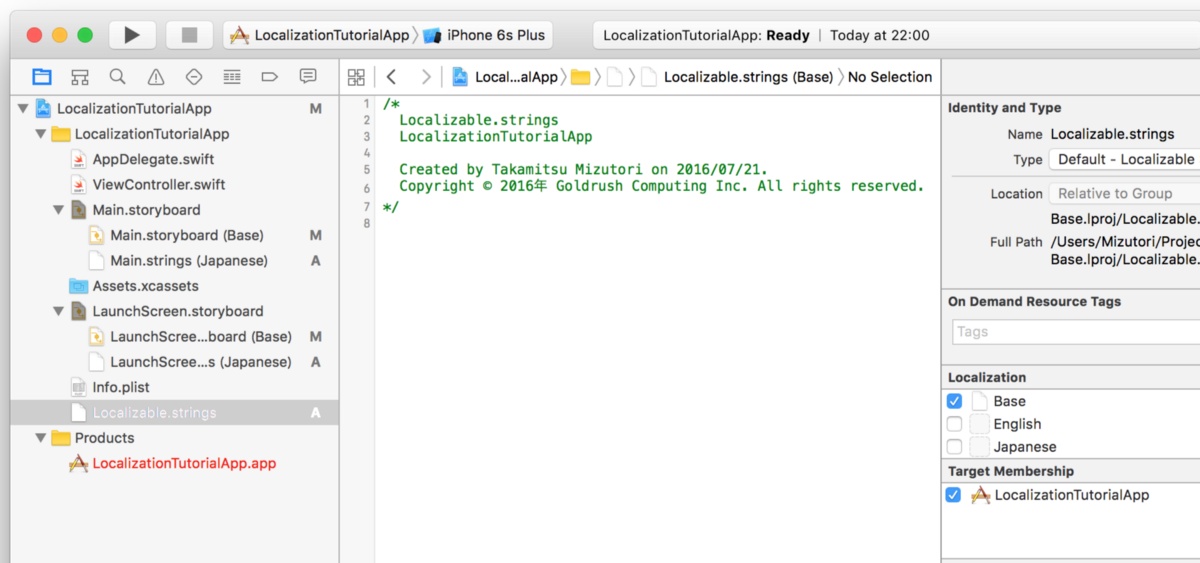
"back" = "Back";

// Cancel Dialog
"cancel_dialog_title" = "Cancel Process";
"cancel_dialog_message" = "Are you sure you want to cancel?";
"cancel_dialog_ok_button_text" = "Yes";
"cancel_dialog_cancel_button_text" = "No";
0.5.2.5. Adding Native Google SignIn
If you are required to have an email onboarding step, you should add a native google sign-in workflow, and you can follow this instructions from LenddoEFL native iOS Onboarding and for more information.
On the said procedure you will be asked to create GoogleProvider class (You may copy the GoogleProvider.m and GoogleProvider.h file from the React-Native Sample App source code) and after having the class you need to send it unto RNOnboardingSdkIOS via your ApplicationDelegate's application: didFinishLaunchingWithOptions: method.
#import "RNOnboardingSdkWrapperIOS.h"
#import "GoogleProvider.h"

@implementation AppDelegate

- (BOOL)application:(UIApplication *)application didFinishLaunchingWithOptions:(NSDictionary *)launchOptions {

  // Other member declartion

  // Create GoogleProvider object and add into a NSArray
  GoogleProvider *googleProvider = [[GoogleProvider alloc] init];
  NSArray *providers = [NSArray arrayWithObjects: googleProvider, nil];

  // Add GoogleProvider object into wrapper
  [RNOnboardingSdkWrapperIOS setProviders:providers];

  return YES;
}
0.5.2.6. Issue you might encounter for implementing GoogleSignIn when using CocoaPods
Commonly used way of importing GoogleSignIn Library is through CocoaPods. Adding it up only on Podfile sometimes might not just do the work. As shown in the sample Podfile below, GoogleSignIn is properly imported
# Uncomment the next line to define a global platform for your project
# platform :ios, '9.0'

target 'RNLenddoEFLSdkWrapperDemo' do
  # Uncomment the next line if you're using Swift or would like to use dynamic frameworks
  # use_frameworks!

  # Pods for RNLenddoEFLSdkWrapperDemo
  pod 'GoogleSignIn'

  target 'RNLenddoEFLSdkWrapperDemoTests' do
    inherit! :search_paths
    # Pods for testing
  end

end

target 'RNLenddoEFLSdkWrapperDemo-tvOS' do
  # Uncomment the next line if you're using Swift or would like to use dynamic frameworks
  # use_frameworks!

  # Pods for RNLenddoEFLSdkWrapperDemo-tvOS

  target 'RNLenddoEFLSdkWrapperDemo-tvOSTests' do
    inherit! :search_paths
    # Pods for testing
  end

end
But you might encounter error below.

To fix the problem,
- Find the GoogleSignIn.framework file in “../ios/Pods/GoogleSignIn/Frameworks” and drag it into Xcode under the "Frameworks" section. In the dialog that pops up, uncheck "Copy items if needed", choose "Create groups", and ensure your main target is checked under "Add to targets".
- Unlike LenddoEFLSdk.Framework, it is not require to add the the framework on "General" > “Embedded Binaries" section. Thus, it should add the
$(PROJECT_DIR)/Pods/GoogleSignIn/Frameworks automatically in Framework Search Paths
- In Xcode do "Product" -> "Clean".


