Research
/Security News
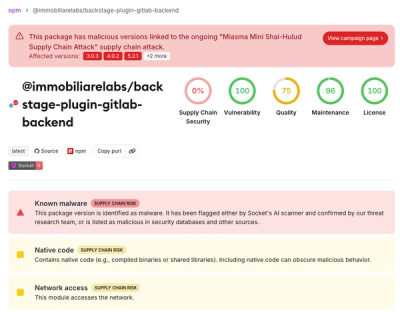
Miasma Mini Shai-Hulud Hits ImmobiliareLabs npm Packages
Miasma Mini Shai-Hulud hits @immobiliarelabs Backstage plugins, targeting GitLab and LDAP auth packages on npm.
By Socket Research Team - Jun 26, 2026


JSON Schema → SQLite — with AI-powered data extraction
Define your data structure once. Generate a database. Extract documents into it.
npm install -g aiex-cli
aiex web                                # configure schemas, AI, integrations, and inspect data
aiex schema                             # generate SQLite from JSON Schema files
aiex extract -s invoice -f invoice.pdf  # extract data with AI and insert into database
aiex watch -s invoice -d ./watch_folder # watch folder daemon for automatic extraction
aiex extract without arguments for a guided extraction workflowaiex extract -d <dir> processes entire directories with optional glob filtering--force to overrideaiex web
Opens a browser UI where you can visually design and manage your schemas, configure AI and integrations, preview extraction prompts, browse inserted SQLite data, inspect extracted JSON files, and apply schema changes to the database. Extraction itself runs from the CLI.
aiex schema
Converts AIEX JSON Schema files into a SQLite database with full migration support. AIEX uses a Drizzle-backed schema dialect rather than the full JSON Schema specification; see Docs/schema-dialect.md for the supported mapping surface.
aiex extract                              # interactive mode (prompts for schema & input)
aiex extract -s <schema> -f <file>        # from file (txt, pdf, png, jpg, ...)
aiex extract -s <schema> -f <file> -m <model>      # specify AI model (overrides auto-selection)
aiex extract -s <schema> -f <file> --no-insert     # extract and save JSON without inserting into SQLite
aiex extract -s <schema> -f <file> --force         # force re-extraction even if already processed
aiex extract -s <schema> -d <directory>            # batch extract all supported files in a directory
aiex extract -s <schema> -d <dir> -g "*.pdf"       # batch with glob filter
The AI reads your document and outputs structured JSON matching your schema.
Examples:
aiex extract                                       # interactive mode
aiex extract -s paper -f research.pdf              # save result to .aiex/extracted/ and insert into database
aiex extract -s paper -f research.pdf --no-insert  # save result only, skip database insert
aiex extract -s paper -f research.pdf -m gpt-4o    # use a specific model
aiex extract -s paper -f research.pdf --force      # force re-extraction even if already processed
aiex extract -s paper -d ./papers -g "*.pdf"       # batch extract PDFs from a directory
Saves the extracted result to .aiex/extracted/<schema-name>-<timestamp>.json with fields like title, firstAuthor, journal, year — exactly as defined in your schema. Data is automatically inserted into the SQLite database.
By default, aiex automatically selects a model based on your input type (vision-capable for images, structured output for text). Use --model / -m to override and specify any model from your AI configuration.
Every extraction is also recorded under .aiex/extracted/_audit/. Audit records include the run status (running, succeeded, failed, or stale), schema name, input source, parser status, parser diagnostics, input quality, field evidence quality, output file, token usage, inserted table rows, synced Notion pages, retry lineage, failure stage, and error message. Use the Web UI to inspect, retry, or delete extraction records.
aiex watch
aiex watch -s <schema> -d <folder>
Runs a background watcher daemon to monitor a folder for new incoming files (such as scanned documents or downloads), automatically performing offline data extraction, database insertion, and system notifications. Run without arguments to choose a schema, watch directory, model, and insert mode interactively.
| Command | Description |
|---|---|
aiex schema | Parse JSON Schema files and migrate to SQLite |
aiex schema --generate | Generate Drizzle schema code only (skip migration) |
aiex schema --force | Allow a high-risk schema migration after reviewing the migration risk report |
aiex web | Launch visual schema/configuration UI and data viewer in browser |
aiex extract | Interactive mode — prompts for schema and file/directory input |
aiex extract -s <name> -f <file> | Extract structured data from a file and insert into SQLite database |
aiex extract -s <name> -f <file> -m <model> | Extract with a specific AI model |
aiex extract -s <name> -f <file> --no-insert | Extract and save JSON without inserting into SQLite |
aiex extract -s <name> -f <file> --force | Force re-extraction even if the file has already been processed |
aiex extract -s <name> -d <dir> | Batch extract all supported files in a directory |
aiex extract -s <name> -d <dir> -g "*.pdf" | Batch extract with glob filter |
aiex watch | Guided setup for watching a directory and automatically extracting new files |
aiex watch -s <name> -d <dir> | Watch a directory for new files and automatically extract data |
aiex watch -s <name> -d <dir> --no-insert | Watch and save JSON without inserting into SQLite |
aiex doctor | System and configuration diagnostics |
aiex completion bash|zsh|fish | Generate shell completion scripts |
Each release ships pre-generated completion files in dist/completions/. You can use either the dynamic method or install them permanently.
Dynamic (session only):
# bash
source <(aiex completion bash)

# zsh
source <(aiex completion zsh)

# fish
aiex completion fish | source
Permanent install (recommended):
Zsh (Oh My Zsh - Recommended):
If you use Oh My Zsh, you can save the completion script directly to the custom completions folder without modifying ~/.zshrc:
mkdir -p ~/.oh-my-zsh/custom/completions
aiex completion zsh > ~/.oh-my-zsh/custom/completions/_aiex
source ~/.zshrc
Zsh (Standard):
Write to a directory in your $fpath (e.g., ~/.zsh/completions):
mkdir -p ~/.zsh/completions
aiex completion zsh > ~/.zsh/completions/_aiex
Then add the following lines to your ~/.zshrc (before compinit):
fpath=(~/.zsh/completions $fpath)
autoload -Uz compinit && compinit
Bash: Write to the system completions directory:
aiex completion bash > /etc/bash_completion.d/aiex
Or for user-level (no sudo):
mkdir -p ~/.local/share/bash-completion/completions
aiex completion bash > ~/.local/share/bash-completion/completions/aiex
Fish: Write to the fish completions directory:
aiex completion fish > ~/.config/fish/completions/aiex.fish
Pre-built completion files are also available in the installed package at
node_modules/aiex-cli/dist/completions/, so Homebrew formulae, oh-my-zsh plugins, and other package managers can reference them directly without runningaiex completion.
aiex works with any OpenAI-compatible API provider. Configure in the Web UI (AI Settings panel):
unpdf, mineru, mineru_api, or external); image input automatically uses a vision model when available, otherwise system OCR on supported platforms{schema} and {text} placeholdersThe built-in model registry automatically suggests capabilities for 2000+ models from providers including OpenAI, Anthropic, Google, Meta, Mistral, DeepSeek, Alibaba Cloud, and more.
aiex can send AI model interaction traces to Langfuse for monitoring and debugging.
https://us.cloud.langfuse.comOnce enabled, every aiex extract call is automatically traced with full request/response payloads, token usage, and latency.
This project includes source code adapted from jsonschema-builder-vue by Gabriel Casotti, used and modified under the MIT License.
The AI model capabilities registry is derived from LiteLLM's model_prices_and_context_window.json, used under the MIT License.
FAQs
JSON Schema → SQLite with AI-powered data extraction
We found that aiex-cli demonstrated a healthy version release cadence and project activity because the last version was released less than a year ago. It has 1 open source maintainer collaborating on the project.
Did you know?

Socket for GitHub automatically highlights issues in each pull request and monitors the health of all your open source dependencies. Discover the contents of your packages and block harmful activity before you install or update your dependencies.
Research
/Security News
Miasma Mini Shai-Hulud hits @immobiliarelabs Backstage plugins, targeting GitLab and LDAP auth packages on npm.

Security News
Rolldown paused Rust React Compiler integration after a 5MB binary size increase raised concerns about shipping React-specific code to all Vite users.

Security News
/Research
Mini Shai-Hulud expands into the Go ecosystem after hitting LeoPlatform npm packages and targeting GitHub Actions workflows.