Research
/Security News
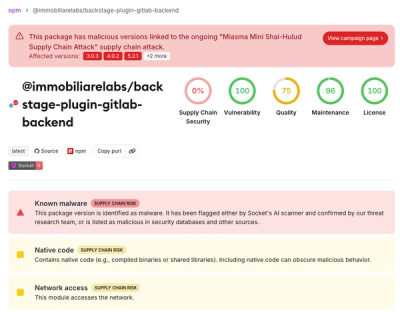
Miasma Mini Shai-Hulud Hits ImmobiliareLabs npm Packages
Miasma Mini Shai-Hulud hits @immobiliarelabs Backstage plugins, targeting GitLab and LDAP auth packages on npm.
By Socket Research Team - Jun 26, 2026
arduino-mqtt
Advanced tools
A powerful tool for connecting your Arduino devices to MQTT brokers. This bridge enables bidirectional communication between Arduino serial interfaces and MQTT protocols, perfect for IoT applications.
A powerful tool for connecting your Arduino devices to MQTT brokers. This bridge enables bidirectional communication between Arduino serial interfaces and MQTT protocols, perfect for IoT applications.
# Install globally
npm install -g arduino-mqtt
# Or use directly with npx
npx arduino-mqtt config
# Interactive setup
arduino-mqtt config

# Or set individual values
arduino-mqtt set port COM7
arduino-mqtt set baud 9600
arduino-mqtt set ip mqtt://localhost:1883
# Start the MQTT-Arduino bridge
arduino-mqtt run
# Press Ctrl+C or run
arduino-mqtt stop
| Parameter | Description | Default Value |
|---|---|---|
port | Serial port connected to Arduino | COM7 |
baud | Baud rate for serial communication | 9600 |
ip | MQTT broker address | mqtt://localhost:1883 |
commandsTopic | Topic to receive commands for Arduino | arduino/commands |
sensorsTopic | Topic to publish Arduino sensor data | arduino/sensors |
username | MQTT broker username (if required) | |
password | MQTT broker password (if required) | |
| Command | Description |
|---|---|
arduino-mqtt config | Interactive configuration wizard |
arduino-mqtt run | Start the bridge |
arduino-mqtt stop | Stop the bridge |
arduino-mqtt set <key> <value> | Update specific configuration |
arduino-mqtt get [key] | View configuration (all or specific key) |
sensorsTopicsensorsTopic/rawcommandsTopic are sent directly to Arduino#include <ArduinoJson.h> // Include ArduinoJson library (install from Library Manager)
// Define pins
#define LED1_PIN 13 // Built-in LED
#define LED2_PIN 12
#define LED3_PIN 11
#define LED4_PIN 10
// Define JSON document size based on your needs
#define JSON_DOC_SIZE 256
void setup() {
Serial.begin(9600);
// Initialize LED pins
pinMode(LED1_PIN, OUTPUT);
pinMode(LED2_PIN, OUTPUT);
pinMode(LED3_PIN, OUTPUT);
pinMode(LED4_PIN, OUTPUT);
delay(1000); // Give serial connection time to stabilize
}
void loop() {
// Read and process commands from MQTT
if (Serial.available() > 0) {
String command = Serial.readStringUntil('\n');
processCommand(command);
}
// Send sensor data to MQTT
sendSensorData();
delay(5000); // Send every 5 seconds
}
// Process incoming commands, including simple key-value pairs
void processCommand(String command) {
// Check if command has a key-value format (key=value)
int separatorPos = command.indexOf('=');
if (separatorPos > 0) {
// Extract key and value
String key = command.substring(0, separatorPos);
String value = command.substring(separatorPos + 1);
// Trim whitespace
key.trim();
value.trim();
// Convert key to lowercase for case-insensitive comparison
key.toLowerCase();
// Check for LED commands (l1, l2, l3, l4)
if (key == "l1" || key == "led1") {
setLedState(LED1_PIN, value);
}
else if (key == "l2" || key == "led2") {
setLedState(LED2_PIN, value);
}
else if (key == "l3" || key == "led3") {
setLedState(LED3_PIN, value);
}
else if (key == "l4" || key == "led4") {
setLedState(LED4_PIN, value);
}
else if (key == "all") {
// Set all LEDs to the same state
setLedState(LED1_PIN, value);
setLedState(LED2_PIN, value);
setLedState(LED3_PIN, value);
setLedState(LED4_PIN, value);
}
}
else {
// Handle legacy commands like "LED_ON" or "LED_OFF"
if (command == "LED_ON") {
digitalWrite(LED1_PIN, HIGH);
}
else if (command == "LED_OFF") {
digitalWrite(LED1_PIN, LOW);
}
}
}
// Set LED state based on various input formats
void setLedState(int pin, String state) {
// Convert to lowercase for case-insensitive comparison
state.toLowerCase();
// Check for various ON representations
if (state == "on" || state == "true" || state == "1" || state == "high") {
digitalWrite(pin, HIGH);
}
// Check for various OFF representations
else if (state == "off" || state == "false" || state == "0" || state == "low") {
digitalWrite(pin, LOW);
}
// Handle numeric brightness for PWM pins
else {
// Try to parse as integer for PWM value
int brightness = state.toInt();
if (brightness > 0 || state == "0") {
// Constrain value to valid PWM range
brightness = constrain(brightness, 0, 255);
analogWrite(pin, brightness);
}
}
}
// Send sensor data as JSON to MQTT
void sendSensorData() {
StaticJsonDocument<JSON_DOC_SIZE> doc;
// Add sensor readings
doc["temperature"] = readTemperature();
doc["humidity"] = readHumidity();
doc["light"] = analogRead(A2);
doc["uptime"] = millis() / 1000;
// Add LED states
doc["led1"] = digitalRead(LED1_PIN);
doc["led2"] = digitalRead(LED2_PIN);
doc["led3"] = digitalRead(LED3_PIN);
doc["led4"] = digitalRead(LED4_PIN);
// Serialize and send JSON
serializeJson(doc, Serial);
Serial.println(); // Add newline to complete the message
}
// Example sensor reading functions
float readTemperature() {
return analogRead(A0) * 0.48; // Example conversion - replace with actual sensor code
}
float readHumidity() {
return analogRead(A1) * 0.1; // Example conversion - replace with actual sensor code
}
#include <ArduinoJson.h>
#include <DHT.h>

#define DHTPIN 2          // Digital pin connected to the DHT sensor
#define DHTTYPE DHT22     // DHT 22 (AM2302)
#define RELAY_PIN 4       // Digital pin connected to relay
#define JSON_DOC_SIZE 384 // Larger for more complex JSON

DHT dht(DHTPIN, DHTTYPE);
bool autoMode = true;
float tempThreshold = 25.0; // Temperature threshold in °C

void setup() {
  Serial.begin(9600);
  pinMode(RELAY_PIN, OUTPUT);
  dht.begin();
  delay(2000); // DHT sensor stabilization

  // Initial status report
  sendStatusReport();
}

void loop() {
  // Handle incoming commands
  if (Serial.available() > 0) {
    String command = Serial.readStringUntil('\n');
    processCommand(command);
  }

  // Auto mode logic
  if (autoMode) {
    float temperature = dht.readTemperature();
    if (!isnan(temperature)) {
      if (temperature > tempThreshold) {
        digitalWrite(RELAY_PIN, HIGH); // Turn on cooling
      } else {
        digitalWrite(RELAY_PIN, LOW);  // Turn off cooling
      }
    }
  }

  // Send regular sensor updates
  static unsigned long lastSendTime = 0;
  if (millis() - lastSendTime > 10000) { // Every 10 seconds
    sendStatusReport();
    lastSendTime = millis();
  }
}

void processCommand(String command) {
  // Try to parse as JSON first
  StaticJsonDocument<JSON_DOC_SIZE> doc;
  DeserializationError error = deserializeJson(doc, command);

  if (!error) {
    // JSON command handling
    if (doc.containsKey("relay")) {
      digitalWrite(RELAY_PIN, doc["relay"] ? HIGH : LOW);
      autoMode = false; // Disable auto mode when manually controlled
    }

    if (doc.containsKey("auto")) {
      autoMode = doc["auto"];
    }

    if (doc.containsKey("threshold")) {
      tempThreshold = doc["threshold"];
    }

    // Send confirmation
    sendStatusReport();
  }
  else {
    // Key-value command handling
    int separatorPos = command.indexOf('=');
    if (separatorPos > 0) {
      String key = command.substring(0, separatorPos);
      String value = command.substring(separatorPos + 1);
      key.trim();
      value.trim();
      key.toLowerCase();

      if (key == "relay") {
        value.toLowerCase();
        bool state = (value == "on" || value == "true" || value == "1" || value == "high");
        digitalWrite(RELAY_PIN, state ? HIGH : LOW);
        autoMode = false;
      }
      else if (key == "auto") {
        value.toLowerCase();
        autoMode = (value == "on" || value == "true" || value == "1");
      }
      else if (key == "threshold") {
        tempThreshold = value.toFloat();
      }

      // Send confirmation
      sendStatusReport();
    }
  }
}

void sendStatusReport() {
  StaticJsonDocument<JSON_DOC_SIZE> doc;

  // Read sensor data
  float h = dht.readHumidity();
  float t = dht.readTemperature();

  // Add sensor readings
  doc["humidity"] = isnan(h) ? "error" : h;
  doc["temperature"] = isnan(t) ? "error" : t;

  // Add system state
  doc["relay"] = digitalRead(RELAY_PIN);
  doc["auto_mode"] = autoMode;
  doc["threshold"] = tempThreshold;
  doc["uptime"] = millis() / 1000;

  // Serialize and send
  serializeJson(doc, Serial);
  Serial.println();
}
#include <ArduinoJson.h>
#include <LowPower.h>

#define BATTERY_PIN A0
#define SOIL_MOISTURE_PIN A1
#define LIGHT_SENSOR_PIN A2
#define JSON_DOC_SIZE 256

// Configuration with defaults
int sleepCycles = 75;      // 75 cycles × 8s = 10 minutes
bool ledEnabled = false;   // LED indicators (disable to save power)
int sensorThreshold = 30;  // Soil moisture threshold percent

void setup() {
  Serial.begin(9600);
  pinMode(LED_BUILTIN, OUTPUT);
  digitalWrite(LED_BUILTIN, LOW); // Ensure LED is off

  delay(1000); // Allow serial to initialize
  sendSensorData(); // Initial reading
}

void loop() {
  // Check for config commands
  if (Serial.available() > 0) {
    String command = Serial.readStringUntil('\n');
    processCommand(command);
  }

  // Flash LED indicator if enabled
  if (ledEnabled) {
    digitalWrite(LED_BUILTIN, HIGH);
    delay(50);
    digitalWrite(LED_BUILTIN, LOW);
  }

  // Send data before sleeping
  sendSensorData();

  // Enter power-down mode for 8s × sleepCycles
  Serial.flush(); // Make sure all serial data is sent
  for (int i = 0; i < sleepCycles; i++) {
    LowPower.powerDown(SLEEP_8S, ADC_OFF, BOD_OFF);
  }
}

void processCommand(String command) {
  // Find key=value separator
  int separatorPos = command.indexOf('=');

  if (separatorPos > 0) {
    String key = command.substring(0, separatorPos);
    String value = command.substring(separatorPos + 1);

    key.trim();
    value.trim();
    key.toLowerCase();

    if (key == "sleep") {
      int cycles = value.toInt();
      if (cycles > 0) {
        sleepCycles = cycles;
      }
    }
    else if (key == "led") {
      value.toLowerCase();
      ledEnabled = (value == "on" || value == "true" || value == "1");
    }
    else if (key == "threshold") {
      int threshold = value.toInt();
      if (threshold >= 0 && threshold <= 100) {
        sensorThreshold = threshold;
      }
    }

    // Send updated configuration
    StaticJsonDocument<JSON_DOC_SIZE> doc;
    doc["config_sleep"] = sleepCycles;
    doc["config_led"] = ledEnabled;
    doc["config_threshold"] = sensorThreshold;
    serializeJson(doc, Serial);
    Serial.println();
  }
}

void sendSensorData() {
  StaticJsonDocument<JSON_DOC_SIZE> doc;

  // Read battery voltage (example calculation for 3.7V LiPo through voltage divider)
  int batteryRaw = analogRead(BATTERY_PIN);
  float batteryVoltage = batteryRaw * (5.0 / 1023.0) * 2.0; // Example voltage divider calculation
  int batteryPercent = map(batteryRaw, 614, 820, 0, 100);   // Map raw values to percentage (calibrate these values)
  batteryPercent = constrain(batteryPercent, 0, 100);

  // Read soil moisture (example)
  int soilRaw = analogRead(SOIL_MOISTURE_PIN);
  int soilPercent = map(soilRaw, 0, 1023, 100, 0);  // Inverted - higher resistance = drier soil

  // Read light level (example)
  int lightRaw = analogRead(LIGHT_SENSOR_PIN);
  int lightPercent = map(lightRaw, 0, 1023, 0, 100);

  // Populate JSON
  doc["device_id"] = "soil_sensor_1";
  doc["battery_v"] = batteryVoltage;
  doc["battery_pct"] = batteryPercent;
  doc["moisture"] = soilPercent;
  doc["light"] = lightPercent;
  doc["needs_water"] = soilPercent < sensorThreshold;

  // Serialize and send
  serializeJson(doc, Serial);
  Serial.println();
}
PuTTY is a versatile tool for testing serial communication with your Arduino:
Testing Arduino Output:
{"temperature":23.5,"humidity":48,"light":512}
Sending Commands to Arduino:
LED_ON
l1=on
l2=off
l3=128
{"led1":true,"led2":false}
Using for Serial Bridge Testing:
arduino-mqtt run{"temperature":23.5,"humidity":55,"light":890}
The Arduino IDE's built-in Serial Monitor is perfect for quick testing:
Monitoring Arduino Output:
{"temperature":22.8,"humidity":45,"led1":1,"led2":0}
Sending Commands:
l1=on
l1=off
l2=128
Testing While Bridge is Running:
arduino-mqtt runMQTTX is a free, cross-platform MQTT client with a user-friendly interface:
Subscribing to Arduino Data:
arduino/sensors (or your configured sensorsTopic)Sending Commands to Arduino:
arduino/commands (or your configured commandsTopic)l1=on
l1=off
led2=128
all=high
{
  "led1": true,
  "led2": false,
  "threshold": 25
}
Testing Complex Scenarios:
arduino/sensors (for main data)arduino/sensors/raw (for non-JSON data)arduino/status (if your sketch publishes status)For a complete test setup, try this workflow:
Setup:
arduino-mqtt configarduino-mqtt runarduino/sensors topicTesting Arduino → MQTT Flow:
Testing MQTT → Arduino Flow:
arduino/commandsTroubleshooting with Serial Monitor:
\n or \r\n)sensorsTopic/raw) to see unparsed dataarduino-mqtt get to verify your configuration settingsThis project is licensed under the MIT License - see the LICENSE file for details.
Contributions are welcome! Feel free to open issues or submit pull requests.
FAQs
A powerful tool for connecting your Arduino devices to MQTT brokers. This bridge enables bidirectional communication between Arduino serial interfaces and MQTT protocols, perfect for IoT applications.
We found that arduino-mqtt demonstrated a not healthy version release cadence and project activity because the last version was released a year ago. It has 1 open source maintainer collaborating on the project.
Did you know?

Socket for GitHub automatically highlights issues in each pull request and monitors the health of all your open source dependencies. Discover the contents of your packages and block harmful activity before you install or update your dependencies.
Research
/Security News
Miasma Mini Shai-Hulud hits @immobiliarelabs Backstage plugins, targeting GitLab and LDAP auth packages on npm.

Security News
Rolldown paused Rust React Compiler integration after a 5MB binary size increase raised concerns about shipping React-specific code to all Vite users.

Security News
/Research
Mini Shai-Hulud expands into the Go ecosystem after hitting LeoPlatform npm packages and targeting GitHub Actions workflows.