Product
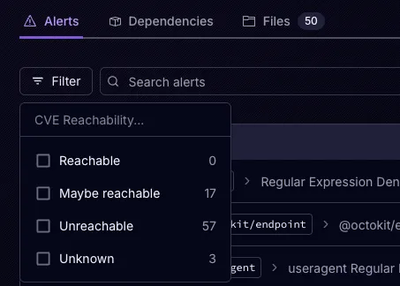
Announcing Precomputed Reachability Analysis in Socket
Socket’s precomputed reachability slashes false positives by flagging up to 80% of vulnerabilities as irrelevant, with no setup and instant results.
By Martin Torp - Jul 30, 2025
collection-storage
Advanced tools
abstraction layer around communication with a collection-based database
Provides an abstraction layer around communication with a collection-based database. This makes switching database choices easier during deployments and testing.
Currently supports MongoDB, DynamoDB, Redis (experimental), PostgreSQL, and in-memory storage.
npm install --save collection-storage
If you want to connect to a Mongo database, you will also need to add a
dependency on mongodb:
npm install --save mongodb
If you want to connect to a Redis database, you will also need to add a
dependency on ioredis:
npm install --save ioredis
warning: Redis support is experimental and the database format is likely to change in later versions.
If you want to connect to a PostgreSQL database, you will also need to add a
dependency on pg:
npm install --save pg
note: Though PostgreSQL is supported, it is not optimised for this type of data storage. If possible, use one of the NoSQL options instead.
You do not need any additional dependencies to connect to an in-memory or DynamoDB database.
import CollectionStorage from 'collection-storage';

const dbUrl = 'memory://something';

async function example() {
  const db = await CollectionStorage.connect(dbUrl);

  const simpleCol = db.getCollection('simple');
  await simpleCol.add({ id: 10, message: 'Hello' });
  const value = await simpleCol.get('id', 10);
  // value is { id: 10, message: 'Hello' }

  const indexedCol = db.getCollection('complex', {
    foo: {},
    bar: { unique: true },
    baz: {},
  });
  await indexedCol.add({ id: 2, foo: 'abc', bar: 'def', baz: 'ghi' });
  await indexedCol.add({ id: 3, foo: 'ABC', bar: 'DEF', baz: 'ghi' });
  const found = await indexedCol.getAll('baz', 'ghi');
  // found is [{ id: 2, ... }, { id: 3, ... }]

  // Next line throws an exception due to the duplicate key in 'bar'
  await indexedCol.add({ id: 4, foo: 'woo', bar: 'def', baz: 'xyz' });

  // Binary data
  const binaryCol = db.getCollection('my-binary-collection');
  await binaryCol.add({ id: 10, someData: Buffer.from('abc', 'utf8') });
  const data = await binaryCol.get('id', 10);
  // data.someData is a Buffer
}
The unindexed properties of your items do not need to be consistent. In particular, this means that later versions of your application are free to change the unindexed attributes, and both versions can co-exist (see migrate below for details on enabling automatic migrations on a per-record basis).
The MongoDB and PostgreSQL databases support changing indices in any way at a later point. In a later deploy, you can simply create your collection with different indices, and the necessary changes will happen automatically. DynamoDB indices will also be updated automatically but note that this may take some time and will use up capacity on the indices. Note that Redis does not currently support changing or removing existing indices, and will not index existing data if a new index is added.
memory://<identifier>[?options]
The in-memory database stores data in Maps and Sets. This data is
not stored to disk, so when the application closes it is gone. If you
specify an identifier, subsequent calls using the same identifier
within the same process will access the same database. If you specify
no identifier, the database will always be created fresh.
simulatedLatency=<milliseconds>: enforces a delay of the given
duration whenever data is read or written. This can be used to
simulate communication with a remote database to ensure that tests do
not contain race conditions.mongodb://[username:password@]host1[:port1][,...hostN[:portN]]][/[database][?options]]
See the mongo documentation for full details.
dynamodb://[key:secret@]dynamodb.region.amazonaws.com[:port]/[table-prefix-][?options]
See the AWS documentation
for a list of region names. Requests will use https by default. Specify
tls=false in the options to switch to http (e.g. when using DynamoDB
Local for testing.)
By default, eventually-consistent reads are used. To use strongly-consistent
reads, specify consistentRead=true (note that this will use twice as much
read capacity for the same operations).
To configure read/write capacity for tables, see the section below (but note that it is recommended to keep the default pay-per-request and configure provisioned throughput externally once the usage is known).
redis://[username:password@]host[:port][/[database-index][?options]]
rediss://[username:password@]host[:port][/[database-index][?options]]
See the ioredis documentation for more details.
postgresql://[username:password@]host[:port]/database[?options]
Options can include ssl=true, sslcert=<cert-file-path>,
sslkey=<key-file-path>, sslrootcert=<root-file-path>. For other options,
see the config keys in the
pg Client constructor documentation.
You can enable client-side encryption by wrapping the collections:
The encryption used is aes-256-cbc.
Any provided keys (encryptByKey) are not stored externally and never leave
the server. These keys must remain constant through restarts and redeploys,
and must be the same on all load-balanced instances. Generated keys
(encryptByRecord) are stored in a provided collection (which does not have
to be in the same database, or even in the same database type), and can be
encrypted using a provided key which is not stored.
import CollectionStorage, {
  encryptByKey,
  encryptByRecord,
  encryptByRecordWithMasterKey,
} from 'collection-storage';

const dbUrl = 'memory://something';

async function example() {
  const db = await CollectionStorage.connect(dbUrl);

  // input keys must be 32 bytes, e.g.:
  const rootKey = crypto.randomBytes(32);

  // Option 1: single key for all values
  const enc1 = encryptByKey(rootKey);
  const simpleCol1 = enc1(['foo'], db.getCollection('simple1'));

  // Option 2: unique key per value, non-encrypted key
  const keyCol2 = db.getCollection('keys2');
  const enc2 = encryptByRecord(keyCol2, { keyCache: { capacity: 50 } });
  const simpleCol2 = enc2(['foo'], db.getCollection('simple2'));

  // Option 3 (recommended): unique key per value, encrypted using global key
  const keyCol3 = db.getCollection('keys3');
  const enc3 = encryptByRecordWithMasterKey(rootKey, keyCol3, { keyCache: { capacity: 50 } });
  const simpleCol3 = enc3(['foo'], db.getCollection('simple3'));

  // option 3 is equivalent to:
  const keyCol4 = encryptByKey(rootKey)(['key'], db.getCollection('keys4'));
  const enc4 = encryptByRecord(keyCol4, { keyCache: { capacity: 50 } });
  const simpleCol4 = enc4(['foo'], db.getCollection('simple4'));

  // For all options, the encryption is transparent:
  await simpleCol1.add({ id: 10, foo: 'This is encrypted' });
  const value1 = await simpleCol1.get('id', 10);
  // value1 is { id: 10, foo: 'This is encrypted' }
}
Notes:
crypto APIs.To use another library for cryptography (e.g. to enable asynchronous
operations), you can provide a final parameter to the encryptBy* function:
const myEncryption = {
  encrypt: async (key, input) => {
    // input (Buffer) => encrypted (Buffer)
  },

  decrypt: async (key, encrypted) => {
    // encrypted (Buffer) => value (Buffer)
  },

  generateKey: () => {
    // return a random key
    // this will be passed to the encrypt/decrypt functions as `key`
  },

  serialiseKey: (key) => {
    // return a string representation of key
  },

  deserialiseKey: (data) => {
    // reverse of serialiseKey
  },
};

const enc = encryptByKey(rootKey, { encryption: myEncryption });
See the documentation for compress below for details on enabling automatic compression of values.
See the documentation for migrate below for details on enabling automatic migrations on a per-record basis.
See the documentation for cache below for details on enabling automatic caching of items.
connectconst db = await CollectionStorage.connect(url);
Connects to the given database and returns a database wrapper.
getCollectionconst collection = db.getCollection(name, [keys]);
Initialises the requested collection in the database and returns a collection wrapper.
keys is an optional object defining the searchable keys for the
collection. For example:
const collection = await db.getCollection(name, {
  someSimpleKey: {},
  someUniqueKey: { unique: true },
  anotherSimpleKey: {},
});
The id attribute is always indexed and should not be specified
explicitly.
closeawait db.close();
Disconnects from the database. Any in-progress operations will complete, but any new operations will fail with an exception.
The database object cannot be reused after calling close.
The returned promise will resolve once all in-progress operations have completed and all connections have fully closed.
addawait collection.add(value);
Adds the given value to the collection. value should be an object
with an id and any other fields you wish to save.
updateawait collection.update(searchAttr, searchValue, update, [options]);
Updates all entries which match searchAttr = searchValue. Any
attributes not specified in update will remain unchanged.
The searchAttr can be any indexed attribute (including id).
When using a non-unique index, only non-unique values can be specified, even if the data contains only one matching entry.
If options is { upsert: true } and no values match the search, a
new entry will be added. If using upsert mode, the searchAttr
must be id.
getconst value = await collection.get(searchAttr, searchValue, [attrs]);
Returns one entry which matches searchAttr = searchValue. If attrs
is specified, only the attributes listed will be returned (by default,
all attributes are returned).
The searchAttr can be any indexed attribute (including id).
attrs is an optional list of strings denoting the attributes to
return.
If no values match, returns null.
getAllconst values = await collection.getAll(searchAttr, searchValue, [attrs]);
Like get, but returns a list of all matching values. If no values
match, returns an empty list.
removeconst count = await collection.remove(searchAttr, searchValue);
Removes all entries matching searchAttr = searchValue.
The searchAttr can be any indexed attribute (including id).
Returns the number of records removed (0 if no records matched).
encryptByKeyconst enc = encryptByKey(key, [options]);
const collection = enc(['encryptedField', 'another'], baseCollection);
Returns a function which can wrap collections with encryption.
By default the provided key should be a 32-byte buffer.
If custom encryption is used, the key should conform to its expectations.
See example notes above for an example on using options.encryption.
If options.allowRaw is true, unencrypted values will be passed through.
This can be useful when migrating old columns to use encryption. Note that
buffer (binary) data will always be decrypted; never passed through.
encryptByRecordconst enc = encryptByRecord(keyCollection, [options]);
const collection = enc(['myEncryptedField', 'another'], baseCollection);
Returns a function which can wrap collections with encryption.
Stores one key per ID in keyCollection (unencrypted).
If options.keyCache is provided, uses a least-recently-used cache for keys
to reduce database access. keyCache should be set to an object which
contains the settings described for cache.
Updating a record re-encrypts using the same key. Removing records also removes the corresponding keys.
See example notes above for an example on using options.encryption.
If options.allowRaw is true, unencrypted values will be passed through.
This can be useful when migrating old columns to use encryption. Note that
buffer (binary) data will always be decrypted; never passed through.
encryptByRecordWithMasterKeyconst enc = encryptByRecordWithMasterKey(masterKey, keyCollection, [options]);
const collection = enc(['myEncryptedField', 'another'], baseCollection);
Returns a function which can wrap collections with encryption.
Stores one key per ID in keyCollection (encrypted using masterKey).
If options.keyCache is provided, uses a least-recently-used cache for keys
to reduce database access. keyCache should be set to an object which
contains the settings described for cache.
This is equivalent to:
const keys = encryptByKey(masterKey, [options])(keyCollection, ['key']);
const enc = encryptByRecord(keys, [options]);
const collection = enc(['myEncryptedField', 'another'], baseCollection);
See example notes above for an example on using options.encryption.
compressconst collection = compress(['compressedField', 'another'], baseCollection);
Wraps a collection with compression. Uses gzip compression and ensures that short uncompressable messages will not grow significantly (2 bytes maximum).
If you apply compression to an existing column, old (uncompressed) values
will be passed through automatically (except binary data). To disable this
functionality, pass allowRaw: false:
const collection = compress(['value'], baseCollection, { allowRaw: false });
If you are migrating a column which contains binary data, you should
probably migrate the data to add compression (or at least prefix all values
with a 0x00 byte to mark them uncompressed). If this is not possible, you
can pass allowRawBuffer: true to compress but note: any data which
begins with 0x00 will have that byte stripped. Additionally, any data which
happens to start with 0x1f 0x8b (the gzip "magic number") will be passed
through zlib.gunzip. Enabling allowRawBuffer is provided as an escape
hatch, but is not recommended.
Do not apply compression to short values, or values with no compressible
structure (e.g. pre-compressed images, random data); it will increase the
size rather than reduce it. By default, compression is not attempted for
values which are less than 200 bytes. You can change this with
options.compressionThresholdBytes; smaller values may result in minor byte
savings, but will require more CPU (note that there is no point setting the
threshold less than 12 as gzip always adds 11 bytes of overhead).
compress & encryptIf you want to use compression in combination with encryption, note that you should compress then encrypt. Once data has been encrypted, compression will have little effect. Also beware: if your application allows writing part of a compressed field, and the database is exposed, it will be possible for an attacker to use compression, along with observation of the resulting record size, to guess secrets from the same value which may otherwise be hidden to them. Data in separate fields which an attacker cannot control will remain safe, even if compressed. This is a rare situation but should be considered when encrypting any compressed data.
const fields = ['field', 'another'];
const enc = encryptByKey(key);
// be sure to apply compression and encryption in the correct order!
const collection = compress(fields, enc(fields, baseCollection));
cacheconst collection = cache(baseCollection, [options]);
Wraps a collection with read caching. Writes will still be recorded immediately and will be reflected in the cached data, but changes made by other clients will not be returned until the cache is deemed stale.
This adds a small overhead to the backing collection as it will fetch the ID attribute for most operations even if not requested, but the ability to return cached data should outweigh this cost in almost all cases.
By default, items in the cache never expire (unless found to be invalid when
performing other operations, such as successfully reusing a unique index value)
and the cache has an unlimited size. In real applications, this is unlikely to
be desirable. You can configure the cache with the options object:
const collection = cache(baseCollection, {
  capacity: 128, // number of records to store (oldest items are removed)
  maxAge: 1000, // max age in milliseconds
});
capacity and maxAge default to infinity. Note that items which expire
due to maxAge will not be removed from the cache automatically. You
should specify a capacity to keep the cache from growing infinitely even
when using a maxAge.
If you want to test situations where the cache has expired, you can also
specify time. This should be a function compatible with the Date.now
signature (Date.now is the default).
migrateconst collection = migrate({
migratedField: (stored) => newValue,
another: (stored) => newValue
}, baseCollection);
const collection = migrate(['versionColumn'], {
  migratedField: (stored, { versionColumn }) => newValue,
  another: (stored, { versionColumn }) => newValue
}, baseCollection);
Wraps a collection with an automatic on-fetch migration. The migrations will be applied whenever records are read, but will not be saved back into the database. The migration functions are per-field, taking in the old field value and returning an updated field value. Each function will only be invoked if the user requested that particular field.
If version information is required to decide whether to migrate or not, additional fields to fetch can be specified and these will be made available to all migration functions in the second function parameter. It is up to you to write the appropriate version to this field when adding or updating values. You can specify as many extra fields as you need (e.g. to allow one version field for each field, or to include other fields which are used to derive new values).
When using DynamoDB, it is possible to specify explicit read/write capacity for each table. By default, all tables are configured as pay-per-request. Note that this will only affect the initial table creation; no automatic migration of provisioned capacity is currently applied.
Typically it is recommended to start with pay-per-request (the default) and configure provisioned capacity once you know what the usage of your tables will be in production. This can be done outside the application, either using the AWS console manually, or the CLI for automation. But if you know the usage in advance and want to specify it on table creation, this library allows you to do so.
To specify explicit provisioned capacities, either:
Specify capacities in the connection string:
- Only do this if you know what you are doing!
- If used incorrectly, this can make DynamoDB cost more.
dynamodb://dynamodb.eu-west-1.amazonaws.com/
  ?provision_my-hot-table=10.2
  &provision_my-hot-table_index_my-special-index=2.1
  &provision_my-hot-table_index=4.2
  &provision=-
(newlines added for clarity, but must not be present in the actual connection string)
The formats recognised are:
fallback for all tables and indices:
provision=<read>.<write>

explicit config for <table-name>:
provision_<table-name>=<read>.<write>

fallback for all indices of <table-name>:
provision_<table-name>_index=<read>.<write>

explicit config for <index-name> of <table-name>:
provision_<table-name>_index_<index-name>=<read>.<write>
Setting any property to a dash (-) will use pay-per-request billing.
Or, if calling DynamoDb.connect directly, you can specify a function
as the second parameter to allow programmatic control:
function myThroughput(tableName, indexName) {
  // Only do this if you know what you are doing!
  // If used incorrectly, this can make DynamoDB cost more.
  switch (tableName) {
    case 'my-hot-table':
      switch (indexName) {
        case null:
          // applies to the table my-hot-table
          return { read: 10, write: 2 };
        case 'my-special-index':
          // applies to my-special-index for my-hot-table
          return { read: 2, write: 1 };
        default:
          // applies to all other indices for my-hot-table
          return { read: 4, write: 2 };
      }
    default:
      // applies to all other tables and indices
      return null; // use pay-per-request
  }
}

const db = DynamoDb.connect('dynamodb://etc', myThroughput);
The function is called once with a null index name for the base table
properties, and once per index for the index properties.
Returning null or undefined will cause that table to use
pay-per-request billing.
Notes for both methods:
Table names and index names will be the raw names before any common prefix is added.
Unique indices are all bundled into a single table, so the provisioned values for these are summed together for that table.
The provisioned units should always be integers, but are automatically
rounded (using ceil) and clamped to a minimum of 1.
DynamoDB does not allow using a mix of provisioned and pay-per-request billing for a table and its indices. Set each table and its indices either all pay-per-request or all provisioned.
To run the test suite, you will need to have a local installation of MongoDB,
Redis, PostgreSQL and DynamoDB Local. By default, the tests will connect to
mongodb://localhost:27017/collection-storage-tests,
redis://localhost:6379/15,
postgresql://localhost:5432/collection-storage-tests, and
dynamodb://key:secret@localhost:8000/collection-storage-tests-?tls=false.
You can change this if required by setting the MONGO_URL, REDIS_URL,
PSQL_URL, and DDB_URL environment variables.
warning: By default, this will flush any Redis database at index 15. If
you have used database 15 for your own data, you should set REDIS_URL to
use a different database index.
note: The PostgreSQL tests will connect to the given server's postgres
database to drop (if necessary) and re-create the specified test database.
You do not need to create the test database yourself.
The target databases can be started using Docker if not installed locally:
docker run -d -p 27017:27017 mongo:4
docker run -d -p 6379:6379 redis:5-alpine
docker run -d -p 5432:5432 postgres:11-alpine
docker run -d -p 8000:8000 amazon/dynamodb-local:latest
FAQs
abstraction layer around communication with a collection-based database
The npm package collection-storage receives a total of 0 weekly downloads. As such, collection-storage popularity was classified as not popular.
We found that collection-storage demonstrated a not healthy version release cadence and project activity because the last version was released a year ago. It has 1 open source maintainer collaborating on the project.
Did you know?

Socket for GitHub automatically highlights issues in each pull request and monitors the health of all your open source dependencies. Discover the contents of your packages and block harmful activity before you install or update your dependencies.
Product
Socket’s precomputed reachability slashes false positives by flagging up to 80% of vulnerabilities as irrelevant, with no setup and instant results.

Product
Socket is launching experimental protection for Chrome extensions, scanning for malware and risky permissions to prevent silent supply chain attacks.

Product
Add secure dependency scanning to Claude Desktop with Socket MCP, a one-click extension that keeps your coding conversations safe from malicious packages.