Product
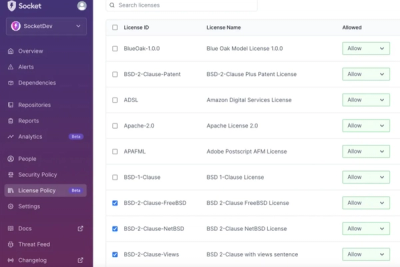
Introducing License Enforcement in Socket
Ensure open-source compliance with Socket’s License Enforcement Beta. Set up your License Policy and secure your software!
By Philipp Burckhardt - Oct 17, 2024
iotivity-node
Advanced tools
This project provides a Javascript API for OCF functionality. The API follows a maintained specification and is implemented as a native addon using iotivity as its backend.

node runs node version 0.12 or later, and thatnode binary can be found is listed in the PATH environment variable so that the command node somescript.js is enough to execute somescript.js using node version 0.12 or later.iotivity-nodenpm install.Install node 4 or later. As with Linux and OSX, make sure that node is called node and that it is on your PATH.
In a PowerShell running as Administrator, run npm install -g --production windows-build-tools. This will install Python and the toolchain necessary for building iotivity-node. While this command runs, you can perform some of the following steps.
Install git
Install 7-Zip
The installation of the windows-build-tools package eventually indicates that it has installed Python. After that message appears, you can perform some of the steps below.
In a command prompt, append the python folder, the python scripts folder, and the 7-Zip folder to your PATH. The paths you append are based on your Windows user name, so replace "yourusernamehere" in the example below with your actual Windows user name.
setx PATH "%PATH%;c:\Users\yourusernamehere\.windows-build-tools\python27;c:\Users\yourusernamehere\.windows-build-tools\python27\scripts;c:\Program Files\7-Zip"
Close the command prompt and reopen it.
In the command prompt, run pip install --egg "scons<3.0.0" to install scons (a python package)
Wait for the installation of the windows-build-tools to complete. Afterwards, you can perform the remaining steps.
Clone this repository and the change directory into it
Run npm install to build iotivity-node.
After the successful completion of the above command, you are ready to use iotivity-node. You can use the usual npm process of adding iotivity-node to the dependencies section of your package's package.json file.
After installation using the steps above, you may want to run the iotivity-node test suite. To do so, perform the following steps from the iotivity-node repository root. The steps apply to all platforms:
npm -g install grunt-cligrunt testThe file appveyor.yml provides an example of the commands necessary for setting up a Windows environment, and the file .travis.yml provides an example of the commands necessary for setting up the Linux and OSX environments.
iotivity-node depends on iotivity proper. It has been tested against 1.3.0. The above installation instructions cover the dependencies for both iotivity-node and iotivity.
iotivity-node requires a compiler that implements the C++11 standard.
During compilation, iotivity-node downloads iotivity from its git repository, builds it, and links against it. If you wish to build iotivity separately, set the environment variable OCTBSTACK_CFLAGS to contain the compiler arguments necessary for building against iotivity, and also set the environment variable OCTBSTACK_LIBS to contain the linker arguments necessary for linking against iotivity. If both variables are set to non-empty values, iotivity-node will skip the step of downloading and building iotivity from sources. If you choose to build iotivity separately, you can use the following procedure:
Grab a snapshot of iotivity from its git repository and unpack it locally.
Make sure a build toolchain, scons (a build tool), and the headers for the above-mentioned library dependencies are installed. Your distribution should provide all these tools and libraries.
cd iotivity
If you're building against version 1.3.0 of iotivity on OSX or Windows, you will first need to apply all the downstream patches which iotivity-node provides in the patches/ subdirectory except the patch which removes the boost dependency. The latter patch serves only to improve build time by eliminating the ability to build targets which require boost. You can apply the patches with git apply <path-to-patch>. All these patches except the boost elmination patch are on track to appear in later versions of iotivity, so they will disappear from later versions of iotivity-node.
scons has the concept of targets just like make. You can get a list of targets contained in the iotivity repository, as well as a listing of recognized build flags via scons --help. The only targets you need for the node.js bindings are octbstack and json2cbor if you are building in SECURED=1 mode. Thus, run scons SECURED=1 json2cbor octbstack to build these targets or scons octbstack if you do not require SECURED=1 mode.
On OSX you need more targets than just octbstack and json2cbor because on that platform iotivity does not build octbstack as a shared library, but rather as an archive. Thus, you need to build all targets that correspond to archives that go into the Linux liboctbstack shared library:
c_commoncoapconnectivity_abstractionloggerocsrmoctbstackroutingmanagerNow that iotivity is built, clone this repository and change directory into it.
Set the following environment variables:
OCTBSTACK_CFLAGS - this should contain the compiler flags for locating the iotivity include files. For example, the value of this variable can be -I/home/nix/iot/iotivity/resource/csdk/stack/include.OCTBSTACK_LIBS - this should contain the linker flags necessary for locating liboctbstack.so both at compile time and at runtime. Its value can be as simple as -loctbstack if liboctbstack is in /usr/lib, but may need to be as complex as -L/home/nix/iot/iotivity/out/linux/x86/release -loctbstack -Wl,-rpath=/home/nix/iot/iotivity/out/linux/x86/release if liboctbstack.so is located on an unusual path.Run npm install with these environment variables set.
The high-level JS API provides a means for persisting the device ID across instantiations of a script according to the iotivity wiki. This mechanism is also responsible for initially creating the configuration file that stores security-related information for a given script. It does so by creating a directory ${HOME}/.iotivity-node. Thereunder, it creates directories whose name is the sha256 checksum of the absolute path of the given script. Thus, if you write a script located in /home/user/myscript.js that uses the high-level JS API, its persistent state will be stored in the directory
/home/user/.iotivity-node/1abfb1b70eaa1ccc17a42990723b153a0d4b913a8b15161f8043411fc7f24fb1
in a file named oic_svr_db.dat. The file initially contains enough information to persist the device ID used whenever you run /home/user/myscript.js. You can add more information to the file in accordance with the iotivity wiki, and using the json2cbor tool. The tool is located in iotivity-installed/bin off the root of this repository, or, if you have chosen to build iotivity externally, then in the output directory created by the iotivity build process.
The JavaScript examples are located in js/ and come in pairs of one client and one server, each illustrating a basic aspect of iotivity. To run them, open two terminals and change directory to the root of the iotivity-node repository in both. Always launch the server before the client. For example, in one terminal you can run node js/server.discoverable.js and in the other terminal you can run node js/client.discovery.js.
Make sure no firewall is running (or one is properly configured to allow iotivity-related traffic and especially multicast traffic) on the machine(s) where these applications are running.
FAQs
IoTivity bindings
The npm package iotivity-node receives a total of 10 weekly downloads. As such, iotivity-node popularity was classified as not popular.
We found that iotivity-node demonstrated a not healthy version release cadence and project activity because the last version was released a year ago. It has 1 open source maintainer collaborating on the project.
Did you know?

Socket for GitHub automatically highlights issues in each pull request and monitors the health of all your open source dependencies. Discover the contents of your packages and block harmful activity before you install or update your dependencies.
Product
Ensure open-source compliance with Socket’s License Enforcement Beta. Set up your License Policy and secure your software!
Product
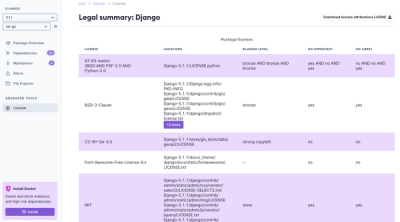
We're launching a new set of license analysis and compliance features for analyzing, managing, and complying with licenses across a range of supported languages and ecosystems.
Product
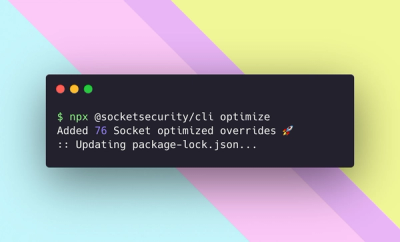
We're excited to introduce Socket Optimize, a powerful CLI command to secure open source dependencies with tested, optimized package overrides.