Security News
The Code You Didn't Write Is Still Yours to Defend
AI agents are pulling packages into environments no scanner is watching, creating exposure before security teams can see it.
By Brad Arkin - Jun 23, 2026
nextjs-swagger-gen
Advanced tools
Generate OpenAPI Swagger specs from Next.js App Router API routes. This tool automatically generates OpenAPI documentation from your Next.js API routes, including:
npx nextjs-swagger-gen -a /path/to/your/app/folder -o /output/path/for/swagger.json
After running the command, open your browser and navigate to http://localhost:3333 to view your generated Swagger UI.
npm install -g nextjs-swagger-gen
nextjs-swagger-gen -a /path/to/your/app
Clone the repository:
git clone https://github.com/youruser/nextjs-swagger-gen.git
cd nextjs-swagger-gen
Install dependencies:
npm install
Build the project:
npm run build
Run the tool:
# Using npm script
npm run start -- -a /path/to/your/app

# Or directly with ts-node
ts-node src/index.ts -a /path/to/your/app
npx nextjs-swagger-gen -a /path/to/your/app [options]
-a, --app-path <path>: Path to your Next.js app directory (required)-o, --output <path>: Path where to save the OpenAPI spec file (default: swagger-spec.json)-p, --port <number>: Port to run the Swagger UI server (default: 3333)-b, --base-url <url>: Base URL for the API (default: http://localhost:3000)-s, --serve: Start the Swagger UI server after generating the spec (default: true)-h, --help: Display help information-V, --version: Display version informationBasic usage:
npx nextjs-swagger-gen -a ./my-nextjs-app
Custom output, port, and base URL:
npx nextjs-swagger-gen -a ./my-nextjs-app -o ./api-docs.json -p 8080 -b https://api.example.com
The tool parses JSDoc comments to enhance the API documentation. Example:
/**
 * Get user's profile and activity data
 *
 * @route GET /api/users/[userId]/activity
 *
 * @param {NextRequest} request - The Next.js request object
 * @param {Object} params - Route parameters
 * @param {Promise<Object>} params.params - Dynamic route parameters
 * @param {string} params.params.userId - The unique identifier of the user
 *
 * @queryParam {string} timezone - User's timezone for activity timestamps (required)
 * @queryParam {string} period - Time period for activity data (e.g., 'day', 'week', 'month')
 * @queryParam {number} limit - Maximum number of activities to return (default: 10)
 *
 * @returns {Promise<NextResponse>} JSON response containing:
 *   - On success: {
 *       success: true,
 *       data: {
 *         userId: string,
 *         activities: Array<{
 *           id: string,
 *           type: string,
 *           timestamp: string,
 *           details: object
 *         }>,
 *         total: number
 *       }
 *     }
 *   - On error: { error: string } with appropriate status code
 *
 * @throws {Error} If there's an issue fetching the user's activity data
 */
This example shows:
[userId])Contributions are welcome! This project is specifically designed for Next.js App Router with TypeScript, but we're open to contributions that support other flavors or add new features.
npm install
MIT License - see the LICENSE file for details.
FAQs
Generate OpenAPI Swagger specs from Next.js App Router API routes
The npm package nextjs-swagger-gen receives a total of 1 weekly downloads. As such, nextjs-swagger-gen popularity was classified as not popular.
We found that nextjs-swagger-gen demonstrated a not healthy version release cadence and project activity because the last version was released a year ago. It has 1 open source maintainer collaborating on the project.
Did you know?

Socket for GitHub automatically highlights issues in each pull request and monitors the health of all your open source dependencies. Discover the contents of your packages and block harmful activity before you install or update your dependencies.
Security News
AI agents are pulling packages into environments no scanner is watching, creating exposure before security teams can see it.

Security News
GitHub Actions checkout now blocks risky pull_request_target checkouts by default to help prevent pwn request supply chain attacks.
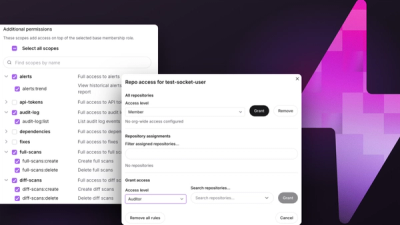
Product
Socket now supports Custom Roles and Repository Access Permissions so organizations can control who can access specific repositories and actions.