witcher - npm Package Compare versions
Comparing version 0.2.0 to 0.3.0
@@ -8,2 +8,14 @@ # Changelog | ||
| ## [0.3.0] - 2023-08-21 | ||
| ### Added | ||
| - Keywords, repository and homepage in `package.json` | ||
| - Demo configurations as an example of how to use `witcher` | ||
| ### Changed | ||
| - README with TLDR section and summary about the project | ||
| - License updated to `MIT` | ||
| ## [0.2.0] - 2023-08-18 | ||
@@ -10,0 +22,0 @@ |
| { | ||
| "name": "witcher", | ||
| "version": "0.2.0", | ||
| "version": "0.3.0", | ||
| "description": "Lightweight and fast API testing framework with database checking.", | ||
| "main": "./dist/index.mjs", | ||
| "type": "module", | ||
| "keywords": [ | ||
| "cli", | ||
| "test", | ||
| "testing", | ||
| "automation", | ||
| "api", | ||
| "api test", | ||
| "api testing", | ||
| "integration", | ||
| "white box", | ||
| "black box" | ||
| ], | ||
| "bin": "dist/index.mjs", | ||
@@ -19,4 +31,6 @@ "scripts": { | ||
| }, | ||
| "author": "", | ||
| "license": "ISC", | ||
| "author": "getjoystick", | ||
| "repository": "github:getjoystick/witcher", | ||
| "homepage": "https://github.com/getjoystick/witcher", | ||
| "license": "MIT", | ||
| "devDependencies": { | ||
@@ -52,3 +66,7 @@ "@tsconfig/node18": "^18.2.0", | ||
| "semver": "^6.3.1" | ||
| }, | ||
| "bugs": { | ||
| "url": "https://github.com/getjoystick/witcher/issues", | ||
| "email": "code@getjoystick.com" | ||
| } | ||
| } |
116
readme.md
| # Witcher API Tester | ||
|  | ||
|  | ||
| Witcher is a lightweight, easy to maintain and fast API tester that is configuration driven. | ||
| Witcher is a lightweight and easy to maintain API tester that is configuration driven. Run with just two simple JSON configs; no need to learn a complicated system. | ||
| - No need to learn a complicated system | ||
| - Make API calls, then validate any part of the response header or body. | ||
| - Set variables based on the response, then use them in subsequent tests/calls. | ||
| - Check for side-effects in a database after each call. | ||
| - Set variables using any part of the response body or header, then use the variables in subsequent tests/calls. | ||
| - Check for side-effects in a database (PostgreSQL or mySQL supported) after each API call. | ||
| - Contributions welcome! | ||
| <table> | ||
| <tr> | ||
| <td>✅</td> | ||
| <td>Run Locally, Interactive Mode</td> | ||
| <td>All configs stored locally. API calls are made from your local machine to the specified endpoints and database connections.</td> | ||
| </tr> | ||
| <tr> | ||
| <td>✅</td> | ||
| <td>Use Configs Hosted on Joystick</td> | ||
| <td>Configs are retrieved from the <a href="https://www.getjoystick.com">Joystick</a> remote config service, where your entire team then can keep them up-to-date, and always run with the latest configs.</td> | ||
| </tr> | ||
| <tr> | ||
| <td>✅</td> | ||
| <td>Run in Non-Interactive Mode</td> | ||
| <td>Perfect for running on a remote machine. Run using one command line. Use configs from the working directory, or grab them from Joystick by passing in API key and config ContentId.</td> | ||
| </tr> | ||
| <tr> | ||
| <td>✅</td> | ||
| <td>Run as Github Action</td> | ||
| <td>The <a href="https://github.com/marketplace/actions/run-api-test-with-witcher">Witcher Github Action</a> is great for integrating with any Github Action CI/CD pipeline for pre/post deployment API validation. Can also use configs that you push on during the deployment process, or retrieve them from Joystick.</td> | ||
| </tr> | ||
| </table> | ||
| # Prerequisites | ||
@@ -19,3 +42,3 @@ | ||
| Witcher can be run using the `npx` command. This will download the latest version of Witcher and run it. | ||
| Witcher can be run using the `npx` command. This will download the latest version of Witcher and run it. Make sure you have npx installed globally (`npm i -g npx`). | ||
@@ -32,23 +55,47 @@ ```bash | ||
| # First-time setup | ||
| # TLDR; Jump Right In! | ||
| ## Local Configs | ||
| 1. Download the two files in the `witcher-demo` folder of this repo. | ||
| - Update `./test-json/testSetup.json` and `./test-json/testUnits.json` to fit your API. | ||
| 2. Run `npx witcher` in the same directory as the two files. Press enter again to proceed with default options. | ||
| ## Running the Project with Joystick-Hosted Configs | ||
|  | ||
| Joystick is a robust remote configuration service. Using Witcher with Joystick-hosted configs means your entire team can collaborate and update your tests. | ||
| 3. Select option 2 to run locally. | ||
|  | ||
| 4. For the set setup config, select `demo-setup.json`. | ||
| 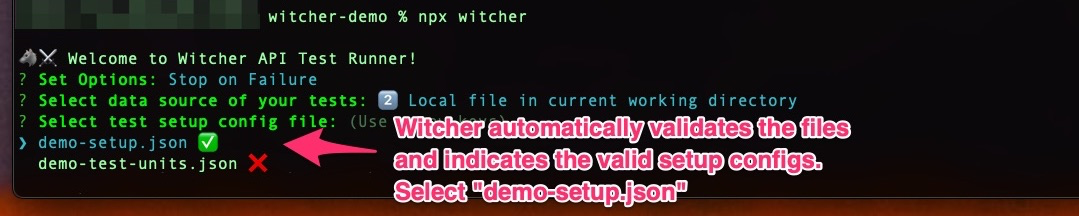 | ||
| 5. Continue without secrets, since we don't need to check a DB. | ||
| 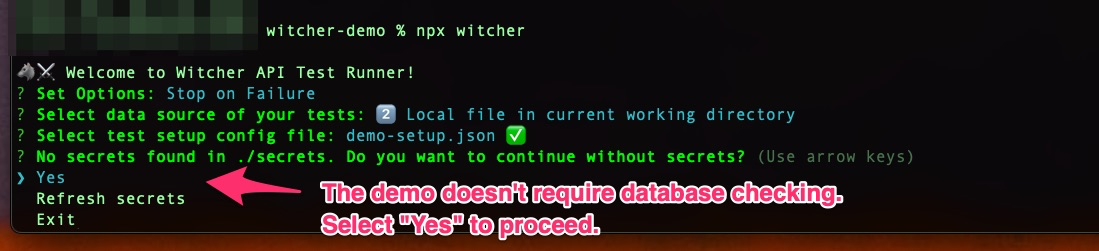 | ||
| 6. The test will run and you will get a report! | ||
| 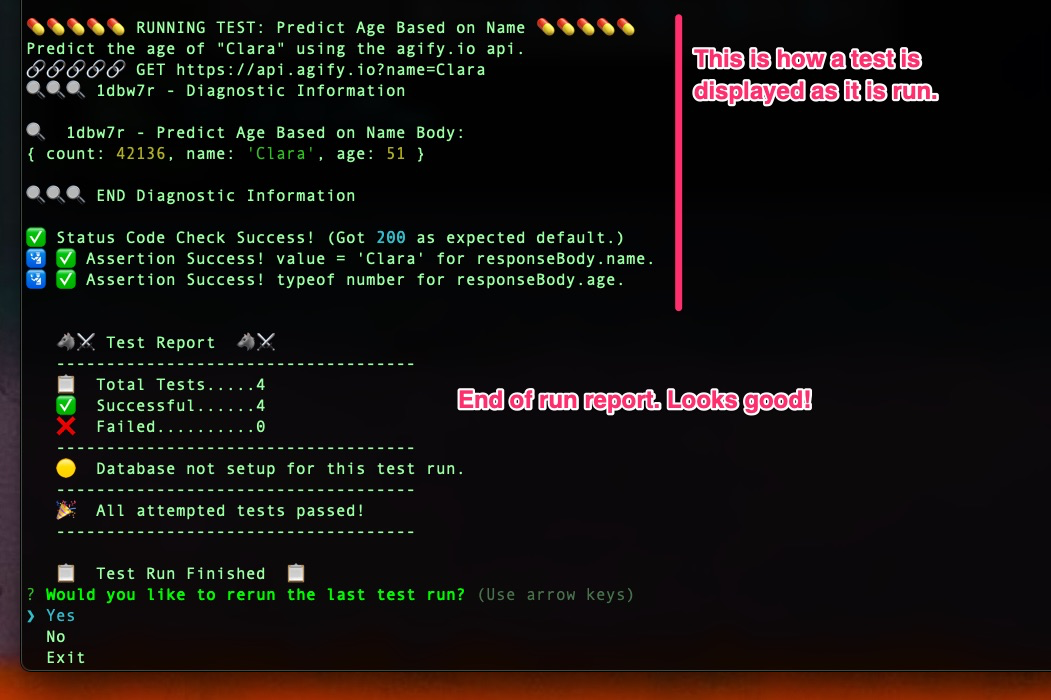 | ||
| # Setup the Configuration Files | ||
| ## Running Using Local Configs | ||
| `./test-json/testSetup.json` and `./test-json/testUnits.json` are the templates to start from. They have comments inside to help guide you. Update them to fit your API. | ||
| ## Running with Joystick Hosted Configs | ||
| [Joystick](https://www.getjoystick.com/) is a robust and modern remote configuration service. Using Witcher with Joystick-hosted configs means your entire team can collaborate and update the test configs. Everyone can see exactly what is being run, and update them instantly. | ||
| ### Setup / First Time | ||
| - Create an account on [Joystick](https://app.getjoystick.com/) | ||
| - Create an organization, product and environment for your testing configs. | ||
| - Add the test suite: | ||
| - [Create an account](https://app.getjoystick.com/) on Joystick. | ||
| - In Joystick, find or create an appropriate environment for your test configs. | ||
| - [Add](https://docs.getjoystick.com/content-management-configs/) the test configs to Joystick: | ||
| - Click on "Create config" on the page of environment | ||
| - Paste the contents of `./test-json/testUnits.json` into editor | ||
| - Change the test suite to fit your API | ||
| - Specify the name of the test suite in the "Content ID" field (e.g. "testsuite-dev-billing") | ||
| - Change the config to fit your API | ||
| - Specify the name of the config in the "Content ID" field (e.g. "testsuite-dev-billing") | ||
| - Click on "Save" | ||
| - Add the root config: | ||
| - Add the root setup config: | ||
| - Click on "Create config" | ||
@@ -63,3 +110,3 @@ - Paste the contents of `./test-json/testSetup.json` into editor | ||
| ## Local Configs | ||
| ## Running Using Local Configs | ||
@@ -74,3 +121,3 @@ - Run `npx witcher` | ||
| ## Joystick-Hosted Configs | ||
| ## Running with Joystick Hosted Configs | ||
@@ -116,3 +163,3 @@ - `npx witcher` | ||
| # Notes | ||
| # Notes and Details | ||
@@ -132,5 +179,5 @@ - Supporting PostgreSQL and mySQL database out-of-the-box. Can be easily extended. | ||
| ### Running Logic | ||
| ### Execution Logic | ||
|  | ||
| 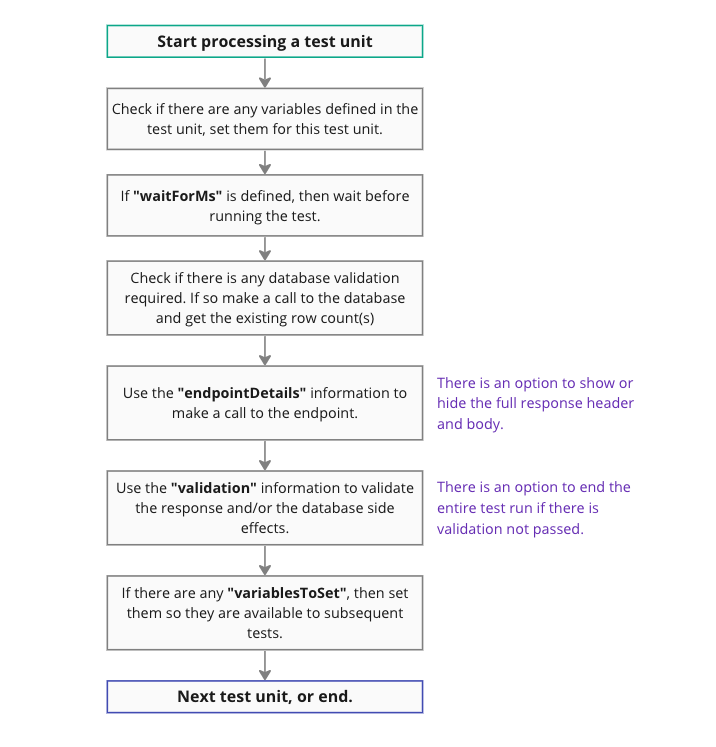 | ||
@@ -172,3 +219,3 @@ ## The Test Setup "Root" Config | ||
| ### Debug Mode | ||
| ### Debug Options | ||
@@ -209,3 +256,3 @@ - You can show the full error, if any, with the request by setting `testRunningOptions.debugResponseOptions.showRequestErrors`. | ||
|  | ||
| 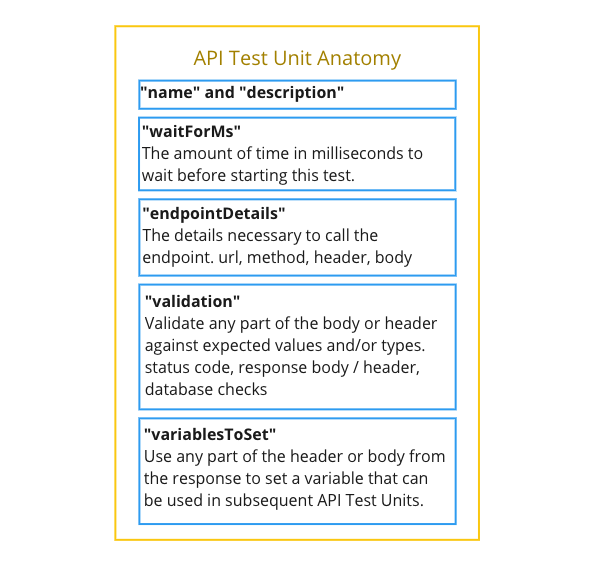 | ||
@@ -218,2 +265,3 @@ This is one Test Unit. It goes inside the "testUnits" array of the Test Units config. | ||
| "description": "Create a new widget for ${ productId }", | ||
| "waitForMs": 1000, | ||
| "endpointDetails": { | ||
@@ -284,5 +332,5 @@ "url": "${ endpointRoot }/product/${ productId }/widget/witcher-widget-${ random.hash }", | ||
| - Variables set in initialTestRunVariables are available immediately to any test. | ||
| - Variables set in Test Unit are only available after the are set, then can be used in any Test Units that come after. | ||
| - Variables set in Test Unit are only available after they are set; then can be used in any Test Units that come after. | ||
| You can set variables that can be used in subsequent tests by with data from any part of the body or header of an API response. See the `variablesToSet` array in the above example. Use `responseBody` or `responseHeader` as the start of your path. Below are some valid examples of how to set variables based on a response from an API call. | ||
| You can set variables that can be used in subsequent tests using data from any part of the body or header of an API response. See the `variablesToSet` array in the below example. Use `responseBody` or `responseHeader` as the start of your path. Here are some examples of setting variables based on a response from an API call. | ||
@@ -319,7 +367,7 @@ ```jsonc | ||
| - Anywhere within the test unit, you can use this pattern `${ myVar }` to use a variable you have previously set. | ||
| - The Test Unit must still validate as JSON, so variable declarations must be used within strings. Thus, they can be used as keys as well! | ||
| - The Test Unit must still validate as JSON, so variable declarations must be used within strings. They can be used as keys as well! | ||
| - For numbers or boolean types, declare the type inside the curly brackets with immediately enclosing double quotes: `"myNumber": "${ someId : number }"` -> OUTPUT `"myNumber": 123`. | ||
| - `"myString": "Doing something with ${ myVar }!!"` is supported | ||
| - `"myNumber": "${ random.number : number }"` is supported | ||
| - `"myBoolean": "${ myBoolean : boolean }"` is supported | ||
| - `"myString": "Doing something with ${ myVar }!!"` is valid | ||
| - `"myNumber": "${ random.number : number }"` is valid | ||
| - `"myBoolean": "${ myBoolean : boolean }"` is valid | ||
@@ -515,11 +563,11 @@ ```jsonc | ||
| 📋 Test Report 📋 | ||
| ------------------ | ||
| 🐺⚔️ Test Report 🐺⚔️ | ||
| ------------------------------------ | ||
| 📋 Total Tests.........8 | ||
| ✅ Successful Tests....7 | ||
| ❌ Failed Tests........1 | ||
| ------------------ | ||
| ------------------------------------ | ||
| ❌ Failed Tests: | ||
| - Create a Folder | ||
| ------------------ | ||
| ------------------------------------ | ||
@@ -526,0 +574,0 @@ ``` |
Sorry, the diff of this file is not supported yet
Sorry, the diff of this file is not supported yet
Sorry, the diff of this file is not supported yet
New alerts
License Policy Violation
LicenseThis package is not allowed per your license policy. Review the package's license to ensure compliance.
Found 1 instance in 1 package
Mixed license
License(Experimental) Package contains multiple licenses.
Found 1 instance in 1 package
Fixed alerts
License Policy Violation
LicenseThis package is not allowed per your license policy. Review the package's license to ensure compliance.
Found 1 instance in 1 package
No contributors or author data
MaintenancePackage does not specify a list of contributors or an author in package.json.
Found 1 instance in 1 package
No bug tracker
MaintenancePackage does not have a linked bug tracker in package.json.
Found 1 instance in 1 package
No repository
Supply chain riskPackage does not have a linked source code repository. Without this field, a package will have no reference to the location of the source code use to generate the package.
Found 1 instance in 1 package
No website
QualityPackage does not have a website.
Found 1 instance in 1 package
Improved metrics
- Total package byte prevSize
- increased by2.27%
346840
- Number of package files
- increased by2.97%
104
- Lines of code
- increased by3.12%
4028
- Number of low maintenance alerts
- decreased by-100%
0
- Number of low quality alerts
- decreased by-50%
1
- Number of lines in readme file
- increased by9.25%
567
Worsened metrics
- Number of low license alerts
- increased byInfinity%
1