

Product
Introducing License Enforcement in Socket
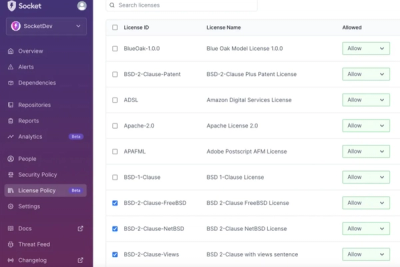
Ensure open-source compliance with Socket’s License Enforcement Beta. Set up your License Policy and secure your software!
By Philipp Burckhardt - Oct 17, 2024

This library has for goal to control the FlipDigit clock composed of 6 Small 7-segment displays by alfazeta with a Raspberry Pi.
The clock was designed to be used with Particle Electron. This library although is designed to control the clock with a Raspberry Pi which is more common and more accessible than the Particle.
The module is available on pip:
pip install flipdigitclock
If you install the library with pip, the required package are installed automatically. If you use the library from sources, the only library needed for this to work is RPi.GPIO. Basic installation can be made like so:
pip3 install RPi.GPIO
or by using the provided requirments.txt file:
pip3 install -r requirments.txt
You will need to connect GPIOs of the Raspberry Pi to the Particle Electron Slot. The default wiring is the following:
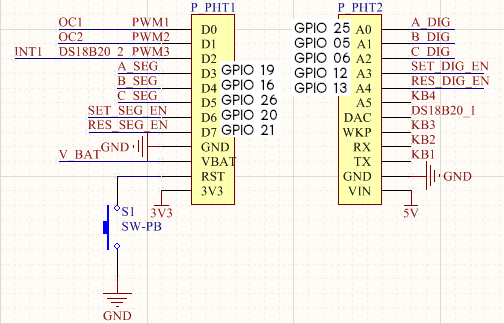
This wiring can be change in the constructor of the FlipDigitClock object which is the following:
clock = FlipDigitClock(A_DIG = 25, B_DIG = 5, C_DIG = 6, SET_DIG_EN = 12, RES_DIG_EN = 13, A_SEG = 19, B_SEG = 16, C_SEG = 26, SET_SEG_EN = 20, RES_SEG_EN = 21)
At first you need to create a clock object like so:
from flipdigitclock import *

clock =  FlipDigitClock()
If you want to change the wiring, check the upper part about it.
The sequence and timing of GPIO toggling is really specific! If the code is stopped, it might stop the sequence in unwanted state that may destroy your clock!
There is a function that reset all the GPIOs of your clock in a safe state:
clock.reset_all()
This function is called every time needed in the code but also if it receive a SIGINT (ctrl+c) or SIGTSTP (ctrl+z). Be really carefull to not stop the code during digit manipulation and how the code is excited!
To drive digits and segment, there is two enum and two arrays already in the lib to help you:
class DigitNumber(Enum):
    SEMI_COLLON_2 = 7
    SEMI_COLLON_1 = 3
    DIGIT_1 = 5
    DIGIT_2 = 1
    DIGIT_3 = 6
    DIGIT_4 = 2
    DIGIT_5 = 4
    DIGIT_6 = 0

DIGITS = [DigitNumber.DIGIT_1.value, DigitNumber.DIGIT_2.value, DigitNumber.DIGIT_3.value, DigitNumber.DIGIT_4.value, DigitNumber.DIGIT_5.value, DigitNumber.DIGIT_6.value, DigitNumber.SEMI_COLLON_2.value, DigitNumber.SEMI_COLLON_4.value]

class SegmentName(Enum):
    A = 3
    B = 5
    C = 1
    D = 6
    E = 2
    F = 4
    G = 0
    COLLON = 7

SEGMENTS = [SegmentName.A.value, SegmentName.B.value, SegmentName.C.value, SegmentName.D.value, SegmentName.E.value, SegmentName.F.value, SegmentName.G.value, SegmentName.COLLON.value]
The naming of the segment follow this pattern:
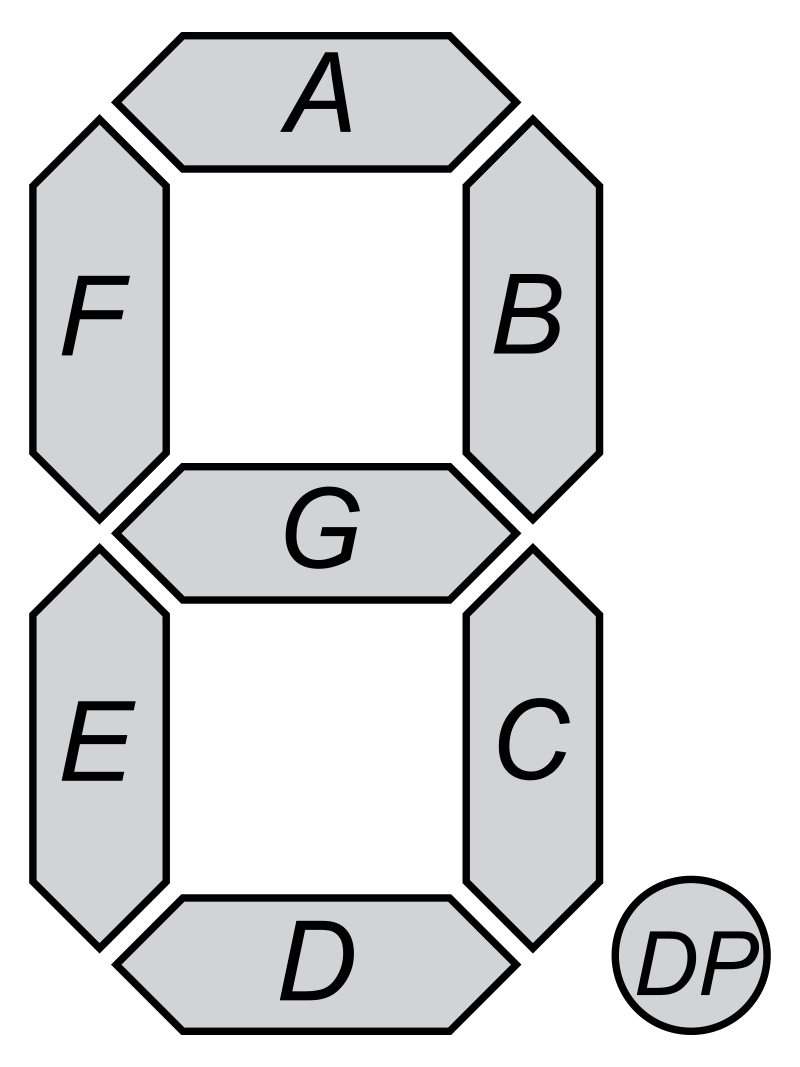
And the numbering of the digit start with DIGIT_1 on the left to DIGIT_6 on the right with SEMI_COLLON_1 for the left dots and SEMI_COLLON_2 for the right ones.
You can now drive single segment on specific digit like so:
clock =  FlipDigitClock()

clock.set_segment(DigitNumber.DIGIT_3.value, SegmentName.G.value)				# set G segment of digit 3
clock.reset_segment(DigitNumber.DIGIT_2.value, SegmentName.A.value)				# reset A segment of digit 2

clock.reset_segment(DigitNumber.SEMI_COLLON_2.value, SegmentName.COLLON.value) # same function for semi-collon
You can directly drive all the segment of a digit with an hex code. The code is going from a for the lsb to g for the msb
As example, a 0 is 0b111111 or 0x3F:
clock =  FlipDigitClock()

clock.set_segments(DigitNumber.DIGIT_3.value, 0x3F)				# set the digit 3 to 0x3f (0)
You can also use function do directly set a number to a digit, clear a digit, set numbers to all digit, and set the semi-collon dots:
clock =  FlipDigitClock()

clock.clear_digit(DigitNumber.DIGIT_1.value)	# clear digit 1
clock.clear_digits(DigitNumber.DIGIT_1.value)	# clear all digit

clock.set_number(DigitNumber.DIGIT_1.value, 7)	# set the digit 1 to 7

clock.set_multiple_digit_number(123456)				# set all the digit to 12 34 56
clock.set_multiple_digit_number(123456, True, True)	# set all the digit to 12:34:56

clock.set_dots(False,False)		# reset both semi-collon
Three examples are available in the examples folder:
Under MIT license. Please see License File for more information.
FAQs
Flip digit clock library
We found that flipdigitclock demonstrated a healthy version release cadence and project activity because the last version was released less than a year ago. It has 1 open source maintainer collaborating on the project.
Did you know?

Socket for GitHub automatically highlights issues in each pull request and monitors the health of all your open source dependencies. Discover the contents of your packages and block harmful activity before you install or update your dependencies.
Product
Ensure open-source compliance with Socket’s License Enforcement Beta. Set up your License Policy and secure your software!
Product
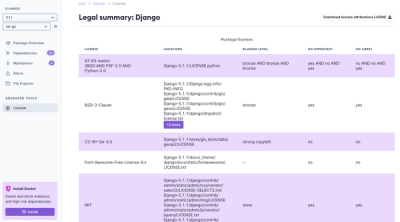
We're launching a new set of license analysis and compliance features for analyzing, managing, and complying with licenses across a range of supported languages and ecosystems.
Product
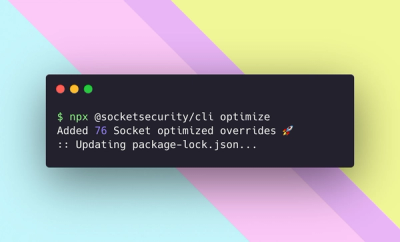
We're excited to introduce Socket Optimize, a powerful CLI command to secure open source dependencies with tested, optimized package overrides.