About
oclock is a Python 3 package.
Its main goal is to provide a simple way to create timed loops with constant time intervals and no drift.
It also provides various other timing tools and a GUI timer.
Timed loops
No drift, timed loops are based on the Timer class,
- either using the
checkpt() method at a location in a for/while loop acting as a reference point to maintain constant duration from one loop to the next,
- or using the
@loop or @interactiveloop decorators that use Timer and checkpt() in the background.
The timing (interval) and execution (pause/stop etc.) can be modified in real time thanks to cancellable sleeping times.
Other tools
Event: class mimicking threading.Event() but with much better sleeping time accuracy.Countdown: a class that starts a GUI countdown timer.parse_time() function: returns a datetime.timedelta from a time string (e.g. ':2:25' for 2 minutes and 25 seconds).measure_time() and measure_duration() functions: are context managers for measuring time and execution times / time uncertainty of encapsulated commands.after() allows the user to run a function after a pre-defined waiting time.- Note that the
Timer class can also be used as a regular chronometer with its methods pause(), resume(), stop() etc.
Quick start
Install
pip install oclock
Timed Loops
The Timer class is mostly designed to create loops of constant duration without drift, while allowing immediate modification/cancellation (sleep time interruption) in threaded environments. It can also be used as a regular chronometer.
Below are some peudo-code quick-start examples. For complete, working examples, see:
Constant-duration loops
The most basic use of the Timer() class in Python code to create a loop of constant duration is:
from oclock import Timer
timer = Timer(interval=2)
while condition:
my_function()
timer.checkpt()
The checkpt() method waits the adequate amount of time to make the loop of constant duration, without drift (using a target regularly spaced in time); condition can include timer methods and attributes, e.g. timer.elapsed_time < max_time.
Note that if my_function() takes longer to execute than the required time interval, the Timer class does not try to compensate the extra time by making the next loop shorter. It just aims at making the total duration of the next loop be the requested interval again (see Behavior when interval is exceeded section below).
The same behavior can be achieved using the @loop decorator:
from oclock import loop
timer = Timer(interval=2)
@loop(timer)
def my_function():
...
Then, calling my_function() will execute the contents of the function in a repeated manner.
The @loop execution exits automatically if the timer is stopped.
Thus, It is useful to include a condition in my_function to exit the loop when needed, e.g.
if timer.elapsed_time > t_max:
    timer.stop()
Interactive modification/cancellation
The timer is also modifiable (change time interval) and cancellable in real time (i.e. even when the timer is in a checkpt() waiting phase). To do so, it must be accessed by another thread that runs concurrently. For example:
from oclock import Timer
from threading import Thread
def user_input(timer):
"""Threaded command line input to change time interval or exit timer."""
while not timer.is_stopped:
a = input()
try:
dt = float(a)
except ValueError:
timer.stop()
else:
timer.interval = dt
timer = Timer(interval=2)
Thread(target=user_input, args=(exit_event, timer)).start()
while not timer.is_stopped:
my_function()
timer.checkpt()
During operation, the Timer object can be paused, resumed, stopped and reset using the corresponding Timer methods (see Regular Timer paragraph below). The oclock module also provides a simple command line interface to create a timed loop for a function and interact with it dynamically using the @interactiveloop decorator:
from oclock import interactiveloop
@interactiveloop(interval=2)
def my_function():
    ...
Now when my_function() is called, an interactive CLI thread starts at the same time where the user can pause/resume/reset/stop the timer in real time, change its interval, and print timing information.
Regular Timer
Although not its main purpose, the Timer class can be used as a regular chronometer with the following methods (no need to be in a threaded environment, although the methods below whould work and be cancellable in a threaded environment):
from oclock import Timer
timer = Timer()
timer.pause()
timer.resume()
timer.stop()
timer.reset()
timer.elapsed_time
timer.pause_time
timer.total_time
Important Note: Do not use the checkpt() method after a pause() call if not in a threaded environment, this will cause the program to be in a perpetual waiting state. In a threaded environment, call resume() to unpause.
Details
See Timer Class details section below for all methods, properties and attributes and the Development section below for accuracy information.
Event class
The oclock.Event class mimicks threading.Event (https://docs.python.org/3/library/threading.html#event-objects) but provides much better sleep time accuracy.
Available methods are the same as for threading.Event:
set()clear()is_set()wait()
Below are comments from Chris D. who originally posted the code for this class on StackOverflow (see Contributors at the end of this file):
Internally, it uses a combination of a time.sleep() loop and a busy loop for greatly increased precision. The sleep loop runs in a separate thread so that the blocking wait() call in the main thread can still be immediately interrupted. When the set() method is called, the sleep thread should terminate shortly afterwards. Also, in order to minimize CPU utilization, I made sure that the busy loop will never run for more than 3 milliseconds.
Countdown GUI
A simple graphical countdown timer based on the Timer class. It can be used either as a python main program from a shell, or as a function in Python code or console.
From a terminal:
python -m oclock 1:45:00
python -m oclock 1:45:
python -m oclock 00:02:00
python -m oclock :2:
python -m oclock 00:00:05
python -m oclock ::5
In python:
from oclock import Countdown
Countdown('1:45:')
(the inputs are of the same format as from the terminal, see above).
When countdown is finished, 'Done' is displayed for 5 seconds in the GUI while the console displays Countdown finished and emits a sound. Then the time passed since the end of countdown is displayed as a negative value in red. The program stops when the GUI window is closed.
Parse time function
The parse_time() function transforms a string in the form 'h:m:s' into a datetime.timedelta object.
It is thus a duration parsing function.
It is used e.g in the argument parsing of the countdown GUI from a terminal (see above).
Inputs of the form '::5' or :2:, '3:30:' are acceptable for 5 seconds, 2 minutes, and 3.5 hours, respectively.
>>> parse_time(':2:30')
datetime.timedelta(seconds=150)
See more examples in the help (docstring) of the function.
NOTE: if decimal numbers are used, they will all be summed up, e.g. parse_time(:1.5:30) yields a duration of 2 minutes.
Context managers to record timing of commands
The measure_time() function is a context manager that saves the timing info of the encapsulated commands. This can be e.g. used in scientific experiments to get the time and time uncertainty associated with a measurement.
from oclock import measure_time, measure_duration
with measure_time() as timing:
my_function()
print(timing)
with measure_duration() as duration:
my_function()
print(duration)
with measure_time() as data:
measurement = my_function()
data['measurement'] = measurement
print(data)
Execute function after waiting time
from oclock import after
def my_function():
print('Hello')
return 3.14
after('::2', my_function)
Timer Class details
Instantiation
from oclock import Timer
timer = Timer(interval=1, name='Timer', warnings=False, precise=False)
Parameters:
interval (float): timer interval in secondsname (str): optional name for description purposes (repr and warnings)warnings (bool): If True, prints warning when time interval exceededprecise (bool) if True, increase time precision (useful for Windows)
Note: The precise=True option uses a custom Event class to replace threading.Event, originally written by Chris D. (see below).
Methods
timer.checkpt()
timer.pause()
timer.resume()
timer.stop()
timer.reset()
timer.set_interval(...)
timer.set_interval(..., immediate=False)
Properties (settable)
timer.interval
timer.interval += 1
timer.interval = 10
timer.warnings
timer.warnings = True
timer.name
timer.name = 'Countdown timer'
Attributes (read-only)
timer.elapsed_time
timer.pause_time
timer.total_time
Background attributes and methods
(mostly for development)
timer.now()
timer.start_time
timer.next_checkpt_release
timer.interval_exceeded
Notes
-
As mentioned previously, methods (and interval setting) take effect immediately, even if the timer is in a waiting phase. It is however possible to wait for the next checkpt to apply a new timer interval, by using the immediate=False option in set_interval() (see example in the Examples.ipynb notebook).
-
After calling pause(), the checkpt() command blocks until resume() is called, however in the current version after stop() the checkpt() becomes non-blocking (equivalent to a pass), so that all following lines will be executed immediately and without any waiting time (i.e. as fast as possible if within a loop), until timer.reset() is called again. This means that it is useful to pin the condition of the loop to the stopping of the timer (see examples).
Timer accuracy
See performance.py file of the module for functions to test the behavior and accuracy of the timer. In particular:
from oclock.performance import performance_test
performance_test(dt=0.01, nloops=1000, fmax=0.99, plot=True, warnings=False, precise=True)
tests the timing on 1000 loops of requested duration 0.01 second (10ms), using within the loop a function sleeping for a random amount of time between 0 and 0.99 dt (with plot=True option to see the results on a matplotlib graph, and warnings=False to not have a printed warning when the execution time of the nested commands exceed the target duration of the loop); precise=True uses the timer in precise mode.
The AccuracyTests.md file gathers some accuracy results in Unix and Windows environments. In summary:
-
with Unix, time fluctuations are < 0.5 ms with the regular timer, and on the order of 0.01 ms (standard deviation) with the precise timer
-
with Windows, the regular timer fails quickly as frame rate is increased, due to fluctuations in the ~ 10 ms range. However the precise timer performs even better than in Unix, with fluctuations of less than 0.01 ms (standard deviation).
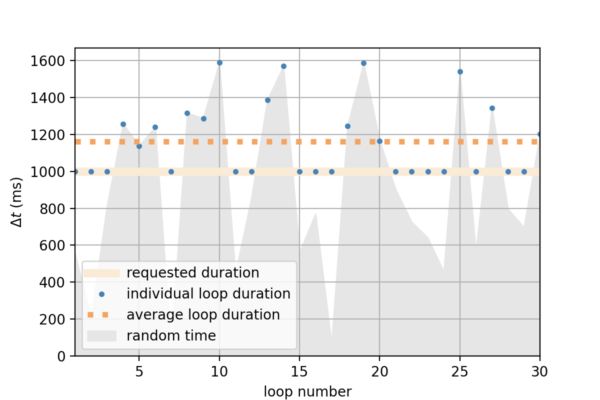
Behavior when interval is exceeded
As explained above, it the contents of the loop take longer to execute than the requested time interval, the Timer simply moves on to the next loop but does not try to compensate for the extra time by making the next loop shorter:
Development
Install the package by cloning the GitHub repo (https://github.com/ovinc/oclock.git) and install in editable mode from the root of the repo:
pip install -e .
Testing
Package requirements to run the tests:
General testing is done with pytest (from the root of the repository):
pytest
(Note: close the interactive countdown window at the end of the pytest run to finish the test.)
Additional testing of interactive command line for real-time timer control can be done by running the example file from the root of the repository.
python -m example
See also Accuracy Test paragraph above to run performance tests for constant-duration loops with the Timer class.
Contributing
Issues and Pull requests must be submitted on GitHub (https://github.com/ovinc/oclock) with commits (preferably squashed into a single commit) in branch authors.
Version number is automatically extracted from git tag using setuptools_scm. Git tags are added by the repo's maintainer.
Requirements
Python >= 3.5
Author
Olivier Vincent
(ovinc.py@gmail.com)
Contributors
The oclock.Event class was originally written by Chris D.
(https://stackoverflow.com/questions/48984512/making-a-timer-timeout-inaccuracy-of-threading-event-wait-python-3-6)
License
GNU GPLv3, see LICENSE file


