onsense — Phone Camera, Sensors & Files for PC AI Agents
Don't describe it. Let your AI see it. onsense is the PC-side MCP broker for the onSense Android app: run uvx onsense pair on your PC, and any MCP-capable AI — Claude Code, Claude Desktop, Codex, or your own agent — can see through your phone's camera, read its sensors, and move files & clipboard both ways. No cloud relay. No ADB.
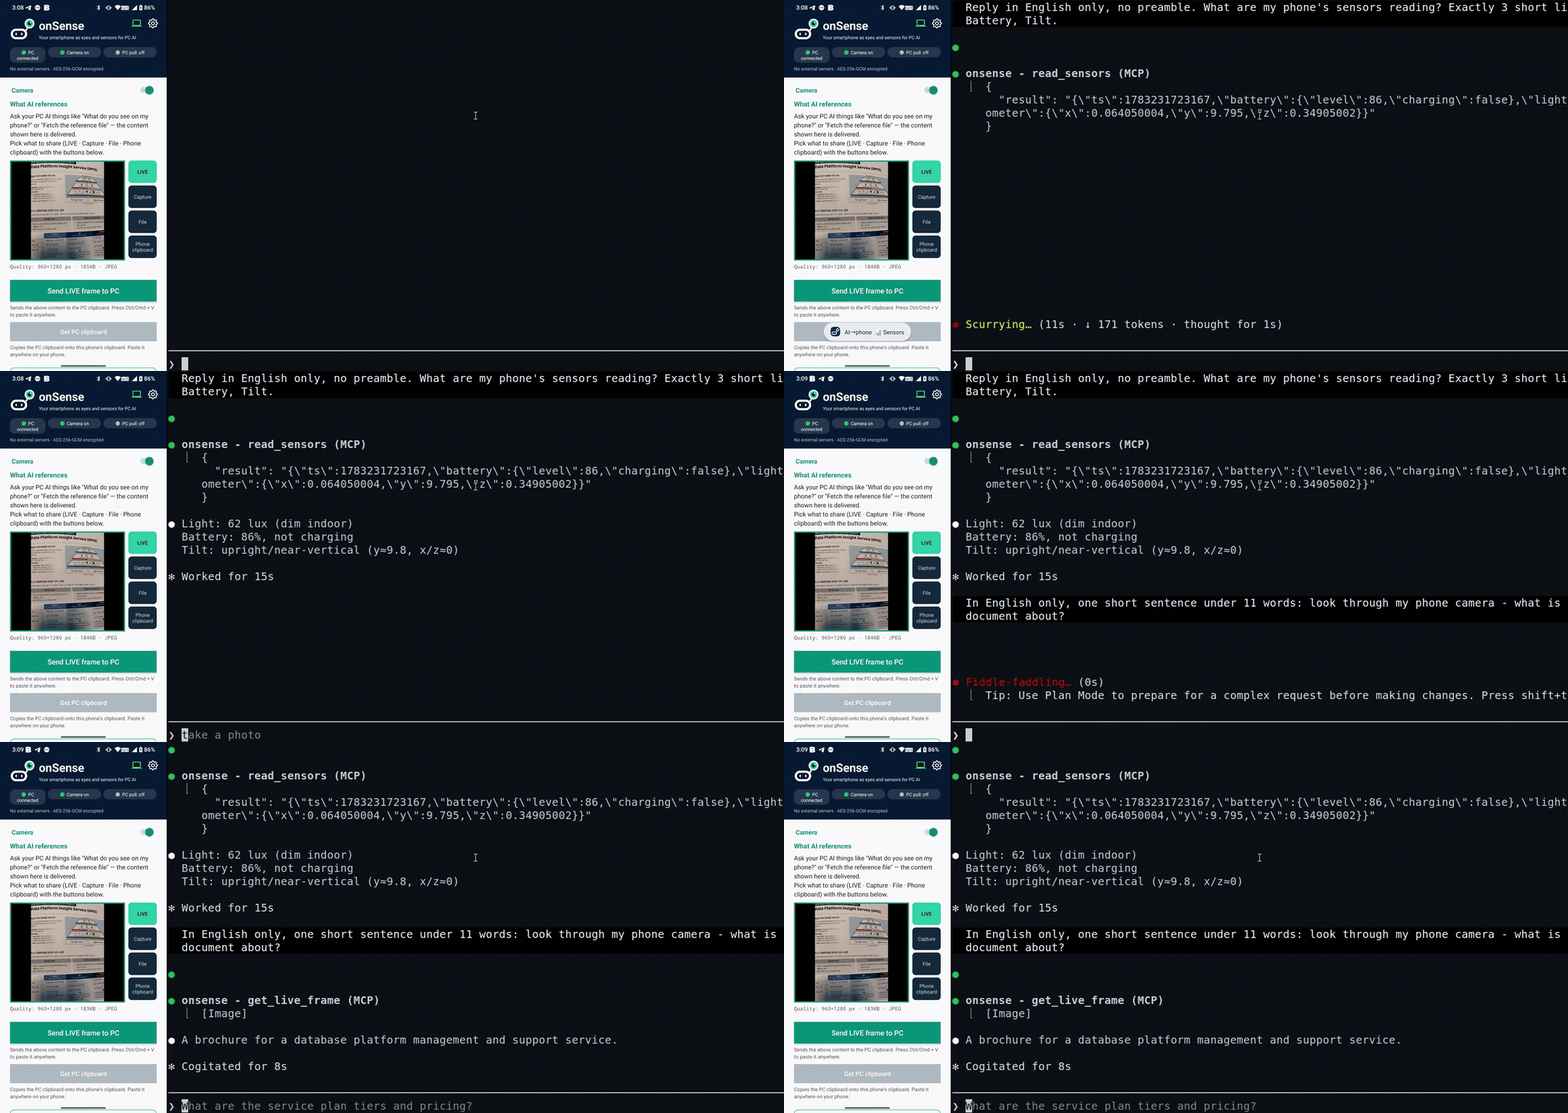
Claude Code, running on the PC, reads the phone's sensors and looks through its camera to answer — live, over local Wi-Fi.
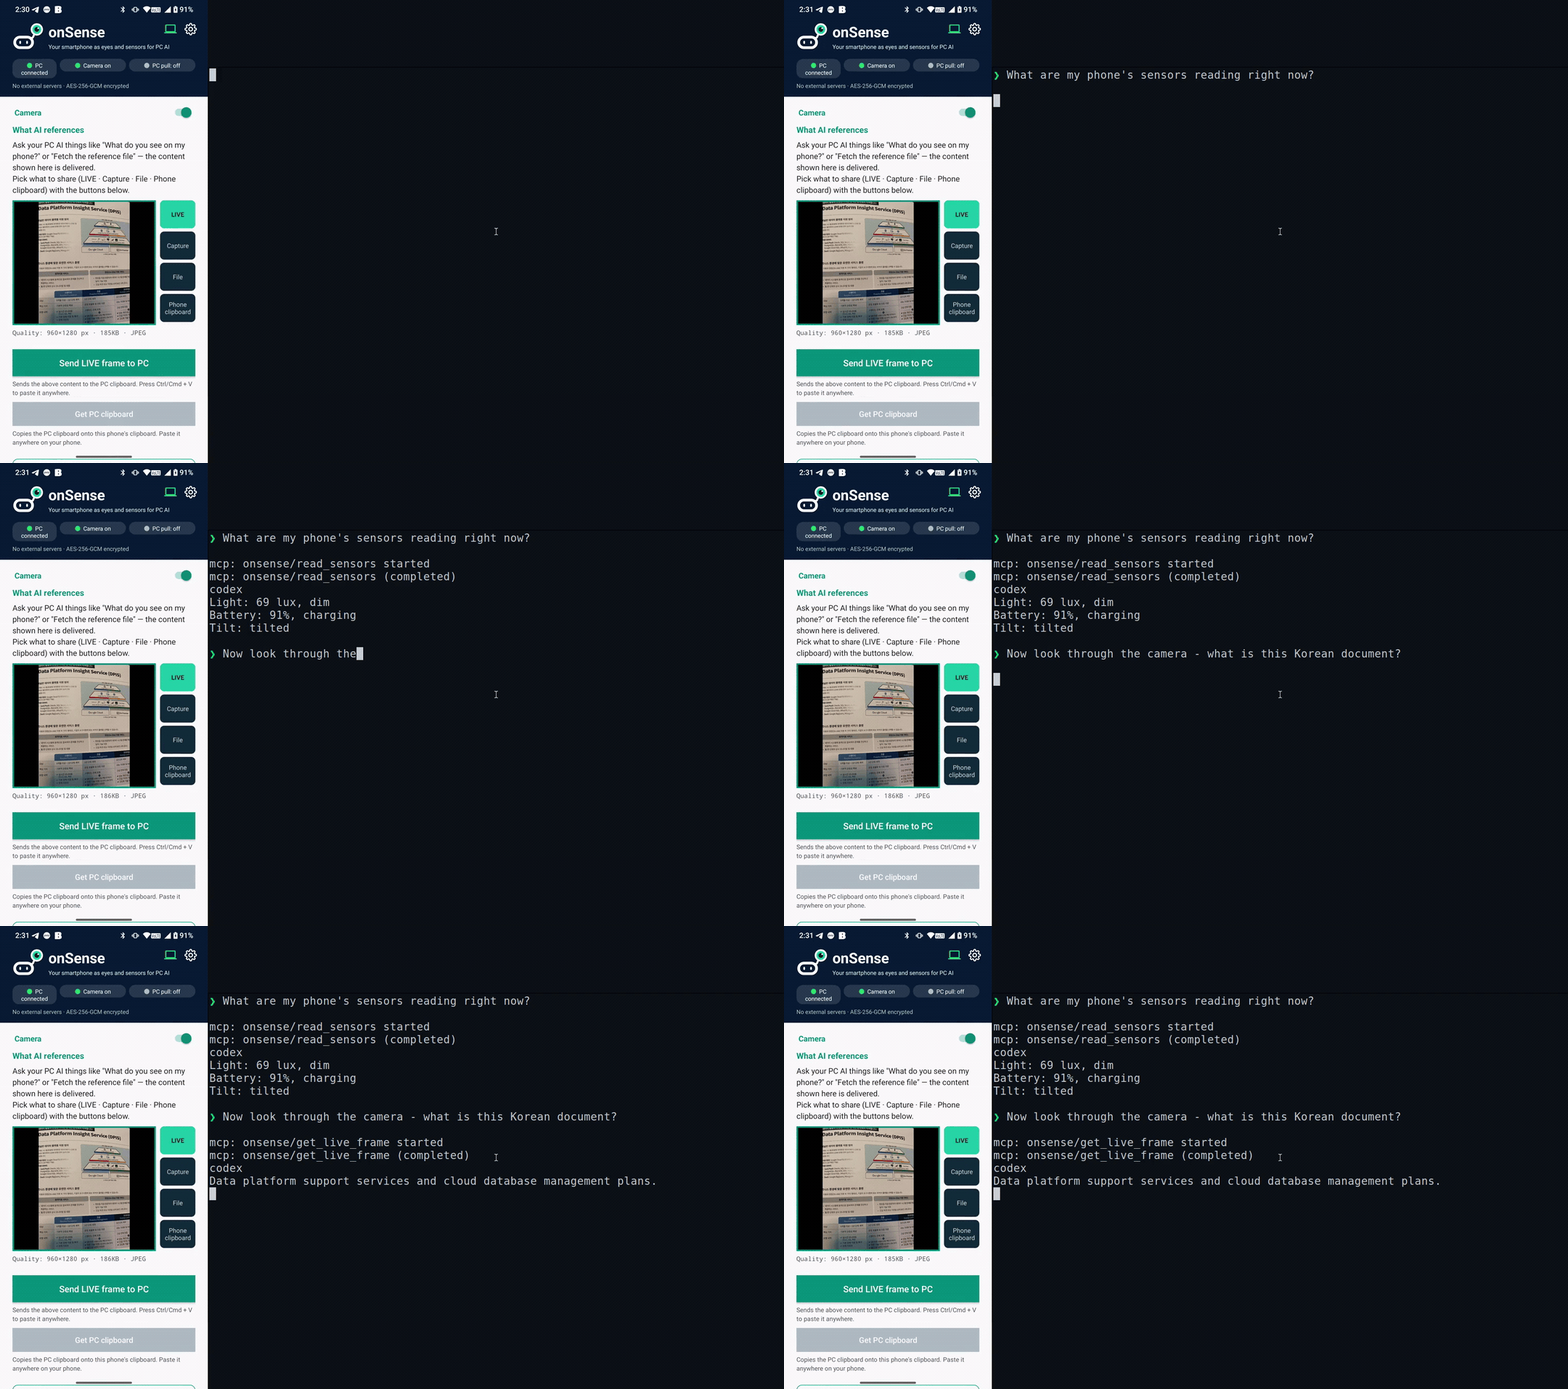
…and the same with Codex. onSense is a standard MCP server, so any MCP client works.
Architecture
Android phone (onSense app)           PC (this package)           AI client
  HTTP provider :8080        ←→    stdio MCP broker          Claude / Codex / …
  camera frames, photos,           onsense serve               natural-language or
  sensors, QR pairing              onsense clip :8770          /onsense tool calls
- The phone runs an HTTP provider on port 8080. It exposes camera frames, recent photos, and sensor readings, all gated by a pairing token.
- The PC package (
onsense) is a stdio MCP broker. It translates MCP tool calls from your AI client into HTTP requests to the phone.
- Discovery uses mDNS (
_onsense._tcp.local.). If the phone's IP changes, the broker rediscovers it automatically — no manual reconfiguration needed.
- An optional clip bridge daemon on port 8770 lets the phone push camera frames, files, and clipboard content to the PC (and, if enabled, lets the phone pull from the PC clipboard).
Requirements
- uv (provides
uvx; downloads a managed Python automatically — no separate Python install needed)
- The onSense Android app installed on a phone on the same local Wi-Fi network as your PC
- An MCP-compatible AI client such as Claude Code, Codex, or any stdio MCP client
Quick Start
0. Fresh PC without uv? Use the app's setup helper (recommended)
On a clean PC, uvx doesn't exist yet and the command below will fail with "'uvx' is not recognized". The easiest fix: install the onSense app first, tap "Start PC setup helper", and open the shown address on your PC. It gives you a one-line command that installs uv, pairs, and registers the MCP server in one go — and because the PC connects out to the phone, it also sidesteps the Windows firewall entirely.
Prefer installing uv yourself? One line:
# Windows (PowerShell)
irm https://astral.sh/uv/install.ps1 | iex
$env:Path = "$env:USERPROFILE\.local\bin;$env:Path"   # make uvx visible in this same shell
curl -LsSf https://astral.sh/uv/install.sh | sh
export PATH="$HOME/.local/bin:$PATH"
1. Pair your phone
Run this once. The PC prints a QR code; scan it from the onSense app ("Scan PC QR"). The phone pushes its address and token to the PC, which registers the MCP server automatically.
uvx onsense pair
After pairing, restart your AI client once so it picks up the new onsense MCP server.
2. Use it
Ask your AI client naturally:
"Take a photo of what's in front of my phone."
"What are the current sensor readings?"
"Show me the last 5 photos on my phone."
The MCP tools are called automatically. In Claude Code you can also use the bundled /onsense slash command (installed during pairing).
3. Diagnose problems
uvx onsense doctor
uvx onsense doctor --base http://192.168.1.5:8080 --token YOUR_PAIRING_TOKEN
Windows: QR scan times out?
The #1 cause is the Windows firewall dropping the phone's inbound connection:
-
If your Wi-Fi network profile is Public, inbound traffic is blocked hard. Switch it to Private (Settings → Network → your Wi-Fi → Network profile), or just use the app's PC setup helper, which needs no inbound port at all.
-
On a Private network, add a durable allow rule once (run as administrator):
uvx onsense pair --fix-firewall
The first-run firewall popup is program-path-scoped and uvx's ephemeral paths silently invalidate it — the port-scoped rule above (TCP 8765–8774, Private) is what actually sticks.
-
If port 8765 is taken, pair automatically falls back to the next free port (up to 8774) and the QR reflects the real port — no action needed.
Subcommands
uvx onsense pair | Display a QR code on the PC; phone scans it and pushes {base, token}; registers MCP automatically |
uvx onsense pair "onsense://pair?base=...&token=..." | Parse a pairing URI directly (phone-displayed QR → manual copy) |
uvx onsense pair --img screenshot.png | Decode a pairing QR from a screenshot file (requires opencv) |
uvx onsense serve | Run the MCP server (stdio). Also starts the clip daemon automatically unless --no-clip is passed |
uvx onsense serve --no-clip | Run the MCP server only, without starting the clip daemon |
uvx onsense clip | Run the clip bridge daemon standalone (port 8770) |
uvx onsense clip --allow-pull | Enable phone→pull: phone can GET /clip to retrieve the PC clipboard |
uvx onsense clip --set-clipboard | Auto-inject received content into the PC OS clipboard (off by default) |
uvx onsense pair --fix-firewall | (Windows, admin) Add the durable port-scoped firewall rule, then pair as usual |
uvx onsense doctor | Diagnose installation, connectivity, and phone reachability |
uvx onsense stats | Show local-only activation stats (--json, --reset). Nothing is uploaded automatically |
Other MCP clients (Claude Desktop, Codex, …)
uvx onsense pair auto-registers the server with Claude Code (via claude mcp add) — this one-line auto-setup is Claude Code-specific. The MCP server itself is standard stdio MCP, so any MCP-compatible client works once you add it manually. Run uvx onsense pair once first: it saves your phone's address and token to ~/.onsense/pair.json, which the server reads at request time — so you don't put the token in each client's config, and the phone's IP is auto-tracked via mDNS.
Claude Desktop — add to claude_desktop_config.json:
{ "mcpServers": { "onsense": { "command": "uvx", "args": ["onsense", "serve"] } } }
Codex — register via the CLI (verified with Codex CLI 0.142.5):
codex mcp add onsense -- uvx onsense serve
Codex sandbox note: Codex's default sandbox blocks network access, so the MCP server can't reach your phone and tool calls fail silently. Run Codex with network access enabled (e.g. --sandbox danger-full-access, or a sandbox policy that permits network) so onsense can talk to the phone on your LAN.
or add to ~/.codex/config.toml:
[mcp_servers.onsense]
command = "uvx"
args = ["onsense", "serve"]
Restart the client once after adding the server. Any other stdio MCP client works the same way — point it at uvx onsense serve.
MCP Tools
These tools are exposed to your AI client after pairing:
get_live_frame() | Capture the current camera frame from the phone (returns JPEG image) |
read_sensors() | Return phone sensor readings as JSON: battery level/charging state, ambient light (lux), accelerometer (x/y/z) |
recent_photos(limit=10) | List recent photos on the phone: id, name, date_added, size, width, height |
get_photo(id, max_width=1024) | Fetch a specific photo by id (downscaled to max_width); use ids from recent_photos |
get_reference() | Fetch whatever the phone has designated as its reference source — a live camera frame, a captured photo, or an arbitrary file (incl. non-images) — saved to disk with path + metadata. The core of the file/capture bridge |
get_cam_fps() | Read the phone's current camera FPS setting (15 = high-performance, 2 = balanced, 0 = on-demand) |
set_cam_fps(fps) | Set the phone's camera FPS: 15 (high-performance), 2 (balanced, recommended), or 0 (power-saving / on-demand) |
If the phone's IP changes, the broker retries using mDNS autodiscovery before surfacing an error.
Clip Bridge (Phone ↔ PC File & Clipboard)
onsense serve automatically starts a clip daemon on port 8770. You can also run it standalone with onsense clip.
Phone → PC push (POST /clip)
The onSense Android app can push content to the PC:
- Images are saved to disk as
latest.jpg (in ONSENSE_CLIP_DIR, default <tempdir>/onsense/).
- Text files are saved to disk.
- Other files (video, PDF, etc.) are saved to disk by filename.
- If
--set-clipboard is active, images and text are also injected into the PC OS clipboard so you can paste with Ctrl+V immediately.
By default, --set-clipboard is off — files are saved to disk but the clipboard is not touched.
PC → Phone pull (GET /clip)
Off by default. Enable with:
uvx onsense clip --allow-pull
When enabled, the phone can GET /clip to retrieve the current PC clipboard content (copied files first, then images, then text). Returns 204 if the clipboard is empty.
Ports and environment variables
PHONE_BASE | (from pairing) | Phone HTTP base URL, e.g. http://192.168.1.5:8080 |
PHONE_TOKEN | (from pairing) | Pairing auth token |
ONSENSE_CLIP_DIR | <tempdir>/onsense | Directory where pushed files are saved |
ONSENSE_CLIP_MAX_MB | 200 | Maximum incoming file size in MB (0 = unlimited) |
ONSENSE_CLIP_ALLOW_PULL | 0 | Set to 1 to enable PC→phone pull without the CLI flag |
ONSENSE_CLIP_SET_CLIPBOARD | 0 | Set to 1 to auto-inject into OS clipboard without the CLI flag |
ONSENSE_TEST_FRAME | (unset) | Local JPEG path returned by get_live_frame when phone is unreachable |
Security
Local network only. The PC-side services bind to all interfaces but reject connections from non-private IP addresses at the application layer. They are not intended to be exposed to the internet.
HMAC request signing. The pairing token is never sent in cleartext. Every authenticated request is signed with HMAC-SHA256 over METHOD\npath\ntimestamp\nnonce\nalgorithm, keyed by a signing key derived from the pairing token via HKDF-SHA256 (a key separate from the encryption key), and carries X-Ts / X-Nonce / X-Sig / X-Enc headers. Servers verify in constant time, reject timestamps outside a ±300 s window, and reject reused nonces — so a sniffed request cannot be replayed and the token cannot be stolen off the wire. New Android installs generate a 128-bit random token, stored on the phone and in ~/.onsense/pair.json (chmod 600) after pairing. (The /health endpoint is unauthenticated.) See PROTOCOL.md for the exact wire format.
Pull and clipboard injection are off by default. GET /clip (phone pulls PC clipboard) and OS clipboard auto-injection (phone push → Ctrl+V) are disabled unless you explicitly pass --allow-pull or --set-clipboard.
Encrypted bodies (AES-256-GCM). Sensitive payloads — camera frames, photos, sensor data, files, and clipboard content — are encrypted between the phone and your PC with AES-256-GCM (no cloud in between, so there is no third party to decrypt them). The key is derived from the pairing token via HKDF-SHA256 (a key separate from the signing key); each message uses a fresh 96-bit nonce, and the GCM tag authenticates the body and binds it to its request (so tampering or response substitution is rejected). A passive sniffer on the same Wi-Fi sees only ciphertext. Low-sensitivity metadata stays plaintext: the open /version and /health endpoints, HTTP error responses, and the saved-file path returned after a push. (Note: large transfers currently buffer the body in memory while encrypting/decrypting — chunked streaming for very large files is a future step. Transport-level TLS is also a possible future hardening.)
File size cap. Incoming pushes are rejected if they exceed ONSENSE_CLIP_MAX_MB (default 200 MB). Set to 0 to remove the cap.
Reporting a vulnerability. Please report security issues privately — see SECURITY.md. Do not open a public issue for security reports.
License
MIT. See LICENSE.