Product
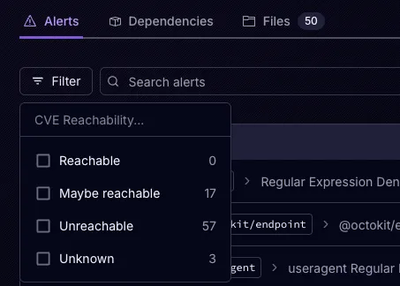
Announcing Precomputed Reachability Analysis in Socket
Socket’s precomputed reachability slashes false positives by flagging up to 80% of vulnerabilities as irrelevant, with no setup and instant results.
By Martin Torp - Jul 30, 2025

Wormhole is a forward proxy without caching. You may use it for:
asyncio and can leverage uvloop or winloop for even better performance. The number of concurrent connections is dynamically adjusted based on system limits.Please install the stable version using pip command:
$ pip install wormhole-proxy
You can install the development snapshot from the main branch on GitHub using the following command:
$ pip install git+https://github.com/cwt/wormhole.git@main
You can also install the development snapshot using pip with
mercurial:
$ pip install hg+https://hg.sr.ht/~cwt/wormhole
Or install from your local clone:
$ hg clone https://hg.sr.ht/~cwt/wormhole
$ cd wormhole/
$ pip install -e .
You can also install the latest tip snapshot using the following
command:
$ pip install https://hg.sr.ht/~cwt/wormhole/archive/tip.tar.gz
Run wormhole command
$ wormhole
Set browser's proxy setting to
host: 127.0.0.1
port: 8800
Wormhole includes built-in tools to securely manage users. These commands will prompt you to enter and confirm passwords interactively.
To create an authentication file and add a new user:
$ wormhole --auth-add wormhole.passwd <username>
To change an existing user's password:
$ wormhole --auth-mod wormhole.passwd <username>
To delete a user:
$ wormhole --auth-del wormhole.passwd <username>
To run the proxy with authentication enabled:
$ wormhole --auth wormhole.passwd
Update the ad-block database:
$ wormhole --update-ad-block-db ads.sqlite3
Run Wormhole with the ad-blocker enabled:
$ wormhole --ad-block-db ads.sqlite3
$ wormhole --help
The output will be similar to this:
usage: wormhole [-h] [-H HOST] [-p PORT] [--allow-private] [-S SYSLOG_HOST] [-P SYSLOG_PORT] [-l] [-v]
                [--auth AUTH_FILE] [--auth-add <AUTH_FILE> <USERNAME>] [--auth-mod <AUTH_FILE> <USERNAME>]
                [--auth-del <AUTH_FILE> <USERNAME>] [--ad-block-db AD_BLOCK_DB] [--update-ad-block-db DB_PATH]
                [--allowlist ALLOWLIST]

Wormhole (3.1.3): Asynchronous I/O HTTP/S Proxy

options:
  -h, --help            show this help message and exit
  -H HOST, --host HOST  Host address to bind [default: 0.0.0.0]
  -p PORT, --port PORT  Port to listen on [default: 8800]
  --allow-private       Allow proxying to private and reserved IP addresses (disabled by default)
  -S SYSLOG_HOST, --syslog-host SYSLOG_HOST
                        Syslog host or path (e.g., /dev/log)
  -P SYSLOG_PORT, --syslog-port SYSLOG_PORT
                        Syslog port [default: 514]
  -l, --license         Print license information and exit
  -v, --verbose         Increase verbosity (-v, -vv)

Authentication Options:
  --auth AUTH_FILE      Enable Digest authentication using the specified file.
  --auth-add <AUTH_FILE> <USERNAME>
                        Add a user to the authentication file and exit.
  --auth-mod <AUTH_FILE> <USERNAME>
                        Modify a user's password in the authentication file and exit.
  --auth-del <AUTH_FILE> <USERNAME>
                        Delete a user from the authentication file and exit.

Ad-Blocker Options:
  --ad-block-db AD_BLOCK_DB
                        Path to the SQLite database file containing domains to block.
  --update-ad-block-db DB_PATH
                        Fetch public ad-block lists and compile them into a database file, then exit.
  --allowlist ALLOWLIST
                        Path to a file of domains to extend the default allowlist.
Official images are available at quay.io/cwt/wormhole.
Pull the desired version tag from Quay.io.
# Replace <tag> with a specific version, e.g., v3.1.2
podman pull quay.io/cwt/wormhole:<tag>
To run Wormhole on the default port 8800 without authentication or ad-blocking:
podman run --rm -it -p 8800:8800 quay.io/cwt/wormhole:<tag>
Step A: Create the ad-block database on your host
First, you need to have a local config path to save the generated database file.
mkdir -p /path/to/config # change this to your desired path
Then, run the following command to create the ad-block database file:
podman run --rm -it -v /path/to/config:/config quay.io/cwt/wormhole:<tag> wormhole --update-ad-block-db /config/ads.sqlite3
This will create a file named ads.sqlite3 in /path/to/config/ on your host.
Step B: Run the container with the database mounted
Now, run the container, mounting the ads.sqlite3 file into the container's /config directory.
# Using :ro mounts the database as read-only for better security.
podman run --rm -it -p 8800:8800 \
  -v /path/to/config/ads.sqlite3:/config/ads.sqlite3:ro \
  quay.io/cwt/wormhole:<tag> \
  wormhole --ad-block-db /config/ads.sqlite3
Step A: Create an authentication file
First, you need to have a local config path to save the generated authentication file.
mkdir -p /path/to/config # change this to your desired path
Run a temporary container to create the authentication file. You will be prompted to enter a password for the new user.
# Replace <username> with your desired username
podman run --rm -it -v /path/to/config:/config quay.io/cwt/wormhole:<tag> \
  wormhole --auth-add /config/wormhole.passwd <username>
Step B: Run the container with the auth file mounted
Mount the authentication file into the /config directory.
# Replace /path/to/config with the absolute path to your wormhole.passwd file.
podman run --rm -it -p 8800:8800 \
  -v /path/to/config/wormhole.passwd:/config/wormhole.passwd:ro \
  quay.io/cwt/wormhole:<tag> \
  wormhole -a /config/wormhole.passwd
(Note: You can use docker in place of podman for all examples.)
MIT License (included in the source distribution)
FAQs
Asynchronous I/O HTTP and HTTPS Proxy on Python >= 3.11
We found that wormhole-proxy demonstrated a healthy version release cadence and project activity because the last version was released less than a year ago. It has 1 open source maintainer collaborating on the project.
Did you know?

Socket for GitHub automatically highlights issues in each pull request and monitors the health of all your open source dependencies. Discover the contents of your packages and block harmful activity before you install or update your dependencies.
Product
Socket’s precomputed reachability slashes false positives by flagging up to 80% of vulnerabilities as irrelevant, with no setup and instant results.
Product
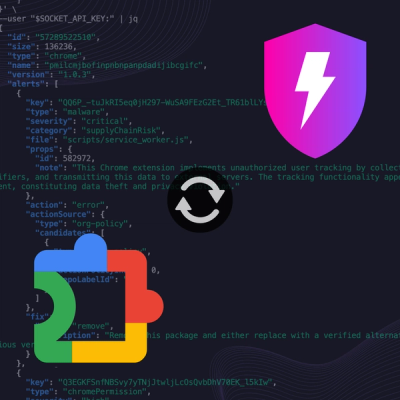
Socket is launching experimental protection for Chrome extensions, scanning for malware and risky permissions to prevent silent supply chain attacks.

Product
Add secure dependency scanning to Claude Desktop with Socket MCP, a one-click extension that keeps your coding conversations safe from malicious packages.