Research
Malicious NuGet Packages Typosquat Nethereum to Exfiltrate Wallet Keys
The Socket Threat Research Team uncovered malicious NuGet packages typosquatting the popular Nethereum project to steal wallet keys.
By Kirill Boychenko - Oct 22, 2025

Runs your UIAutomation tests from the command line for both iPhone and iPad, in the simulator or on your device.
Supports coffeescript and javascript.
Make sure bwoken is properly installed. Then, build your project and run all your tests via:
# will build and run all of your tests
$ bwoken test
# will run one file, relative to integration/coffeescript/{iphone,ipad}/
# (note: no file extension)
$ bwoken test --focus some_test # runs this test on (iphone and ipad) OR (connected iDevice)
$ bwoken test --focus some_test --family iphone
To add new coffeescript test, add those file to the /integration/coffeescript/iphone or /integration/coffeescript/ipad folder. To add new javascript test, if the iphone and ipad folder don't exist in the /integration/javascript forlder, create them. Then copy your test file inside those folder depending on your target. Your file hierarchy should look something like this
| integration
	| coffeescript
		| iphone
			| exemple.coffee
		| ipad
			| example.coffee
	| javascript
		| iphone
			| myTest.js
		| ipad
			| myiPadtest.js
	|tmp
Note that your test scripts inside the coffeescript and javascript folder will be copied to their equivalent folder in the /tmp folder(ie: /tmp/javascript/iphone/myTest.js), so all your import statement should be relative to that location (ie: #import "../filetoImport.js" for file in the javascript folder)
To run bwoken tests on your device, just plug it in! And if you want to run tests in the simulator, just unplug it!
# without a device connected, will run on the simulator:
$ bwoken test

# with a device connected, will run on the device:
$ bwoken test

# with a device connected, will run on the simulator:
$ bwoken test --simulator
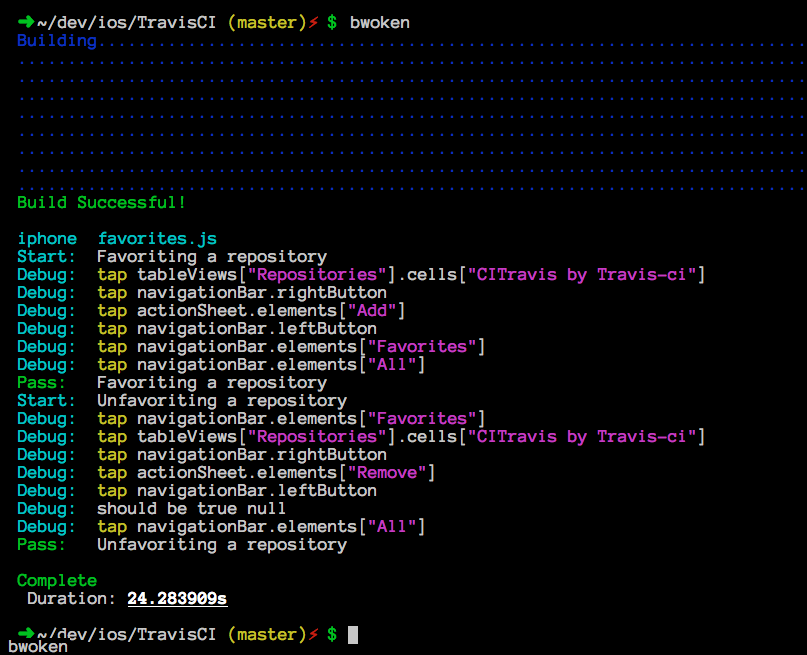
Your tests will look something like this:
$ bwoken test
Building.............................................................................
.....................................................................................
.....................................................................................
.....................................................................................
.....................................................................................
.....................................................................................
.....................................................................................
................................................................................
Build Successful!

iphone  favorites.js
Start:  Favoriting a repository
Debug:  tap tableViews["Repositories"].cells["CITravis by Travis-ci"]
Debug:  tap navigationBar.rightButton
Debug:  tap actionSheet.elements["Add"]
Debug:  tap navigationBar.leftButton
Debug:  tap navigationBar.elements["Favorites"]
Debug:  navigationBar.elements["Favorites"].scrollToVisible
Debug:  tap navigationBar.elements["All"]
Pass:   Favoriting a repository
Start:  Unfavoriting a repository
Debug:  tap navigationBar.elements["Favorites"]
Debug:  tap tableViews["Repositories"].cells["CITravis by Travis-ci"]
Debug:  tap navigationBar.rightButton
Debug:  tap actionSheet.elements["Remove"]
Debug:  tap navigationBar.leftButton
Debug:  should be true null
Debug:  tap navigationBar.elements["All"]
Pass:   Unfavoriting a repository

Complete
 Duration: 23.419741s
Here's a list of all the switches that bwoken takes for the test command:
$ bwoken test -h
[...]
        --simulator             Use simulator, even when an iDevice is connected
        --device                Use given device (name or id)
        --family                Test only one device type, either ipad or iphone. Default is to test on both
        --scheme                Specify a custom scheme
        --product-name          Specify a custom product name (e.g. --product-name="My Product"). Default is the name of of the xcodeproj file
        --integration-path      Specify a custom directory to store your test scripts in (e.g. --integration-path=uiautomation/path/dir). Note that this folder still expects the same directory structure as the one create by `bwoken init`.
        --formatter             Specify a custom formatter (e.g., --formatter=passthru)
        --focus                 Specify particular tests to run
        --clobber               Remove any generated file
        --skip-build            Do not build the iOS binary
        --configuration         The build configruation to use (e.g., --configuration=Release)
        --sdk-version           The SDK version to use (e.g., --sdk-version=6.1)
        --verbose               Be verbose
    -h, --help                  Display this help message.
Sometimes we'd like to have some javascript help us out. For example, what if you'd like Underscore.js in your test suite? Simple! Just put it in integration/javascript and import it in your test:
#import "../underscore.js"
Wanna bring in tuneup.js, mechanic, or underscore without manually downloading them first? Just use #github instead of #import:
#github "jashkenas/underscore/underscore.js"
#github "alexvollmer/tuneup_js/tuneup.js"
#github "jaykz52/mechanic/src/mechanic-core.js"
If you don't have an iOS project already, go ahead and create it. If you already have a project, no worries: you can install bwoken at any point.
Ensure your project is in a workspace rather than simply a project:
Note: This is done automatically if you use CocoaPods. I highly suggest you do!
Ensure Xcode is up-to-date.
Install rvm via the instructions. Ensure your after_cd_bundler rvm hook is enabled:
$ chmod u+x ~/.rvm/hooks/after_cd_bundler
NOTE: Do NOT use sudo to install or run bwoken. It will almost definitely fail you.
In the terminal, inside the directory of your project (e.g., you should see a ProjectName.xcodeproj file), create .ruby-version and .ruby-gemset files and trigger their use:
$ echo '2.1.0' > .ruby-version
$ echo 'my_project' > .ruby-gemset
$ cd .
Install bundler (a ruby library dependency manager) and init:
$ gem install bundler # idempotent; might already be installed and that's ok
$ bundle init
This will create a Gemfile. Add bwoken to it and bundle:
$ echo "gem 'bwoken', '2.0.0'" >> Gemfile
$ bundle
The last installation step is to initialize the bwoken file structure:
$ bwoken init
Now, you can start using it!
Technically, you can skip this entire Installation section and just run sudo gem install bwoken && bwoken init. This is listed here for completeness, but you really shouldn't install gems this way. This installation method will almost certainly not work with versions of OS X prior to Mavericks.
Special thank you goes out to everyone who's helped with bwoken. Here's a (probably incomplete) list of those folks:
git checkout -b my-new-feature)git commit -am 'Added some feature')git push origin my-new-feature)FAQs
Unknown package
We found that bwoken demonstrated a not healthy version release cadence and project activity because the last version was released a year ago. It has 1 open source maintainer collaborating on the project.
Did you know?

Socket for GitHub automatically highlights issues in each pull request and monitors the health of all your open source dependencies. Discover the contents of your packages and block harmful activity before you install or update your dependencies.
Research
The Socket Threat Research Team uncovered malicious NuGet packages typosquatting the popular Nethereum project to steal wallet keys.

Product
A single platform for static analysis, secrets detection, container scanning, and CVE checks—built on trusted open source tools, ready to run out of the box.
Product
Socket is launching experimental protection for the Hugging Face ecosystem, scanning for malware and malicious payload injections inside model files to prevent silent AI supply chain attacks.