Product
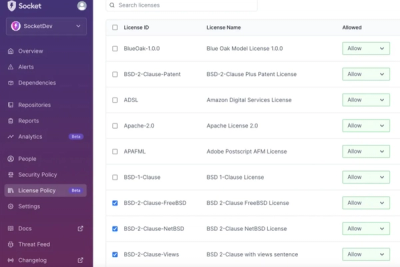
Introducing License Enforcement in Socket
Ensure open-source compliance with Socket’s License Enforcement Beta. Set up your License Policy and secure your software!
By Philipp Burckhardt - Oct 17, 2024
@baianat/align
Advanced tools
A simple text editor with expandable commands.
First step is to install it using yarn or npm:
npm install @baianat/align

# or use yarn
yarn add @baianat/align
<head>
  <link rel="stylesheet" href="dist/css/align.css">
  <!-- the editor's theme -->
  <link rel="stylesheet" href="dist/css/default-theme.css">
</head>
<body>
    ...
    <script type="text/javascript" src="dist/js/align.js"></script>
</body>
You need a div to render Align in it.
<div class="align"></div>

<script>
  new Align('.align', {
    // settings
  });
</script>
You can also pass the element directly to the constructor
<div class="align"></div>

<script>
  const myAlign = document.querySelector('.align');
  new Align(myAlign, {
    // settings
  });
</script>
Align comes with two styling bars(stylers), the main toolbar (toolbar) and the pop-up toolbar (bubble) that pops when you select a text.
You can choose to work with either of the toolbars, or both of them, by passing the toolbar object and/or the bubble object to the Align settings object.
You can choose what commands you'd like both of the stylers to include, by passing the desired commands through the commands array.
new Align('.editor', {
  shortcuts: true, // enable or disable keyboard shortcuts, default is (false)
  postTitle: 'title placeholder', // add title post placeholder, default is (false)
  toolbar: {
    tooltip: true, // show or hide commands tooltip, default is (false)
    commands: [
      {'fontSize': [false, 1, 2, 3, 4, 5, 6, 7]},
      {'fontName': ['Poppins', 'Raleway', 'Roboto']},
      'separator',
      'bold', 'italic', 'underline', 'strikeThrough',
      'separator',
      'justifyLeft', 'justifyCenter', 'justifyRight', 'justifyFull',
      'separator',
      'h2', 'h3', 'h4', 'p', 'blockquote', 'pre', 'createLink', 'insertLine',
      'separator',
      'orderedList', 'unorderedList', 'indent', 'outdent',
      'superscript', 'subscript',
      'separator',
      'color', 'backColor',
      'separator',
      'selectContent', 'removeFormat', 'undo', 'redo', 'fullscreen'
    ]
  },
  bubble: {
    theme: 'dark',
    commands: [
      'bold', 'italic', 'underline', 'strikeThrough',
      'separator',
      'justifyLeft', 'justifyCenter', 'justifyRight', 'justifyFull',
    ]
  },
  creator: {
    theme: 'light',
    items: ['figure', 'video', 'facebook', 'embed']
  }
});
| COMMAND | SHORTCUT | DESCRIPTION |
|---|---|---|
| font | changes the font name for the selection or at the insertion point. | |
| color | changes a font color for the selection or at the insertion point. | |
| backColor | changes the element background color. | |
| fontSize | changes the font size for the selection or at the insertion point. | |
| bold | Mac: ⌘ B Win: Ctrl B | toggles bold on/off for the selection or at the insertion point. |
| italic | Mac: ⌘ I Win: Ctrl I | toggles italics on/off for the selection or at the insertion point. |
| underline | Mac: ⌘ U Win: Ctrl U | toggles underline on/off for the selection or at the insertion point. |
| strikeThrough | toggles strikethrough on/off for the selection or at the insertion point. | |
| justifyLeft | Mac: ⌘ L Win: Ctrl L | justifies the selection or insertion point to the left. |
| justifyCenter | Mac: ⌘ E Win: Ctrl E | centers the selection or insertion point. |
| justifyRight | Mac: ⌘ R Win: Ctrl R | right-justifies the selection or the insertion point. |
| justifyFull | Mac: ⌘ J Win: Ctrl J | justifies the selection or insertion point. |
| superscript | Mac: ⌘ ⇧ = Win: Ctrl ⇧ = | toggles superscript on/off for the selection or at the insertion point. |
| subscript | Mac: ⌘ = Win: Ctrl = | toggles subscript on/off for the selection or at the insertion point. |
| indent | Mac: ⇥ Win: Tab | indents the line containing the selection or insertion point. |
| outdent | Mac: ⇧ ⇥ Win: Shift Tab | outdents the line containing the selection or insertion point. |
| selectContent | Mac: ⌘ ⇧ A Win: Ctrl Shift A | selects all of the content of the editor region. |
| removeFormat | Mac: ⌘ \ Win: Ctrl \ | removes all formatting from the current selection. |
| h1 | adds an HTML h1 tag around the line containing the current selection. | |
| h2 | adds an HTML h2 tag around the line containing the current selection. | |
| blockquote | adds an HTML blockquote tag around the line containing the current selection. | |
| p | adds an HTML p tag around the line containing the current selection. | |
| pre | adds an HTML pre tag around the line containing the current selection so you can highlight its script. | |
| orderedList | creates a numbered ordered list for the selection or at the insertion point. | |
| unorderedList | creates a bulleted unordered list for the selection or at the insertion point. | |
| insertLine | inserts a horizontal rule at the insertion point (deletes selection). | |
| createLink | creates an anchor link from the selection text. | |
| html | toggles HTML on/off for all text. | |
| sperator | used for decoration to separate commands. |
| ITEM | DESCRIPTION |
|---|---|
| figure | uploades an image figure and inseart it in the selected place |
| video | embed a video for youtube/vimeo url in the selected place |
| embed a facebook post from url in the selected place | |
| embed | embed any embed iframe script in the selected place |
To extend Align's cmdsSchemas object to add a new command or overwrite a current command behavior, use Align.extend('commandName', { //setting })
Note: you can overwrite the current commands behavior, if you used your
commandNamesame as one ofAlign's commands.
Align.extend('commandName', {
  element: 'custom',
  data() {
    // a function to store a reference to command elements
  },
  create() {
    // a function to render the command on execution
  },
  action() {
    // a function to define command actions
  }
})
A full working example on how to add addImage command
Align.extend('addImage', {
  element: 'custom',
  data() {
    return {
      button: document.createElement('div'),
      input: document.createElement('input'),
      icon:
        `<svg class="icon" viewBox="0 0 24 24">
          <path d="M21 19V5c0-1.1-.9-2-2-2H5c-1.1 0-2 .9-2 2v14c0 1.1.9 2 2 2h14c1.1 0 2-.9 2-2zM8.5 13.5l2.5 3.01L14.5 12l4.5 6H5l3.5-4.5z"></path>
        </svg>`
    }
  },
  create() {
    this.$data = this.data;
    this.data = this.$data();
    const button = this.data.button;
    const input = this.data.input;
    const icon = this.data.icon;

    button.classList.add('styler-button');
    button.appendChild(input);
    button.insertAdjacentHTML('beforeend', icon);
    input.classList.add('styler-input');
    input.type = 'file';
    input.addEventListener('change', this.action.bind(this));

    return button;
  },
  action() {
    const file = this.data.input.files[0];
    const selectedPosition = window.getSelection().getRangeAt(0);
    if (!file || !window.getSelection().rangeCount) return;
    const imageURL = URL.createObjectURL(file);
    const img = document.createElement('img');

    img.src = imageURL;
    img.classList.add('align-image');
    selectedPosition.insertNode(img);
    this.data.input.value = null;

    // add your logic to save `imageURL` in the database
  }
});
If you want to change Align's icons or add a new one, use Align.extendIcon('iconName', 'svg path')
Note: your icon should be only one path SVG.
// change bold command icon
Align.extendIcons('bold', 'M12 2c1.1 0 2 .9 2 2s-.9 2-2 2-2-.9-2-2 .9-2 2-2zm9 7h-6v13h-2v-6h-2v6H9V9H3V7h18v2z');
To get Align's content you can use content property
To get Align's post title you can use title property
saveToDatabase(myEditor.content);
We using highlight.js plug-in to highlight pre tags.
To enable syntax highlighting you have to include highlight.js as external dependence before Align
<head>
  <link rel="stylesheet" href="dist/css/align.css">
  <link rel="stylesheet" href="path-to/highlight.min.css">
</head>
<body>
    ...
  <script src="path-to/highlight.min.js"></script>
  <script src="dist/js/align.js"></script>
</body>
Copyright (c) 2017 Baianat
FAQs
ES6 text editor
The npm package @baianat/align receives a total of 5 weekly downloads. As such, @baianat/align popularity was classified as not popular.
We found that @baianat/align demonstrated a not healthy version release cadence and project activity because the last version was released a year ago. It has 3 open source maintainers collaborating on the project.
Did you know?

Socket for GitHub automatically highlights issues in each pull request and monitors the health of all your open source dependencies. Discover the contents of your packages and block harmful activity before you install or update your dependencies.
Product
Ensure open-source compliance with Socket’s License Enforcement Beta. Set up your License Policy and secure your software!
Product
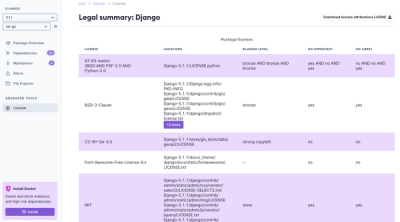
We're launching a new set of license analysis and compliance features for analyzing, managing, and complying with licenses across a range of supported languages and ecosystems.
Product
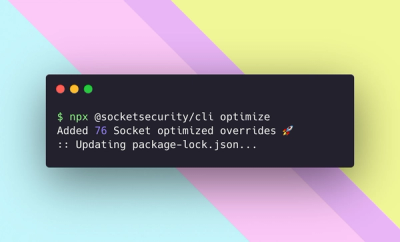
We're excited to introduce Socket Optimize, a powerful CLI command to secure open source dependencies with tested, optimized package overrides.