Product
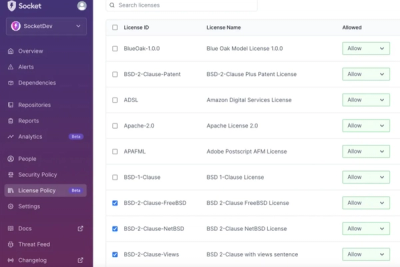
Introducing License Enforcement in Socket
Ensure open-source compliance with Socket’s License Enforcement Beta. Set up your License Policy and secure your software!
By Philipp Burckhardt - Oct 17, 2024
@solana/pay
Advanced tools
`@solana/pay` is a JavaScript library for facilitating commerce on Solana by using a token transfer URL scheme. The URL scheme ensures that no matter the wallet or service used, the payment request must be created and interpreted in one standard way.
@solana/pay is a JavaScript library for facilitating commerce on Solana by using a token transfer URL scheme. The URL scheme ensures that no matter the wallet or service used, the payment request must be created and interpreted in one standard way.
Businesses and developers can use Solana Pay to accept payments in SOL or any SPL token without intermediaries. It offers frictionless and portable integration options like payment links, pay now buttons or QR codes on your app, dApp, website, blog, and so much more.

Payment requests can be encoded as a URL according to the scheme, scanned using a QR code, sent and confirmed by the wallet, and discovered by the app.

With a Solana Pay button, you could integrate an embeddable payment button that can be added to your existing app.

Payment requests could be encoded as a deep link. The app prepares a payment request, and passes control to the wallet. The wallet signs, sends, and confirms it, or cancels the request and passes control back to the app.
Learn how to integrate Solana Pay in your website, application or wallet.
This section describes how a merchant can integrate Solana Pay into their payments flow. It shows how to create a payment request link, encode it into a QR code, find the transaction, and validate it.
This guide walks through an example of a QR code-based Point of Sale system that accepts payments via Solana Pay.
The complete example code can be found here.
Before you can receive payments, you'll need to obtain a native SOL address. This doesn't cost anything, and you can use any wallet to get started.
If you want to receive USDC or another SPL token on Solana, you'll need to create a token account, which may require a small amount of SOL.
One way to do both is to use FTX / FTX.us, which will provide a native SOL deposit address and an associated USDC token account to receive payments.
Install the packages and import them in your code.
npm
npm install @solana/pay @solana/web3.js --save
yarn
yarn add @solana/pay @solana/web3.js
When working on Solana, you will need to connect to the network. For our example, we will connect to devnet.
devnet network
import { Cluster, clusterApiUrl, Connection } from '@solana/web3.js';

async function main() {
    // Variable to keep state of the payment status
    let paymentStatus: string;

    // Connecting to devnet for this example
    console.log('1. ✅ Establish connection to the network');
    const connection = new Connection(clusterApiUrl('devnet'), 'confirmed');
}
Solana Pay uses a standard URL scheme across wallets for native SOL and SPL Token payments. Several parameters are encoded within the link representing an intent to collect payment from a customer.
recipient, amount, label, message , memo and reference.
// -- snippet -- //

/**
 * Simulate a checkout experience
 *
 * Recommendation:
 * `amount` and `reference` should be created in a trusted environment (server).
 * The `reference` should be unique to a single customer session,
 * and will be used to find and validate the payment in the future.
 *
 */
console.log('2. 🛍 Simulate a customer checkout \n');
const amount = new BigNumber(20);
const reference = new Keypair().publicKey;
const label = 'Jungle Cats store';
const message = 'Jungle Cats store - your order - #001234';
const memo = 'JC#4098';

/**
 * Create a payment request link
 *
 * Solana Pay uses a standard URL scheme across wallets for native SOL and SPL Token payments.
 * Several parameters are encoded within the link representing an intent to collect payment from a customer.
 */
console.log('3. 💰 Create a payment request link \n');
const url = encodeURL({ recipient: MERCHANT_WALLET, amount, reference, label, message, memo });
For SPL Token transfers, use the spl-token parameter. The spl-token is the mint address of the SPL token.
    // -- snippet -- //

     /**
     * Simulate a checkout experience
     *
     * Recommendation:
     * `amount` and `reference` should be created in a trusted environment (server).
     * The `reference` should be unique to a single customer session,
     * and will be used to find and validate the payment in the future.
     *
     */
    console.log('2. 🛍 Simulate a customer checkout \n');
    const amount = new BigNumber(20);
    const reference = new Keypair().publicKey;
    const label = 'Jungle Cats store';
    const message = 'Jungle Cats store - your order - #001234';
    const memo = 'JC#4098';
+   const splToken = 'EPjFWdd5AufqSSqeM2qN1xzybapC8G4wEGGkZwyTDt1v';

    /**
     * Create a payment request link
     *
     * Solana Pay uses a standard URL scheme across wallets for native SOL and SPL Token payments.
     * Several parameters are encoded within the link representing an intent to collect payment from a customer.
     */
    console.log('3. 💰 Create a payment request link \n');
-   const url = encodeURL({ recipient: MERCHANT_WALLET, amount, reference, label, message, memo });
+   const url = encodeURL({ recipient: MERCHANT_WALLET, amount, reference, label, message, memo, splToken });
Now that you've created a payment link, you need a way to show it to your customers.
// -- snippet -- //

/**
 * Create a payment request link
 *
 * Solana Pay uses a standard URL scheme across wallets for native SOL and SPL Token payments.
 * Several parameters are encoded within the link representing an intent to collect payment from a customer.
 */
console.log('3. 💰 Create a payment request link \n');
const url = encodeURL({ recipient: MERCHANT_WALLET, amount, reference, label, message, memo });

// encode URL in QR code
const qrCode = createQR(url);

The QR code needs to be visible on your payment page.
// -- snippet -- //

console.log('3. 💰 Create a payment request link \n');
const url = encodeURL({ recipient: MERCHANT_WALLET, amount, reference, label, message, memo });

// encode URL in QR code
const qrCode = createQR(url);

// get a handle of the element
const element = document.getElementById('qr-code');

// append QR code to the element
qrCode.append(element);
Instructions on integrating with your framework of choice can be found here.
With the payment link set up and shown to the customer, you will need to ensure that the customer has paid for the item before shipping their order.
When a customer approves the payment request in their wallet, this transaction exists on-chain. You can use any references encoded into the payment link to find the exact transaction on-chain.
findTransactionSignature to find the on-chain transaction. Provide a reference to this function that identifies the transaction associated with the order.
// -- snippet -- //

/**
 * Simulate wallet interaction
 *
 * This is only for example purposes. This interaction will be handled by a wallet provider
 */
console.log('4. 🔐 Simulate wallet interaction \n');
simulateWalletInteraction(connection, url);

// Update payment status
paymentStatus = 'pending';

/**
 * Wait for payment to be confirmed
 *
 * When a customer approves the payment request in their wallet, this transaction exists on-chain.
 * You can use any references encoded into the payment link to find the exact transaction on-chain.
 * Important to note that we can only find the transaction when it's **confirmed**
 */
console.log('\n5. Find the transaction');
const signatureInfo = await findTransactionSignature(connection, reference, undefined, 'confirmed');

// Update payment status
paymentStatus = 'confirmed';
Note: The findTransactionSignature function uses confirmed as the default finality value. This can, on rare occasions, result in a transaction that is not fully complete. For full finality, use finalized. This can result in slower transaction completion.
If a transaction with the given reference can't be found, the findTransactionSignature function will throw an error. There are a few reasons why this could be:
// -- snippet -- //

let signatureInfo: ConfirmedSignatureInfo;

return new Promise((resolve, reject) => {
    /**
     * Retry until we find the transaction
     *
     * If a transaction with the given reference can't be found, the `findTransactionSignature`
     * function will throw an error. There are a few reasons why this could be a false negative:
     *
     * - Transaction is not yet confirmed
     * - Customer is yet to approve/complete the transaction
     *
     * You can implement a polling strategy to query for the transaction periodically.
     */
    const interval = setInterval(async () => {
        console.log('Checking for transaction...', count);
        try {
            signatureInfo = await findTransactionSignature(connection, reference, undefined, 'confirmed');
            console.log('\n 🖌  Signature found: ', signatureInfo.signature);
            clearInterval(interval);
            resolve(signatureInfo);
        } catch (error: any) {
            if (!(error instanceof FindTransactionSignatureError)) {
                console.error(error);
                clearInterval(interval);
                reject(error);
            }
        }
    }, 250);
});
Once the findTransactionSignature function returns a signature, it confirms that a transaction that references the order has been recorded on-chain. But it doesn't guarantee that a valid transfer with the expected amount and recipient happened.
validateTransactionSignature allows you to validate that the transaction signature found matches the transaction that you expected.
// -- snippet -- //

/**
 * Validate transaction
 *
 * Once the `findTransactionSignature` function returns a signature,
 * it confirms that a transaction with reference to this order has been recorded on-chain.
 *
 * `validateTransactionSignature` allows you to validate that the transaction signature
 * found matches the transaction that you expected.
 */
console.log('\n6. 🔗 Validate transaction \n');
const amountInLamports = amount.times(LAMPORTS_PER_SOL).integerValue(BigNumber.ROUND_FLOOR);

try {
    await validateTransactionSignature(connection, signature, MERCHANT_WALLET, amountInLamports, undefined, reference);

    // Update payment status
    paymentStatus = 'validated';
    console.log('✅ Payment validated');
    console.log('📦 Ship order to customer');
} catch (error) {
    console.error('❌ Payment failed', error);
}
We recommend handling a customer session in a secure environment. Building a secure integration with Solana Pay requires a payment flow as follows:

The steps outlined above prevents:
This section describes how a wallet provider can support payment links in their wallet. It shows how to parse the payment URL and create a transaction from it.
This guide walks through an example implementation for wallet providers. The purpose of this is to make it easy for wallets to implement the protocol correctly.
Install the packages and import them in your code.
npm
npm install @solana/pay @solana/web3.js --save
yarn
yarn add @solana/pay @solana/web3.js
As a wallet provider, you will have to parse the received URL to extract the parameters. For more information on the URL format, please see the specification.
import { parseURL } from '@solana/pay';

/**
 * For example only
 *
 * The URL that triggers the wallet interaction; follows the Solana Pay URL scheme
 * The parameters needed to create the correct transaction is encoded within the URL
 */
const url =
    'solana:mvines9iiHiQTysrwkJjGf2gb9Ex9jXJX8ns3qwf2kN?amount=0.01&reference=82ZJ7nbGpixjeDCmEhUcmwXYfvurzAgGdtSMuHnUgyny&label=Michael&message=Thanks%20for%20all%20the%20fish&memo=OrderId5678';
const { recipient, amount, splToken, reference, label, message, memo } = parseURL(url);
Use the createTransaction function to create a transaction with the parameters from the parseURL function with an additional payer.
The payer should be the public key of the current users' wallet.
import { parseURL, createTransaction } from '@solana/pay';

const url =
    'solana:mvines9iiHiQTysrwkJjGf2gb9Ex9jXJX8ns3qwf2kN?amount=0.01&reference=82ZJ7nbGpixjeDCmEhUcmwXYfvurzAgGdtSMuHnUgyny&label=Michael&message=Thanks%20for%20all%20the%20fish&memo=OrderId5678';
const { recipient, amount, splToken, reference, label, message, memo } = parseURL(url);

/**
 * Create the transaction with the parameters decoded from the URL
 */
const payer = CUSTOMER_WALLET.publicKey;
const tx = await createTransaction(connection, payer, recipient, amount as BigNumber, {
    reference,
    memo,
});
This transaction should represent the original intent of the payment request link. The example implementation walks through the steps on how to construct the transaction:
Native SOL transfer
SPL token transfer
With the transaction formed. The user must be prompted to approve the transaction.
The label and message should be shown to the user, as it gives added context to the user on the transaction.
sendAndConfirmTransaction to complete the transaction.
const { recipient, message, memo, amount, reference, label } = parseURL(url);
console.log('label: ', label);
console.log('message: ', message);

/**
* Create the transaction with the parameters decoded from the URL
*/
const tx = await createTransaction(connection, CUSTOMER_WALLET.publicKey, recipient, amount as BigNumber, {
reference,
memo,
});

/**
* Send the transaction to the network
*/
sendAndConfirmTransaction(connection, tx, [CUSTOMER_WALLET]);
The Solana Pay JavaScript SDK is open source and available under the Apache License, Version 2.0. See the LICENSE file for more info.
FAQs
`@solana/pay` is a JavaScript library for facilitating commerce on Solana by using a token transfer URL scheme. The URL scheme ensures that no matter the wallet or service used, the payment request must be created and interpreted in one standard way.
The npm package @solana/pay receives a total of 1,278 weekly downloads. As such, @solana/pay popularity was classified as popular.
We found that @solana/pay demonstrated a not healthy version release cadence and project activity because the last version was released a year ago. It has 13 open source maintainers collaborating on the project.
Did you know?

Socket for GitHub automatically highlights issues in each pull request and monitors the health of all your open source dependencies. Discover the contents of your packages and block harmful activity before you install or update your dependencies.
Product
Ensure open-source compliance with Socket’s License Enforcement Beta. Set up your License Policy and secure your software!
Product
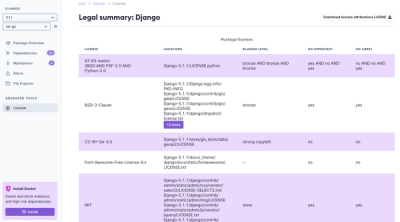
We're launching a new set of license analysis and compliance features for analyzing, managing, and complying with licenses across a range of supported languages and ecosystems.
Product
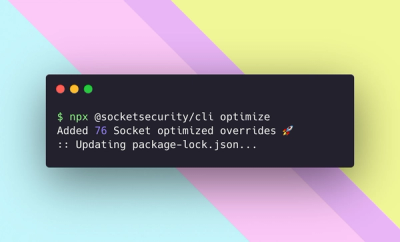
We're excited to introduce Socket Optimize, a powerful CLI command to secure open source dependencies with tested, optimized package overrides.