
Security News
Oracle Drags Its Feet in the JavaScript Trademark Dispute
Oracle seeks to dismiss fraud claims in the JavaScript trademark dispute, delaying the case and avoiding questions about its right to the name.
By Sarah Gooding - Feb 07, 2025
aallen-vue2
Advanced tools
TUIKit 是基于 IM SDK 实现的一套 UI 组件,其包含会话、聊天、群组、个人资料等功能,基于 TUIKit 组件您可以像搭积木一样快速搭建起自己的业务逻辑。
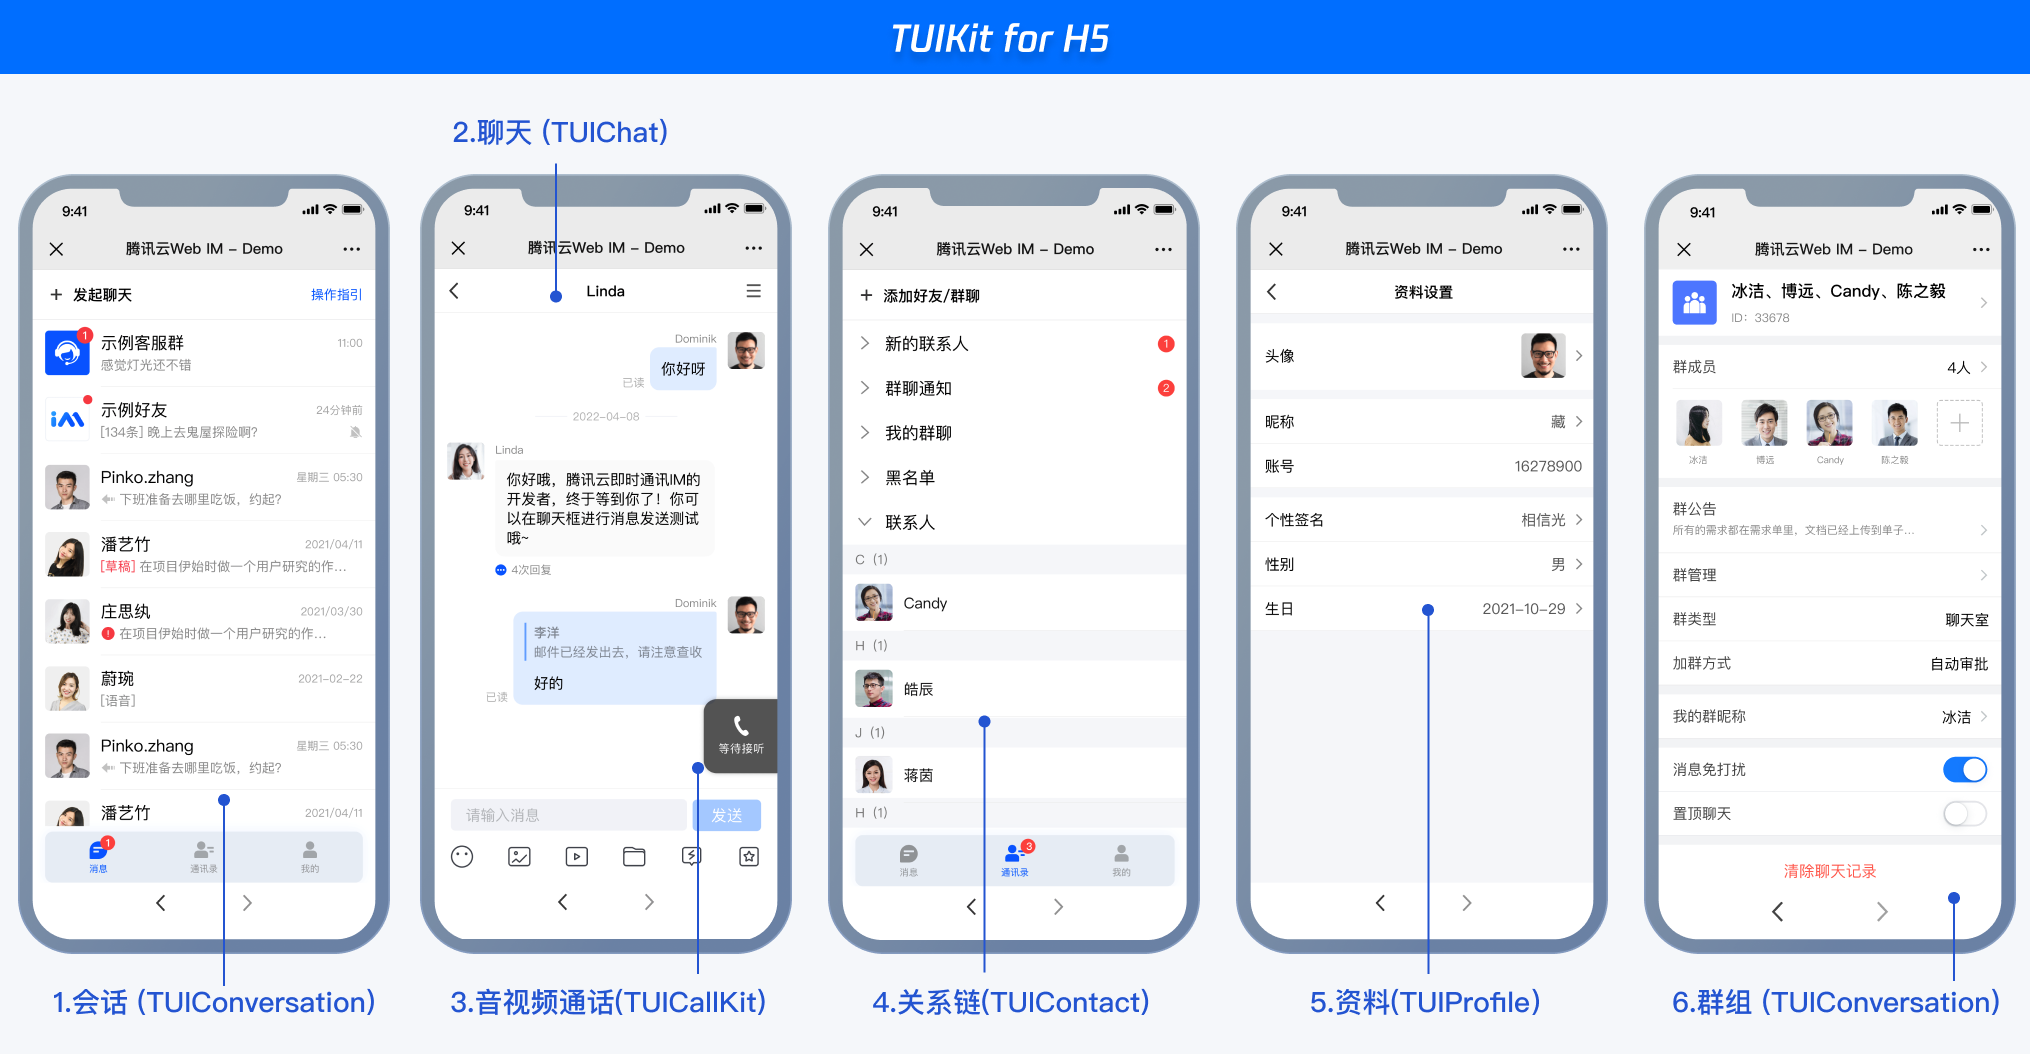
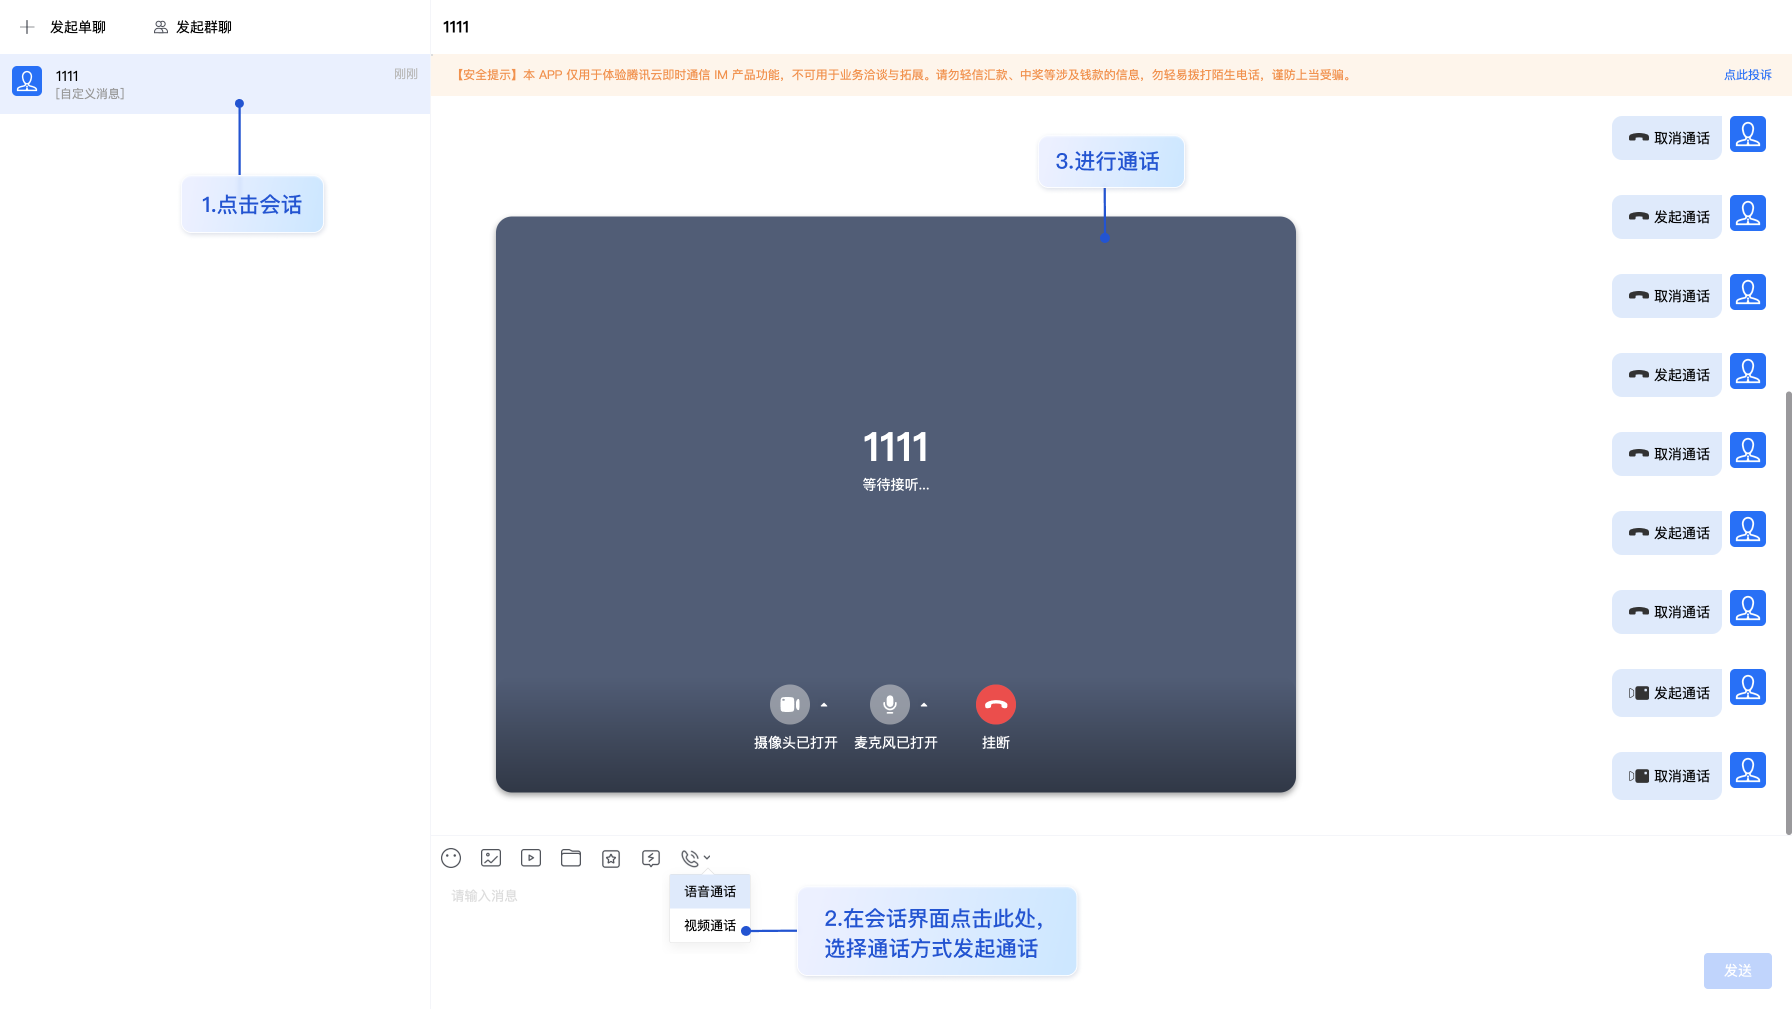
chat-uikit-vue2 是一款 Vue2 版本 Chat UI 组件库,它提供了一些通用的 UI 组件,包含会话、聊天、音视频通话、关系链、资料、群组等功能。基于这些精心设计的 UI 组件,您可以快速构建优雅的、可靠的、可扩展的 Chat 应用。
开发者在使用 chat-uikit-vue2 时只需关注自身业务需求或个性化扩展即可,chat 相关的逻辑操作和数据处理,chat-uikit-vue2 已为您封装好。
chat-uikit-vue2 Web 端 和 H5 端界面效果如下图所示, 可点击 CHAT WEB DEMO 体验地址 进行在线体验。

TUIKit 支持使用 webpack 或 vite 创建项目工程,配置 Vue2 + TypeScript + sass。
以下是使用 vue-cli 搭建项目工程示例
使用 vue-cli 方式创建项目, 配置 Vue2 + TypeScript + sass。 如果您尚未安装 vue-cli ,可以在 terminal 或 cmd 中采用如下方式进行安装:
npm install -g @vue/cli@5.0.8 sass sass-loader@10.1.1
通过 vue-cli 创建项目,并选择下图中所选配置项。
vue create chat-example
创建完成后,切换到项目所在目录, 并升级 vue 相关配置到 vue2.7
cd chat-example
npm i vue@2.7.9 vue-template-compiler@2.7.9
通过 npm 方式下载 TUIKit 组件,为了方便您后续的拓展,建议您将 TUIKit 组件复制到自己工程的 src 目录下:
# macOS
npm i @tencentcloud/chat-uikit-vue2
mkdir -p ./src/TUIKit && rsync -av --exclude={'node_modules','package.json','excluded-list.txt'} ./node_modules/@tencentcloud/chat-uikit-vue2/ ./src/TUIKit
# windows
npm i @tencentcloud/chat-uikit-vue2
xcopy .\node_modules\@tencentcloud\chat-uikit-vue2 .\src\TUIKit /i /e /exclude:.\node_modules\@tencentcloud\chat-uikit-vue2\excluded-list.txt
成功后目录结构如图所示:
在 main.ts 中,引入 TUIKit,并注册到 Vue 项目实例中:
import Vue from "vue";
import App from "./App.vue";
import { TUIComponents, TUIChatKit, genTestUserSig } from "./TUIKit";
import { TUILogin } from "@tencentcloud/tui-core";

const SDKAppID = 0; // Your SDKAppID
const secretKey = ""; //Your secretKey
const userID = ""; // User ID

// TUIChatKit add TUIComponents
TUIChatKit.components(TUIComponents, Vue);
// TUIChatKit init
TUIChatKit.init();
// TUICore login
TUILogin.login({
  SDKAppID,
  userID,
  // UserSig 是用户登录即时通信 IM 的密码,其本质是对 UserID 等信息加密后得到的密文。
  // 该方法仅适合本地跑通 Demo 和功能调试,详情请参见 https://cloud.tencent.com/document/product/269/32688
  userSig: genTestUserSig({
    SDKAppID,
    secretKey,
    userID,
  }).userSig,
  // 如果您需要发送图片、语音、视频、文件等富媒体消息,请设置为 true
  useUploadPlugin: true,
  // 本地审核可识别、处理不安全、不适宜的内容,为您的产品体验和业务安全保驾护航
  // 此功能为增值服务,请参考:https://cloud.tencent.com/document/product/269/79139
  // 如果您已购买内容审核服务,开启此功能请设置为 true
  useProfanityFilterPlugin: false,
  framework: "vue2",
});

Vue.config.productionTip = false;

new Vue({
  render: (h) => h(App),
}).$mount("#app");

export { SDKAppID, secretKey };
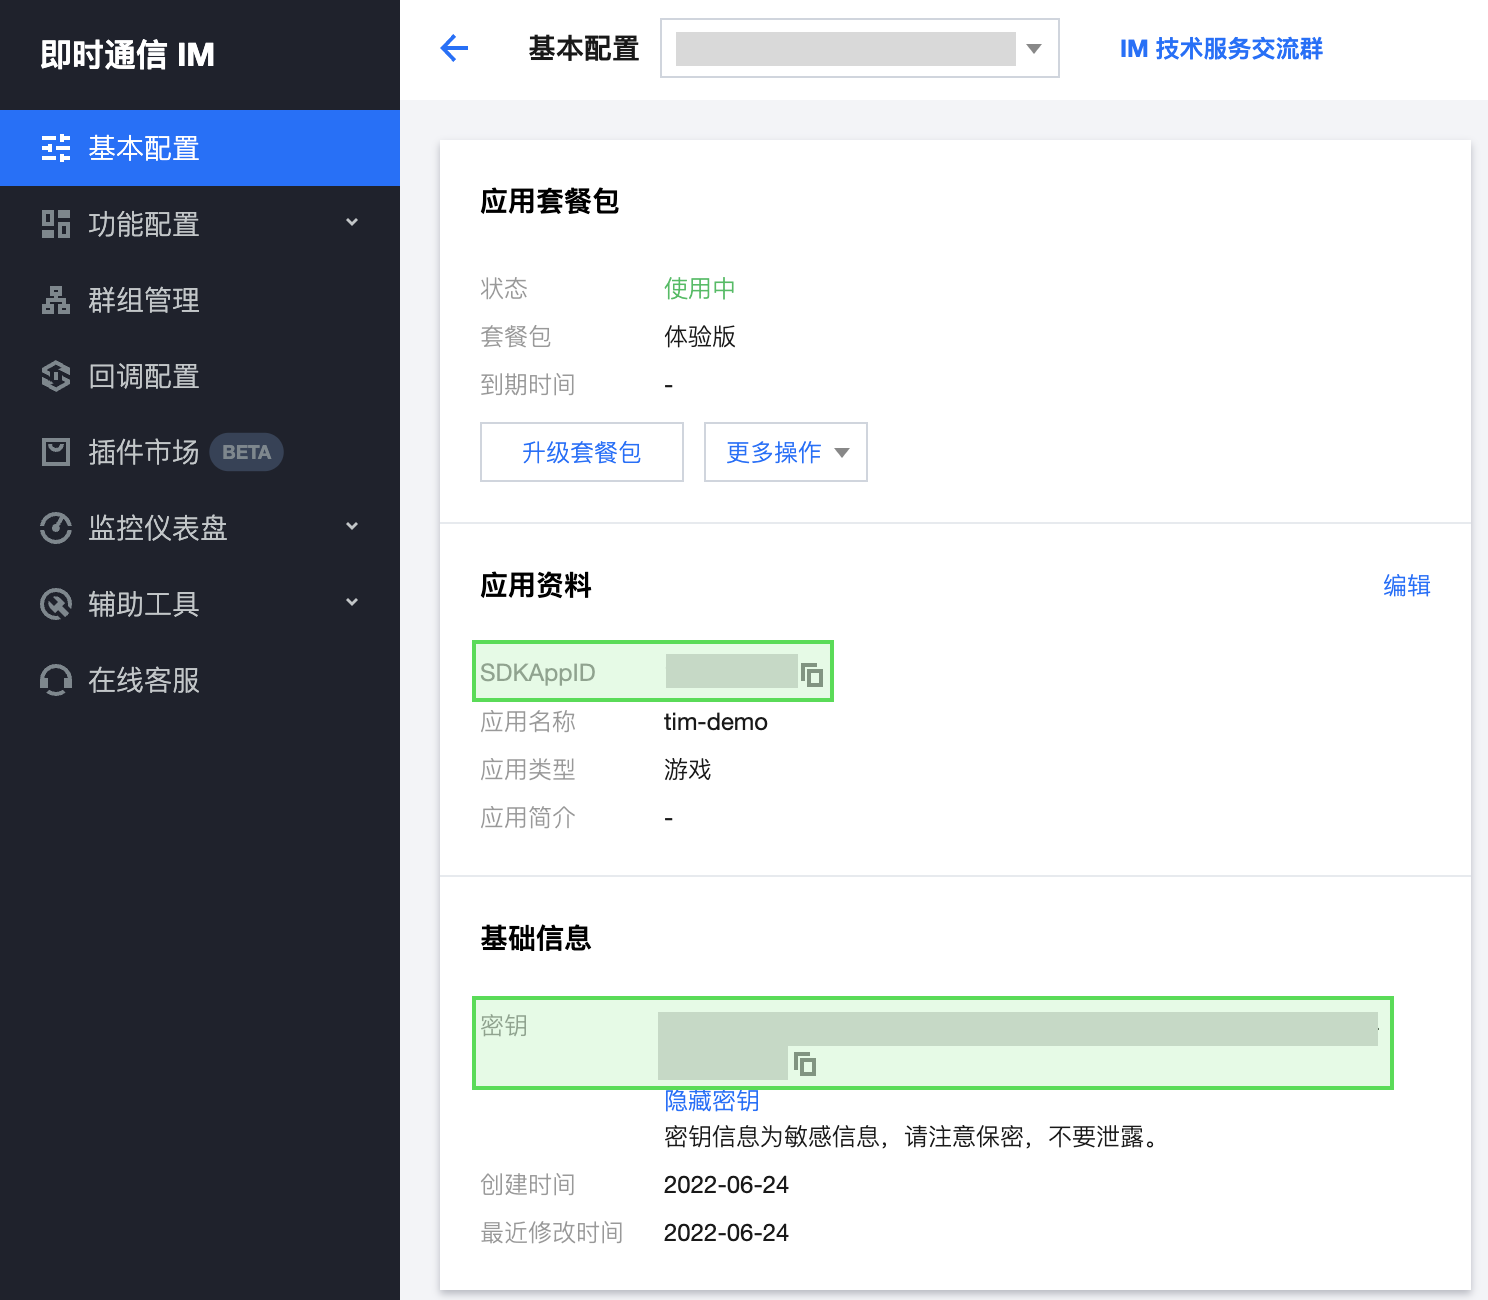
设置 main.ts 文件示例代码中的相关参数 SDKAppID、secretKey 以及 userID ,其中 SDKAppID 和密钥等信息,可通过 即时通信 IM 控制台 获取,单击目标应用卡片,进入应用的基础配置页面。例如:
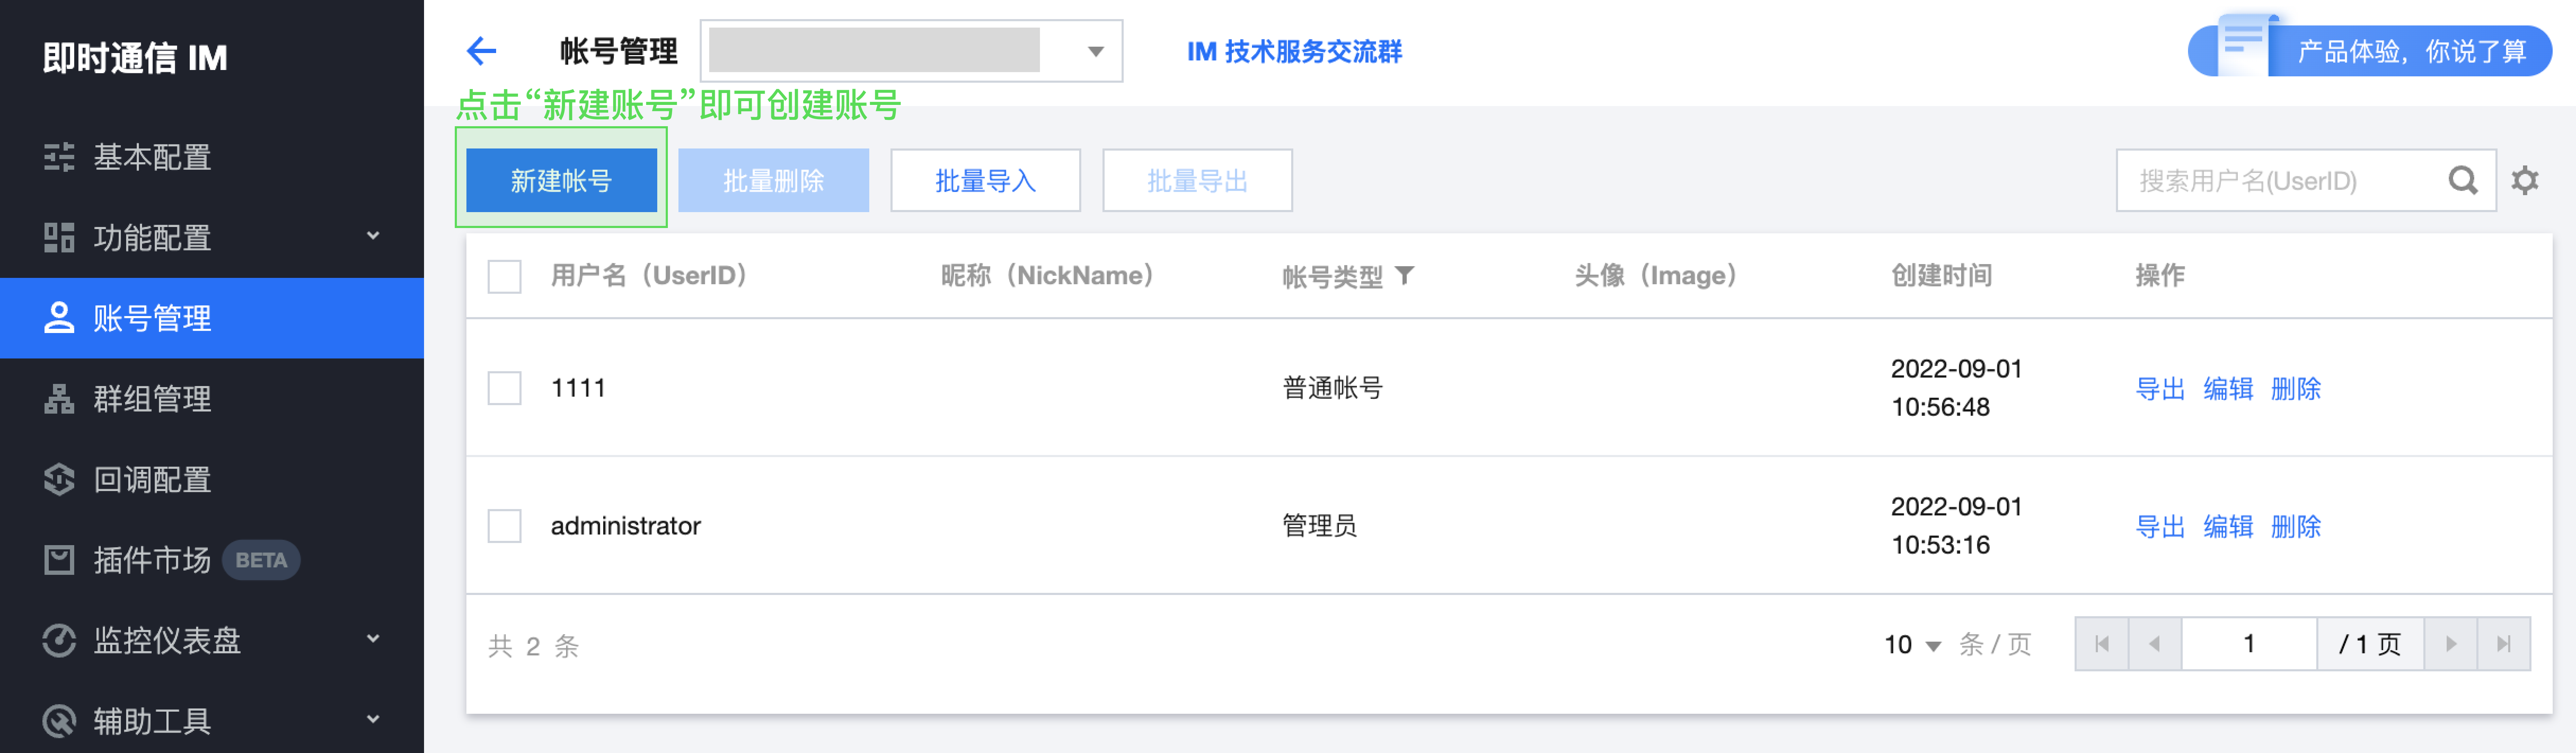
userID 信息,可通过 即时通信 IM 控制台 进行创建和获取,单击目标应用卡片,进入应用的账号管理页面,即可创建账号并获取 userID。例如:
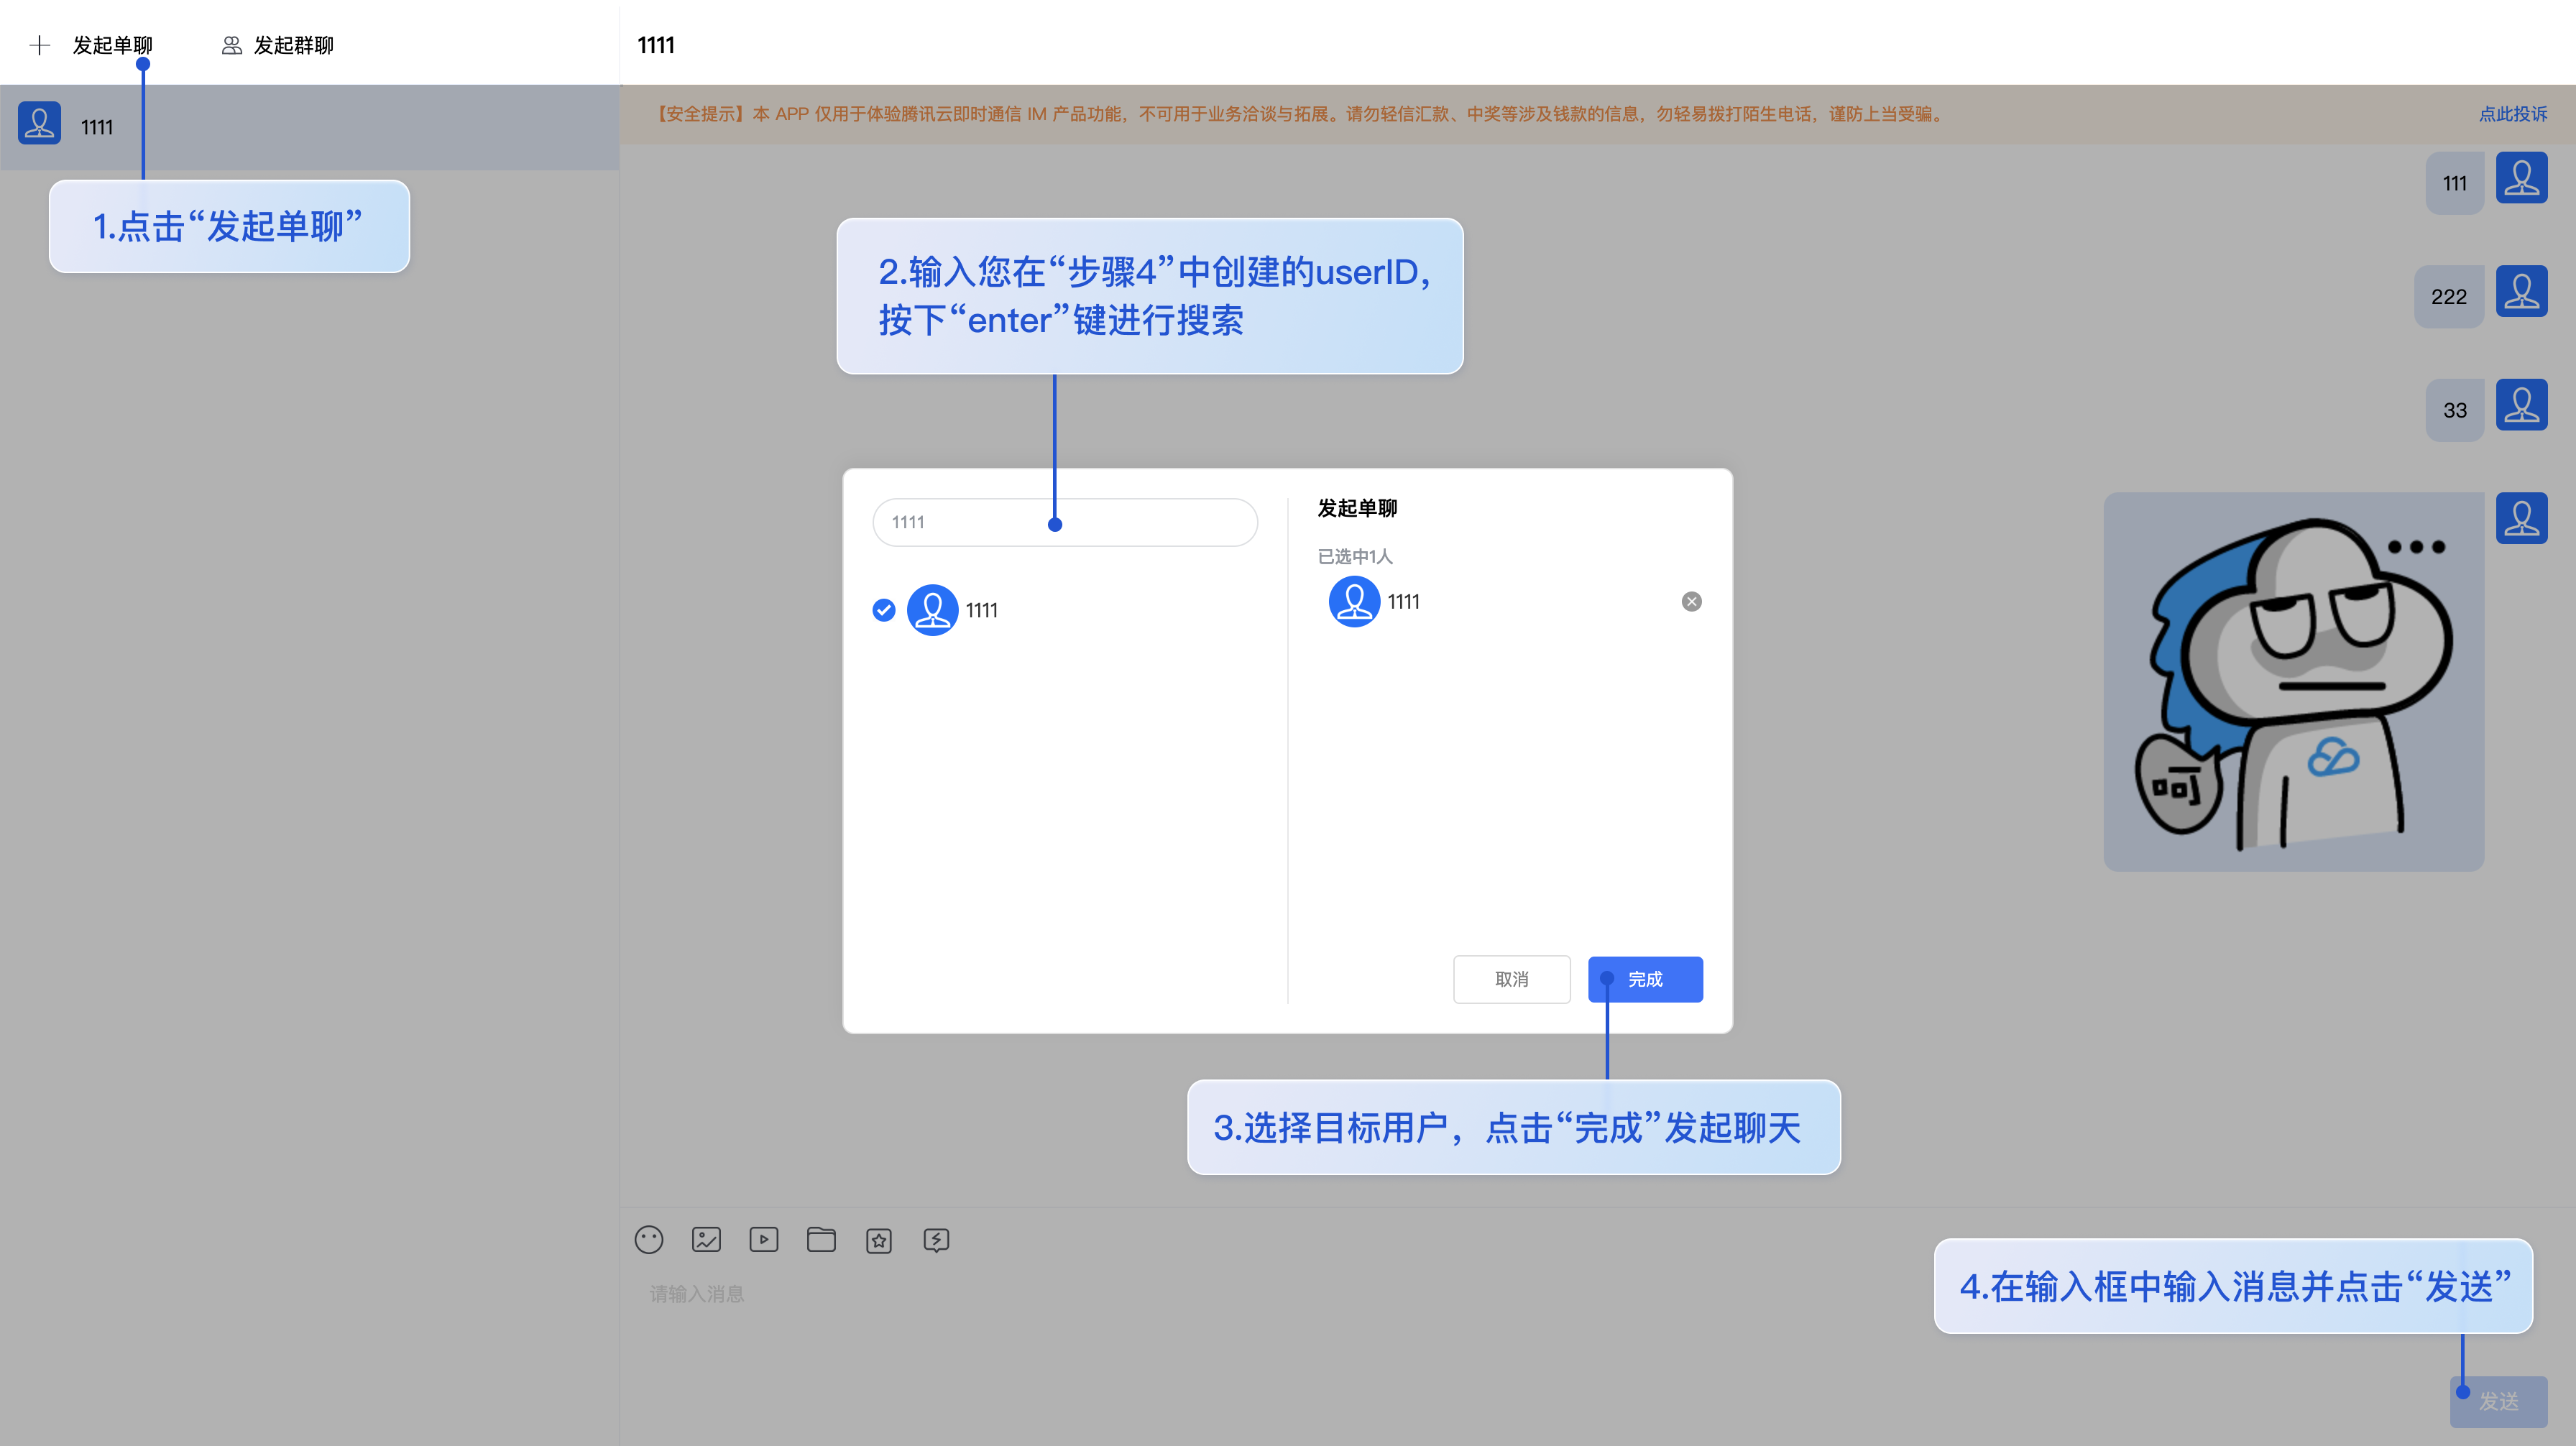
在需要展示的页面,调用 TUIKit 的组件即可使用。 例如:在 App.vue 页面中,使用 TUIConversation、TUIChat、TUISearch 快速搭建聊天界面。
<template>
  <div class="home-TUIKit-main">
    <div
      :class="isH5 ? 'conversation-h5' : 'conversation'"
      v-show="!isH5 || !currentConversationID"
    >
      <TUIConversation class="conversation" />
      <TUIContact display-type="selectFriend" />
    </div>
    <div class="chat" v-show="!isH5 || currentConversationID">
      <TUIChat>
        <h1>欢迎使用腾讯云即时通信IM</h1>
      </TUIChat>
    </div>
    <!-- TUICallKit 组件:通话 UI 组件主体 -->
    <TUICallKit
      :class="
        !showCallMini ? 'callkit-drag-container' : 'callkit-drag-container-mini'
      "
      :allowedMinimized="true"
      :allowedFullScreen="false"
      :onMinimized="onMinimized"
    />
  </div>
</template>

<script lang="ts">
import Vue from "vue";
import {
  TUIGlobal,
  TUIStore,
  StoreName,
} from "@tencentcloud/chat-uikit-engine";
import { TUIConversation, TUIChat, TUIContact } from "./TUIKit";
// vue 2.7 及以上
import { TUICallKit } from "@tencentcloud/call-uikit-vue2";
// vue 2.6 及 以下, 请注释上行,开放下行注释
// import { TUICallKit } from "@tencentcloud/call-uikit-vue2.6";
export default Vue.extend({
  name: "App",
  components: {
    TUIConversation,
    TUIChat,
    TUICallKit,
    TUIContact,
  },
  data() {
    return {
      currentModel: "conversation",
      isH5: TUIGlobal.getPlatform() === "h5",
      currentConversationID: "",
      showCallMini: false,
    };
  },
  mounted: function () {
    TUIStore.watch(StoreName.CONV, {
      currentConversationID: (id: string) => {
        this.currentConversationID = id;
      },
    });
  },
  methods: {
    onMinimized: function onMinimized(oldStatus: boolean, newStatus: boolean) {
      this.showCallMini = newStatus;
    },
  },
});
</script>
<style scoped>
.home-TUIKit-main {
  display: flex;
  height: 100vh;
  overflow: hidden;
}
.search {
  padding: 12px;
}
.conversation {
  min-width: 285px;
  flex: 0 0 24%;
  border-right: 1px solid #f4f5f9;
}
.conversation-h5 {
  flex: 1;
  border-right: 1px solid #f4f5f9;
}
.chat {
  flex: 1;
  height: 100%;
  position: relative;
}
.callkit-drag-container {
  position: fixed;
  left: calc(50% - 25rem);
  top: calc(50% - 18rem);
  width: 50rem;
  height: 36rem;
  border-radius: 16px;
  box-shadow: rgba(0, 0, 0, 0.16) 0px 3px 6px, rgba(0, 0, 0, 0.23) 0px 3px 6px;
}
.callkit-drag-container-mini {
  position: fixed;
  width: 168px;
  height: 56px;
  right: 10px;
  top: 70px;
}
</style>
# vue-cli
npm run serve
请参考官网文档 TUIChat 独立集成方案 (vue2)
module.exports = {
  ...
  rules: {
    ...
    'vue/multi-word-component-names': 'warn',
  },
};
# .eslintignore
src/TUIKit
若按照上述步骤接入后,运行时出现以下错误,请您务必删除 TUIKit 目录下的 node_modules 目录,以保证 TUIKit 的依赖唯一性,避免 TUIKit 多份依赖造成问题。
TUIKit 仅支持 ts 环境运行,您可以通过渐进式配置 typescript 来使您项目中已有的 js 代码 与 TUIKit 中 ts 代码共存。 请在您 vue-cli 脚手架创建的工程根目录执行:
vue add typescript
之后按照如下进行配置项进行选择(为了保证能同时支持原有 js 代码 与 TUIKit 中 ts 代码,请您务必严格按照以下五个选项进行配置)
error TS1371: This import is never used as a value and must use 'import type' because 'importsNotUsedAsValues' is set to 'error'.
'ITUIPlugins' is a type and must be imported using a type-only import when 'preserveValueImports' and 'isolatedModules' are both enabled.
This import is never used as a value and must use 'import type' because 'importsNotUsedAsValues' is set to 'error'.
为了兼容支持 typescript 3 版本,TUIKit 放弃了采用 import type xxx from xxx 的形式来导入类型。
如遇以上问题,请您在您项目根目录的 tsconfig.json 设置以下规则:
// tsconfig.json
{
  ...
  "compilerOptions": {
    ...
    "preserveValueImports": false,
    "importsNotUsedAsValues": "preserve"
  },
}
出现以上报错信息,是因为您未安装 sass 环境导致,请执行以下命令进行 sass 环境安装:
npm i -D sass sass-loader@10.1.1
(1) 安装支持 composition-api 以及 script setup 的相关依赖,以及vue2.6相关依赖
npm i @vue/composition-api unplugin-vue2-script-setup vue@2.6.14 vue-template-compiler@2.6.14
(2) main.ts 中引入 VueCompositionAPI
import VueCompositionAPI from "@vue/composition-api";
Vue.use(VueCompositionAPI);
(3) 在 vue.config.js 中增加,若没有该文件请新建:
const ScriptSetup = require("unplugin-vue2-script-setup/webpack").default;
module.exports = {
  parallel: false, // disable thread-loader, which is not compactible with this plugin
  configureWebpack: {
    plugins: [
      ScriptSetup({
        /* options */
      }),
    ],
  },
  chainWebpack(config) {
    // disable type check and let `vue-tsc` handles it
    config.plugins.delete("fork-ts-checker");
  },
};
(4) 在 TUIKit/adapter-vue.ts 文件最后, 替换导出源:
// 初始写法
export * from "vue";
// 替换为
export * from "@vue/composition-api";
(5) 在 App.vue 复制的代码中,替换 TUICallKit 源到 vue2.6 版本:
// vue 2.7 及以上
// import { TUICallKit } from "@tencentcloud/call-uikit-vue2";
// vue 2.6 及 以下, 请注释上行,开放下行注释
import { TUICallKit } from "@tencentcloud/call-uikit-vue2.6";
如果您是 vue2.7 项目,请在您项目根目录执行:
npm i vue@2.7.9 vue-template-compiler@2.7.9
如果您是 vue2.6 项目,请在您项目根目录执行:
npm i vue@2.6.14 vue-template-compiler@2.6.14
点此进入 IM 社群,享有专业工程师的支持,解决您的难题
FAQs
TUIKit 是基于 IM SDK 实现的一套 UI 组件,其包含会话、聊天、群组、个人资料等功能,基于 TUIKit 组件您可以像搭积木一样快速搭建起自己的业务逻辑。
The npm package aallen-vue2 receives a total of 0 weekly downloads. As such, aallen-vue2 popularity was classified as not popular.
We found that aallen-vue2 demonstrated a not healthy version release cadence and project activity because the last version was released a year ago. It has 1 open source maintainer collaborating on the project.
Did you know?

Socket for GitHub automatically highlights issues in each pull request and monitors the health of all your open source dependencies. Discover the contents of your packages and block harmful activity before you install or update your dependencies.
Security News
Oracle seeks to dismiss fraud claims in the JavaScript trademark dispute, delaying the case and avoiding questions about its right to the name.

Security News
The Linux Foundation is warning open source developers that compliance with global sanctions is mandatory, highlighting legal risks and restrictions on contributions.

Security News
Maven Central now validates Sigstore signatures, making it easier for developers to verify the provenance of Java packages.