Product
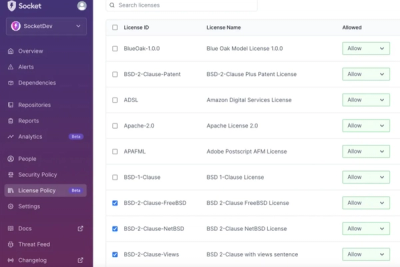
Introducing License Enforcement in Socket
Ensure open-source compliance with Socket’s License Enforcement Beta. Set up your License Policy and secure your software!
By Philipp Burckhardt - Oct 17, 2024
aurelia-store
Advanced tools

Aurelia single state store based on RxJS.
Various examples can be found in the samples repository.
Install the npm dependency via
npm install aurelia-store
or via the CLI
au install aurelia-store
If your Aurelia CLI build is based on RequireJS or SystemJS you can setup the plugin using the following dependency declaration:
au import aurelia-store
alternatively you can manually add these dependencies to your vendor bundle:
...
"dependencies": [
  {
    "name": "aurelia-store",
    "path": "../node_modules/aurelia-store/dist/amd",
    "main": "aurelia-store"
  },
  {
    "name": "rxjs",
    "path": "../node_modules/rxjs",
    "main": false
  }
]
In your main.ts you'll have to register the Store using a custom entity as your State type:
import {Aurelia} from 'aurelia-framework'
import {initialState} from './state';

export function configure(aurelia: Aurelia) {
  aurelia.use
    .standardConfiguration()
    .feature('resources');

  ...

  aurelia.use.plugin("aurelia-store", { initialState });  // <----- REGISTER THE PLUGIN

  aurelia.start().then(() => aurelia.setRoot());
}
The state itself can be a simple object like this:
// state.ts
export interface State {
  frameworks: string[];
}

export const initialState: State = {
  frameworks: ["Aurelia", "React", "Angular"]
};
Once the plugin is installed and configured you can use the Store by injecting it via constructor injection.
You register actions (reducers) with methods, which get the current state and have to return the modified next state.
Typically you'd want to subscribe to the exposed observable state and work with the streamed state.
An example VM and View can be seen below:
import { autoinject } from 'aurelia-dependency-injection';
import { State } from './state';
import { Store } from "aurelia-store";

// An action is a simple function which gets the current state and should return a modified clone of it.
// You should not modify and return the previous state, as the states act as snapshots of your app over time
// which enables cool features like time-travelling, Redux DevTools integration and so on ...
const demoAction = (state: State) => {
  const newState = Object.assign({}, state);
  newState.frameworks.push("PustekuchenJS");

  return newState;
}

@autoinject()
export class App {

  public state: State;
  private subscription: Subscription;

  constructor(private store: Store<State>) {
    this.store.registerAction("DemoAction", demoAction);
  }

  attached() {
    // this is the single point of data subscription, the state inside the component will be automatically updated
    // no need to take care of manually handling that. This will also update all subcomponents.
    // Since the state is an observable you can use all kinds of RxJS witchcraft to skip,filter,map streamed states.
    this.subscription = this.store.state.subscribe(
      (state: State) => this.state = state
    );
  }

  detached() {
    this.subscription.unsubscribe();
  }

  addAnotherFramework() {
    // you create a new state by dispatching your action using the stores method
    this.store.dispatch(demoAction);
  }
}
Don't forget to unsubscribe from any previous subscriptions you've made. A good place for that could be the
detachedhook as shown in above example.
<template>
  <h1>Frameworks</h1>

  <ul>
    <li repeat.for="framework of state.frameworks">${framework}</li>
  </ul>

  <button click.delegate="addAnotherFramework()">Add one more</button>
</template>
Dispatching unregistered actions will result in an error
In order to remove a registered action, simply call store.unregisterAction
...
store.unregisterAction(demoAction);
Instead of handling subscriptions and disposal of those by yourself you may prefer to use the connectTo decorator.
What it does is to connect your stores state automatically to a class property called state. It does so by overriding the
bind method and the unbind method for proper setup and teardown of a subscription. The actual description is stored in another property
called _stateSubscription.
Above ViewModel example thus could look the following:
import { autoinject } from 'aurelia-dependency-injection';
import { State } from './state';
import { Store, connectTo } from "aurelia-store";

...

@autoinject()
@connectTo()
export class App {

  public state: State;

  constructor(private store: Store<State>) {
    this.store.registerAction("DemoAction", demoAction);
  }

  addAnotherFramework() {
    // you create a new state by dispatching your action using the stores method
    this.store.dispatch(demoAction);
  }
}
Note that there is no more need to use attached nor bind. We still declare the state property, in order to properly type-cast and use it in the TypeScript workflow. If you're using pure JavaScript, you may omit that definition.
In case you want to provide a custom selector instead of subscribing to the whole state, you may pass a function, which will get the store passed and return an observable to be used instead of store.state. The decorator accepts a generic interface which matches your State, for a better TypeScript workflow.
@connectTo<State>((store) => store.state.pluck("bar"))

// resulting state will be only the value of bar
If you also want to override the default target property state, you can pass in a settings object instead of the function, where the prop selector matches above function and target specifies the new target property.
@connectTo<State>({
  selector: (store) => store.state.pluck("bar"), // same as above
  target: "foo" // link to foo instead of state property
})
If multiple actions are dispatched, they will get queued and executed one after another in order to make sure that each dispatch starts with an up to date state.
You can provide parameters to your actions by adding them after the state parameter. When dispatching provide your values which will be spread to the actual reducer.
// additional parameter
const greetingAction = (state: State, greetingTarget: string) => {
  const newState = Object.assign({}, state);
  newState.target = greetingTarget;

  return newState;
}

...

// dispatching with the value for greetingTarget
this.store.dispatch(greetingAction, "zewa666");
Perhaps you don't want or can't obtain a reference to the store but still would like to dispatch your actions.
In order to do so you can leverage the higher order function dispatchify like this:
import { dispatchify } from "aurelia-store";
import { yourAction } from "./where/ever";

dispatchify(yourAction)("PARAM1", "MYPARAM2", "AND_SO_ON");
If you need to keep track of the history of states you can provide additional options to setup the store to work on a StateHistory vs State model.
export function configure(aurelia: Aurelia) {
  aurelia.use
    .standardConfiguration()
    .feature('resources');

  ...

  const initialState: State = {
    frameworks: ["Aurelia", "React", "Angular"]
  };

  aurelia.use.plugin("aurelia-store", { initialState, history: { undoable: true } });  // <----- REGISTER THE PLUGIN WITH HISTORY SUPPORT

  aurelia.start().then(() => aurelia.setRoot());
}
Now when you subscribe to new state changes instead of a simple State you'll get a StateHistory object returned:
import {StateHistory} from "aurelia-store";
...

constructor(private store: Store<StateHistory<State>>) {
  this.store.registerAction("DemoAction", demoAction);
}

attached() {
  this.store.state.subscribe(
    (state: StateHistory<State>) => this.state = state
  );
}
A state history is an interface defining all past and future states as arrays of these plus a currently present one.
// aurelia-store -> history.ts
export interface StateHistory<T> {
  past: T[];
  present: T;
  future: T[];
}
Now keep in mind that every action will receive a StateHistory<T> as input and should return a new StateHistory<T>.
You can use the nextStateHistory helper function to easily push your new state and create a proper StateHistory representation, which will simply move the currently present state to the past, place your provided one as present and remove the future states.
import { nextStateHistory } from "aurelia-store";

const greetingAction = (currentState: StateHistory<State>, greetingTarget: string) => {
  return nextStateHistory(currentState, { target: greetingTarget });
}
Which is the same as returing a handcrafted object like the following:
const greetingAction = (currentState: StateHistory<State>, greetingTarget: string) => {
  return Object.assign(
    {},
    currentState,
    {
      past: [...currentState.past, currentState.present],
      present: { target: greetingTarget },
      future: []
    }
  );
}
In order to do state time-travelling you can import the pre-registered action jump and pass it either a positive number for traveling into the future or a negative for travelling to past states.
import { jump } from "aurelia-store";

...
// Go back one step in time
store.dispatch(jump, -1);

// Move forward one step to future
store.dispatch(jump, 1);
Having too many items could result in a memory hit. Thus you can specify the limit for when the histories past and future start to overflow.
That means your past and future arrays can hold only a max of the provided limit and new entries start to kick out respectively the first or last item
of your history stacks.
...
// REGISTER THE PLUGIN WITH HISTORY SUPPORT AND OVERFLOW LIMIT OF 10
aurelia.use.plugin("aurelia-store", { initialState, history: { undoable: true, limit: 10 } });
You may also register actions which resolve the newly created state with a promise. Same applies for history enhanced Stores. Just make sure the all past/present/future states by themselves are synchronous values.
A middleware is similar to an action, with the difference that it may return void as well. Middlewares can be executed before the dispatched action, thus potentially manipulating the current state which will be passed to the action, or afterwards, thus modifying the returned value from the action. Either way the middleware reducer can be sync as well as async.
You register a middleware by it as the first parameter to store.registerMiddleware and the placement before or after as second, followed by an optional third
settings parameter. This will be passed into your middleware itself during execution.
const customLogMiddleware = (currentState) => console.log(currentState);
// In TypeScript you can use the exported MiddlewarePlacement string enum
store.registerMiddleware(customLogMiddleware, MiddlewarePlacement.After);

// in JavaScript just provide the string "before" or "after"
store.registerMiddleware(customLogMiddleware, "after");
In order to remove a registered middleware, simply call store.unregisterMiddleware
...
store.unregisterMiddleware(customLogMiddleware);
Additionally a middleware might accept a second argument which reflects the current unmodified state, this means the one before any other middlewares or, in case of a after positioning, the result of the dispatched action. This can be useful to determine the state diff that happened in the middleware chain or to reset the next state at certain conditions.
...
const decreaseBefore = (currentState: TestState, originalState: TestState) => {
  const newState = Object.assign({}, currentState);
  newState.counter = originalState.counter;

  return newState;
}
Last but not least a potential third argument can be any settings as mentioned during middleware registration.
const customLogMiddleware = (currentState, originalState, settings) => console[settings.logType](currentState);
store.registerMiddleware(customLogMiddleware, MiddlewarePlacement.After, { logType: "log" });
By default errors thrown by middlewares will be thrown in order to guarantee continues states. If you would like to stop state propagation you need to pass in the propagateError option:
aurelia.use.plugin("aurelia-store", { initialState, propagateError: true });
Out of the box aurelia-store provides an localStorageMiddleware which stores your most recent emitted state in the window.localStorage. In order to make use of it all you need to do is to register it as usual:
import { localStorageMiddleware } from "aurelia-store";

...

store.registerMiddleware(localStorageMiddleware, MiddlewarePlacement.After, { key: "my-storage-key" });
The third option is optional, and if no key is provided the default key will be
aurelia-store-state
Now in order to rehydrate the stored state all you need to do is to dispatch the provided rehydrateFromLocalStorage action:
import { rehydrateFromLocalStorage } from "aurelia-store";

...

store.registerAction("Rehydrate", rehydrateFromLocalStorage);
store.dispatch(rehydrateFromLocalStorage);
In order to get insights in total run durations to effectively calculate and dispatch the next state you can pass in additional options in the plugin configuration section:
...
// typescript options (PerformanceMeasurement.All | PerformanceMeasurement.StartEnd)
aurelia.use.plugin("aurelia-store", { initialState, measurePerformance: PerformanceMeasurement.All });

// javascript options ("all" | "startEnd")
aurelia.use.plugin("aurelia-store", { initialState, measurePerformance: "all" });
You can choose between startEnd - which gets you a single measure with the duration - or all, which will provide you, besides the total duration, all single marks after every middleware and the actual dispatching.
For various features, the plugin does create log statements if turned on. E.g the dispatch info of the currently dispatched action will log on an info level by default. Combining multiple of those features, might create an overflow of your console window. As such you can define the log level to be used per feature in the plugin init options. In the following example we'd like to have the logLevel for the dispatchAction info set to debug instead of the default info level:
// Available features
export interface LogDefinitions {
  performanceLog?: LogLevel;
  dispatchedActions?: LogLevel;
  devToolsStatus?: LogLevel;
}

// Available log levels

// Setup TypeScript
import { LogLevel } from "aurelia-store";
...
aurelia.use.plugin("aurelia-store", { initialState, history: {
  logDispatchedActions: true,
  logDefinitions: {
    dispatchedActions: LogLevel.debug
  }
}});

// Setup JavaScript
...
aurelia.use.plugin("aurelia-store", { initialState, history: {
  logDispatchedActions: true,
  logDefinitions: {
    dispatchedActions: "debug"
  }
}});
Thanks goes to Dwayne Charrington for his Aurelia-TypeScript starter package https://github.com/Vheissu/aurelia-typescript-plugin
If you want to learn more about state containers in Aurelia take a look at this article from Pragmatic Coder
FAQs
Aurelia single state store based on RxJS
The npm package aurelia-store receives a total of 1,762 weekly downloads. As such, aurelia-store popularity was classified as popular.
We found that aurelia-store demonstrated a not healthy version release cadence and project activity because the last version was released a year ago. It has 2 open source maintainers collaborating on the project.
Did you know?

Socket for GitHub automatically highlights issues in each pull request and monitors the health of all your open source dependencies. Discover the contents of your packages and block harmful activity before you install or update your dependencies.
Product
Ensure open-source compliance with Socket’s License Enforcement Beta. Set up your License Policy and secure your software!
Product
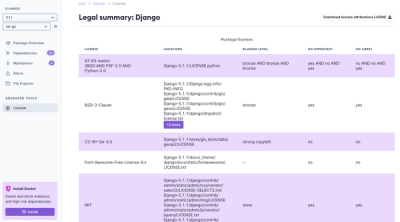
We're launching a new set of license analysis and compliance features for analyzing, managing, and complying with licenses across a range of supported languages and ecosystems.
Product
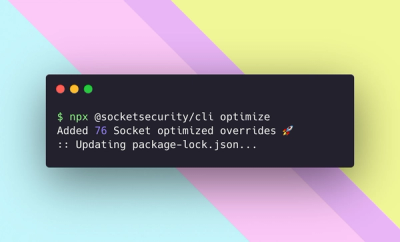
We're excited to introduce Socket Optimize, a powerful CLI command to secure open source dependencies with tested, optimized package overrides.