Product
Introducing License Enforcement in Socket
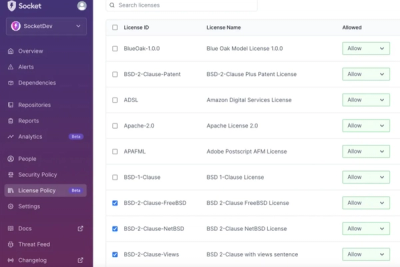
Ensure open-source compliance with Socket’s License Enforcement Beta. Set up your License Policy and secure your software!
By Philipp Burckhardt - Oct 17, 2024
bower-auto-release
Advanced tools
This node module will help you to publish your package to bower in addition to already publishing it to npm. Ideally you would only publish to npm, but as many older projects still use bower, this is sometime an unfortunate necessity.
This node module will help you to publish your package to bower in addition to already publishing it to npm. Ideally you would only publish to npm, but as many older projects still use bower, this is sometime an unfortunate necessity.
Assuming you already defined you npm module in CI and already use the incredible wnpm-release script to automatically bump your node module's version all you have to do in order to publish your package to bower is follow this simple steps:
Just run the command bower init, and answer truthfully to all questions :P
Notice: this is relevant only if you wish to publish your component to a private registry.
Example: https://github.com/wix-private/wix-style/blob/master/.bowerrc
This is critical so that we work against wix's private bower registry
{
  "name": "my-package",
  "version": "1.0.0",
  "scripts": {
    "build": ":",
    "test": ":",
    "release": "wnpm-release; bower-auto-release",
    "postpublish": "rm -f npm-shrinkwrap.json"
  },
  "devDependencies": {
    "wnpm-ci": "*",
    "bower-auto-release": "*"
  }
}
--dist optionBy default the contents of your post-build dist folder will be copied to the bower-component's root folder. You can change this behaviour by designating a different folder with the --dist option.
For example to copy the contents of the build output folder you would use: bower-auto-release --dist build
Or, to copy everything simply use --dist . (take note that in such a case dist will be removed from .gitignore on the bower-component branch).
--git-repo optionBy default your project is pulled from the repository designated by the GIT_REMOTE_URL environment variable. You can change this behaviour by designating a different repository with the --git-repo option.
For example: bower-auto-release --git-repo git@github.com:wix/my-library
This option is typically used on monorepos that have multiple bowers to release. Since bower's design dictates one-to-one relationship between published component and git repo, you should create a separate repo for publishing and pass it using this option.
--branch optionBy default your project is published to a branch named ${package-name}-bower. You can change this using the --branch option.
For example: bower-auto-release --branch kuku
In case you use a separate repo for publishing bowers from monorepo as described above, it might make sense to do something like this:
bower-auto-release --git-repo git@github.com:wix/my-library-bower --branch master
Once you're build is complete in CI, your package can be installed with -
bower install package-name
where package-name is the name you gave your package in bower init above
FAQs
This **node module** will publish your package to a bower registry. Ideally you would **only publish to npm**, but as many older projects still use bower, this is sometime an unfortunate necessity.
The npm package bower-auto-release receives a total of 37,704 weekly downloads. As such, bower-auto-release popularity was classified as popular.
We found that bower-auto-release demonstrated a not healthy version release cadence and project activity because the last version was released a year ago. It has 8 open source maintainers collaborating on the project.
Did you know?

Socket for GitHub automatically highlights issues in each pull request and monitors the health of all your open source dependencies. Discover the contents of your packages and block harmful activity before you install or update your dependencies.
Product
Ensure open-source compliance with Socket’s License Enforcement Beta. Set up your License Policy and secure your software!
Product
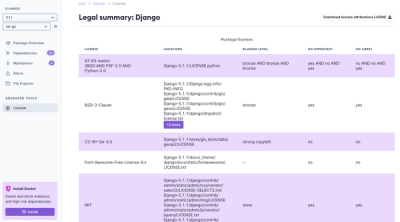
We're launching a new set of license analysis and compliance features for analyzing, managing, and complying with licenses across a range of supported languages and ecosystems.
Product
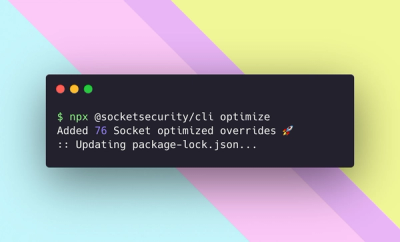
We're excited to introduce Socket Optimize, a powerful CLI command to secure open source dependencies with tested, optimized package overrides.