creevey
Easy to start, fast and powerful visual testing runner with a little portion of magic. Named after Colin Creevey character from Harry Potter universe.


Intro
Main goal of creevey take visual testing to a new level. Allow you to get fast and reliable screenshot tests without frustrating. You may call it unit screenshot tests, because creevey tightly integrated with Storybook. So you test visual representation of your components in isolate environment and you will not want to return to slow and flaky e2e screenshots anymore.
Contents
How to start
yarn add -D creevey
- Add decorator
withCreevey into your storybook config
import { addDecorator } from '@storybook/react';
import { withCreevey } from 'creevey';
addDecorator(withCreevey());
- Start storybook and run tests
yarn start-storybook -p 6006
yarn creevey --gridUrl "http://example.com:4444/wd/hub"
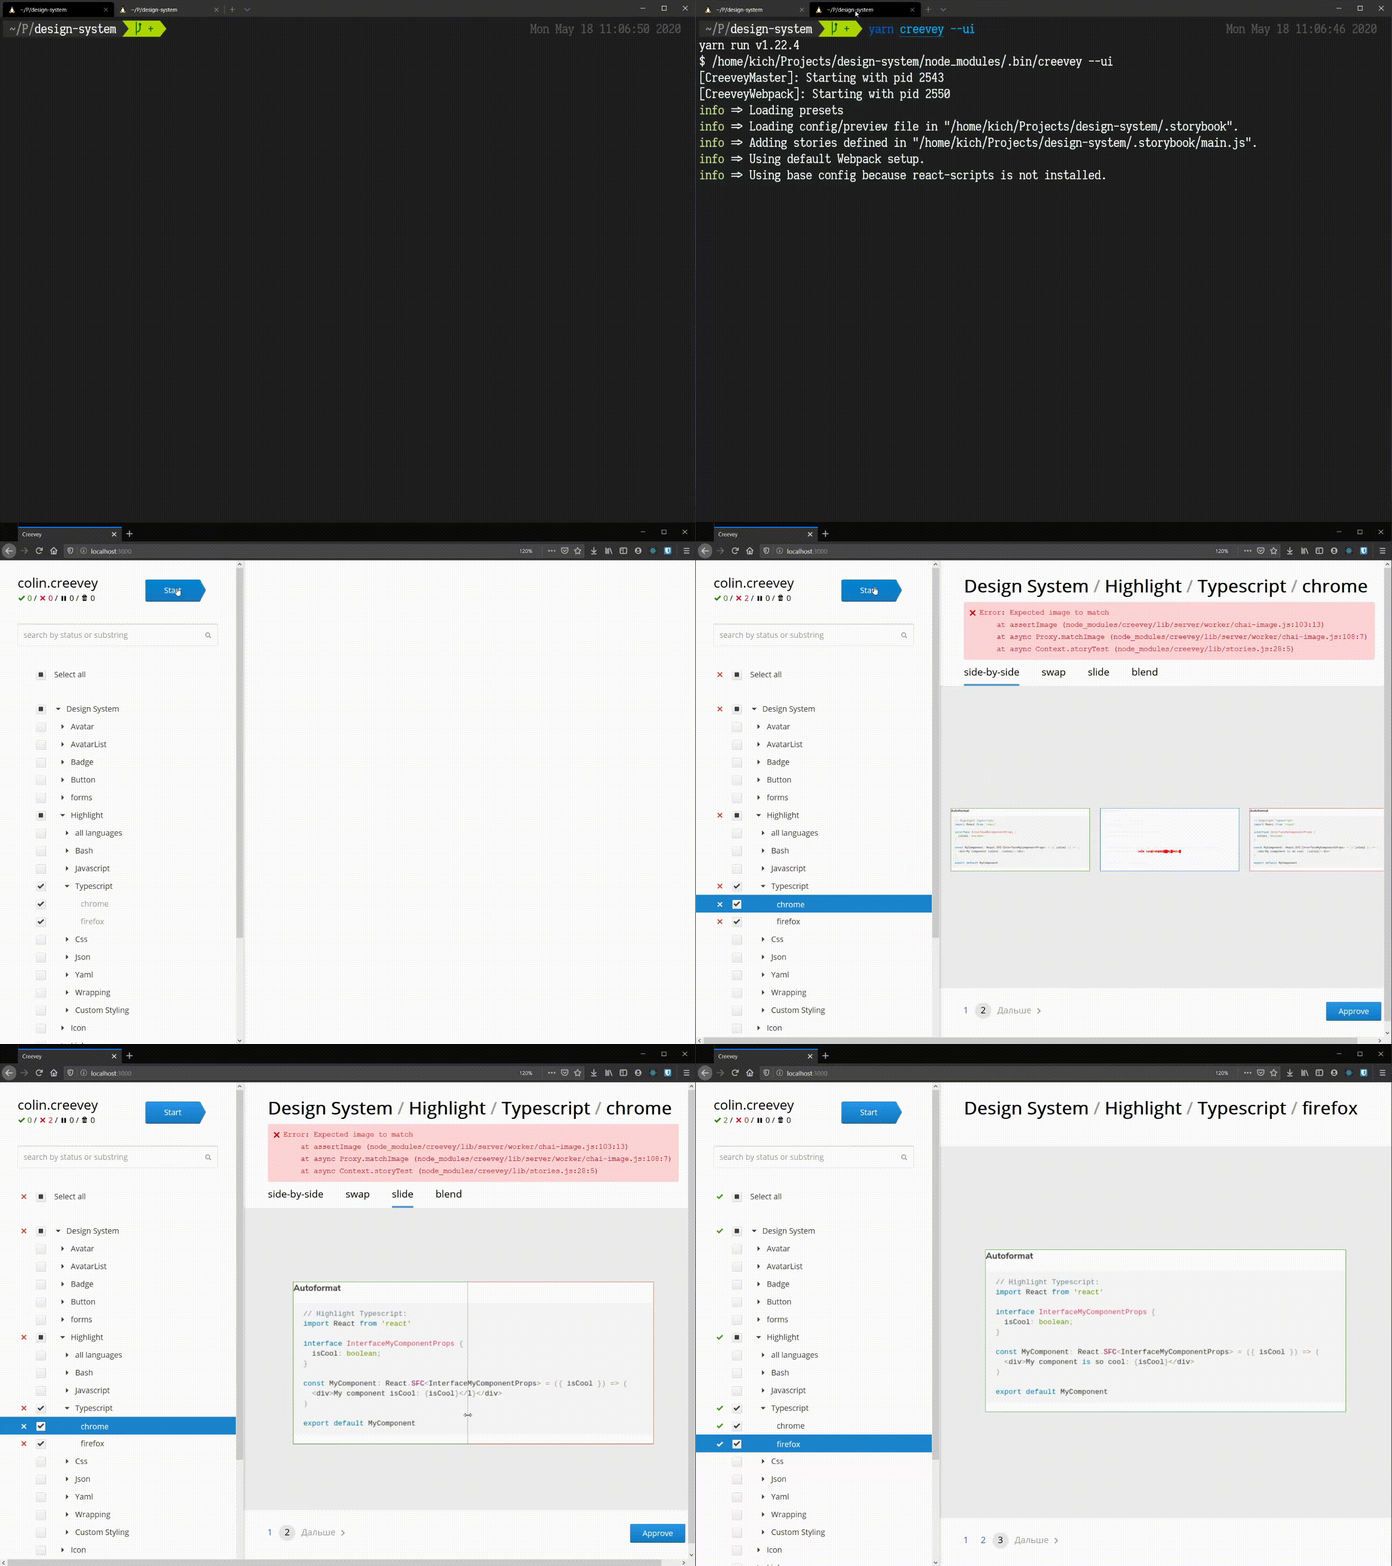
Instead of run tests directly, you could start fancy WebUI Runner, adding --ui option. Also you could check examples directory to see how creevey works with different frameworks.
Write tests
By default creevey generate for each story very simple screenshot test. In most cases it would enough to test your UI. But you may want to do some interactions and capture one or multiple screenshots with different state of your story. For this case you could write custom tests, like this
import React from 'react';
import { CSFStory } from 'creevey';
import MyComponent from './src/components/MyComponent';

export default { title: 'MyComponent' };

export const Basic: CSFStory<JSX.Element> = () => <MyComponent />;
Basic.story = {
  parameters: {
    creevey: {
      captureElement: '#root',
      tests: {
        async click() {
          await this.browser.actions().click(this.captureElement).perform();

          await this.expect(await this.takeScreenshot()).to.matchImage('clicked component');
        },
      },
    },
  },
};
Here you define story parameters with simple test click. Where you setup capturing element #root then click on that element and taking screenshot to assert it. this.browser allow you to access to native selenium webdriver instance you could check API here. You also could write more powerful tests
import React from 'react';
import { CSFStory } from 'creevey';
import MyForm from './src/components/MyForm';

export default { title: 'MyForm' };

export const Basic: CSFStory<JSX.Element> = () => <MyForm />;
Basic.story = {
  parameters: {
    creevey: {
      captureElement: '#root',
      delay: 1000,
      tests: {
        async submit() {
          const input = await this.browser.findElement({ css: '.my-input' });

          const empty = await this.takeScreenshot();

          await this.browser.actions().click(input).sendKeys('Hello Creevey').sendKeys(this.keys.ENTER).perform();

          const submitted = await this.takeScreenshot();

          await this.expect({ empty, submitted }).to.matchImages();
        },
      },
    },
  },
};
In this example I fill some simple form and submit it. Also as you could see, I taking two different screenshots before and after form fill and assert these in the end.
Setup local Selenium Grid
Creevey use Selenium Webdriver under the hood to allow run tests in various browsers. So you need to do some additional setup. In next versions Creevey will be do it automatically. But now you need to setup Selenium Grid hub. I recommend to use Selenoid — Lightweight Golang implementation of Selenium hub, that allow you to start you own Grid in few steps
That's it. cm will be download browser docker images and start Selenium Grid. You could check it by opening tests endpoint http://localhost:4444/wd/hub.
Use remote grid (BrowserStack/SauceLabs/etc)
Sometimes you already have Selenium Grid on one of many different e2e testing services, like BrowserStack or SauceLabs. You could use these services. But tricky part is you should start tunneling utility, that allow remote browser connect into your local storybook instance. For now Creevey don't have start/finish hooks, so you need to start this utility manually. For more information you can get here for BrowserStack of here for SauceLabs
Config/Options
Creevey config
Without config creevey taking screenshots only for chrome browser in one concurrent instance, to run tests in different browsers or speedup tests and run in parallel, you need to define config file .creevey/config.js, here is example of possible options
const path = require('path');
module.exports = {
gridUrl: '<gridUrl>/wd/hub',
storybookUrl: 'http://localhost:6006',
storybookDir: path.join(__dirname, '.storybook'),
screenDir: path.join(__dirname, 'images'),
reportDir: path.join(__dirname, 'report'),
diffOptions: { threshold: 0.1 },
maxRetries: 2,
browsers: {
chrome: true,
ff: 'firefox',
ie11: {
browserName: 'internet explorer',
gridUrl: '<anotherGridUrl>/wd/hub',
limit: 2,
},
otherChrome: {
browserName: 'chrome',
storybookUrl: 'http://mystoryhost:6007',
viewport: { width: 1024, height: 720 },
},
},
};
CLI Options
--config — Specify path to config file. Default .creevey/config.js or creevey.config.js--gridUrl — Specify selenium grid url, work only in zero-config--ui — Start runner web server--update — Approve all images from report directory--port — Specify port for web server. Default 3000--reportDir — Path where reports will be stored--screenDir — Path where reference images are located--debug — Enable debug output
Storybook parameters
You could specify screenshot test parameters for each story you have. For example you want to specify capture element, because by default creevey capture viewport screenshots. To achieve this you could define parameters on global level
import { addParameters } from '@storybook/react';

addParameters({ creevey: { captureElement: '#root' } });
Also you could define parameters on kind or story levels. All these parameters are deeply merged by storybook for each story.
import React from 'react';
import { CSFStory } from 'creevey';
import MyComponent from './src/components/MyComponent';
export default {
title: 'MyComponent'
parameters: {
creevey: {
skip: [
{ in: 'ie11', reason: '`MyComponent` do not support IE11' },
{ in: 'firefox', stories: 'Loading' },
{
in: ['firefox', 'chrome'],
tests: /.*hover$/,
reason: 'For some reason `MyComponent` hovering do not work correctly',
},
],
},
},
};
export const Basic: CSFStory<JSX.Element> = () => <MyComponent />;
Basic.story = {
parameters: {
creevey: {
captureElement: '.container',
delay: 1000
tests: {
},
},
},
};
skip option examples:
- Skip all stories for all browsers:
skip: 'Skip reason message'skip: { reason: 'Skip reason message' }
- Skip all stories for specific browsers:
skip: { in: 'ie11' }skip: { in: ['ie11', 'chrome'] }skip: { in: /^fire.*/ }
- Skip all stories in specific kinds:
skip: { kinds: 'Button' }skip: { kinds: ['Button', 'Input'] }skip: { kinds: /.*Modal$/ }
- Skip all tests in specific stories:
skip: { stories: 'simple' }skip: { stories: ['simple', 'special'] }skip: { stories: /.*large$/ }
- Skip specific tests:
skip: { tests: 'click' }skip: { tests: ['hover', 'click'] }skip: { tests: /^press.*$/ }
- Multiple skip options:
skip: [{ /* ... */ }]
NOTE: If you try to skip stories by story name, the storybook name format will be used (For more info see storybook-export-vs-name-handling)
Creevey under the hood
Creevey built on top of mocha+chai, pixelmatch and selenium tools. Also creevey use Node.js cluster module to handle multiple processes.
All screenshot tests are running in nodejs environment, so creevey should load stories source code into nodejs. And to achieve this creevey load webpack config that storybook use to build bundle. Then creevey tweak config a little and add special webpack-loader to cutoff all non-story things and leave only story metadata and tests. This allow creevey to support any framework or project configuration, that supported by storybook it self. After storybook bundle built, creevey subscribe to storybook channel events and require bundle. Stories are loaded by storybook and all metadata emitted in setStories event. That metadata used to generate tests.
Multiple process configuration used to run each browser instance in separate nodejs worker process. Master process manage workers pool, handle ui web server. One of workers process used to build webpack bundle.
Future plans
- Add
docker support that allow start test without specifying gridUrl and setup selenoid locally. - Allow use different webdrivers not only
selenium, but also puppeteer or playwright. - Integrate Creevey UI into Storybook UI and start it with storybook.
Known issues
- Hot reloading don't work very well. Creevey watching for changes story files and to decide that files needs to be watched it get from
fileName parameter saved by storybook for each story. And this fileName in some cases contains relative path not from root project directory. So Creevey couldn't resolve that path to absolute one. Possible solutions, try to store stories in root project directory like in this repo. Or you could update storybook to 6.x


