Product
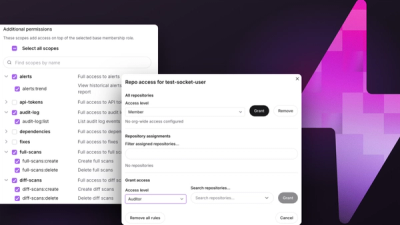
Introducing Repository Access Permissions and Custom Roles
Socket now supports Custom Roles and Repository Access Permissions so organizations can control who can access specific repositories and actions.
By Joe Werle - Jun 19, 2026
exp-clldocs-mcp-server
Advanced tools
{
"mcpServers": {
"clldocs-mcp-server": {
"args": ["exp-clldocs-mcp-server"], // TODO @zeuslawyer updatet
"env": {
"MCP_ANTHROPIC_API_KEY": "sk-XXXXXX"
}
}
}
}
Make sure that you connect to the server correctly from Cursor Settings >> MCP
ccip_chain_configurations.
Open the Cursor AI chat window, and make sure you choose Agent mode, not the other modes. Encourage it to use MCP tools. Try the following prompt for example: Use MCP tools and get me the CCIP configs for arbitrum sepolia on testnet. The window will show you the data being passed into the tool function implementation as params. You may have to click RUN TOOL or something similar. Depending on the IDE, the agent may present the info to you differently but the configuration data should be what is returned by the tool, regardless of whether the Agent pretty prints it.pnpm install
Then build the server with pnpm run build. Note: to make sure the server reflects your changes run this every time before you connect to the MCP server from your IDE as this is how it gets the latest tools and also the llms texts get copied over this way.
If you want to check that the server is compiling and serving correctly run pnpm run serve in a new terminal window. But pnpm run build also checks that things compile correctly.
Create a .cursor/mcp.json directory in your project root. Configure the MCP server as follows (note this is for stdio type MCP servers only that run locally on-machine only). VSCode has a different UI to access and start and restart MCP servers, but appears to pick up the mcp.json file.
{
  "mcpServers": {
    "cll-mcp-server-dev": {
      // @dev Todo
      "command": "node",
      "args": ["/your/path/to/project-root/dist/index.js"], // @dev TODO
      "env": {
        "MCP_ANTHROPIC_API_KEY": "value" // @dev TODO. Get API KEY from https://docs.anthropic.com/en/api/getting-started
      }
    }
  }
}
NOTE This is useful for checking responses and checking that tools are registered in the MCP server etc. But the responses provided by the Agent are LLM-generated and will differ from the raw response returned from the actual tool implementations.
This is the Inspector Repo README
Open a new terminal that will run the inspector and show logs.
Set your API Key in that terminal session as follows:
export MCP_ANTHROPIC_API_KEY=sk-ant-etc-etc-etc
Then run the command :
pnpm run inspect.
The first time it will require you to approve the download of @modelcontextprotocol/inspector - just type y.
If successful you should see:
Starting MCP inspector...
⚙️ Proxy server listening on port 6277
🔍 MCP Inspector is up and running at http://127.0.0.1:6274 🚀
If you click on the localhost URL it will open up the inspector UI. On the left, enter the relevant API Keys required in the env vars. Then click Connect.
Pass the key params into the boxes indicated and run the tool to debug.
FAQs
Prototype MCP Server for CLL
We found that exp-clldocs-mcp-server demonstrated a not healthy version release cadence and project activity because the last version was released a year ago. It has 1 open source maintainer collaborating on the project.
Did you know?

Socket for GitHub automatically highlights issues in each pull request and monitors the health of all your open source dependencies. Discover the contents of your packages and block harmful activity before you install or update your dependencies.
Product
Socket now supports Custom Roles and Repository Access Permissions so organizations can control who can access specific repositories and actions.
Product
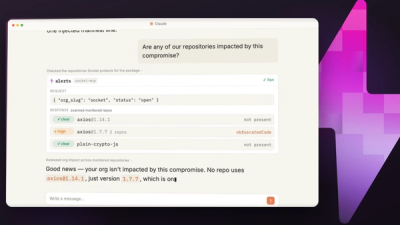
Socket MCP now lets AI assistants review org alerts, investigate threats using the Socket threat feed, and inspect package files in addition to dependency scoring.
Product
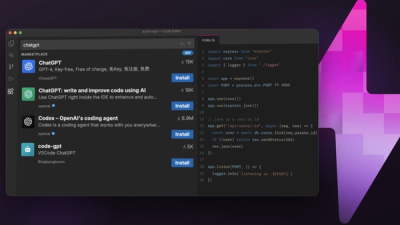
Socket Firewall blocks malicious VS Code and Open VSX extensions before install, protecting developers from compromised editor marketplaces.