face-api.js


JavaScript API for face detection and face recognition in the browser implemented on top of the tensorflow.js core API (tensorflow/tfjs-core)
Table of Contents:
Resources
Live Demos
Check out the live demos!
Tutorials
Check out my face-api.js tutorials:
Examples
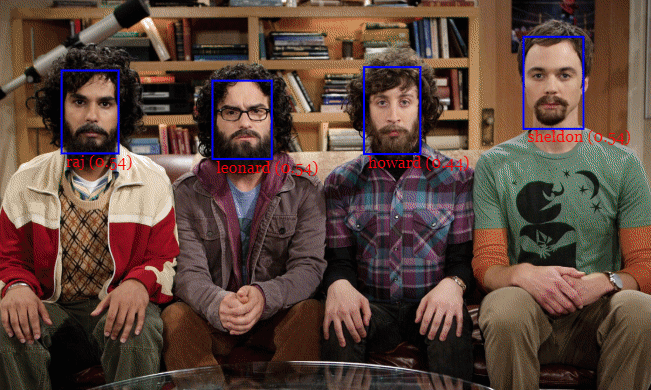
Face Recognition
Face Similarity
Face Landmark Detection

Realtime Face Tracking
MTCNN
Running the Examples
Clone the repository:
git clone https://github.com/justadudewhohacks/face-api.js.git
Running the Browser Examples
cd face-api.js/examples/examples-browser
npm i
npm start
Browse to http://localhost:3000/.
Running the Nodejs Examples
cd face-api.js/examples/examples-nodejs
npm i
Now run one of the examples using ts-node:
ts-node faceDetection.ts
Or simply compile and run them with node:
tsc faceDetection.ts
node faceDetection.js
Available Models
Face Detection Models
SSD Mobilenet V1
For face detection, this project implements a SSD (Single Shot Multibox Detector) based on MobileNetV1. The neural net will compute the locations of each face in an image and will return the bounding boxes together with it's probability for each face. This face detector is aiming towards obtaining high accuracy in detecting face bounding boxes instead of low inference time. The size of the quantized model is about 5.4 MB (ssd_mobilenetv1_model).
The face detection model has been trained on the WIDERFACE dataset and the weights are provided by yeephycho in this repo.
Tiny Face Detector
The Tiny Face Detector is a very performant, realtime face detector, which is much faster, smaller and less resource consuming compared to the SSD Mobilenet V1 face detector, in return it performs slightly less well on detecting small faces. This model is extremely mobile and web friendly, thus it should be your GO-TO face detector on mobile devices and resource limited clients. The size of the quantized model is only 190 KB (tiny_face_detector_model).
The face detector has been trained on a custom dataset of ~14K images labeled with bounding boxes. Furthermore the model has been trained to predict bounding boxes, which entirely cover facial feature points, thus it in general produces better results in combination with subsequent face landmark detection than SSD Mobilenet V1.
This model is basically an even tinier version of Tiny Yolo V2, replacing the regular convolutions of Yolo with depthwise separable convolutions. Yolo is fully convolutional, thus can easily adapt to different input image sizes to trade off accuracy for performance (inference time).
MTCNN
Note, this model is mostly kept in this repo for experimental reasons. In general the other face detectors should perform better, but of course you are free to play around with MTCNN.
MTCNN (Multi-task Cascaded Convolutional Neural Networks) represents an alternative face detector to SSD Mobilenet v1 and Tiny Yolo v2, which offers much more room for configuration. By tuning the input parameters, MTCNN should be able to detect a wide range of face bounding box sizes. MTCNN is a 3 stage cascaded CNN, which simultaneously returns 5 face landmark points along with the bounding boxes and scores for each face. Additionally the model size is only 2MB.
MTCNN has been presented in the paper Joint Face Detection and Alignment using Multi-task Cascaded Convolutional Networks by Zhang et al. and the model weights are provided in the official repo of the MTCNN implementation.
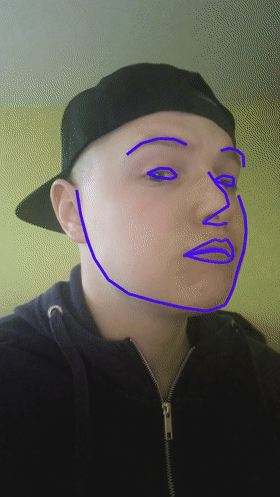
68 Point Face Landmark Detection Models
This package implements a very lightweight and fast, yet accurate 68 point face landmark detector. The default model has a size of only 350kb (face_landmark_68_model) and the tiny model is only 80kb (face_landmark_68_tiny_model). Both models employ the ideas of depthwise separable convolutions as well as densely connected blocks. The models have been trained on a dataset of ~35k face images labeled with 68 face landmark points.
Face Recognition Model
For face recognition, a ResNet-34 like architecture is implemented to compute a face descriptor (a feature vector with 128 values) from any given face image, which is used to describe the characteristics of a persons face. The model is not limited to the set of faces used for training, meaning you can use it for face recognition of any person, for example yourself. You can determine the similarity of two arbitrary faces by comparing their face descriptors, for example by computing the euclidean distance or using any other classifier of your choice.
The neural net is equivalent to the FaceRecognizerNet used in face-recognition.js and the net used in the dlib face recognition example. The weights have been trained by davisking and the model achieves a prediction accuracy of 99.38% on the LFW (Labeled Faces in the Wild) benchmark for face recognition.
The size of the quantized model is roughly 6.2 MB (face_recognition_model).
Getting Started
face-api.js for the Browser
Simply include the latest script from dist/face-api.js.
Or install it via npm:
npm i face-api.js
face-api.js for Nodejs
We can use the equivalent API in a nodejs environment by polyfilling some browser specifics, such as HTMLImageElement, HTMLCanvasElement and ImageData. The easiest way to do so is by installing the node-canvas package.
Alternatively you can simply construct your own tensors from image data and pass tensors as inputs to the API.
Furthermore you want to install @tensorflow/tfjs-node (not required, but highly recommended), which speeds things up drastically by compiling and binding to the native Tensorflow C++ library:
npm i face-api.js canvas @tensorflow/tfjs-node
Now we simply monkey patch the environment to use the polyfills:
import '@tensorflow/tfjs-node';
import * as canvas from 'canvas';
import * as faceapi from 'face-api.js';
const { Canvas, Image, ImageData } = canvas
faceapi.env.monkeyPatch({ Canvas, Image, ImageData })
Usage
Loading the Models
To load a model, you have provide the corresponding manifest.json file as well as the model weight files (shards) as assets. Simply copy them to your public or assets folder. The manifest.json and shard files of a model have to be located in the same directory / accessible under the same route.
Assuming the models reside in public/models:
await faceapi.loadSsdMobilenetv1Model('/models')
All global neural network instances are exported via faceapi.nets:
console.log(faceapi.nets)
The following is equivalent to await faceapi.loadSsdMobilenetv1Model('/models'):
await faceapi.nets.ssdMobilenetv1.loadFromUri('/models')
In a nodejs environment you can furthermore load the models directly from disk:
await faceapi.nets.ssdMobilenetv1.loadFromDisk('./models')
You can also load the model from a tf.NamedTensorMap:
await faceapi.nets.ssdMobilenetv1.loadFromWeightMap(weightMap)
Alternatively, you can also create own instances of the neural nets:
const net = new faceapi.SsdMobilenetv1()
await net.load('/models')
You can also load the weights as a Float32Array (in case you want to use the uncompressed models):
net.load(await faceapi.fetchNetWeights('/models/face_detection_model.weights'))
const res = await axios.get('/models/face_detection_model.weights', { responseType: 'arraybuffer' })
const weights = new Float32Array(res.data)
net.load(weights)
High Level API
In the following input can be an HTML img, video or canvas element or the id of that element.
<img id="myImg" src="images/example.png" />
<video id="myVideo" src="media/example.mp4" />
<canvas id="myCanvas" />
const input = document.getElementById('myImg')
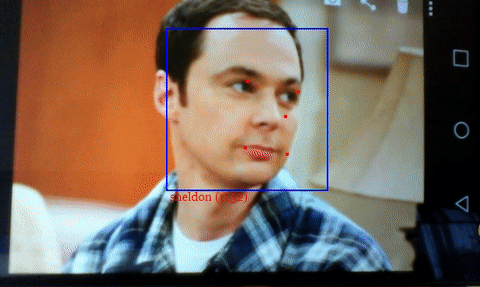
Detecting Faces
Detect all faces in an image. Returns Array<FaceDetection>:
const detections = await faceapi.detectAllFaces(input)
Detect the face with the highest confidence score in an image. Returns FaceDetection | undefined:
const detection = await faceapi.detectSingleFace(input)
By default detectAllFaces and detectSingleFace utilize the SSD Mobilenet V1 Face Detector. You can specify the face detector by passing the corresponding options object:
const detections1 = await faceapi.detectAllFaces(input, new faceapi.SsdMobilenetv1Options())
const detections2 = await faceapi.detectAllFaces(input, new faceapi.TinyFaceDetectorOptions())
const detections3 = await faceapi.detectAllFaces(input, new faceapi.MtcnnOptions())
You can tune the options of each face detector as shown here.
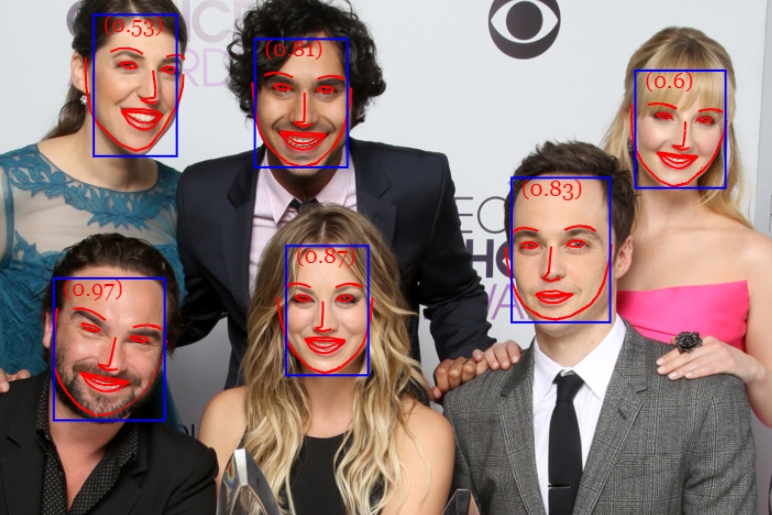
Detecting 68 Face Landmark Points
After face detection, we can furthermore predict the facial landmarks for each detected face as follows:
Detect all faces in an image + computes 68 Point Face Landmarks for each detected face. Returns Array<FaceDetectionWithLandmarks>:
const detectionsWithLandmarks = await faceapi.detectAllFaces(input).withFaceLandmarks()
Detect the face with the highest confidence score in an image + computes 68 Point Face Landmarks for that face. Returns FaceDetectionWithLandmarks | undefined:
const detectionWithLandmarks = await faceapi.detectSingleFace(input).withFaceLandmarks()
You can also specify to use the tiny model instead of the default model:
const useTinyModel = true
const detectionsWithLandmarks = await faceapi.detectAllFaces(input).withFaceLandmarks(useTinyModel)
Computing Face Descriptors
After face detection and facial landmark prediction the face descriptors for each face can be computed as follows:
Detect all faces in an image + computes 68 Point Face Landmarks for each detected face. Returns Array<FullFaceDescription>:
const fullFaceDescriptions = await faceapi.detectAllFaces(input).withFaceLandmarks().withFaceDescriptors()
Detect the face with the highest confidence score in an image + computes 68 Point Face Landmarks and face descriptor for that face. Returns FullFaceDescription | undefined:
const fullFaceDescription = await faceapi.detectSingleFace(input).withFaceLandmarks().withFaceDescriptor()
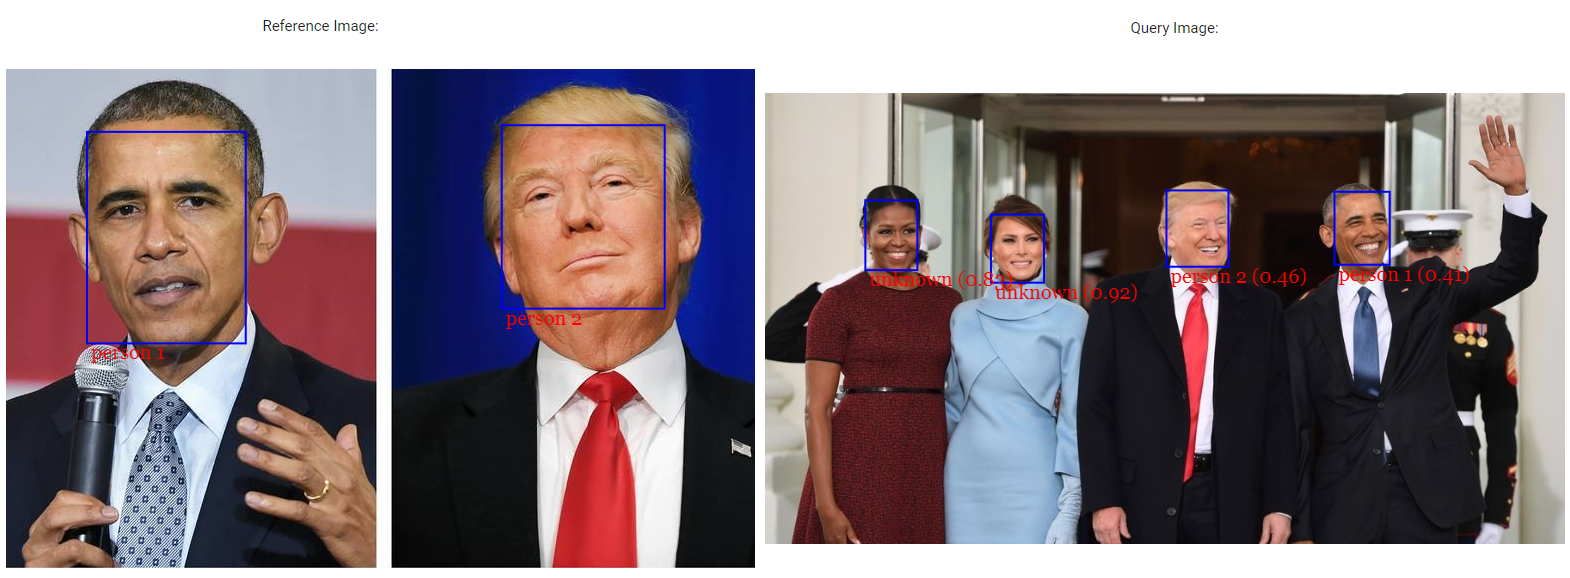
Face Recognition by Matching Descriptors
To perform face recognition, one can use faceapi.FaceMatcher to compare reference face descriptors to query face descriptors.
First, we initialize the FaceMatcher with the reference data, for example we can simply detect faces in a referenceImage and match the descriptors of the detected faces to faces of subsquent images:
const fullFaceDescriptions = await faceapi
.detectAllFaces(referenceImage)
.withFaceLandmarks()
.withFaceDescriptors()
if (!fullFaceDescriptions.length) {
return
}
const faceMatcher = new faceapi.FaceMatcher(fullFaceDescriptions)
Now we can recognize a persons face shown in queryImage1:
const singleFullFaceDescription = await faceapi
  .detectSingleFace(queryImage1)
  .withFaceLandmarks()
  .withFaceDescriptor()

if (singleFullFaceDescription) {
  const bestMatch = faceMatcher.findBestMatch(singleFullFaceDescription.descriptor)
  console.log(bestMatch.toString())
}
Or we can recognize all faces shown in queryImage2:
const fullFaceDescriptions = await faceapi
  .detectAllFaces(queryImage2)
  .withFaceLandmarks()
  .withFaceDescriptors()

fullFaceDescriptions.forEach(fd => {
  const bestMatch = faceMatcher.findBestMatch(fd.descriptor)
  console.log(bestMatch.toString())
})
You can also create labeled reference descriptors as follows:
const labeledDescriptors = [
  new faceapi.LabeledFaceDescriptors(
    'obama',
    [descriptorObama1, descriptorObama2]
  ),
  new faceapi.LabeledFaceDescriptors(
    'trump',
    [descriptorTrump]
  )
]

const faceMatcher = new faceapi.FaceMatcher(labeledDescriptors)
Displaying Detection Results
Drawing the detected faces into a canvas:
const detections = await faceapi.detectAllFaces(input)
const detectionsForSize = detections.map(det => det.forSize(input.width, input.height))
const canvas = document.getElementById('overlay')
canvas.width = input.width
canvas.height = input.height
faceapi.drawDetection(canvas, detectionsForSize, { withScore: true })
Drawing face landmarks into a canvas:
const detectionsWithLandmarks = await faceapi
.detectAllFaces(input)
.withFaceLandmarks()
const detectionsWithLandmarksForSize = detectionsWithLandmarks.map(det => det.forSize(input.width, input.height))
const canvas = document.getElementById('overlay')
canvas.width = input.width
canvas.height = input.height
faceapi.drawLandmarks(canvas, detectionsWithLandmarks, { drawLines: true })
Finally you can also draw boxes with custom text:
const boxesWithText = [
  new faceapi.BoxWithText(new faceapi.Rect(x, y, width, height), text))
  new faceapi.BoxWithText(new faceapi.Rect(0, 0, 50, 50), 'some text'))
]

const canvas = document.getElementById('overlay')
faceapi.drawDetection(canvas, boxesWithText)
Face Detection Options
SsdMobilenetv1Options
export interface ISsdMobilenetv1Options {
minConfidence?: number
maxResults?: number
}
const options = new faceapi.SsdMobilenetv1Options({ minConfidence: 0.8 })
TinyFaceDetectorOptions
export interface ITinyFaceDetectorOptions {
inputSize?: number
scoreThreshold?: number
}
const options = new faceapi.TinyFaceDetectorOptions({ inputSize: 320 })
MtcnnOptions
export interface IMtcnnOptions {
minFaceSize?: number
scoreThresholds?: number[]
scaleFactor?: number
maxNumScales?: number
scaleSteps?: number[]
}
const options = new faceapi.MtcnnOptions({ minFaceSize: 100, scaleFactor: 0.8 })
Utility Classes
IBox
export interface IBox {
  x: number
  y: number
  width: number
  height: number
}
IFaceDetection
export interface IFaceDetection {
  score: number
  box: Box
}
IFaceLandmarks
export interface IFaceLandmarks {
  positions: Point[]
  shift: Point
}
IFaceDetectionWithLandmarks
export interface IFaceDetectionWithLandmarks {
  detection: FaceDetection
  landmarks: FaceLandmarks
}
IFullFaceDescription
export interface IFullFaceDescription extends IFaceDetectionWithLandmarks {
  descriptor: Float32Array
}
Other Useful Utility
Using the Low Level API
Instead of using the high level API, you can directly use the forward methods of each neural network:
const detections1 = await faceapi.ssdMobilenetv1(input, options)
const detections2 = await faceapi.tinyFaceDetector(input, options)
const detections3 = await faceapi.mtcnn(input, options)
const landmarks1 = await faceapi.detectFaceLandmarks(faceImage)
const landmarks2 = await faceapi.detectFaceLandmarksTiny(faceImage)
const descriptor = await faceapi.computeFaceDescriptor(alignedFaceImage)
const regionsToExtract = [
new faceapi.Rect(0, 0, 100, 100)
]
const canvases = await faceapi.extractFaces(input, regionsToExtract)
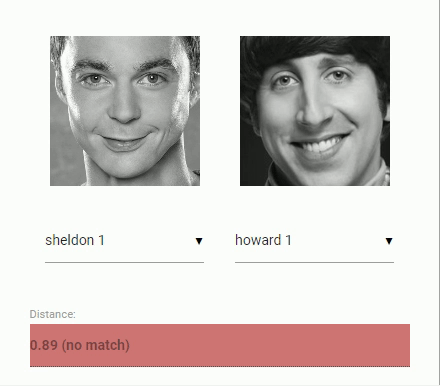
Euclidean Distance
const dist = faceapi.euclideanDistance([0, 0], [0, 10])
console.log(dist)
Retrieve the Face Landmark Points and Contours
const landmarkPositions = landmarks.positions
const jawOutline = landmarks.getJawOutline()
const nose = landmarks.getNose()
const mouth = landmarks.getMouth()
const leftEye = landmarks.getLeftEye()
const rightEye = landmarks.getRightEye()
const leftEyeBbrow = landmarks.getLeftEyeBrow()
const rightEyeBrow = landmarks.getRightEyeBrow()
Fetch and Display Images from an URL
<img id="myImg" src="">
const image = await faceapi.fetchImage('/images/example.png')
console.log(image instanceof HTMLImageElement)
const myImg = document.getElementById('myImg')
myImg.src = image.src
Fetching JSON
const json = await faceapi.fetchJson('/files/example.json')
Creating an Image Picker
<img id="myImg" src="">
<input id="myFileUpload" type="file" onchange="uploadImage()" accept=".jpg, .jpeg, .png">
async function uploadImage() {
const imgFile = document.getElementById('myFileUpload').files[0]
const img = await faceapi.bufferToImage(imgFile)
document.getElementById('myImg').src = img.src
}
Creating a Canvas Element from an Image or Video Element
<img id="myImg" src="images/example.png" />
<video id="myVideo" src="media/example.mp4" />
const canvas1 = faceapi.createCanvasFromMedia(document.getElementById('myImg'))
const canvas2 = faceapi.createCanvasFromMedia(document.getElementById('myVideo'))