Product
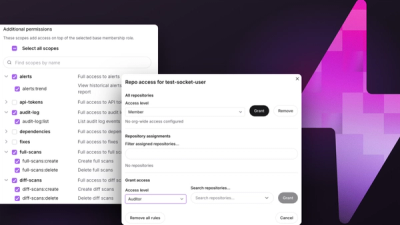
Introducing Repository Access Permissions and Custom Roles
Socket now supports Custom Roles and Repository Access Permissions so organizations can control who can access specific repositories and actions.
By Joe Werle - Jun 19, 2026
formique-css
Advanced tools

Formique is a robust and elegant WCAG and ARIA compliant form-building library tailored for JavaScript enthusiasts. It supports a wide array of input types, features JS-driven themes, and offers advanced functionalities like nested conditional logic and dynamic dropdowns. Highly customizable and extensible, Formique is built for the Semantq JS Framework but seamlessly integrates with Vanilla JS, React, Vue, Angular, and Svelte.
Formique is Open-source & MIT licensed.
Formique is designed with a laser focus on WAI-ARIA and WCAG usability and accessibility, ensuring that the generated form HTML markup meets the highest standards of web accessibility.
With minimal declarative form input definitions, Formique takes care of the rest to ensure the final markup is comprehensive enough to meet official usability and accessibility standards.
For more information on the Web Content (Forms) Accessibility Guidelines (WCAG), you can visit the W3C website.
html <input type="text"> html <input type="email"> html <input type="number"> html <input type="password"> html <input type="tel"> html <input type="date"> html <input type="time"> html <input type="datetime-local"> html <input type="month"> html <input type="week"> html <input type="url"> html <input type="search"> html <input type="color"> html <input type="file"> html <input type="hidden"> html <input type="image"> html <textarea> html <input type="radio"> html <input type="checkbox"> html <select> html <select> html <input type="submit"> The form schema is an array of field definitions. Each field is defined by an array containing:
You don't need to use the type, name and label keys to define these parameters. Example Input Definition:
['text', 'firstname', 'First Name' ]
In the example above:
<input type="text" ...<input name="firstname" ...<label for="firstname">First Name</label><div class="input-block" id="firstname-block">
<label for="firstname">First Name</label>
<input type="text" name="firstname" id="firstname" class="form-input" placeholder="First
Name">
</div>
Validation: Object specifying validation rules. This can include:
required: trueminlength: 5maxlength: 50pattern: "/^[A-Za-z0-9]+$/"min: 1max: 100step: 0.01 (for decimal increments)Formique will filter out any invalid validation defined and throw warnings on the browser console.E.g. when you define min and max validations (instead of minlength and maxlength) for a text field, Formique will filter these out.
id, class, style, etc.
{ id: 'username', class: 'form-input', style: 'font-size: 13px;' }binding: '::nameOfField'binding: 'bind-value''::inputName' or 'bind-value'inputName must be the value defined as the input name (the second item) in the input definition object.value and label.
[{ value: 'male', label: 'Male' }, { value: 'female', label: 'Female' }]For fields like singleSelect and multipleSelect you can also define default or pre selected options this way:
[{ value: 'red', label: 'Red' }, { value: 'blue', label: 'Blue', selected: true }]
In the example given: the blue option will be selected by default.
There are two primary ways to install and use Formique in your project:
Include the CSS in the head section of your HTML file:
<link rel="stylesheet" href="https://cdn.jsdelivr.net/npm/formique-css@1.0.1/formique.min.css" formique-style>
Include the JavaScript before the closing </body> tag of your HTML file:
<script src="https://cdn.jsdelivr.net/npm/formique@1.0.1/formique.mjs.js"></script>
Define the form container somewhere in the HTML body:
<div id="formique"></div>
Alternatively, you can use a different container ID by setting containerId: 'someelementid' in the formSettings object.
Define your formParams, formSchema, and initialize Formique in a <script> block (placed below the previous script tag):
<script>
    const formSchema = [
        ['text', 'name', 'Name', { required: true }, {}],
        ['email', 'email', 'Email', { required: true }, {}],
        ['singleSelect', 'diet', 'Dietary Requirements', { required: true }, {}, [
            { value: 'gluten-free', label: 'Gluten-free' },
            { value: 'vegetarian', label: 'Vegetarian' },
            // Additional options here...
        ]],
        ['submit', 'submitButton', 'Submit']
    ];

    const formParams = {
        method: 'post',
        action: 'submit.js',
        id: 'myForm',
        class: 'form',
        style: 'width: 100%; font-size: 14px;'
    };

    const formSettings = {
        requiredFieldIndicator: true,
        framework: 'semantq',
        placeholders: true,
        containerid: 'form-div'
    };

    // Initialize the form
    const form = new Formique(formSchema, formParams, formSettings);
</script>
Note: You can also use this instantiation with just the formSchema, leaving out the formParams and formSettings. This will apply the default dark theme and render the form inputs without the surrounding <form> element.
Install Formique via npm:
npm install formique
Import and Use Formique in Your JavaScript File:
import Formique from 'formique';

const formSchema = [
    // Define your schema as shown above...
];

const formParams = {
    // Optional parameters...
};

const formSettings = {
    // Optional settings...
};

const form = new Formique(formSchema, formParams, formSettings);
Formique is also available in additional formats like ESM (ES Modules) and IIFE (Immediately Invoked Function Expression) for specific use cases. For most projects, we recommend using UMD for browser contexts and ESM for Node.js environments. Refer to the Formique CDN for all available formats.
Include the CSS and import Formique in the head section of your HTML file:
<link rel="stylesheet" href="https://cdn.jsdelivr.net/npm/formique-css@1.0.1/formique.min.css" formique-style>
Define form container somewhere in the html body:
<div id="formique"></div>
Define your form parameters (formParams), form schema (formSchema) and then initialize Formique in script which should go before the html </body> tag.
<script type="module">
    import Formique  from 'formique';

    const formParams = {
        method: 'post',
        action: 'submit.js',
        id: 'myForm',
        class: 'form',
        semantq: true,
        style: 'width: 100%; font-size: 14px;'
    };

    const formSchema = [
        ['text', 'name', 'Name', { required: true }],
        ['email', 'email', 'Email', { required: true }],
        [
            'singleSelect', 'diet', 'Dietary Requirements', {required: true}, {},
            [
                {value: 'gluten-free', label: 'Gluten-free'},
                {value: 'dairy-free', label: 'Dairy-free'},
                {value: 'keto', label: 'Ketogenic'},
                {value: 'low-carb', label: 'Low-carb'},
                {value: 'pescatarian', label: 'Pescatarian'},
                {value: 'halal', label: 'Halal'},
                {value: 'kosher', label: 'Kosher'},
                {value: 'vegetarian', label: 'Vegetarian'},
                {value: 'lacto-ovo-vegetarian', label: 'Lacto-ovo-vegetarian'},
                {value: 'raw-food', label: 'Raw food'},
                {value: 'macrobiotic', label: 'Macrobiotic'},
                {value: 'flexitarian', label: 'Flexitarian'}
            ]
        ],
        ['submit', 'submitButton', 'Submit'],
    ];

    const form = new Formique(formParams, formSchema);


</script>
Formique can be used as either a UMD module with a simple <script> tag or as an ESM module via npm.
Here's an example of a form schema that defines various input fields with validation, attributes, binding syntax and options:
const formSchema = [
  // Text Input Field
  [
    'text',
    'firstName',
    'First Name',
    { minlength: 2, maxlength: 5, required: true, disabled: true }, // Validation options
    { value: "John", id: 'firstNameInput', class: 'form-input', style: 'width: 100%;', oninput: "incrementer()" }, // Attributes
  ],

  // URL Input Field
  [
    'url',
    'websiteUrl',
    'Website URL',
    { required: true }, // Validation options
    { id: 'websiteUrlInput', class: 'form-control', style: 'width: 100%;', binding: 'bind:value'  }
  ],

  // Radio Input Field
  [
    'radio',
    'gender',
    'Gender',
    { required: true }, // Validation options
    { id: 'genderRadio', class: 'form-radio-input', style: 'margin-left: 1rem;', onchange: 'actionFunction()' }
    [
      { value: 'male', label: 'Male' }, // Options
      { value: 'female', label: 'Female' },
      { value: 'other', label: 'Other' }
    ]
  ],

  // Checkbox Input Field
  [
    'checkbox',
    'preferences',
    'Preferences',
    { required: true }, // Validation options
    { id: 'preferencesCheckbox', binding: '::preferences', class: 'form-checkbox-input', style: 'margin-left: 1rem;', onchange: 'submit' }
    [
      { value: 'news', label: 'Newsletter' }, // Options
      { value: 'updates', label: 'Product Updates' },
      { value: 'offers', label: 'Special Offers' }
    ]
  ],

  // Single Select Input Field
  [
    'singleSelect',
    'colors',
    'Colors',
    { required: true }, // Validation options
    { id: 'colorsSelect', class: 'form-select-input', style: 'margin-left: 1rem;', onchange: 'trigger' }, // the onchange: 'trigger' format works with (framework: semantq) set in your formSettings object so that the syntax can be transformed as per framework specs
    [
      { value: 'red', label: 'Red' }, // Options
      { value: 'green', label: 'Green' },
      { value: 'blue', label: 'Blue', selected: true }
    ]
  ],

  // Multiple Select Input Field
  [
    'multipleSelect', // Type of field
    'colors', // Name/identifier of the field
    'Colors', // Label of the field
    { required: true, min: 2, max: 3 }, // Validation options
    { id: 'colorsSelect', class: 'form-select-input', style: 'margin-left: 1rem;', onchange: 'alerter' }
    [
      { value: 'red', label: 'Red' }, // Options
      { value: 'green', label: 'Green' },
      { value: 'blue', label: 'Blue' },
      { value: 'yellow', label: 'Yellow' }
    ]
  ],

  // Submit Button
  [
    'submit',
    'submitButton',
    'Submit',
    {}, // Validation options
    { id: 'submitBtn', class: 'form-submit-btn', style: 'margin-top: 1rem; width: 100%;' }
  ]
];
To create a form using Formique, you need to define the form parameters and schema. Below is an example of how to invoke the class with basic parameters, followed by a full list of possible parameters.
const formParams = {
  method: 'post', // HTTP method (e.g., 'get', 'post')
  action: 'submit.js', // Form submission URL
  id: 'myForm', // Unique identifier for the form
  class: 'form', // CSS class for styling
  semantq: true, // Whether to use semantic HTML elements
  style: 'width: 100%; font-size: 14px;' // Inline CSS styling
};
const formParams = {
  method: 'post', // HTTP method (e.g., 'get', 'post')
  action: 'submit.js', // Form submission URL
  id: 'myForm', // Unique identifier for the form
  class: 'form', // CSS class for styling
  semantq: true, // if true it enables Semantq syntax sugar: i.e. attribute: onchange: 'handlerFunction' will be transformed to: @change={handlerFunction} if false or not defined completely the output would be regular html e.g.: onchange="handlerFunction()"
  style: 'width: 100%; font-size: 14px;', // Inline CSS styling
  enctype: 'multipart/form-data', // Encoding type for file uploads
  target: '_blank', // Where to open the form result (e.g., '_self', '_blank')
  novalidate: true, // Disable form validation
  accept_charset: 'UTF-8' // this will be transformed to: accept-charset: 'UTF-8' Character set for form data
};
By customizing these parameters, you can control various aspects of the form's behavior and appearance.
<div id="formique">
<form
  method="post"
  action="submit.js"
  id="myForm"
  class="form"
  semantq
  style="width: 100%; font-size: 14px;"
>
  <div class="input-block">
    <label for="firstNameInput">First Name</label>
    <input
      type="text"
      name="firstName"
      bind:value="firstName"
      id="firstNameInput"
      value="John"
      class="form-input"
      style="width: 100%;"
      @input={incrementer}
      minlength="2"
      maxlength="5"
      required
      disabled
    />
  </div>
  <div class="input-block">
    <label for="websiteUrlInput">Website URL</label>
    <input
      type="url"
      name="websiteUrl"
      bind:value="websiteUrl"
      id="websiteUrlInput"
      class="form-control"
      style="width: 100%;"
      required
    />
  </div>
  <fieldset class="radio-group">
    <legend>Gender</legend>
    <div>
      <input
        type="radio"
        name="gender"
        value="male"
        bind:value="gender"
        class="form-radio-input"
        style="margin-left: 1rem;"
        @change={actioner}
        id="genderRadio-male"
      />
      <label for="genderRadio-male">Male</label>
    </div>
    <div>
      <input
        type="radio"
        name="gender"
        value="female"
        bind:value="gender"
        class="form-radio-input"
        style="margin-left: 1rem;"
        @change={actioner}
        id="genderRadio-female"
      />
      <label for="genderRadio-female">Female</label>
    </div>
    <div>
      <input
        type="radio"
        name="gender"
        value="other"
        bind:value="gender"
        class="form-radio-input"
        style="margin-left: 1rem;"
        @change={actioner}
        id="genderRadio-other"
      />
      <label for="genderRadio-other">Other</label>
    </div>
  </fieldset>
  <fieldset class="checkbox-group">
    <legend>Preferences</legend>
    <div>
      <input
        type="checkbox"
        name="preferences"
        value="news"
        bind:checked="preferences"
        class="form-checkbox-input"
        style="margin-left: 1rem;"
        @change={submit}
        id="preferencesCheckbox-news"
      />
      <label for="preferencesCheckbox-news">Newsletter</label>
    </div>
    <div>
      <input
        type="checkbox"
        name="preferences"
        value="updates"
        bind:checked="preferences"
        class="form-checkbox-input"
        style="margin-left: 1rem;"
        @change={submit}
        id="preferencesCheckbox-updates"
      />
      <label for="preferencesCheckbox-updates">Product Updates</label>
    </div>
    <div>
      <input
        type="checkbox"
        name="preferences"
        value="offers"
        bind:checked="preferences"
        class="form-checkbox-input"
        style="margin-left: 1rem;"
        @change={submit}
        id="preferencesCheckbox-offers"
      />
      <label for="preferencesCheckbox-offers">Special Offers</label>
    </div>
  </fieldset>
  <fieldset class="form-select">
    <label for="colorsSelect">Colors</label>
    <select
      name="colors"
      bind:value="colors"
      id="colorsSelect"
      class="form-select-input"
      style="margin-left: 1rem;"
      @change={trigger}
      required
    >
      <option value="">Choose an option</option>
      <option value="red">Red</option>
      <option value="green">Green</option>
      <option value="blue" selected>Blue</option>
    </select>
  </fieldset>
  <fieldset class="form-select">
    <label for="colorsSelect">Colors</label>
    <select
      name="colors"
      bind:value="colors"
      id="colorsSelect"
      class="form-select-input"
      style="margin-left: 1rem;"
      @change={alerter}
      required
      multiple
    >
      <option value="red">Red</option>
      <option value="green">Green</option>
      <option value="blue">Blue</option>
      <option value="yellow">Yellow</option>
    </select>
  </fieldset>
  <input
    type="submit"
    id="submitBtn"
    value="Submit"
    class="form-submit-btn"
    style="margin-top: 1rem;"
  />
</form>
</div>
The dynamicSingleSelect input type in Formique is used for generating dynamic dropdowns based on predefined options. It allows you to define multi-level select options (e.g., categories and subcategories) that change based on user selections. Below is an example of the schema format for implementing dynamic drop-downs.
The code below goes into your
[
  'dynamicSingleSelect',       // Input type (required)
  'languages',                 // Field name (required)
  'Programming Scope-Programming Languages', // Labels for both primary drop down and secondary (dynamic) drop down seperated by a hyphen - e.g. Country-States
  { required: true },          // Validation rules (optional) but the curly braces {} must always be included
  {},                          // Field attributes (optional) but the curly braces {} must always be included

  // Dropdown Options
  [
    {
      id: 'frontend',           // Option group ID (required)
      label: 'Front End',       // Option group label (required)
      options: [                // List of options (required)
        { value: 'javascript', label: 'JavaScript' },
        { value: 'html', label: 'HTML' },
        { value: 'css', label: 'CSS' },
        { value: 'typescript', label: 'TypeScript' },
        { value: 'semantq', label: 'Semantq' },
        { value: 'svelte', label: 'Svelte' },
        { value: 'vue', label: 'Vue' },
        { value: 'react', label: 'React' },
        { value: 'angular', label: 'Angular' },
      ]
    },
    {
      id: 'backend',            // Option group ID (required)
      label: 'Back End',        // Option group label (required)
      options: [                // List of options (required)
        { value: 'nodejs', label: 'Node.js' },
        { value: 'python', label: 'Python' },
        { value: 'java', label: 'Java' },
        { value: 'php', label: 'PHP' },
        { value: 'ruby', label: 'Ruby' },
        { value: 'csharp', label: 'C#' },
        { value: 'golang', label: 'Go' }
      ]
    }
  ]
]
Formique allows for dynamic form generation with powerful conditional logic based on the values of other form fields. This allows you to create forms where the options in one field depend on the selection made in another field.
The following schema demonstrates how to implement dynamic dropdowns with nested conditional logic in Formique.
[
  // Role field - Single Select (required)
  ['singleSelect', 'role', 'Role', { required: true }, { dependents: ['topic', 'mode'] },
    // in the attributes object of the parent field add dependents (array) by field names to the dependents: item
    [
      { value: 'conference attendee', label: 'Conference Attendee' },
      { value: 'conference presenter', label: 'Conference Presenter' }
    ]
  ],

  // Topic field - Text input (dependent on 'role' being 'conference presenter')
  ['text', 'topic', 'Topic', {}, { dependsOn: 'role', condition: 'conference presenter' }],
  // in the attributes object of the child field add the dependsOn: 'role' item where the key is dependsOn: and the value is name of the parent field: e.g. 'role in this case'
  // also add the condition this way:  condition: 'conference presenter'
  // you can use the string 'conference presenter' as the condition to be met
  // so this if the user select Conference Presenter in the role field - then dependents of that field (mode and topic) will be displayed. If the selected is changed to something else that doesn't meet the defined condtion - the dependents will be hidden.

  // Mode field - Single Select (required, dependent on 'role' being 'conference presenter')
  ['singleSelect', 'mode', 'Mode', { required: true }, { dependsOn: 'role', condition: (value) => value === 'conference presenter' }, // you can use an arrow function to evaluate the condition - this is useful for more comprex evaluations
    [
      { value: 'physical', label: 'Physical' },
      { value: 'virtual', label: 'Virtual' }
    ]
  ]
]
Formique provides a set of CSS classes to facilitate the styling of various form elements. The default class names for different form components are as follows:
input-blockform-inputradio-groupcheckbox-groupform-selectThese classes are predefined in the formique.css stylesheet. Developers can either use this stylesheet for consistent styling or create their own custom CSS based on these class names to suit their design preferences. Also, Formique implements these class names by default. The input class can be overidden by defining your preferred class names in the input attributes object e.g.
{ class: 'form-control' }
In addition to external stylesheets, individual form elements can be styled directly via attributes specified in the form schema. This allows for fine grained control over the appearance of each element.
Formique is an open-source project. Contributions, issues, and feature requests are welcome!
Formique is licensed under the MIT License.
Javascript forms, declarative form syntax, js form library, formique
FAQs
Formique JS form builder CSS styles
We found that formique-css demonstrated a healthy version release cadence and project activity because the last version was released less than a year ago. It has 1 open source maintainer collaborating on the project.
Did you know?

Socket for GitHub automatically highlights issues in each pull request and monitors the health of all your open source dependencies. Discover the contents of your packages and block harmful activity before you install or update your dependencies.
Product
Socket now supports Custom Roles and Repository Access Permissions so organizations can control who can access specific repositories and actions.
Product
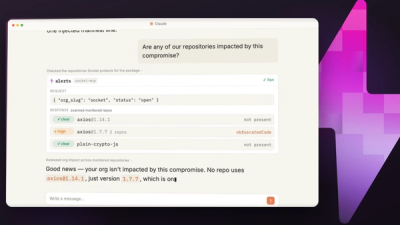
Socket MCP now lets AI assistants review org alerts, investigate threats using the Socket threat feed, and inspect package files in addition to dependency scoring.
Product
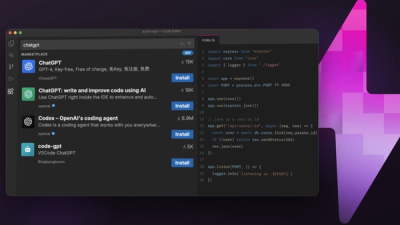
Socket Firewall blocks malicious VS Code and Open VSX extensions before install, protecting developers from compromised editor marketplaces.