Product
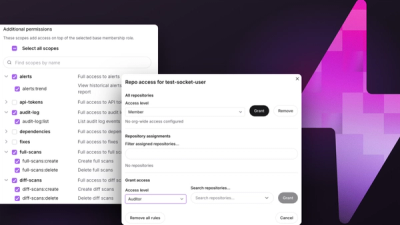
Introducing Repository Access Permissions and Custom Roles
Socket now supports Custom Roles and Repository Access Permissions so organizations can control who can access specific repositories and actions.
By Joe Werle - Jun 19, 2026
hello-npm-test
Advanced tools
title: 如何发布一个自己的node模块到npm date: 2019-4-1 tags:
本文介绍如何创建一个自己的 node 模块,以及怎样发布到 npm ,与其他开发人员共享你的模块。
作为一个前端开发人员,或者 nodejs 开发人员,目前我们使用最多的模块管理机制实属是 npm。我们可以使用很简单方式引用其他开发者发布到 npm 的模块。例如,当需要在你的项目中使用 vue。那么你可以:
$ npm install vue --save
安装 vue 模块到你的项目中,然后通过简单的导入命令使用她:
const Vue = require('vue')

// 或者使用 es Module 语法

import Vue from 'vue'

new Vue({
  // ...
})
那么,我们自己怎样去创建一个自己模块,并且发布到 npmjs 呢?
在开始之前,你需要有 3 样关键的工具,请确保你已经安装或者注册了。
首先,我们要初始化一个 node 项目,也就是你的 node 包。随便在电脑的哪个位置创建一个新的文件夹,名字嘛,假定我们叫她 hello-npm。什么!你说她俗气?没办法!因为 苏大强 喜欢,我 苏明成 表示也没有办法。
OK!使用编辑器打开并进入到 hello-npm 文件夹,使用 npm init 初始化 package.json。
$ npm init
这时你会看到一些提示:
elenh@elenh MINGW64 ~/Desktop/hello-npm
$ npm init
This utility will walk you through creating a package.json file.
It only covers the most common items, and tries to guess sensible defaults.

See `npm help json` for definitive documentation on these fields
and exactly what they do.

Use `npm install <pkg>` afterwards to install a package and
save it as a dependency in the package.json file.

Press ^C at any time to quit.
package name: (hello-npm) hello-npm
version: (1.0.0)
description: a node test module which will be published to npm.
entry point: (index.js)
test command:
git repository:
keywords: npm node test
author: elenh
license: (ISC)
About to write to C:\Users\yisiw\Desktop\hello-npm\package.json:

{
  "name": "hello-npm",
  "version": "1.0.0",
  "description": "a node test module which will be published to npm.",
  "main": "index.js",
  "scripts": {
    "test": "echo \"Error: no test specified\" && exit 1"
  },
  "keywords": [
    "npm",
    "node",
    "test"
  ],
  "author": "elenh",
  "license": "ISC"
}


Is this ok? (yes) y
具体的意思就是确定 package.json 文件中的一些必要字段信息。比如,包的名字 name ,包的语义化版本号 version ,包的描述信息 description,包的入口点 (entry point)main,测试脚本命令 (test command)script,git 仓库地址 (git repository),在 npm 中的搜索关键字 keywords ,包的作者名 author 以及该包的开源许可证类别 license。
注:如果直接按回车的话,表示直接使用默认值设置该字段,但是作为一个即将要把包发布到
npm的模块分享者来说,请仔细填写这些信息。因为这关系到该模块是否能正常使用(main 入口点),或则说别的开发者能够方便检索到你的模块(keywords, description)。很关键的一点是,你的version字段一定要遵循npm的语义化版本定义规则。以便使用此模块的开发者知道使用该模块的哪个版本。关于语义化版本规则请参考本博客的另一篇文章npm的使用。
现在,我们已经初始化好了 package.json 文件。是时候创建模块文件了。在 hello-npm 文件夹中新建一个名为 index.js 的文件。并在里面写入如下代码:
module.exports = function ( str ){
  console.log( 'hello' + str )
}
如上,使用 CommonJs 模块语法默认导出了一个函数,代码质量及其酷炫。苏明玉 都表示很惊讶!
至于为什么使用名为 index.js 的文件呢?这边要说的话就需要展开 nodejs 的模块加载规则了,嗯,苏明哲让我别展开了,听大哥的话,所以请自行 Google。
另一点需要说的是,在 package.json 文件中,我们定义了模块的入口点(entry point)main 字段,其默认值就是 index.js。她表示当使用模块导入语法使用该模块时,使用哪个文件作为入口点。当然,你可以修改她,比如:
{
  "main": "src/index.js"
}
表示模块入口点为 src 文件夹下的 index.js 文件。
到目前为止,你的模块已经可用了,那么怎么测试你的模块呢?此时,因为还没有发布到 npm ,所以不能使用如下方式直接安装。
$ npm install hello-npm
重新创建一个项目文件夹用来测试我们新写的模块,名为 my-project 。进入到该文件夹,初始化 node 项目。
npm init -y
此时,我们直接使用默认的
package.json的设置即可,因为只是用来测试的。
同样,我们新建一个 index.js 文件,并准备在该文件中使用 hello-npm 模块。
两种方式来引用她:
cd 进入到 my-project 文件夹中,并安装 hello-npm。
$ npm install C:/Users/yisiw/Desktop/hello-npm
然后你可以看到 my-project 文件夹中的 package.json 文件中多出了 dependencies 字段如下:
{
  "name": "my-project",
  "version": "1.0.0",
  "description": "",
  "main": "index.js",
  "scripts": {
    "test": "echo \"Error: no test specified\" && exit 1"
  },
  "keywords": [],
  "author": "",
  "license": "ISC",
  "dependencies": {
    "hello-npm": "file:../hello-npm"
  }
}
在 index.js 中使用她。
// my-project/index.js

const log = require('hello-npm')

log('npm')
然后在终端执行:
$ node index.js
hellonpm
没错!成功的打印出了 hellonpm,鼓掌。
npm link 将 hello-npm 包关联到全局后通过 npm link hello-npm 来使用她。首先进入到 hello-npm 文件中,打开命令行,输入如下命令:
npm link
这句命令的意思是将本模块地址关联到 nodejs 的全局环境中,以便可以在本机的任何项目中使用她。
E:\nodejs\node_modules\hello-npm -> C:\Users\yisiw\Desktop\hello-npm
为了同第一种方式区分开,我们首先把之前的 node_modules 文件夹、package-lock.json 和 package.json 中的 dependencies 字段删除,然后进入到 my-project 文件夹中。输入如下命令:
npm link hello-npm

elenh@elenh MINGW64 ~/Desktop/my-project
$ npm link hello-npm
C:\Users\yisiw\Desktop\my-project\node_modules\hello-npm -> E:\nodejs\node_modules\hello-npm -> C:\Users\yisiw\Desktop\hello-npm
执行完 npm link hello-npm 命令后,你会发现,my-project 文件夹中的 node_mnodules 右出现了,并且里面存在 hello-npm 包。那么我们再次执行:
$ node index.js
hellonpm
没错,同样是有用的。
接下来,我们应该将我们的包使用版本控制工具管理起来,方便之后的维护及更新。没错!是 Github。理所当然!
FAQs
a node test module which will be published to npm.
The npm package hello-npm-test receives a total of 23 weekly downloads. As such, hello-npm-test popularity was classified as not popular.
We found that hello-npm-test demonstrated a not healthy version release cadence and project activity because the last version was released a year ago. It has 1 open source maintainer collaborating on the project.
Did you know?

Socket for GitHub automatically highlights issues in each pull request and monitors the health of all your open source dependencies. Discover the contents of your packages and block harmful activity before you install or update your dependencies.
Product
Socket now supports Custom Roles and Repository Access Permissions so organizations can control who can access specific repositories and actions.
Product
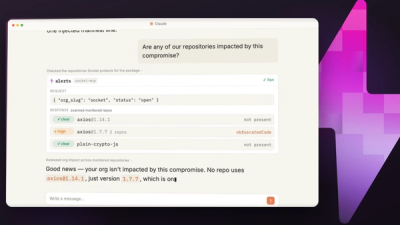
Socket MCP now lets AI assistants review org alerts, investigate threats using the Socket threat feed, and inspect package files in addition to dependency scoring.
Product
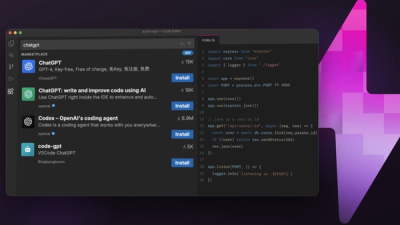
Socket Firewall blocks malicious VS Code and Open VSX extensions before install, protecting developers from compromised editor marketplaces.