Product
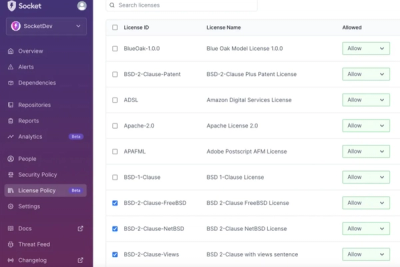
Introducing License Enforcement in Socket
Ensure open-source compliance with Socket’s License Enforcement Beta. Set up your License Policy and secure your software!
By Philipp Burckhardt - Oct 17, 2024
jest-environment-puppeteer
Advanced tools
The jest-environment-puppeteer package provides a Jest test environment that uses Puppeteer, a headless Chrome Node API, to run browser tests. This allows you to write tests that interact with a real browser, making it ideal for end-to-end (E2E) testing, UI testing, and web scraping.
End-to-End Testing
This feature allows you to perform end-to-end testing by interacting with a real browser. The code sample demonstrates how to navigate to Google's homepage and check if the text 'google' is present on the page.
const puppeteer = require('puppeteer');
describe('Google', () => {
beforeAll(async () => {
await page.goto('https://google.com');
});
it('should display "google" text on page', async () => {
const text = await page.evaluate(() => document.body.textContent);
expect(text).toContain('google');
});
});UI Testing
This feature allows you to perform UI testing by simulating user interactions. The code sample demonstrates how to click a button on a webpage and verify that a message is displayed as a result.
const puppeteer = require('puppeteer');

describe('Button Click', () => {
  beforeAll(async () => {
    await page.goto('https://example.com');
  });

  it('should click a button and display a message', async () => {
    await page.click('#myButton');
    const message = await page.$eval('#message', el => el.textContent);
    expect(message).toBe('Button clicked!');
  });
});
Web Scraping
This feature allows you to perform web scraping by extracting information from web pages. The code sample demonstrates how to navigate to a webpage and scrape the title of the page.
const puppeteer = require('puppeteer');

describe('Web Scraping', () => {
  beforeAll(async () => {
    await page.goto('https://example.com');
  });

  it('should scrape the title of the page', async () => {
    const title = await page.title();
    expect(title).toBe('Example Domain');
  });
});jest-puppeteer provides a similar environment for running Puppeteer tests with Jest. It offers a more integrated setup with additional utilities and configurations specifically designed for Puppeteer, making it easier to write and manage browser tests.
Puppeteer is a Node library that provides a high-level API to control Chrome or Chromium over the DevTools Protocol. While it doesn't integrate directly with Jest, it can be used in conjunction with Jest to perform browser automation tasks. jest-environment-puppeteer essentially builds on top of Puppeteer to provide a seamless Jest environment.
Cypress is an end-to-end testing framework that provides a complete solution for running browser tests. Unlike jest-environment-puppeteer, Cypress comes with its own test runner and assertion library, offering a more comprehensive and user-friendly experience for writing and running browser tests.


Run your tests using Jest & Puppeteer 🎪✨
npm install jest-environment-puppeteer puppeteer
Update your Jest configuration:
{
  "globalSetup": "jest-environment-puppeteer/setup",
  "globalTeardown": "jest-environment-puppeteer/teardown",
  "testEnvironment": "jest-environment-puppeteer"
}
Use Puppeteer in your tests:
describe("Google", () => {
  beforeAll(async () => {
    await page.goto("https://google.com");
  });

  it('should display "google" text on page', async () => {
    const text = await page.evaluate(() => document.body.textContent);
    expect(text).toContain("google");
  });
});
global.browserGive access to the Puppeteer Browser.
it("should open a new page", async () => {
  const page = await browser.newPage();
  await page.goto("https://google.com");
});
global.pageGive access to a Puppeteer Page opened at start (you will use it most of time).
it("should fill an input", async () => {
  await page.type("#myinput", "Hello");
});
global.contextGive access to a browser context that is instantiated when the browser is launched. You can control whether each test has its own isolated browser context using the browserContext option in config.
global.jestPuppeteer.debug()Put test in debug mode.
debugger instruction to Chromium, if Puppeteer has been launched with { devtools: true } it will stopit("should put test in debug mode", async () => {
await jestPuppeteer.debug();
});
global.jestPuppeteer.resetPage()Reset global.page
beforeEach(async () => {
  await jestPuppeteer.resetPage();
});
global.jestPuppeteer.resetBrowser()Reset global.browser, global.context, and global.page
beforeEach(async () => {
  await jestPuppeteer.resetBrowser();
});
Jest Puppeteer uses cosmiconfig for configuration file support. This means you can configure Jest Puppeteer via (in order of precedence):
"jest-puppeteer" key in your package.json file..jest-puppeteerrc file written in JSON or YAML..jest-puppeteerrc.json, .jest-puppeteerrc.yml, .jest-puppeteerrc.yaml, or .jest-puppeteerrc.json5 file..jest-puppeteerrc.js, .jest-puppeteerrc.cjs, jest-puppeteer.config.js, or jest-puppeteer.config.cjs file that exports an object using module.exports..jest-puppeteerrc.toml file.By default it looks for config at the root of the project. You can define a custom path using JEST_PUPPETEER_CONFIG environment variable.
It should export a config object or a Promise that returns a config object.
interface JestPuppeteerConfig {
  /**
   * Puppeteer connect options.
   * @see https://pptr.dev/api/puppeteer.connectoptions
   */
  connect?: ConnectOptions;
  /**
   * Puppeteer launch options.
   * @see https://pptr.dev/api/puppeteer.launchoptions
   */
  launch?: PuppeteerLaunchOptions;
  /**
   * Server config for `jest-dev-server`.
   * @see https://www.npmjs.com/package/jest-dev-server
   */
  server?: JestDevServerConfig | JestDevServerConfig[];
  /**
   * Allow to run one browser per worker.
   * @default false
   */
  browserPerWorker?: boolean;
  /**
   * Browser context to use.
   * @default "default"
   */
  browserContext?: "default" | "incognito";
  /**
   * Exit on page error.
   * @default true
   */
  exitOnPageError?: boolean;
  /**
   * Use `runBeforeUnload` in `page.close`.
   * @see https://pptr.dev/api/puppeteer.page.close
   * @default false
   */
  runBeforeUnloadOnClose?: boolean;
}
// jest-puppeteer.config.cjs

/** @type {import('jest-environment-puppeteer').JestPuppeteerConfig} */
module.exports = {
  launch: {
    dumpio: true,
    headless: process.env.HEADLESS !== "false",
  },
  server: {
    command: "node server.js",
    port: 4444,
    launchTimeout: 10000,
    debug: true,
  },
};
This example uses an already running instance of Chrome by passing the active web socket endpoint to connect. This is useful, for example, when you want to connect to Chrome running in the cloud.
// jest-puppeteer.config.cjs
const dockerHost = "http://localhost:9222";

async function getConfig() {
  const data = await fetch(`${dockerHost}/json/version`).json();
  const browserWSEndpoint = data.webSocketDebuggerUrl;
  /** @type {import('jest-environment-puppeteer').JestPuppeteerConfig} */
  return {
    connect: {
      browserWSEndpoint,
    },
    server: {
      command: "node server.js",
      port: 3000,
      launchTimeout: 10000,
      debug: true,
    },
  };
}

module.exports = getConfig();
It is possible to create a custom environment from the Jest Puppeteer's one. It is not different from creating a custom environment from "jest-environment-node". See Jest testEnvironment documentation to learn more about it.
// my-custom-environment
const JestPuppeteerEnvironment =
  require("jest-environment-puppeteer").TestEnvironment;

class CustomEnvironment extends JestPuppeteerEnvironment {
  // Implement your own environment
}
Thanks to Fumihiro Xue for his great Jest example.
FAQs
Puppeteer environment for Jest.
The npm package jest-environment-puppeteer receives a total of 103,809 weekly downloads. As such, jest-environment-puppeteer popularity was classified as popular.
We found that jest-environment-puppeteer demonstrated a healthy version release cadence and project activity because the last version was released less than a year ago. It has 1 open source maintainer collaborating on the project.
Did you know?

Socket for GitHub automatically highlights issues in each pull request and monitors the health of all your open source dependencies. Discover the contents of your packages and block harmful activity before you install or update your dependencies.
Product
Ensure open-source compliance with Socket’s License Enforcement Beta. Set up your License Policy and secure your software!
Product
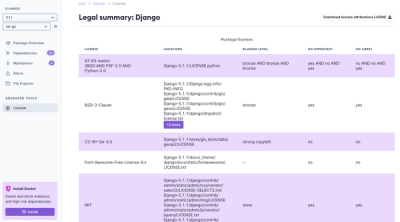
We're launching a new set of license analysis and compliance features for analyzing, managing, and complying with licenses across a range of supported languages and ecosystems.
Product
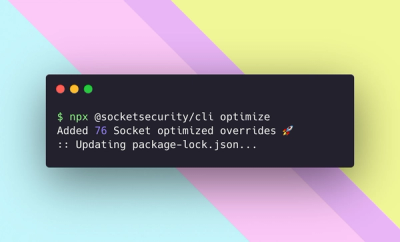
We're excited to introduce Socket Optimize, a powerful CLI command to secure open source dependencies with tested, optimized package overrides.