Product
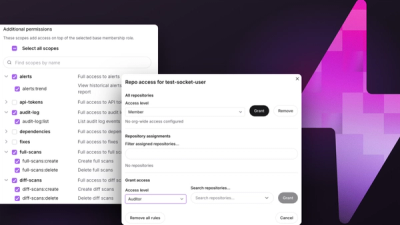
Introducing Repository Access Permissions and Custom Roles
Socket now supports Custom Roles and Repository Access Permissions so organizations can control who can access specific repositories and actions.
By Joe Werle - Jun 19, 2026
mcp-screenshot-server
Advanced tools
MCP server for capturing screenshots on local and remote machines
A modular MCP (Model Context Protocol) solution for capturing screenshots on both local and remote machines through Claude Code, using secure tunnels for communication.
git clone <repository-url>
cd mcp-local-remote-screenshot
npm install
npm run build
Create .env files for both local and remote instances:
For Remote Instance (.env.remote):
INSTANCE_TYPE=remote
SHARED_SECRET=your-secure-shared-secret-here
WEBSOCKET_PORT=8765
LOCALTUNNEL_SUBDOMAIN=my-screenshot-server  # Optional: for consistent URL
For Local Instance (.env.local):
INSTANCE_TYPE=local
SHARED_SECRET=your-secure-shared-secret-here
REMOTE_TUNNEL_URL=wss://xxxxx.loca.lt  # Will be provided by remote instance
Add to your Claude Code configuration:
{
  "mcpServers": {
    "screenshot": {
      "command": "node",
      "args": ["/path/to/mcp-screenshot-server/dist/index.js"],
      "env": {
        "INSTANCE_TYPE": "local",
        "SHARED_SECRET": "your-secure-shared-secret",
        "REMOTE_TUNNEL_URL": "wss://your-tunnel.loca.lt"
      }
    }
  }
}
npm run remote
# or with custom env file
node dist/index.js --env .env.remote
LocalTunnel created: wss://xxxxx.loca.lt
REMOTE_TUNNEL_URL in your local .env filenpm run local
# or
node dist/index.js --env .env.local
Once both servers are running and Claude Code is configured, the LLM can use these commands:
Use the screenshot tool to capture a fullscreen screenshot from the local machine
Use the screenshot tool to capture a fullscreen screenshot from the remote machine
Use the screenshot tool to capture the "Simulator" window from the local machine
Use the screenshot tool to capture the "Chrome" window from the remote machine
┌─────────────────┐         ┌─────────────────┐
│  Local Machine  │         │ Remote Machine  │
│                 │         │                 │
│  ┌───────────┐  │         │  ┌───────────┐  │
│  │    MCP    │  │ WebSocket  │    MCP    │  │
│  │  Server   │◄─┼─────────┼─►│  Server   │  │
│  │ (Local)   │  │   WSS    │  │ (Remote)  │  │
│  └─────┬─────┘  │         │  └─────┬─────┘  │
│        │        │         │        │        │
│  ┌─────▼─────┐  │         │  ┌─────▼─────┐  │
│  │Screenshot │  │         │  │Screenshot │  │
│  │ Service   │  │         │  │ Service   │  │
│  └───────────┘  │         │  └───────────┘  │
└─────────────────┘         └─────────────────┘
         ▲                           ▲
         │                           │
         └───────────┬───────────────┘
                     │
              ┌──────▼──────┐
              │ Claude Code │
              │     LLM     │
              └─────────────┘
SHARED_SECRETsrc/
├── core/
│ └── mcp-server.ts # Main MCP server implementation
├── services/
│ ├── screenshot.ts # Screenshot capture service
│ └── tunnel.ts # Tunnel and communication service
├── types/
│ └── index.ts # TypeScript type definitions
└── index.ts # Entry point
npm run dev
MIT
FAQs
MCP server for capturing screenshots on local and remote machines
We found that mcp-screenshot-server demonstrated a not healthy version release cadence and project activity because the last version was released a year ago. It has 1 open source maintainer collaborating on the project.
Did you know?

Socket for GitHub automatically highlights issues in each pull request and monitors the health of all your open source dependencies. Discover the contents of your packages and block harmful activity before you install or update your dependencies.
Product
Socket now supports Custom Roles and Repository Access Permissions so organizations can control who can access specific repositories and actions.
Product
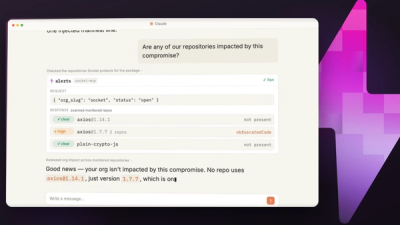
Socket MCP now lets AI assistants review org alerts, investigate threats using the Socket threat feed, and inspect package files in addition to dependency scoring.
Product
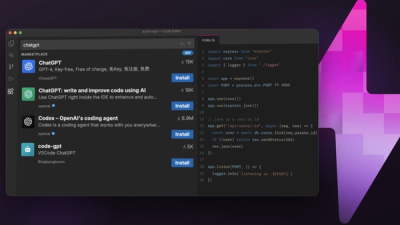
Socket Firewall blocks malicious VS Code and Open VSX extensions before install, protecting developers from compromised editor marketplaces.