Product
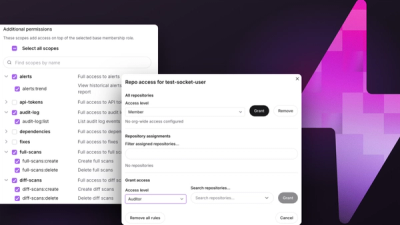
Introducing Repository Access Permissions and Custom Roles
Socket now supports Custom Roles and Repository Access Permissions so organizations can control who can access specific repositories and actions.
By Joe Werle - Jun 19, 2026
- **[1] 创建 package 文件,里边包含了你要发布包的一些信息(name/version 等)** - **[2] 发布 vue 包需要用到 webpack 打包/ es6 语法/vue 文件所以需要配置一下 webpack** - **[3] 注册 npm 账号,发布自己的 vue 组件**
在官网给了一个最基础的 npm 包的 package.json 配置文件如下
{
"name": "my_package", //发布npm包的名字
"description": "", //对组件的描述
"version": "1.0.0", //版本号
"main": "index.js", //定义了包的入口文件
"scripts": {
"test": ""
},
"repository": {
"type": "git",
"url": "" //输入git的地址
},
"keywords": [], //关键字,方便别人搜索
"author": "", //作者自己的名字
"license": "ISC",
"bugs": {
"url": "" //方便别人给你提issue的地址
},
"homepage": "" //可以指向自己的github地址
}
官网地址 creating-a-package-json-file
2.1 在上边 package.json 的基础上我们需要添加devDependencies 字段和 dependencies字段,用来添加项目开发依赖和项目依赖
{
  "name": "heyushuo-toast",
  "version": "1.0.0",
  "description": "弹窗组件",
  "main": "dist/toast.min.js",
  "scripts": {
    "test": "echo \"Error: no test specified\" && exit 1",
    "start": "webpack-dev-server --hot --inline",
    "build": "webpack --display-error-details --config webpack.config.js"
  },
  "author": "heyushuo",
  "license": "ISC",
  "repository": {
    "type": "git",
    "url": "https://github.com/heyushuo/npm-package"
  },
  "devDependencies": {
    "babel-core": "^6.26.0",
    "babel-loader": "^7.1.2",
    "babel-plugin-transform-object-rest-spread": "^6.26.0",
    "babel-plugin-transform-runtime": "^6.23.0",
    "babel-polyfill": "^6.26.0",
    "babel-preset-env": "^1.7.0",
    "babel-preset-es2015": "^6.24.1",
    "babel-preset-stage-2": "^6.24.1",
    "css-loader": "^0.28.7",
    "es6-promise": "^4.1.1",
    "less": "^2.7.3",
    "less-loader": "^4.0.5",
    "node-sass": "^4.9.4",
    "sass": "^1.14.3",
    "sass-loader": "^7.1.0",
    "style-loader": "^0.19.0",
    "url-loader": "^0.6.2",
    "vue": "^2.5.9",
    "vue-hot-reload-api": "^2.2.4",
    "vue-html-loader": "^1.2.4",
    "vue-loader": "^13.5.0",
    "vue-router": "^3.0.1",
    "vue-style-loader": "^3.0.3",
    "vue-template-compiler": "^2.5.9",
    "vuex": "^3.0.1",
    "webpack": "^3.9.1",
    "webpack-dev-server": "^2.9.5"
  },
  "dependencies": {
    "axios": "^0.18.0"
  }
}
当用户在下载你的包的时候,devDependencies 字段下依赖包并不会下载,dependencies 字段是必须安装的依赖
2.2 此时我们需要安装依赖包
npm install
2.3 根目录下新增 webpack.config.js 文件,并添加配置
const path = require("path");
const webpack = require("webpack");
const uglify = require("uglifyjs-webpack-plugin");

module.exports = {
  entry: "./src/index.js", //入口文件,就是在src目录下的index.js文件,
  output: {
    path: path.resolve(__dirname, "./dist"), //输出路径dist目录
    publicPath: "/dist/",
    filename: "toast.min.js", //打包后输出的文件名字,这里需要和package.json文件下main应该写为:'dist/toast.min.js'
    libraryTarget: "umd",
    //  libraryTarget:为了支持多种使用场景,我们需要选择合适的打包格式。libraryTarget 属性。这是可以控制 library 如何以不同方式暴露的选项。
    umdNamedDefine: true
  },
  externals: {
    vue: "vue",
    axios: "axios"
  },
  module: {
    rules: [
      {
        test: /\.vue$/,
        loader: "vue-loader"
      },
      {
        test: /\.less$/,
        use: [
          {
            loader: "style-loader"
          },
          {
            loader: "css-loader"
          },
          {
            loader: "less-loader"
          }
        ]
      },
      {
        test: /\.scss$/,
        use: [
          {
            loader: "style-loader"
          },
          {
            loader: "css-loader"
          },
          {
            loader: "scss-loader"
          }
        ]
      },
      {
        test: /\.js$/,
        exclude: /node_modules|vue\/dist|vue-router\/|vue-loader\/|vue-hot-reload-api\/|vue-router\//,
        loader: "babel-loader" //babel的相关配置在.babelrc文件里
      },
      {
        test: /\.(png|jpg|gif|ttf|svg|woff|eot)$/,
        loader: "url-loader",
        query: {
          limit: 30000 //把一些小图片打包为base64
        }
      }
    ]
  }
};
umdNamedDefine
2.4 开始开发自己的组件了
在 src 目录下创建一个 index.js 最为 webpack 的入口文件,创建一个 component 文件写自己的组件,common 放一些公用样式或者文件
在 index.js 文件引入写好的组件,并导出组件
import toast from "./component/index.vue";
export default toast;
接下来可以执行如下命令,生成需要发布包的文件
npm run build
//这里打包后的文件与package.json文件内的main字段相对应

"main": "dist/toast.min.js",
到这里第二部就算完成了,大家也可以把自己平时写的组件全部复制过来就可以.
接下来就是最重要的一步注册 npm 包,发布自己的包
这里需要注意:一定要确保本地镜像为 npm,不然无法提交成功
// 1.查询当前配置的镜像
npm get registry
//https://registry.npmjs.org/
// 设置成淘宝镜像
npm config set registry http://registry.npm.taobao.org/
// 换成原来的
npm config set registry https://registry.npmjs.org/
npm 发布包的一些相关命令
npm login           //登录npm
npm publish         //发布包
npm unpublish       //删除包
再发布前需要配置.npmignore 文件,忽略一些无用的文件
.*
/node_modules
/src
package-lock.json
webpack.config.js
FAQs
- **[1] 创建 package 文件,里边包含了你要发布包的一些信息(name/version 等)** - **[2] 发布 vue 包需要用到 webpack 打包/ es6 语法/vue 文件所以需要配置一下 webpack** - **[3] 注册 npm 账号,发布自己的 vue 组件**
We found that meet0703 demonstrated a not healthy version release cadence and project activity because the last version was released a year ago. It has 1 open source maintainer collaborating on the project.
Did you know?

Socket for GitHub automatically highlights issues in each pull request and monitors the health of all your open source dependencies. Discover the contents of your packages and block harmful activity before you install or update your dependencies.
Product
Socket now supports Custom Roles and Repository Access Permissions so organizations can control who can access specific repositories and actions.
Product
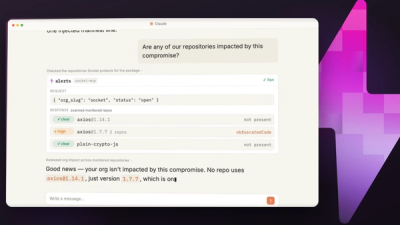
Socket MCP now lets AI assistants review org alerts, investigate threats using the Socket threat feed, and inspect package files in addition to dependency scoring.
Product
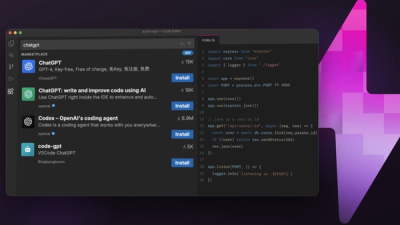
Socket Firewall blocks malicious VS Code and Open VSX extensions before install, protecting developers from compromised editor marketplaces.