Product
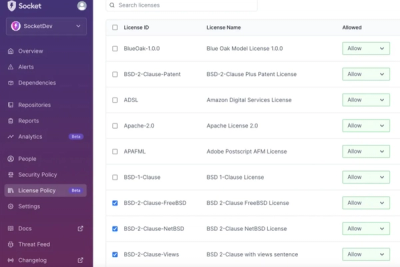
Introducing License Enforcement in Socket
Ensure open-source compliance with Socket’s License Enforcement Beta. Set up your License Policy and secure your software!
By Philipp Burckhardt - Oct 17, 2024
mongodb-memory-server
Advanced tools
In-memory MongoDB Server. Designed with testing in mind, the server will allow you to connect your favourite ODM or client library to the MongoDB Server and run integration tests isolated from each other.
The mongodb-memory-server package provides an in-memory MongoDB server for testing purposes. It allows developers to run MongoDB instances without needing to install MongoDB on their local machine, making it ideal for unit tests and CI environments.
Start an in-memory MongoDB server
This code demonstrates how to start an in-memory MongoDB server using mongodb-memory-server and connect to it using Mongoose. The server runs entirely in memory, making it fast and ideal for testing.
const { MongoMemoryServer } = require('mongodb-memory-server');
const mongoose = require('mongoose');
(async () => {
const mongod = new MongoMemoryServer();
const uri = await mongod.getUri();
await mongoose.connect(uri, { useNewUrlParser: true, useUnifiedTopology: true });
console.log('MongoDB in-memory server started');
// Your code here
await mongoose.disconnect();
await mongod.stop();
})();Use with Jest for testing
This code shows how to integrate mongodb-memory-server with Jest for testing. It sets up the in-memory MongoDB server before all tests and tears it down after all tests, ensuring a clean state for each test run.
const { MongoMemoryServer } = require('mongodb-memory-server');
const mongoose = require('mongoose');

let mongod;

beforeAll(async () => {
  mongod = new MongoMemoryServer();
  const uri = await mongod.getUri();
  await mongoose.connect(uri, { useNewUrlParser: true, useUnifiedTopology: true });
});

afterAll(async () => {
  await mongoose.disconnect();
  await mongod.stop();
});

// Your tests here
Create and use collections
This code demonstrates how to create and use collections with mongodb-memory-server. It defines a Mongoose model, saves a document, and retrieves all documents from the collection.
const { MongoMemoryServer } = require('mongodb-memory-server');
const mongoose = require('mongoose');

(async () => {
  const mongod = new MongoMemoryServer();
  const uri = await mongod.getUri();

  await mongoose.connect(uri, { useNewUrlParser: true, useUnifiedTopology: true });

  const Cat = mongoose.model('Cat', { name: String });
  const kitty = new Cat({ name: 'Zildjian' });
  await kitty.save();
  console.log('Cat saved:', kitty);

  const cats = await Cat.find();
  console.log('All cats:', cats);

  await mongoose.disconnect();
  await mongod.stop();
})();Mockgoose is a similar package that provides a mock in-memory database for MongoDB. It is designed to work with Mongoose and is useful for testing purposes. However, it is less actively maintained compared to mongodb-memory-server.
Mongo-unit is another package that provides an in-memory MongoDB instance for testing. It is simpler to use but offers fewer configuration options compared to mongodb-memory-server. It is suitable for basic testing scenarios.


![]()
![]()
This package spins up a actual/real MongoDB Server programmatically from node for testing or mocking during development. By default it holds the data in memory. Fresh spinned up mongod process takes about 7Mb of memory. The server will allow you to connect your favorite ODM or client library to the MongoDB Server and run integration tests isolated from each other.
This package on first start downloads the latest MongoDB binaries and save it to node_modules/.cache/mongodb-memory-server/mongodb-binaries folder. So first run may take a time. All further runs will fast, because use already downloaded binaries.
Every MongoMemoryServer instance creates and starts fresh MongoDB server on some free port. You may start up several mongod simultaneously. When you terminate your script or call stop() MongoDB server(s) will be automatically shutdown.
Perfectly works with Travis CI without additional services and addons options in .travis.yml.
yarn add mongodb-memory-server --dev
OR
npm install mongodb-memory-server --save-dev
import MongoMemoryServer from 'mongodb-memory-server';

const mongod = new MongoMemoryServer();

const uri = await mongod.getConnectionString();
const port = await mongod.getPort();
const dbPath = await mongod.getDbPath();
const dbName = await mongod.getDbName();

// some code

// you may stop mongod manually
mongod.stop();
// or it will be stopped automatically when you exit from script
All options are optional.
const mongod = new MongoMemoryServer({
  instance: {
    port?: ?number, // by default choose any free port
    ip?: string, // by default '127.0.0.1', for binding to all IP addresses set it to `::,0.0.0.0`,
    dbName?: string, // by default generate random dbName
    dbPath?: string, // by default create in temp directory
    storageEngine?: string, // by default `ephemeralForTest`, available engines: [ 'devnull', 'ephemeralForTest', 'mmapv1', 'wiredTiger' ]
    debug?: boolean, // by default false
    replSet?: string, // by default no replica set, replica set name
    auth?: boolean, // by default `mongod` is started with '--noauth', start `mongod` with '--auth'
    args?: string[], // by default no additional arguments, any additional command line arguments for `mongod` `mongod` (ex. ['--notablescan'])
  },
  binary: {
    version?: string, // by default 'latest'
    downloadDir?: string, // by default node_modules/.cache/mongodb-memory-server/mongodb-binaries
    platform?: string, // by default os.platform()
    arch?: string, // by default os.arch()
    debug?: boolean, // by default false
  },
  debug?: boolean, // by default false
  autoStart?: boolean, // by default true
});
Also you can use the environment variables for configure installation process
MONGOMS_DOWNLOAD_DIR=/path/to/mongodb/binaries
MONGOMS_PLATFORM=linux
MONGOMS_ARCH=x64
MONGOMS_VERSION=3
MONGOMS_DEBUG=1 # also available case-insensitive values: "on" "yes" "true"
MONGOMS_DOWNLOAD_MIRROR=url # your mirror url to download the mongodb binary
MONGOMS_DISABLE_POSTINSTALL=1 # if you want to skip download binaries on `npm i` command
import { MongoMemoryReplSet } from 'mongodb-memory-server';

const replSet = new MongoMemoryReplSet();
await replSet.waitUntilRunning();
const uri = await mongod.getConnectionString();
const port = await mongod.getPort();
const dbPath = await mongod.getDbPath();
const dbName = await mongod.getDbName();

// some code

// stop replica set manually
replSet.stop();
// or it should be stopped automatically when you exit from script
All options are optional.
const replSet = new MongoMemoryReplSet({
  autoStart, // same as for MongoMemoryServer
  binary: binaryOpts, // same as for MongoMemoryServer
  debug, // same as for MongoMemoryServer
  instanceOpts: [
    {
      args,  // any additional instance specific args
      port,  // port number for the instance
      dbPath, // path to database files for this instance
      storageEngine,  // same storage engine options
    },
    // each entry will result in a MongoMemoryServer
  ],
  // unless otherwise noted below these values will be in common with all instances spawned.
  replSet: {
    name,  // replica set name (default: 'testset')
    auth,  //  enable auth support? (default: false)
    args,  // any args specified here will be combined with any per instance args from `instanceOpts`
    count,  // number of `mongod` processes to start; (default: 1)
    dbName,  // default database for db URI strings. (default: uuid.v4())
    ip,  // by default '127.0.0.1', for binding to all IP addresses set it to `::,0.0.0.0`
    oplogSize,  // size (in MB) for the oplog; (default: 1)
    spawn,  // spawn options when creating the child processes
    storageEngine,  // default storage engine for instance. (Can be overridden per instance)
  }
});
Take a look at this test file.
import mongoose from 'mongoose';
import MongoMemoryServer from 'mongodb-memory-server';

const mongoServer = new MongoMemoryServer();

mongoose.Promise = Promise;
mongoServer.getConnectionString().then((mongoUri) => {
  const mongooseOpts = { // options for mongoose 4.11.3 and above
    autoReconnect: true,
    reconnectTries: Number.MAX_VALUE,
    reconnectInterval: 1000,
    useMongoClient: true, // remove this line if you use mongoose 5 and above
  };

  mongoose.connect(mongoUri, mongooseOpts);

  mongoose.connection.on('error', (e) => {
    if (e.message.code === 'ETIMEDOUT') {
      console.log(e);
      mongoose.connect(mongoUri, mongooseOpts);
    }
    console.log(e);
  });

  mongoose.connection.once('open', () => {
    console.log(`MongoDB successfully connected to ${mongoUri}`);
  });
});
For additional information I recommend you to read this article Testing a GraphQL Server using Jest with Mongoose
import mongoose from 'mongoose';
import MongoMemoryServer from 'mongodb-memory-server';

mongoose.Promise = Promise;

const mongoServer1 = new MongoMemoryServer();
const mongoServer2 = new MongoMemoryServer();

// Firstly create connection objects, which you may import in other files and create mongoose models.
// Connection to databases will be estimated later (after model creation).
const connections = {
  conn1: mongoose.createConnection(),
  conn2: mongoose.createConnection(),
  conn3: mongoose.createConnection(),
};

const mongooseOpts = { // options for mongoose 4.11.3 and above
  promiseLibrary = Promise;
  autoReconnect: true,
  reconnectTries: Number.MAX_VALUE,
  reconnectInterval: 1000,
  useMongoClient: true, // remove this line if you use mongoose 5 and above
};

mongoServer1.getConnectionString('server1_db1').then((mongoUri) => {
  connections.conn1.open(mongoUri, mongooseOpts);
  connection.once('open', () => {
    console.log(`MongoDB successfully connected to ${mongoUri}`);
  });
});

mongoServer1.getConnectionString('server1_db2').then((mongoUri) => {
  connections.conn2.open(mongoUri, mongooseOpts);
  connection.once('open', () => {
    console.log(`MongoDB successfully connected to ${mongoUri}`);
  });
});

mongoServer2.getConnectionString('server2_db').then((mongoUri) => {
  connections.conn3.open(mongoUri, mongooseOpts);
  connection.once('open', () => {
    console.log(`MongoDB successfully connected to ${mongoUri}`);
  });
});

export default connections;


// somewhere in other file
import { Schema } from 'mongoose';
import { conn1, conn2, conn3 } from './file_above';

const userSchema = new Schema({
  name: String,
});

const taskSchema = new Schema({
  userId: String,
  task: String,
});

export default {
  User: conn1.model('user', userSchema),
  Task: conn2.model('task', taskSchema),
  UserOnServer2: conn3.model('user', userSchema),
}
Note: When you create mongoose connection manually, you should do:
import mongoose from 'mongoose';

const opts = { useMongoClient: true }; // remove this option if you use mongoose 5 and above
const conn = mongoose.createConnection(); // just create connection instance
const User = conn.model('User', new mongoose.Schema({ name: String })); // define model
conn.open(uri, opts); // open connection to database (NOT `connect` method!)
With default connection:
import mongoose from 'mongoose';

const opts = { useMongoClient: true }; // remove this option if you use mongoose 5 and above
mongoose.connect(uri, opts);
const User = mongoose.model('User', new mongoose.Schema({ name: String })); // define model
Start Mocha with --timeout 60000 cause first download of MongoDB binaries may take a time.
import mongoose from 'mongoose';
import MongoMemoryServer from 'mongodb-memory-server';

let mongoServer;
const opts = { useMongoClient: true }; // remove this option if you use mongoose 5 and above

before((done) => {
  mongoServer = new MongoMemoryServer();
  mongoServer.getConnectionString().then((mongoUri) => {
    return mongoose.connect(mongoUri, opts, (err) => {
      if (err) done(err);
    });
  }).then(() => done());
});

after(() => {
  mongoose.disconnect();
  mongoServer.stop();
});

describe('...', () => {
  it("...", async () => {
    const User = mongoose.model('User', new mongoose.Schema({ name: String }));
    const cnt = await User.count();
    expect(cnt).to.equal(0);
  });
});
import mongoose from 'mongoose';
import MongoMemoryServer from 'mongodb-memory-server';

// May require additional time for downloading MongoDB binaries
jasmine.DEFAULT_TIMEOUT_INTERVAL = 60000;

let mongoServer;
const opts = { useMongoClient: true }; // remove this option if you use mongoose 5 and above

beforeAll(async () => {
  mongoServer = new MongoMemoryServer();
  const mongoUri = await mongoServer.getConnectionString();
  await mongoose.connect(mongoUri, opts, (err) => {
    if (err) console.error(err);
  });
});

afterAll(() => {
  mongoose.disconnect();
  mongoServer.stop();
});

describe('...', () => {
  it("...", async () => {
    const User = mongoose.model('User', new mongoose.Schema({ name: String }));
    const cnt = await User.count();
    expect(cnt).toEqual(0);
  });
});
Additional examples of Jest tests:
mongodb in tests in current packagemongoose in graphql-compose-mongooseFor AVA written detailed tutorial how to test mongoose models by @zellwk.
It is very important to limit spawned number of Jest workers for avoiding race condition. Cause Jest spawn huge amount of workers for every node environment on same machine. More details
Use --maxWorkers 4 or --runInBand option.
script:
-  - yarn run coverage
+  - yarn run coverage -- --maxWorkers 4
Inspired by alternative runners for mongodb-prebuilt:
MIT
FAQs
MongoDB Server for testing (auto-download latest version). The server will allow you to connect your favourite ODM or client library to the MongoDB Server and run parallel integration tests isolated from each other.
The npm package mongodb-memory-server receives a total of 478,228 weekly downloads. As such, mongodb-memory-server popularity was classified as popular.
We found that mongodb-memory-server demonstrated a healthy version release cadence and project activity because the last version was released less than a year ago. It has 2 open source maintainers collaborating on the project.
Did you know?

Socket for GitHub automatically highlights issues in each pull request and monitors the health of all your open source dependencies. Discover the contents of your packages and block harmful activity before you install or update your dependencies.
Product
Ensure open-source compliance with Socket’s License Enforcement Beta. Set up your License Policy and secure your software!
Product
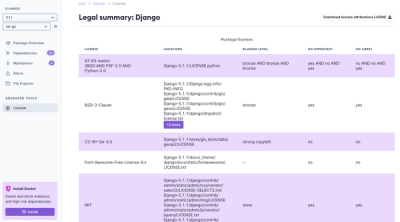
We're launching a new set of license analysis and compliance features for analyzing, managing, and complying with licenses across a range of supported languages and ecosystems.
Product
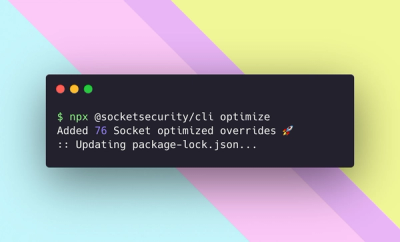
We're excited to introduce Socket Optimize, a powerful CLI command to secure open source dependencies with tested, optimized package overrides.