Huge News!Announcing our $40M Series B led by Abstract Ventures.Learn More
Socket
Sign inDemoInstall
Socket

node-red-contrib-aliyun-living

Package Overview
Dependencies
Maintainers
1
Versions
4
Alerts
File Explorer

Advanced tools

Socket logo

Install Socket

Detect and block malicious and high-risk dependencies

Install

node-red-contrib-aliyun-living

阿里生活物联网开放平台(飞燕平台)

  • 0.0.5
  • latest
  • Source
  • npm
  • Socket score

Version published
Maintainers
1
Created
Source
node-red-contrib-aliyun-living
连接阿里云生活物联网平台(飞燕平台)
  • 获取项目设备状态
  • 上传下发物模型属性数据
  • 通过云智能APP扫码接入,云智能app中绑定天猫精灵账号,即可通过天猫精灵音箱语音控制该设备.

登录生活物联网平台(飞燕平台)

用法
  1. 平台创建新项目,自有品牌项目
  2. 创建新产品
  3. 设置产品模型参数
    • "功能定义"中的是预设模型属性,可自行增添或删除功能
    • "人机交互"开启"使用公版App控制产品"按钮,子项目"天猫精灵"中打开开关
    • "设备调试"新增测试设备,该设备都使用上面定义的模型,此处可获取节点需要的三个参数
      1. ProductKey
      2. DeviceName
      3. ProductSecret
  4. NODE-RED节点配置以上3个参数即可,部署后会显示二维码,通过云智能APP扫码接入,二维码只在部署后显示一次,若需要再显示可移动下节点重新点击部署按钮.
  5. 节点手动/语音控制均可反馈到平台,从而同步到天猫精灵APP中状态一致.
列子
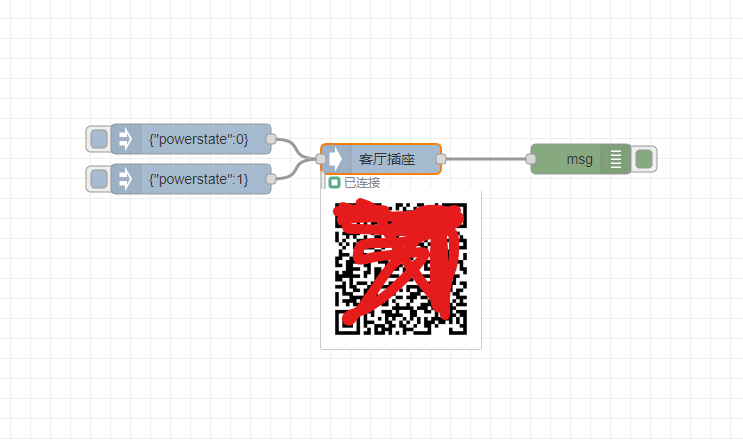
e.g. 代码如下:

[
    {
        "id": "0ebdd7f42d3b294b",
        "type": "tab",
        "label": "流程 1",
        "disabled": false,
        "info": "",
        "env": []
    },
    {
        "id": "ee70ab5d3fe65fe7",
        "type": "inject",
        "z": "0ebdd7f42d3b294b",
        "name": "",
        "props": [
            {
                "p": "payload"
            }
        ],
        "repeat": "",
        "crontab": "",
        "once": false,
        "onceDelay": 0.1,
        "topic": "",
        "payload": "{\"powerstate\":0}",
        "payloadType": "json",
        "x": 300,
        "y": 440,
        "wires": [
            [
                "9190308ae48ff1e3"
            ]
        ]
    },
    {
        "id": "39e291cef7291f9f",
        "type": "debug",
        "z": "0ebdd7f42d3b294b",
        "name": "",
        "active": true,
        "tosidebar": true,
        "console": false,
        "tostatus": false,
        "complete": "true",
        "targetType": "full",
        "statusVal": "",
        "statusType": "auto",
        "x": 690,
        "y": 460,
        "wires": []
    },
    {
        "id": "9190308ae48ff1e3",
        "type": "aliyun-living",
        "z": "0ebdd7f42d3b294b",
        "name": "客厅插座",
        "width": 160,
        "DeviceName": "test-CZ",
        "ProductKey": "AAAAAAAAA",
        "DeviceSecret": "BBBBBBBBBBBBBBBBBBBBBBBBBB",
        "x": 490,
        "y": 460,
        "wires": [
            [
                "39e291cef7291f9f"
            ]
        ]
    },
    {
        "id": "d9932408b7dded29",
        "type": "inject",
        "z": "0ebdd7f42d3b294b",
        "name": "",
        "props": [
            {
                "p": "payload"
            }
        ],
        "repeat": "",
        "crontab": "",
        "once": false,
        "onceDelay": 0.1,
        "topic": "",
        "payload": "{\"powerstate\":1}",
        "payloadType": "json",
        "x": 300,
        "y": 480,
        "wires": [
            [
                "9190308ae48ff1e3"
            ]
        ]
    }
]

结束


Keywords

FAQs

Package last updated on 13 Jan 2022

Did you know?

Socket

Socket for GitHub automatically highlights issues in each pull request and monitors the health of all your open source dependencies. Discover the contents of your packages and block harmful activity before you install or update your dependencies.

Install

Related posts

SocketSocket SOC 2 Logo

Product

  • Package Alerts
  • Integrations
  • Docs
  • Pricing
  • FAQ
  • Roadmap
  • Changelog

Packages

npm

Stay in touch

Get open source security insights delivered straight into your inbox.


  • Terms
  • Privacy
  • Security

Made with ⚡️ by Socket Inc