
Company News
Socket Has Acquired Secure Annex
Socket has acquired Secure Annex to expand extension security across browsers, IDEs, and AI tools.
By Feross Aboukhadijeh - Apr 28, 2026
npm i qroll
The library targets a parent DIV by its id.
Wrap all your content into a parent DIV with the id 'qroll-parent' and class 'qroll-main' The slides will correspond to the first level DIV children of the parent. The example below will produce 3 slides:
<div id="qroll-parent" class="qroll-main">
    <div>
        <h1>My first slide</h1>
    </div>

    <div>
        <h2>My Second slide</h2>
    </div>

    <div>
        <h2>My Third slide</h2>
    </div>
</div>
Add options to the Parent wrapper using css classes:
transition duration:
qroll-transition-[duration] with possible duration values 300, 400, 500, 600, 700, 800, 1000
show the vertical navigation:
qroll-nav
use infinite loop scrolling:
qroll-loop
<div id="qroll-parent" class="qroll-main qroll-transition-1000 qroll-loop">
    <div>
        <h1>My first slide</h1>
    </div>

    <div>
        <h2>My Second slide</h2>
    </div>

    <div>
        <h2>My Third slide</h2>
    </div>
</div>
The navigation tooltips will try to find the first h1, h2, h3 or h4 element of each slide, to show their text content inside the tooltip. If there are no h1, h2, h3 or h4 element on a slide, the information provided in the tooltip will default to the page index.
You can also customize the content of your tooltips by adding a few data properties to your children divs. In the example below, the first tooltip will use the data-title property, the other tooltips will use the h2 element's content:
<div id="qroll-parent" class="qroll-main qroll-transition-1000 qroll-loop">
    <div data-title="my custom name">
        <h1>My first slide</h1>
    </div>

    <div data-title="My slide 2">
        <h2>My Second slide</h2>
    </div>

    <div data-title="My slide 3">
        <h2>My Third slide</h2>
    </div>
</div>
You can also customize the css of each tooltip, using a data-tooltip-css property:
<div id="qroll-parent" class="qroll-main qroll-transition-1000 qroll-loop">
    <div data-title="my custom name" data-tooltip-css="background:blue;color:turquoise;font-weight:bold">
        <h1>My first slide</h1>
    </div>

    <div>
        <h2>My Second slide</h2>
    </div>

    <div>
        <h2>My Third slide</h2>
    </div>
</div>
You can set up meta tags (title and description) for all your main slides (not on horizontal slides), that will be applied on the HTML head when a slide gets into focus, so that each slide be treated as a separate page.
<div id="qroll-parent" class="qroll-main qroll-transition-1000 qroll-loop">
    <div data-meta-title="Slide 1" data-meta-description="This is a description for Slide 1">
        <h1>Slide 1</h1>
    </div>
    <div data-meta-title="Slide 2" data-meta-description="This is a description for Slide 2">
        <h2>Slide 2</h2>
    </div>
    <div data-meta-title="Slide 3" data-meta-description="This is a description for Slide 3">
        <h2>Slide 3</h2>
    </div>
</div>
Children can become carousels by adding the following css classes:
<div id="qroll-parent" class="qroll-main qroll-transition-1000 qroll-loop">
    <div class="qroll-carousel qroll-tooltip qroll-loop" data-title="My carousel">
        <div data-title="Carousel slide 1" data-tooltip-css="font-weight:bold">
            <h2>Carousel slide 1</h2>
        </div>
        <div data-title="Carousel slide 2">
            <h2>Carousel slide 2</h2>
        </div>
        <div data-title="Carousel slide 3">
            <h2>Carousel slide 3</h2>
        </div>
    </div>

    <div data-title="Regular slide">
        <h2>My Second slide</h2>
    </div>

    <div data-title="Another regular slide">
        <h2>My Third slide</h2>
    </div>
</div>
You can include a carousel component into a slide, by adding the following css classes to a slide's child div:
<div id="qroll-parent" class="qroll-main qroll-transition-1000 qroll-loop">
    <div data-title="My slide 1">
        <h1>My inner carousel</h1>

        <div class="qroll-carousel-component-horizontal">
            <div style="height: 100px">
                <p>My inner carousel paragraph 1</p>
            </div>
            <div style="height: 100px">
                <p>My inner carousel paragraph 2</p>
            </div>
            <div style="height: 100px">
                <p>My inner carousel paragraph 3</p>
            </div>
        </div>
    </div>

    <div data-title="My slide 2">
        <h2>Slide 2</h2>
    </div>
</div>
Inner carousels have an auto sliding feature you can activate adding a few data-attributes to the inner carousel div.
You can control sliding direction (defaults to right on horizontal carousel, and down on vertical) and the timing (defaults to 5000ms). The activation of the auto-sliding feature will display a pause / play button on the top left of the carousel, allowing users to stop and start the auto sliding.
Horizontal carousel component:
<div id="qroll-parent" class="qroll-main qroll-transition-1000 qroll-loop">
    <div data-title="My slide 1">
        <h1>My inner carousel</h1>

        <div class="qroll-carousel-component-horizontal" data-auto-slide="true" data-direction="right" data-timer="5000">
            <div style="height: 100px">
                <p>My inner carousel paragraph 1</p>
            </div>
            <div style="height: 100px">
                <p>My inner carousel paragraph 2</p>
            </div>
            <div style="height: 100px">
                <p>My inner carousel paragraph 3</p>
            </div>
        </div>
    </div>

    <div data-title="My slide 2">
        <h2>Slide 2</h2>
    </div>
</div>
Vertical carousel component:
<div id="qroll-parent" class="qroll-main qroll-transition-1000 qroll-loop">
    <div data-title="My slide 1">
        <h1>My inner carousel</h1>

        <div class="qroll-carousel-component-vertical" data-auto-slide="true" data-direction="down" data-timer="5000">
            <div style="height: 200px">
                <p>My inner carousel paragraph 1</p>
            </div>
            <div style="height: 200px">
                <p>My inner carousel paragraph 2</p>
            </div>
            <div style="height: 200px">
                <p>My inner carousel paragraph 3</p>
            </div>
        </div>
    </div>

    <div data-title="My slide 2">
        <h2>Slide 2</h2>
    </div>
</div>
Qroll provides a ready-made wrapper for the native HTML dialog element, to help you set up easy modals. Dialogs require the following:
You can also provide a title, that wil be displayed in the header of the dialog, and specify if you wish to display a close cross button on the top right of the modal. Finally, you can provide a set of css classes into the data-css-classes attribute, and refer to these classes in your own css.
<div id="qroll-parent" class="qroll-main qroll-transition-1000 qroll-loop">
    <div data-title="My slide 1">
        <h1>My slides</h1>
    </div>

    <div data-title="My slide 2">
        <h2>Slide 2</h2>
    </div>

    <div class="qroll-dialog" data-id="myDialog" data-title="Hello Dialog!" data-close-button="true" data-css-classes="my-dialog-class my-dialog-class--warning">
        <div>
            Warning, you are awesome !
        </div>
    </div>
</div>
Dialogs can be open from anywhere in your application by calling the qroll.openDialog() interface, passing it the id as an argument. It can be used inline:
<div id="qroll-parent" class="qroll-main qroll-transition-1000 qroll-loop">
    <div data-title="My slide 1">
        <h1>My slides</h1>
    </div>

    <div data-title="My slide 2">
        <h2>Slide 2</h2>
        <button id="triggerButton"" onclick="qroll.openDialog('myDialog')">
            Am I awesome ?
        </button>
    </div>

    <div class="qroll-dialog" data-id="myDialog" data-title="Hello Dialog!" data-close-button="true" data-css-classes="my-dialog-class my-dialog-class--warning">
        <div>
            Warning, you are awesome !
        </div>
    </div>
</div>
...or in your own javascript file:
<script>

    const triggerButton = document.getElementById("triggerButton");
    triggerButton.addEventListener("click", () => {
        qroll.openDialog("myDialog")
    });

</script>
Reversely, a dialog can be closed from your application:
<script>

    const triggerButton = document.getElementById("triggerButton");
    triggerButton.addEventListener("click", () => {
        qroll.openDialog("myDialog");
        setTimeout(() => {
            qroll.closeDialog("myDialog");
        }, 3000);
    });

</script>
You can add a carousel inner component into your dialog element (horizontal only):
<div id="qroll-parent" class="qroll-main qroll-transition-1000 qroll-loop">
    <div data-title="My slide 1">
        <h1>My slides</h1>
    </div>

    <div data-title="My slide 2">
        <h2>Slide 2</h2>
        <button id="triggerButton"" onclick="qroll.openDialog('myDialog')">
            Am I awesome ?
        </button>
    </div>

    <div class="qroll-dialog" data-id="myDialog" data-title="Hello Dialog!" data-close-button="true" data-css-classes="my-dialog-class my-dialog-class--warning">
        <div data-carousel data-auto-slide="true">
            <div>Awesome 1</div>
            <div>Awesome 2</div>
            <div>Awesome 3</div>
        </div>
    </div>
</div>
Qroll provides a set of minimalist charts to complement your slides on the go with cool graphs that are easy to set up. Add the "qroll-chart" class to a div inside a slide, and use data attributes for all the options. You can include your own set of colors. If not, great default colors will be applied.
The dataset passed into data-x-values and data-y-values uses JSON format.
<div id="qroll-parent" class="qroll-main qroll-transition-1000 qroll-loop">
    <div data-title="My slide 1">
        <h1>My line chart</h1>
        <div
            class="qroll-chart"
            data-type="line"
            data-x-values='[
                {
                    "name" : "Blue serie",
                    "data" : [-50,-32,-2,3,5,8,13,21,34,55,89,100]
                },
                {
                    "name" : "Red serie",
                    "data" : [1,1,2,3,5,8,13,21,34,55,89,90]
                }
            ]'
            data-y-values='["JAN","FEB","MAR","APR","MAY","JUN","JUL","AUG","SEP","OCT","NOV","DEC"]'
            data-legend="true"
            data-tooltip="true"
            data-line-size="8"
            data-plot-size="6"
            data-plot-value="true"
            data-plot="true"
            data-title="Title"
            data-subtitle="This is a subtitle"
            data-symbol="$"
            data-ticks="true"
            data-value-box="true"
            data-x-axis="true"
            data-y-axis="true"
            data-x-grid="true"
            data-y-grid="true"
            data-colors='["#3366CC", "#DC3912"]'
        >
        </div>
    </div>

    <div data-title="My slide 2">
        <h2>Slide 2</h2>
    </div>
    <div data-title="My slide 3">
        <h2>Slide 3</h2>
    </div>
</div>
<div id="qroll-parent" class="qroll-main qroll-transition-1000 qroll-loop">
    <div data-title="My slide 1">
        <h1>My Donut chart</h1>
        div
            style="max-width: 600px; margin:0 auto"
            class="qroll-chart"
            data-type="donut"
            data-title="title"
            data-subtitle="This is a subtitle"
            data-total="true"
            data-total-label="Total"
            data-tooltip="true"
            data-x-values='[
                {
                    "name" : "Blue serie",
                    "data" : 10
                },
                {
                    "name" : "Red serie",
                    "data" : 20
                },
                {
                    "name" : "Orange serie",
                    "data" : 30
                },
                {
                    "name" : "Green serie",
                    "data" : 5
                },
                {
                    "name" : "Purple serie",
                    "data" : 3
                },
                {
                    "name" : "Indigo serie",
                    "data" : 10
                }
            ]'
        >
        </div>
    </div>

    <div data-title="My slide 2">
        <h2>Slide 2</h2>
    </div>
    <div data-title="My slide 3">
        <h2>Slide 3</h2>
    </div>
</div>
<div id="qroll-parent" class="qroll-main qroll-transition-1000 qroll-loop">
    <div data-title="My slide 1">
        <h1>My Gauge chart</h1>
        <div
            style="max-width: 300px; margin:0 auto"
            class="qroll-chart"
            data-type="gauge"
            data-min="0"
            data-max="100"
            data-gradient="false"
            data-symbol="%"
            data-value="80"
            data-title="Performance"
            data-bar-width="60"
            data-subtitle="Almost to target"
            style="width: 118px"
        >
        </div>
    </div>

    <div data-title="My slide 2">
        <h2>Slide 2</h2>
    </div>
    <div data-title="My slide 3">
        <h2>Slide 3</h2>
    </div>
</div>
If your data gets updated, you will need to refresh the charts. For now the way to proceed is slightly barbaric, yet effective:
<script>

// refresh charts after data update

function refreshCharts() {
    const charts = document.getElementsByClassName("qroll-chart");
    Array.from(charts).forEach(chart => {
        chart.innerHTML = "";
    });
    qroll.updateCharts();
}

refreshCharts();

</script>
Qroll provides a ready-made menu you can choose to add to your application. Just set up an empty div at first child of the main parent element, with the following attributes:
<div id="qroll-parent" class="qroll-main qroll-transition-1000 qroll-loop">
    <div
        class="qroll-menu"
        data-auto="true"
        data-css-classes="my-menu-class"
        data-title="My menu"
    >
    </div>

    <div data-title="My slide 1">
        <h1>My slide 1</h1>
    </div>
    <div data-title="My slide 2">
        <h2>My slide 2</h2>
    </div>

</div>
The data-auto attribute will create menu items based on your main slides, and link to them. You can also provide additional links (or only use these), by adding the data-additional-links attribute, and provide an array of links. This is also the place where you can link to a specific horizontal slide index (for example: slide 3 at horizontal index 2):
<div id="qroll-parent" class="qroll-main qroll-transition-1000 qroll-loop">
    <div
        class="qroll-menu"
        data-auto="true"
        data-css-classes="my-menu-class"
        data-title="My menu"
        data-additional-links='[
            {
                "label": "My outside link",
                "href": "https://myoutsidelink.com",
                "target": "_blank",
                "id": "myOutsideLink1"
            },
            {
                "label":"My inner link",
                "slideTo":"3,2",
                "id": "innerLink1"
            }
        ]'
    >
    </div>

    <div data-title="My slide 1">
        <h1>My slide 1</h1>
    </div>
    <div data-title="My slide 2">
        <h2>My slide 2</h2>
    </div>

</div>
As for styling the menu, you can provide your own css classes through the data-css-classes attribute, or target the following classes:
<style>

.qroll-main-menu-backdrop {}
.qroll-main-menu-body {}
.qroll-main-menu-item {}
.qroll-main-menu-item--selected {}
.qroll-main-menu-link {}
.qroll-main-menu-title {}
.qroll-main-menu-trigger-button {}

</style>
A range of ready made css classes allows you to style your buttons & basic form elements directly in your HTML.
<button
    class="
        qroll-button
        bg-transparent
        outline-1-#FFF
        text-#FFF
        radius-6
        h-1.2
        my-1
        px-1.5
        py-0.5
    "
>
    CLICK
</button>

<!-- Exact same styles can be applied on inputs, textareas, selects -->

<input
    type="text"
    class="
        qroll-input
        radius-4
        px-1
        bg-#FFFFFF12
        outline-1-#FFF
        text-#FFF
        my-1
    "
>
Here is a list of available classes for these items:
| Class | Description | Examples |
|---|---|---|
| bg | Background: add any color type after the dash | bg-white, bg-#FFF |
| text | Text color: add any color type after the dash | text-white, text-#FFF |
| radius | add a number after the dash. Corresponds to px | radius-6 |
| rounded | sets border radius to ideal rounded shape | rounded |
| outline | provide a number and a color | outline-1-#FFF |
| h | Height: provide a number, corresponds to em | h-1, h-0.5 |
| ma | Margin all : provide a number, corresponds to em | ma-1, ma-0.2 |
| mx, my, mt, mr, mb, ml | Specified margin, provide a number, corresponds to em | mx-1, my-0.2, mt-3, mr-2, mb-0.5, ml-2 |
| pa | Padding all: provide a number, corresponds to em | pa-1, pa-0.5 |
| px, py, pt, pr, pb, pl | Specified padding, provide a number, corresponds to em | px-1, py-0.2, pt-3, pe-2, pb-0.5, pl-2 |
Qroll exposes a few methods you can control:
<script>
    qroll.slideUp();
</script>
<script>
    qroll.slideDown();
</script>
<script>
    // go to first slide
    qroll.slideToIndex(0);

    // go to second slide of horizontal carousel page
    qroll.slideToIndex(1,1);
</script>
<script>

    qroll.refresh();

</script>
<script>
    qroll.getCurrentSlideIndex();
</script>
{
    element: HTMLElement;
    hasCarousel: boolean;
    index: number;
    title: string;
}
<script>
    qroll.getSlides();
</script>
<script defer src="qroll.js"></script>
<template>
  <div id="app">
    <div id="qroll-parent" class="qroll-main qroll-loop qroll-tooltip">
      <div>
        <MyComponent/>
      </div>
      <div>
        <MyOtherComponent/>
      </div>
      <div>
        <MyFinalComponent/>
      </div>
    </div>
  </div>
</template>
... and you are good to go :)
Add qroll's style.css into the assets/css folder Add qroll scripts into the public folder (both qroll.umd.cjs and qroll.umd.cjs.map)
export default defineNuxtConfig({
    app: {
        head: {
            script: [
                {
                    src: /qroll.umd.cjs,
                    body: true,
                    defer: true,
                    crossorigin: ""
                }
            ]
        }
    },
    css: ['@assets/css/style.css']
})
Or directly in the head of your vue file, if your application contains several routes. Add the script to every head of every vue file using the library.
Place the main parent div inside your index.vue file. Don't forget to add data-delay (ms) and data-nuxt attributes. data-delay will show a spinner while the script is running to put your slides into shape, whild data-nuxt="true" will make sure the script runs after the HTML is displayed.
There are 2 types of loader icons you can use:
<script setup lang="ts">
// your code here
// if you need to restart qroll after a page hydration, you can call window.qroll.restart(), but no need to do that on the first load.
</script>

<template>
    <div id="qroll-parent" class="qroll-main qroll-loop qroll-tooltip" data-delay="1000" data-nuxt="true" data-loader-icon="dots">
         <div>
            <MyComponent/>
        </div>
        <div>
            <MyOtherComponent/>
        </div>
        <div>
            <MyFinalComponent/>
        </div>
    </div>
</template>
FAQs
A friendly full page scroll UI library
The npm package qroll receives a total of 0 weekly downloads. As such, qroll popularity was classified as not popular.
We found that qroll demonstrated a not healthy version release cadence and project activity because the last version was released a year ago. It has 1 open source maintainer collaborating on the project.
Did you know?

Socket for GitHub automatically highlights issues in each pull request and monitors the health of all your open source dependencies. Discover the contents of your packages and block harmful activity before you install or update your dependencies.
Company News
Socket has acquired Secure Annex to expand extension security across browsers, IDEs, and AI tools.

Research
/Security News
Socket is tracking cloned Open VSX extensions tied to GlassWorm, with several updated from benign-looking sleepers into malware delivery vehicles.
Product
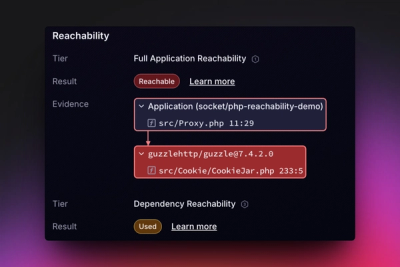
Reachability analysis for PHP is now available in experimental, helping teams identify which vulnerabilities are actually exploitable.