
Product
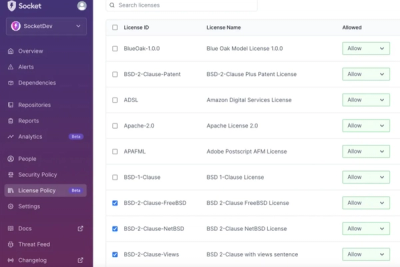
Introducing License Enforcement in Socket
Ensure open-source compliance with Socket’s License Enforcement Beta. Set up your License Policy and secure your software!
By Philipp Burckhardt - Oct 17, 2024
react-native-screens
Advanced tools
First incomplete navigation solution for your react-native app.
The react-native-screens package provides native primitives to manage and optimize navigation and screen transitions in React Native applications. It aims to improve performance by using native navigation components.
Native Stack Navigator
This feature allows you to create a stack navigator using native components, which can improve performance and provide a more seamless user experience.
import { createNativeStackNavigator } from 'react-native-screens/native-stack';
import { NavigationContainer } from '@react-navigation/native';
import HomeScreen from './HomeScreen';
import DetailsScreen from './DetailsScreen';
const Stack = createNativeStackNavigator();
function App() {
return (
<NavigationContainer>
<Stack.Navigator>
<Stack.Screen name="Home" component={HomeScreen} />
<Stack.Screen name="Details" component={DetailsScreen} />
</Stack.Navigator>
</NavigationContainer>
);
}
export default App;Screen Component
The Screen and ScreenContainer components allow you to manage screens more efficiently by leveraging native screen management, which can lead to better performance.
import { Screen, ScreenContainer } from 'react-native-screens';
import { View, Text } from 'react-native';

function MyScreen() {
  return (
    <Screen>
      <View>
        <Text>My Screen Content</Text>
      </View>
    </Screen>
  );
}

function App() {
  return (
    <ScreenContainer>
      <MyScreen />
    </ScreenContainer>
  );
}

export default App;
Screen Lifecycle Methods
This feature allows you to use lifecycle methods to detect when a screen is focused or unfocused, enabling you to perform actions like data fetching or cleanup.
import { useFocusEffect } from '@react-navigation/native';
import { useCallback } from 'react';
import { View, Text } from 'react-native';

function MyScreen() {
  useFocusEffect(
    useCallback(() => {
      console.log('Screen is focused');
      return () => {
        console.log('Screen is unfocused');
      };
    }, [])
  );

  return (
    <View>
      <Text>My Screen Content</Text>
    </View>
  );
}

export default MyScreen;React Navigation is a popular library for routing and navigation in React Native applications. It provides a wide range of navigators, including stack, tab, and drawer navigators. While react-native-screens focuses on optimizing performance with native components, React Navigation offers a more comprehensive set of features and is highly customizable.
React Native Navigation by Wix is another powerful navigation library that provides native navigation components. It offers a more native feel and performance compared to React Navigation but can be more complex to set up. It is similar to react-native-screens in its focus on native performance but provides a more extensive set of features.
This project aims to expose native navigation container components to React Native. It is not designed to be used as a standalone library but rather as a dependency of a full-featured navigation library.
Screens are already integrated with the React Native's most popular navigation library react-navigation and Expo. Read usage guide depending on if you are using Expo or not.
Since version 2.0.0 react-native-screens requires RN v0.60+. Check 1.0.0-alpha for Expo support or older versions of React Native.
Screens support is built into react-navigation starting from version 2.14.0 for all the different navigator types (stack, tab, drawer, etc). We plan on adding it to other navigators in near future.
To configure react-navigation to use screens instead of plain RN Views for rendering screen views, follow the steps below:
yarn add react-native-screens
2.Link native modules this library ships with into your app:
react-native link react-native-screens
If you are not familiar with the concept of linking libraries read on here.
3.Enable screens support before any of your navigation screen renders. Add the following code to your main application file (e.g. App.js):
import { enableScreens } from 'react-native-screens';

enableScreens();
Note that the above code need to execute before first render of a navigation screen. You can check Example's app App.js file as a reference.
dependencies section in android/app/build.gradle. You likely already have appcompat dependency listed there in which case you need to make sure that you use version 1.1.0-rc.01:implementation 'androidx.appcompat:appcompat:1.1.0-rc01'
implementation 'androidx.swiperefreshlayout:swiperefreshlayout:1.1.0-alpha02'
(the dependency on swiperefresh is only needed because of a bug in appcompat library that does not list it as dependency despite referencing classes from that package).
Make sure that the version of react-navigation you are using is 2.14.0 or higher
You are all set 🎉 – when screens are enabled in your application code react-navigation will automatically use them instead of relying on plain React Native Views.
Screens support is built into Expo SDK 30 and react-navigation starting from 2.14.0. Make sure your app use these versions before you start.
yarn add react-native-screens
import { useScreens } from 'react-native-screens';

useScreens();
React-native-navigation library already uses native containers for rendering navigation scenes so wrapping these scenes with <ScreenContainer> or <Screen> component does not provide any benefits. Yet if you would like to build a component that uses screens primitives under the hood (for example a view pager component) it is safe to use <ScreenContainer> and <Screen> components for that as these work out of the box when rendered on react-native-navigation scenes.
In order to take advantage of the native stack navigator primitive introduced in version 2.0 you need to use navigator creator function exported by react-native-screens package:
import createNativeStackNavigator from 'react-native-screens/createNativeStackNavigator';
Then replace places when you use createStackNavigator with createNativeStackNavigator. Note that not all the screen customization options are supported. There are some technical limitations for implementing some of the stack header options. Documenting the supported parameters is on an immediate roadmap and will be available soon.
This library should work out of the box with all existing react-native libraries. If you experience problems with interoperability please report an issue.
If you are building navigation library you may want to use react-native-screens to have a control which parts of the react component tree are attached to the native view hierarchy. To do that react-native-screens provides you with two components documented below:
<ScreenContainer/>This component is a container for one or more Screen components.
It does not accept other component types are direct children.
The role of container is to control which of its children screens should be attached to the view hierarchy.
It does that by monitoring active property of each of its children.
It it possible to have as many active children as you'd like but in order for the component to be the most efficient we should keep the number of active screens to the minimum.
In a case of stack navigator or tabs navigator we only want to have one active screen (the top most view on a stack or the selected tab).
Then for the time of transitioning between views we may want to activate a second screen for the duration of transition, and then go back to just one active screen.
<Screen/>This component is a container for views we want to display on a navigation screen.
It is designed to only be rendered as a direct child of ScreenContainer.
In addition to plain React Native View props this component only accepts a single additional property called active.
When active is set to 0, the parent container will detach its views from the native view hierarchy.
Otherwise the views will be attached as long as the parent container is attached too.
<ScreenContainer>
  <Screen>{tab1}</Screen>
  <Screen active={1}>{tab2}</Screen>
  <Screen>{tab3}</Screen>
</ScreenContainer>
<ScreenStack>Screen stack component expects one or more Screen components as direct children and renders them in a platform native stack container (for iOS it is UINavigationController and for Android inside Fragment container). For Screen components placed as children of ScteenStack the active property is ignored and instead the screen that corresponds to the last child is rendered as active. All type of updates done to the list of children are acceptable, when the top element is exchanged the container will use platform default (unless customized) animation to transition between screens.
StackScreen extends the capabilities of Screen component to allow additional customizations and to make it possible to handle events such as using hardware back or back gesture to dismiss the top screen. Below is the list of additional properties that can be used for Screen component:
onDismissA callback that gets called when the current screen is dismissed by hardware back (on Android) or dismiss gesture (swipe back or down). The callback takes no arguments.
stackAnimationAllows for the customization of how the given screen should appear/dissapear when pushed or popped at the top of the stack. The followin values are currently supported:
"default" – uses a platform default animation"fade" – fades screen in or out"none" – the screen appears/dissapears without an animationstackPresentationDefines how the method that should be used to present the given screen. It is a separate property from stackAnimation as the presentation mode can carry additional semantic. The allowed values are:
"push" – the new screen will be pushed onto a stack which on iOS means that the default animation will be slide from the side, the animation on Android may vary depending on the OS version and theme."modal" – the new screen will be presented modally. In addition this allow for a nested stack to be rendered inside such screens"transparentModal" – the new screen will be presented modally but in addition the second to last screen will remain attached to the stack container such that if the top screen is non opaque the content below can still be seen. If "modal" is used instead the below screen will get unmounted as soon as the transition ends.<ScreenStackHeaderConfig>The config component is expected to be rendered as a direct children of <Screen>. It provides an ability to configure native navigation header that gets rendered as a part of native screen stack. The component acts as a "virtual" element that is not directly rendered under Screen. You can use its properties to customize platform native header for the parent screen and also render react-native components that you'd like to be displayed inside the header (e.g. in the title are or on the side).
Along with this component properties that can be used to customize header behavior one can also use one or the below component containers to render custom react-native content in different areas of the native header:
ScreenStackHeaderTitleView – react native views rendered as children will appear on the navigation bar in the place of title. Note that title is aligned next to back button on Android while it is centered on iOS.ScreenStackHeaderCenterView – the childern will render in the center of the native navigation bar (on iOS this has the same behavior as ScreenStackHeaderTitleView container)ScreenStackHeaderRightView – the children will render on the right hand side of the navigation bar (or on the left hand side in case LTR locales are set on the user's device)ScreenStackHeaderLeftView – the children will render on the left hand side of the navigation bar (or on the right hand side in case LTR locales are set on the user's device).Below is a list of properties that can be set with ScreenStackHeaderConfig component:
hiddenWhen set to true the header will be hidden while the parent Screen is on the top of the stack. The default value is false.
colorControls the color of items rendered on the header. This includes back icon, back text (iOS only) and title text. If you want the title to have different color use titleColor property.
titleString that representing screen title that will get rendered in the middle section of the header. On iOS the title is centered on the header while on Android it is aligned to the left and placed next to back button (if one is present).
titleFontFamilyCustomize font family to be used for the title.
titleFontSizeCustomize the size of the font to be used for the title.
titleColorAllows for setting text color of the title.
backgroundColorControlls the color of the navigation header.
hideShadowBoolean that allows for disabling drop shadow under navigation header. The default value is true.
hideBackButtonIf set to true the back button will not be rendered as a part of navigation header.
gestureEnabledWhen set to false the back swipe gesture will be disabled when the parent Screen is on top of the stack. The default value is true.
translucent (iOS only)When set to true, it makes native navigation bar on iOS semi transparent with blur effect. It is a common way of presenting navigation bar introduced in iOS 11. The default value is false.
backTitle (iOS only)Allows for controlling the string to be rendered next to back button. By default iOS uses the title of the previous screen.
backTitleFontFamily (iOS only)Allows for customizing font family to be used for back button title on iOS.
backTitleFontSize (iOS only)Allows for customizing font size to be used for back button title on iOS.
largeTitle (iOS only)When set to true it makes the title display using the large title effect.
largeTitleFontFamily (iOS only)Customize font family to be used for the large title.
largeTitleFontSize (iOS only)Customize the size of the font to be used for the large title.
If you are adding a new native component to be used from the React Native app, you may want it to respond to navigation lifecycle events.
Good example is a map component that shows current user location. When component is on the top-most screen it should register for location updates and display users location on the map. But if we navigate away from a screen that has a map, e.g. by pushing new screen on top of it or if it is in one of a tabs and user just switched to the previous app, we may want to stop listening to location updates.
In order to achieve that we need to know at the native component level when our native view goes out of sight. With react-native-screens you can do that in the following way:
In order for your native view on iOS to be notified when its parent navigation container goes into background override didMoveToWindow method:
- (void)didMoveToWindow
{
  [super didMoveToWindow];
  BOOL isVisible = self.superview && self.window;
  if (isVisible) {
    // navigation container this view belongs to became visible
  } else {
    // we are in a background
  }
}
You can check our example app for a fully functional demo see RNSSampleLifecycleAwareView.m for more details.
On Android you can use LifecycleObserver interface which is a part of Android compat library to make your view handle lifecycle events. Check LifecycleAwareView.java from our example app for more details on that.
In addition to that you will need to register for receiving these updates. This can be done using LifecycleHelper.register.
Remember to call LifecycleHelper.unregister before the view is dropped.
Please refer to SampleLifecycleAwareViewManager.java from our example app to see what are the best ways of using the above methods.
React native screens library is licensed under The MIT License.
This project is supported by amazing people from Expo.io and Software Mansion

FAQs
Native navigation primitives for your React Native app.
The npm package react-native-screens receives a total of 902,095 weekly downloads. As such, react-native-screens popularity was classified as popular.
We found that react-native-screens demonstrated a healthy version release cadence and project activity because the last version was released less than a year ago. It has 7 open source maintainers collaborating on the project.
Did you know?

Socket for GitHub automatically highlights issues in each pull request and monitors the health of all your open source dependencies. Discover the contents of your packages and block harmful activity before you install or update your dependencies.
Product
Ensure open-source compliance with Socket’s License Enforcement Beta. Set up your License Policy and secure your software!
Product
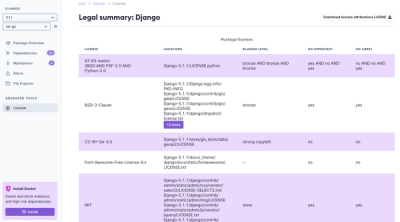
We're launching a new set of license analysis and compliance features for analyzing, managing, and complying with licenses across a range of supported languages and ecosystems.
Product
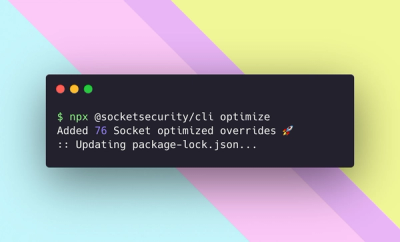
We're excited to introduce Socket Optimize, a powerful CLI command to secure open source dependencies with tested, optimized package overrides.