Sets up markdown code blocks to run through shiki which means it gets the VS Code quality
syntax highlighting, with optional inline TypeScript compiler-backed tooling.
Why Shiki? Shiki uses the same syntax highlighter engine as VS Code, which means no matter how complex your code is - it will syntax highlight correctly.
In addition to all the languages shiki handles (it's a lot), this module adds opt-in @typescript/twoslash rendering for TypeScript code blocks and tsconfig JSON files.
This module powers the code samples on the TypeScript website.
With Shiki Twoslash, you can explain complicated code in a way that lets people introspect at their own pace.
Plugin Setup
Setup
-
Install the dependency: yarn add remark-shiki-twoslash
-
Include "remark-shiki-twoslash" in the plugins section of whatever you're using:
 const jsx = await mdx(content, {
   filepath: "file/path/file.mdx",
-  remarkPlugins: [],
+  remarkPlugins: [[remarkShikiTwoslash, { theme: "dark-plus" }]],
 }
}
-
Add the CSS
This CSS comes from the TypeScript website's scss
You should consider it a base to work from, rather than a perfect for every project reference.
pre {
background-color: white;
color: black;
padding: 12px;
border-left: 1px solid #999;
border-bottom: 1px solid #999;
margin-bottom: 3rem;
overflow: auto;
position: relative;
}
pre.shiki {
overflow: initial;
}
pre.twoslash {
border-color: #719af4;
}
pre .code-container {
overflow: auto;
}
pre code {
white-space: pre;
-webkit-overflow-scrolling: touch;
}
pre data-err {
background: url("data:image/svg+xml,%3Csvg%20xmlns%3D'http%3A%2F%2Fwww.w3.org%2F2000%2Fsvg'%20viewBox%3D'0%200%206%203'%20enable-background%3D'new%200%200%206%203'%20height%3D'3'%20width%3D'6'%3E%3Cg%20fill%3D'%23c94824'%3E%3Cpolygon%20points%3D'5.5%2C0%202.5%2C3%201.1%2C3%204.1%2C0'%2F%3E%3Cpolygon%20points%3D'4%2C0%206%2C2%206%2C0.6%205.4%2C0'%2F%3E%3Cpolygon%20points%3D'0%2C2%201%2C3%202.4%2C3%200%2C0.6'%2F%3E%3C%2Fg%3E%3C%2Fsvg%3E")
repeat-x bottom left;
padding-bottom: 3px;
}
pre .error,
pre .error-behind {
margin-left: -20px;
margin-top: 8px;
margin-bottom: 4px;
padding: 6px;
padding-left: 14px;
white-space: pre-wrap;
display: block;
}
pre .error {
position: absolute;
background-color: #ffeeee;
border-left: 2px solid #bf1818;
width: calc(100% - 14px);
display: flex;
align-items: center;
color: black;
}
pre .error .code {
display: none;
}
pre .error-behind {
user-select: none;
color: #ffeeee;
}
data-lsp {
border-bottom: 1px dotted transparent;
transition-timing-function: ease;
transition: border-color 0.3s;
}
@media (prefers-reduced-motion: reduce) {
data-lsp {
transition: none;
}
}
pre:hover data-lsp {
border-color: #747474;
}
#twoslash-mouse-hover-info {
background-color: #3f3f3f;
color: #fff;
text-align: left;
padding: 5px 8px;
border-radius: 2px;
font-family: "JetBrains Mono", Menlo, Monaco, Consolas, Courier New, monospace;
font-size: 14px;
white-space: pre-wrap;
}
-
Add the JS for hover info to your component:
In a React codebase:
import React, { useEffect } from "react"
import { setupTwoslashHovers } from "shiki-twoslash/dist/dom";
export default () => {
useEffect(setupTwoslashHovers, [])
return </>
}
In a non-React codebase, you can still call setupTwoslashHovers via a bundler or module import, it will set up all
of the hovers on the page, this will need to be after the HTML is set up.
Verify
With that set up, start up your server and add a codeblock to a markdown file to see if it renders with highlights:
```json
{ "json": true }
```
If that works, then add a twoslash example:
```ts twoslash
interface IdLabel {id: number, /* some fields */ }
interface NameLabel {name: string, /* other fields */ }
type NameOrId<T extends number | string> = T extends number ? IdLabel : NameLabel;
// This comment should not be included

// ---cut---
function createLabel<T extends number | string>(idOrName: T): NameOrId<T> {
  throw "unimplemented"
}

let a = createLabel("typescript");
```
If the code sample shows as
function createLabel<T extends number | string>(idOrName: T): NameOrId<T> {
  throw "unimplemented"
}

let a = createLabel("typescript")
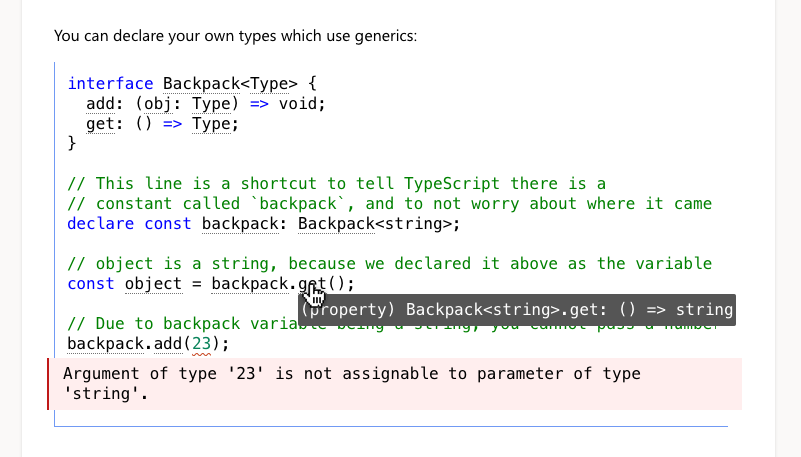
Then it worked, and you should be able to hover over createLabel to see it's types.
Plugin Config
This plugin passes the config options directly to Shiki and Twoslash. You probably will want to
set theme, then also the TwoslashOptions here.
Light / Dark Modes
If you pass more than one theme into themes then a codeblock will render for each theme into your HTML. This means that you can use CSS display: none on the one which shouldn't be seen.
const jsx = await mdx(content, {
  filepath: "file/path/file.mdx",
  remarkPlugins: [[remarkShikiTwoslash, { themes: ["dark-plus", "light-plus"] }]],
})
@media (prefers-color-scheme: light) {
  .shiki.dark-plus {
    display: none;
  }
}

@media (prefers-color-scheme: dark) {
  .shiki.light-plus {
    display: none;
  }
}
Power User Features
Once you start writing long articles, you'll start to feel the desire to remove repetition in your code samples. This plugin adds the ability to import code into code samples. This is a string replacement before code is passed to twoslash. This is done by making a twoslash include code sample which is given a unique identifier.
Inside that code-block, you can use // - [id] to make sub-queries to the import, these will be stripped out in the code show. Here's an example markdown file using includes:
# Hello, world!

```twoslash include main
const a = 1
// - 1
const b = 2
// - 2
const c= 3
```

Let's talk a bit about `a`:

```ts twoslash
// @include: main-1
```

`a` can be added to another number

```ts twoslash
// @include: main-1
// ---cut---
const nextA = a + 13
```

You can see what happens when you add `a + b`

```ts twoslash
// @include: main-2
// ---cut---
const result = a + b
//    ^?
```

Finally here is `c`:

```ts twoslash
// @include: main
// ---cut---
c.toString()
```