Product
Introducing License Enforcement in Socket
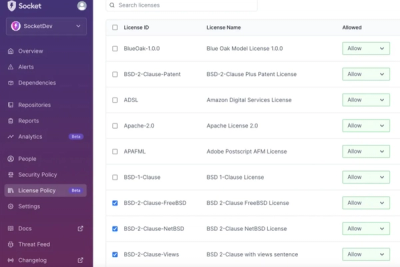
Ensure open-source compliance with Socket’s License Enforcement Beta. Set up your License Policy and secure your software!
By Philipp Burckhardt - Oct 17, 2024
tagliatelle-components
Advanced tools
Tagliatelle is a react component library built for www.stylist.co.uk.
We use:
To visit a hosted version of our Storybook please visit Chromatic for the latest generated link.
If you have not done so, please read the FE Onboarding documentation and complete the prerequisites, which involves gaining access to relevant services.
Tagliatelle is undergoing an update to reflect Gloria, our design system. Due to this ongoing update some components have been deprecated, with other components or style approaches favoured. You will find that across our frontends, for example, Doris, deprecated components are still in use because the work required to replace these components is yet to be prioritised on jira. Please find a reference this work under the "Tag" epic on jira.
>
When working on new features, please use the prompted guides provided by VSCode intellisense. You may also read about the new approach for typography here.
>
Additionally, there is an Excel sheet outlining the topics to audit components against that has been created, click here to view.
>
Lastly, there is a draft PR in which a new way to classify components was being explored. We currently follow the Atomic design principle, however we felt this approach was quite limiting, and we wanted to establish a more custom way to classify our component library. A lot of good work was done in the PR but it is not a finished piece of work.
Using NVM install node v14.15.0.
Install dependencies.
npm i
Running npm run start will launch Storybook at port http://localhost:6006/
CHROMATIC_PROJECT_TOKEN=
To create a new component its best to run the following command.
npm run create-component
This command will require you to respond to two questions.
? Please select which category the new component belongs to? (Use arrow keys)
❯ atoms
  molecules
  organisms
? What is the component name? (please use camelCase)
You'll find your new component folder in the following directory src/components{category}
The new component folder will come with a *.stories.tsx file ready so you can see the changes you make on Storybook.
You will also find the following files:
- DOMAttributes
  - component.tsx
  - component.style.ts (We use styled-components for our styling)
  - component.test.tsx (Take a snapshot of your built component!)
  - index.ts
Happy Building!
To create a new icon, add the *.svg to the following directory src/icons/assets, then in the terminal, run the following command;
npm run create-icon
For logos run
npm run create-icon -- --isLogo="true" --useCurrentColor="false"
In the src/icons/new-components you'll find a new component for your icon. The folder will also include a *.stories.tsx file enabling you to view this new icon on storybook.
Side Note: New Icons have been added which will replace all current icons at a later date. New icons can be found in the 'new-components' directory and in storybook under 'All Icons' -> 'New'.
Design tokens can be found at src/tokens. Please try to follow the naming conventions established in the files in tag or figma.
Run npm run link in tag and then npm link tagliatelle-components in Doris to create a symlink to make changes to components and use them in Doris without pubishing the component library.
Everytime you make a change and want to see it in Doris, run npm run build in tag.
If you prefer for rollup to watch for changes add -w to the link command in package.json.
Alternatively, if the above solution does not work to create the link, run npm i ../tagliatelle in Doris which will update your package.json to replace the remote npm package with the local package (where ../tagliatelle is the relative path to your local Tag).
!Important! Do not commit this updated package.json to the repo.
Previously, we styled and created typography components, like <H1 />, <BodyArticle />etc.
However, under the new DS, Gloria, we are following a new way of handling typography. We use style objects (named after typography styles from our design system) on our theme and apply them to any HTML tag. Material UI does something very similar
We decided to adopt this approach to stop the following from happening; for example, the typography styles applied for a <H2> may be needed to style the title of card which wouldn't semantically be <H2>, or on desktop the styling for H2 was good but on mobile, design required it to follow the font size of a H4.
This kind of restriction was causing us to continously extend the styles for heading/type components or change their base html rendering. This made our typography components not very reusable, and was slowing down development by creating this added labour, in which design could freely apply type styles across a page design without thinking of html semantics as much as development was.
const heading = ({ theme }: { theme: Theme }) =>
  css(
    theme.typography.heading1.smallbold,
    mediaQuery.up(theme.layout.newBreakpoints.md, theme.typography.display03.bold),
    mediaQuery.up(theme.layout.newBreakpoints.xl, theme.typography.display02.bold),
  );

<h1 css={(theme) => heading({ theme })}>Hey, I'm a heading</h1>
We have a workflow on Github that handles the build and publishing of tagliatelle. It uses version 14.15.0 of node, just like we do on our local machines.
Before publishing via Github, increment the package.json version, run npm i and then commit and push changes.
When you have created a new change to the repo and have opened a PR, you will find Chromatic tests will run. Click through to chromatic to resolve the changes (you may also approve PR's on Chromatic).
Alternatively, you can run npm run chromatic on the branch you've opened a PR for.
Make sure you have the --project-token= in your .env file. You may also find this on Chromatic.
After an approved PR, increment the package.json version and run npm run build.
Login in to npm with npm login and then run npm publish to publish your changes.
Our Chromatic account runs on a free plan. Every month, we only have a certain number of builds available, limiting Storybook deployments. Each open PR creates a build and a corresponding published storybook version. Chromatic creates a url for our published storybook for each PR.
Visit chromatic for a link to storybook live.
As Tag is built using typescript, we want our consuming app to be privy to each component's prop types. Typescript can generate declaration files for your types, which defines all the types a typescript file has declared.
To have typescript generate this for us we add in the tsconfig.json file the following.
{
  "compilerOptions": {
    ...other code
    "rootDir": "src/",
    "declaration": true,
    "declarationDir": "dist/dts",
  },
  ...other code
}
This flags the typescript engine to create declarations files for each typescript file that lies within the scope of the rootDir, and once it creates it we ask for them to be stored in the following directory dist/dts.
This works well but means our bundle size gets bigger because the number of files in the declarationDir is a lot.
To optimise our bundle we want to be able to rollup our declarations into one single index file, just like we do with the rest of our code.
To do so we have to use the npm package rollup-plugin-dts.
We call the package in our rollup.config.js file like so;
  {
    input: 'dist/dts/index.d.ts',
    output: [{ file: 'dist/index.d.ts', format: 'esm' }],
    plugins: [dts()]
  }
When we build our app, in addition to our index.js file we get an index.d.ts file that our consuming app has access to. So, when a Tag component is now used in a consuming app the IDE can reference that components types to help with development.
We use @emotion/styled to style all components in Tag. Please install vscode-styled-components extensions on vscode for syntax highlighting and type recognition. You are free to use other extensions for syntax highlighting as you please.
FAQs
Front-end component library
The npm package tagliatelle-components receives a total of 129 weekly downloads. As such, tagliatelle-components popularity was classified as not popular.
We found that tagliatelle-components demonstrated a healthy version release cadence and project activity because the last version was released less than a year ago. It has 0 open source maintainers collaborating on the project.
Did you know?

Socket for GitHub automatically highlights issues in each pull request and monitors the health of all your open source dependencies. Discover the contents of your packages and block harmful activity before you install or update your dependencies.
Product
Ensure open-source compliance with Socket’s License Enforcement Beta. Set up your License Policy and secure your software!
Product
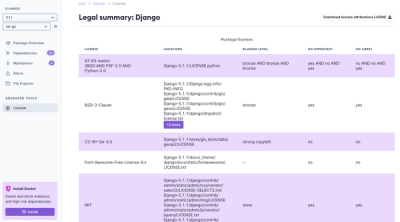
We're launching a new set of license analysis and compliance features for analyzing, managing, and complying with licenses across a range of supported languages and ecosystems.

Product
We're excited to introduce Socket Optimize, a powerful CLI command to secure open source dependencies with tested, optimized package overrides.