ChatGPT - Command-Line Interface


CLI tool for interacting with ChatGPT using terminal
Requirements
- Python >= 3.8.0
- OpenAI account and valid API key
Installation
Tool can be installed using python3 pip command:
pip install chatgpt-cli-tool
Or you can install it directly form this project after building it:
python build.py

pip install dist/chatgpt-cli-tool-{version}.tar.gz
Configuration
In order to use ChatGPT cli you will first need to register and create an API key on
the official OpenAI website.
Then you can configure the tool with your API key using any of the following options:
- Create an ~/.chatgpt-cli/.env file with variable OPENAI_API_KEY
- Create an .env file in the working directory with variable OPENAI_API_KEY
- Set it through environment variable OPENAI_API_KEY
- Pass it as the first argument when executing this tool (e.g.
chatgpt-cli my_api_key [out_file])
All configurable environment variables for ChatGPT can be found in .env.example file:
| OPENAI_API_KEY | OpenAI API key used to send request | - |
| GPT_MODEL | GPT model used for chat completion | gpt-3.5-turbo |
| GPT_TEMPERATURE | GPT temperature value (between 0 and 2), lower values provide more focused and deterministic output | 1 |
| GPT_STREAM_RESPONSE | Enable OpenAI client to use Server Sent Events for streaming tokens from the API | true |
| GPT_SYSTEM_DESC | The description for the system on how to best tailor answers (disable with "None") | You are a very direct and straight-to-the-point assistant. |
| GPT_IMAGE_MODEL | GPT model used for generating images | dall-e-2 |
| GPT_IMAGE_SIZE | The generated image size (256x256, 512x512, 1024x1024, 1792x1024 or 1024x1792) | 1024x1024 |
| HISTORY_SIZE | Number of last messages to keep in history as a context for the next question | 3 |
| CHAT_TEXT_WIDTH | Maximum number of characters to display per line in interactive chat mode (0 - as much as possible) | 0 |
| CHAT_COLORED | Enable this to use colors in interactive chat mode | true |
| CHAT_COLOR_YOU | The color used for your inputs | green |
| CHAT_COLOR_AI | The colore of AI responses | white |
Image model dall-e-2 requires image size less than or equal to 1024x1024, dall-e-3 requires greater than or equal to
1024x1024
Supported ANSI colors are: black, red, green, yellow, blue, magenta, cyan, and white
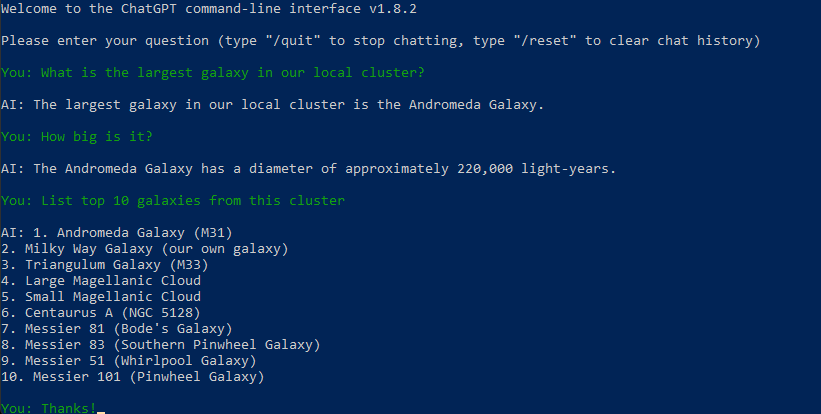
Running the CLI
If you installed the tool using pip, then simply start the cli using any of the following commands:
chatgpt-cli [api_key] [file_out]
This command starts interactive ChatGPT where you can chat with AI in form of a dialog.
chatgpt-cli my_api_key ./path/to/chat.txt
chatgpt-cli my_api_key
chatgpt-cli chat.txt
chatgpt-cli
If file does not exist it will be created together with all parent directories. Otherwise, if the file already exists
the user is prompted with 3 options on how to handle the existing file content:
- Continue conversation
- Keep previous content and start new conversation
- Delete previous content and start new conversation
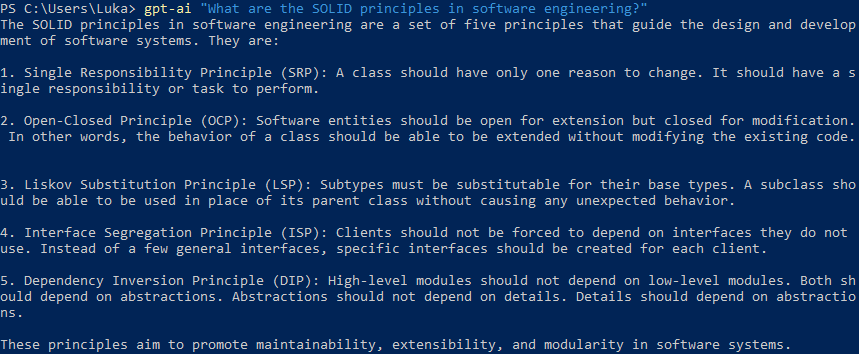
gpt-ai [api_key] [prompt]
This command sends single chat completion prompt for given query or content, and prints the result on stdout.
gpt-ai my_api_key "What is ChatGPT?"
gpt-ai "What is ChatGPT?"
cat file.txt | gpt-ai my_api_key
cat question.txt | gpt-ai
cat long-story.txt | gpt-ai "summarize this text in 5 bullet points"
gpt-ai "explain this code" < main.py
gpt-img [api_key] [prompt] [img_out]
This command generates image for given prompt or content, and stores the image in provided output path or if not
specified, prints the binary result on stdout. Some terminals like PowerShell might corrupt the binary content when
outputting to file.
gpt-img my_api_key "Robot walking a dog" ./my-images/image.png
gpt-img "Robot walking a dog" ./my-images/image.png
gpt-img "Robot walking a dog" > image.png
cat description.txt | gpt-img "with cartoon graphics" ./image.png
cat description.txt | gpt-img ./image.png
cat description.txt | gpt-img > ./image.png
gpt-img < idea.txt
gpt-refactor [api_key] [prompt] [file_pattern]
This command iterate over files specified by glob pattern, and then uses provided prompt to refactor every file and
writes the response content back to the current file.
gpt-refactor my_api_key "format this code" ./src/**/*.py
gpt-refactor "format this code" ./src/**/*.py
cat todo.txt | gpt-refactor "with CRLF endings" ./my_list.txt
cat instructions.txt | gpt-refactor ./*.csv
API key argument is optional for all commands, but if provided it will override API key defined using environment
variables.
Examples
Interactive mode
Single query mode
Recommendations
ChatGPT-Slackbot
If you are a regular Slack user, check out my other project which provides seamless ChatGPT and Slack
integration: https://github.com/lmatosevic/chatgpt-slackbot
License
ChatGPT-Cli is MIT licensed.


