Security News
Fluent Assertions Faces Backlash After Abandoning Open Source Licensing
Fluent Assertions is facing backlash after dropping the Apache license for a commercial model, leaving users blindsided and questioning contributor rights.
 Future Vision : A New Era in Robotics Education
It allows you to control the leds, RGB led, buttons and 8x8 led matrix on your Arduino board with Python language.
You can control Arduino with computer vision using your host computer and facilitate computer vision on a Raspberry Pi board.
A Darwin Future Vision mobile app created for the library allows you to control your iPhone phone's observational hardware: its flash, screen brightness and speaker volume ratio.
It pulls iPhone hardware information about the phone's screen brightness, speaker volume ratio, and which volume button is pressed, allowing you to retrieve and use this data in your python code
You can control 5 led graphs in the LEDs section of the iPhone app.
With the iPhone app, you can send data to your python code or see the data you send from your python code in the app.

It aims to reawaken children's curiosity in robotics education and break new ground in robotics education by going beyond the classical robotics education.

With the Arduino module of the Future Vision library, you can control the LEDs, RGB LEDs and 8x8 LED matrix on Arduino using Python language, and also read values from the buttons connected to the analog pins of Arduino.
With the Raspberry Pi module of the Future Vision library, you can read and control the LEDs, RGB LEDs, 8x8 LED matrix on the Sense HAT and Sense HAT sensors on the Raspberry Pi, you can also read the Sense HAT joystick values.
With the Vision module of the Future Vision library, you can create your own sign language, detect hands, detect happiness and unhappiness on your face, detect the instantaneous number of faces in a room, detect colors, detect whether eyes are closed or open, manage keys on the keyboard, measure volume, make your computer talk, analyze left and right arm movements, recognize objects and perform personal face recognition.
With the iPhone module of the Future Vision library and the mobile app, you can control your iPhone's observational hardware: flash, screen brightness and speaker volume. You can also see the screen brightness, speaker volume ratio and volume up or down button presses data on your computer and control your Arduino or Raspberry Pi board based on this data, or you can control your phone's flash with Arduino and Raspberry Pi, for example, by pressing the button.


In order for the Future Vision library to work correctly with your Arduino Uno board, you need to install the FutureVision-Arduino.ino code on your Arduino Uno board.
Pins 13, 12 and 11 are dedicated to LED matrix, pins 10, 9, 8 are dedicated to RGB LED. You can only use pins 7, 6, 5, 4, 3, 2 as digital outputs.
from futurevision import arduino
uno=arduino.Arduino(usb_port="/dev/cu.usbmodem101",baud=9600)
uno.on(pin=7)
uno.wait(1)
uno.off(pin=7)
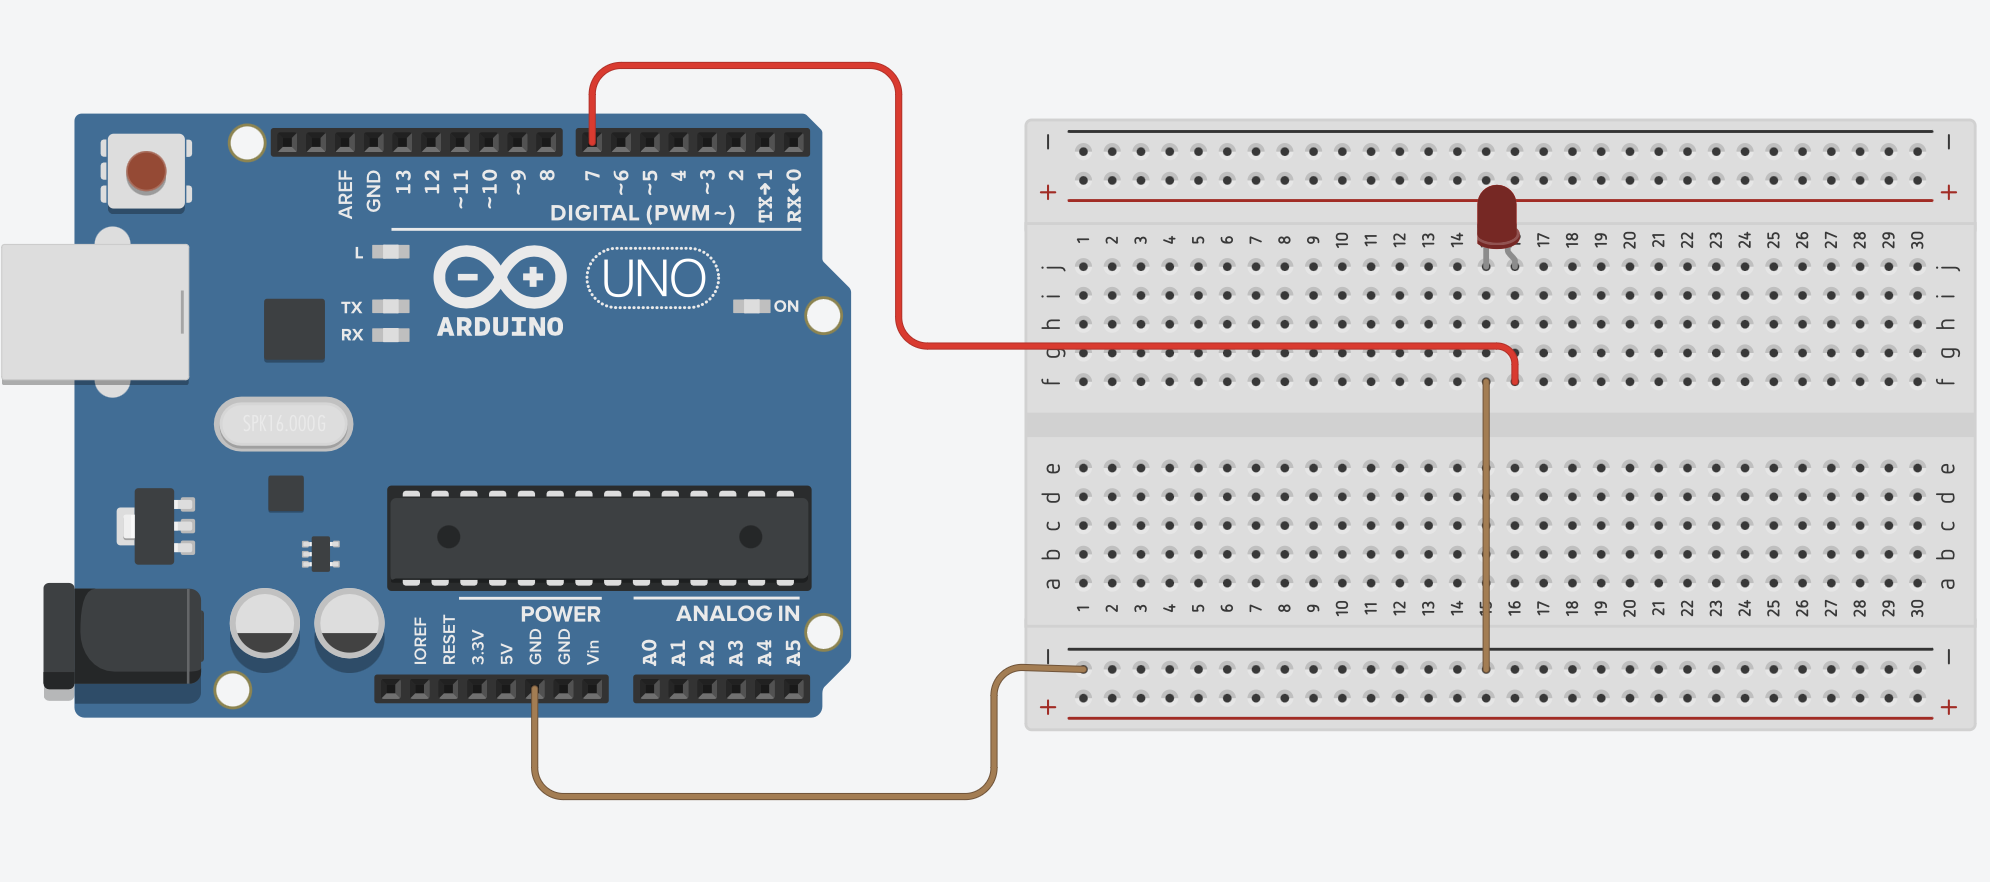
LED connections are as follows.

Colors you can display on RGB LED:
You can turn off your RGB led by entering one of these parameters: clear & off
Pin layout of the RGB LED: R:10 G:9 B:8
from futurevision import arduino
uno=arduino.Arduino(usb_port="/dev/cu.usbmodem101",baud=9600)
uno.rgb_led("red")
uno.wait(1)
uno.rgb_led("yellow")
uno.wait(1)
uno.rgb_led("green")
uno.wait(1)
uno.rgb_led("blue")
uno.wait(1)
uno.rgb_led("purple")
uno.wait(1)
uno.rgb_led("white")
uno.wait(1)
uno.rgb_led("clear")
uno.wait(1)
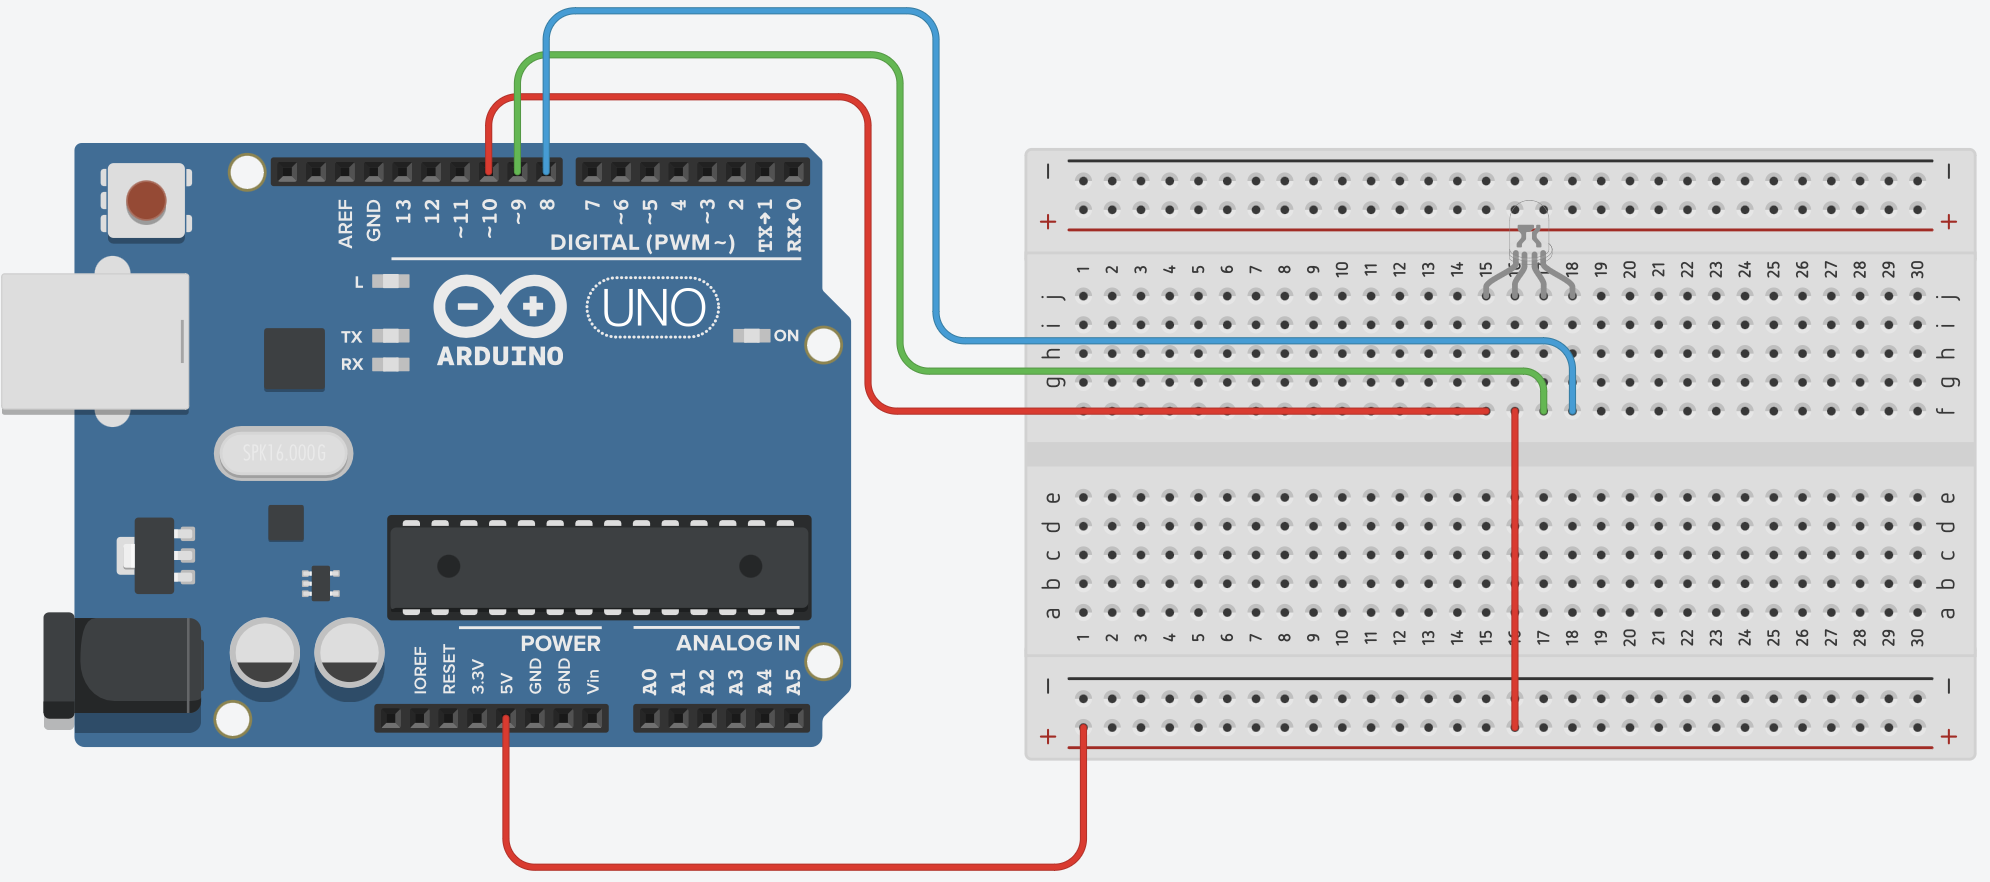
RGB LED connections are as follows.

The values of the buttons are set to be read only from analog pins. The returned button value will be given as {PIN}. For example, let's say we have two buttons connected to pins A0 and A3. When we press the A3 pin three times and press the button on the A0 pin twice, the terminal output will be as follows.
from futurevision import arduino
uno=arduino.Arduino(usb_port="/dev/cu.usbmodem101",baud=9600)
while True:
    read=uno.read()
    print(read)
Terminal Output
(base) ali@aliedis-MacBook-Air Desktop % python3 test.py
3
3
3
0
0
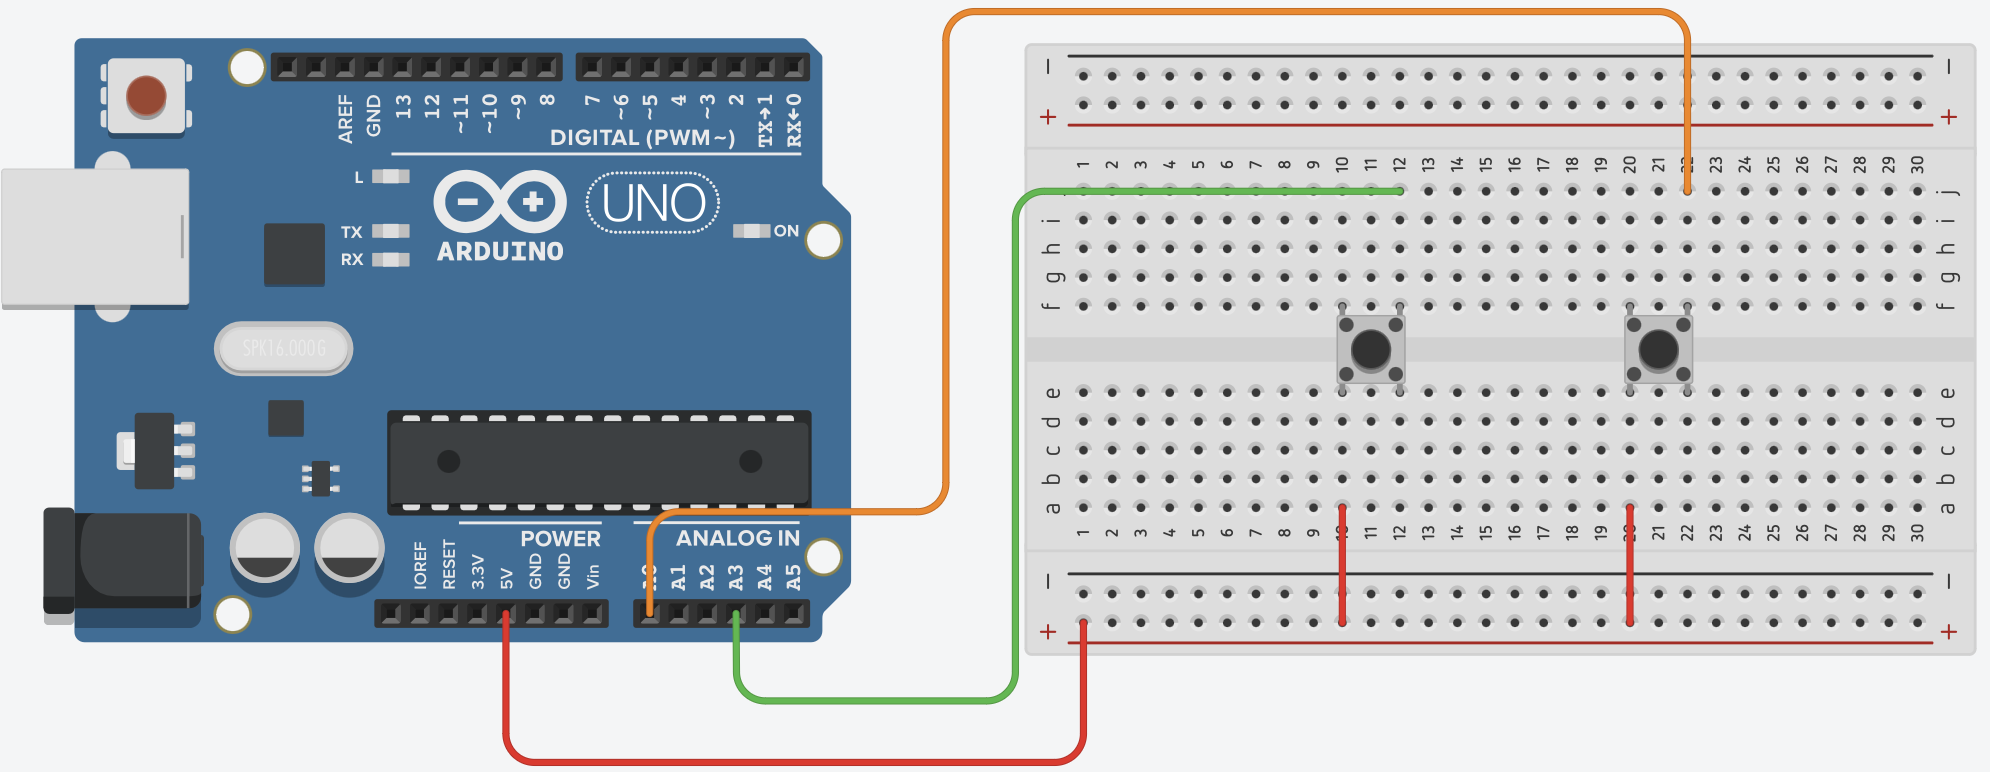
The button connections are as follows.

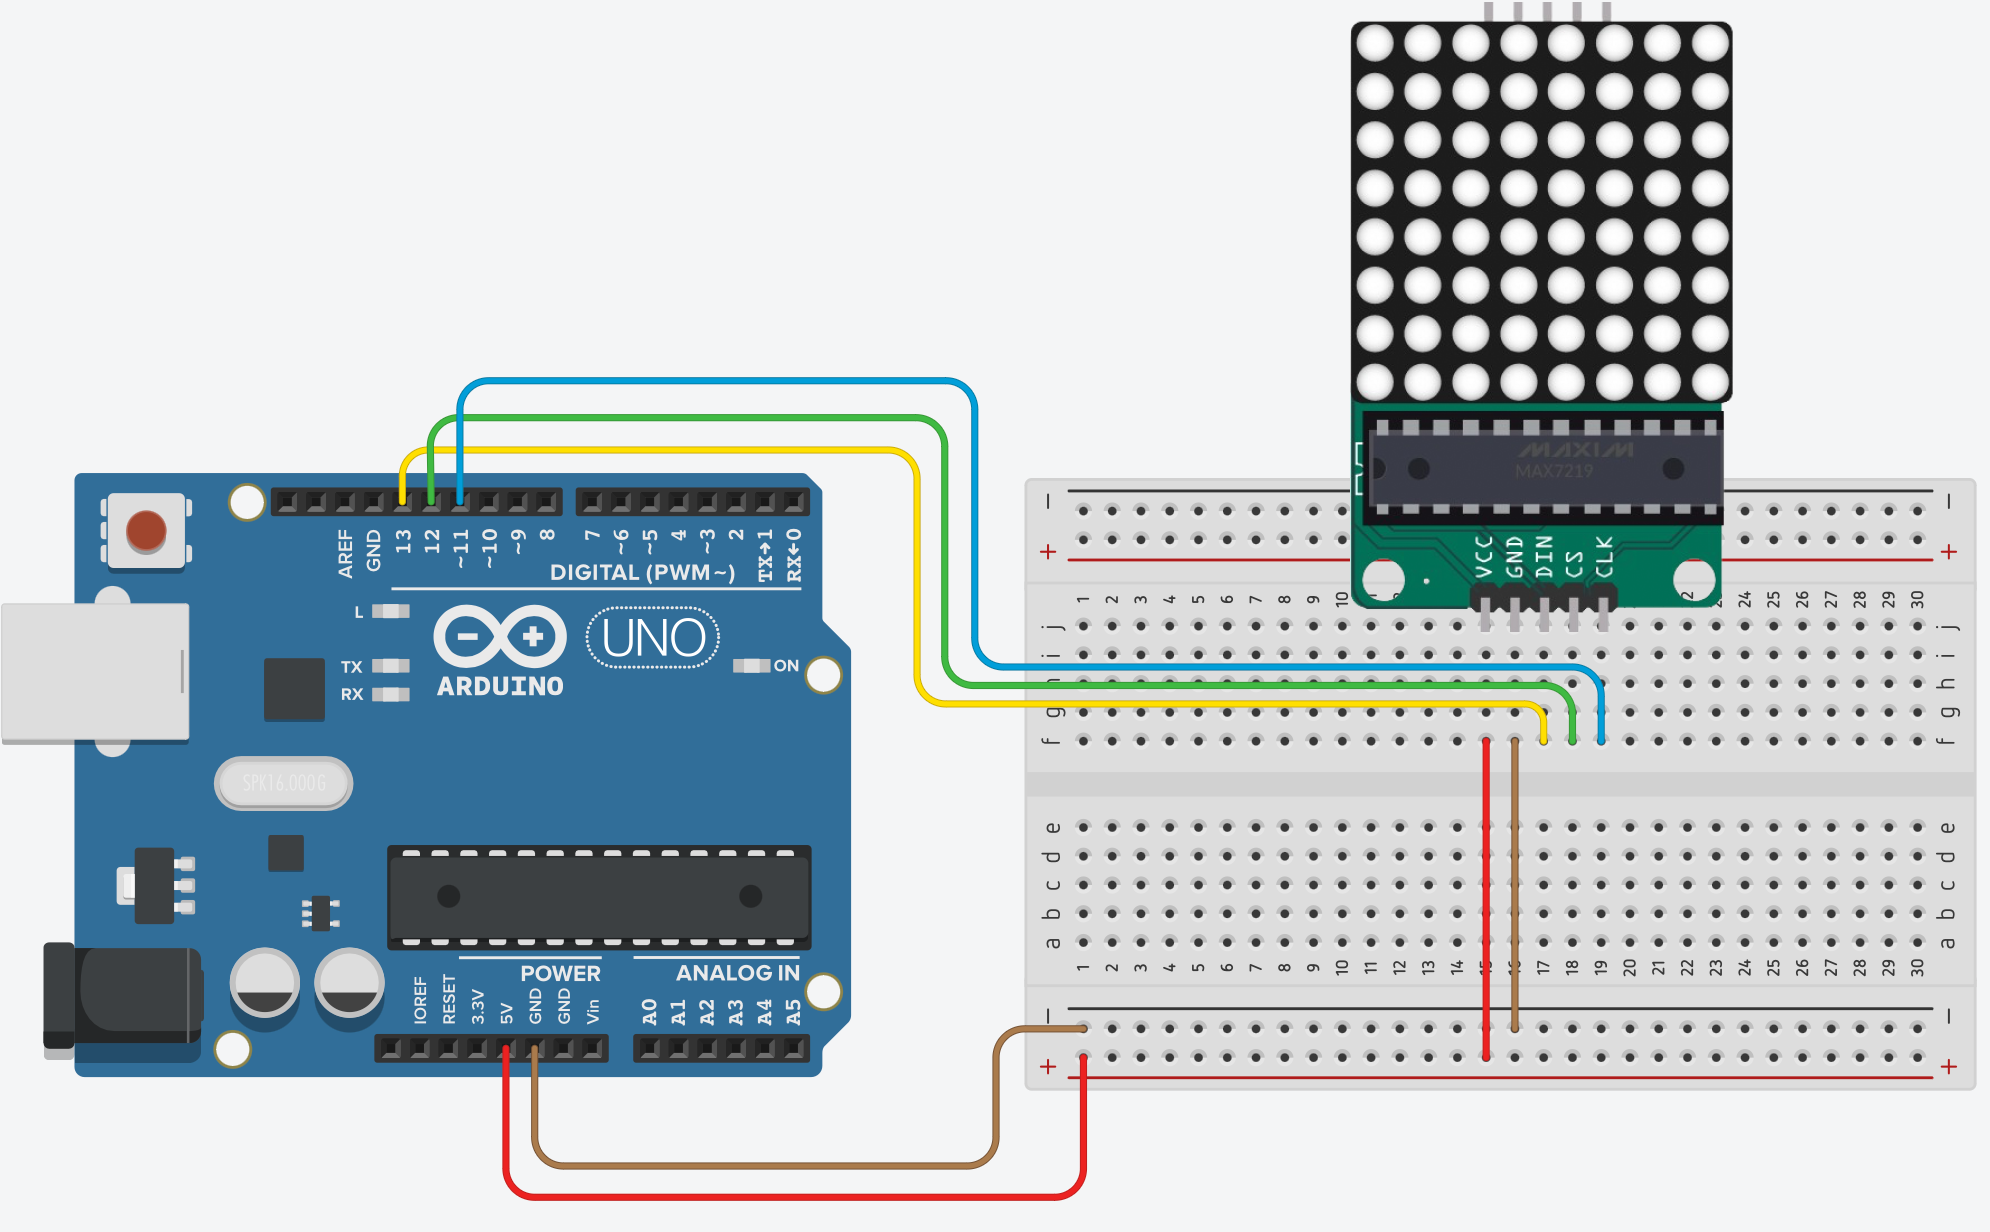
Pin Layout of Led Matrix: DIN:13, CS:12, CLK:11
You can show any characters you want in Led Matrix. The character and shape list is as follows:
A, B, C, D, E, F, G, H, I, J, K, L, M, N, O, P, Q, R, S, T, U, V, W, X, Y, Z
a, b, c, d, e, f, g, h, i, j, k, l, m, n, o, p, q, r, s, t, u, v, w, x, y, z
1, 2, 3, 4, 5, 6, 7, 8, 9, 0
+, -, *, /, %, %, =, up, down, right, left, happy, unhappy, heart
You can turn off your led matrix by entering one of these commands: clear & off
Led Matrix is set to run vertically by default. To change this, you can change the direction parameter to 0.
Example: uno.show_led_matrix("A",0)
from futurevision import arduino
uno=arduino.Arduino(usb_port="/dev/cu.usbmodem101",baud=9600)

upper_letter_list=['A', 'B', 'C', 'D', 'E', 'F', 'G', 'H', 'I', 'J', 'K', 'L', 'M', 'N', 'O', 'P', 'Q', 'R', 'S', 'T', 'U', 'V', 'W', 'X', 'Y', 'Z']
lower_letter_list=['a', 'b', 'c', 'd', 'e', 'f', 'g', 'h', 'i', 'j', 'k', 'l', 'm', 'n', 'o', 'p', 'q', 'r', 's', 't', 'u', 'v', 'w', 'x', 'y', 'z']

number_list=[1, 2, 3, 4, 5, 6, 7, 8, 9, 0]
sign_list=['+', '-', '*', '/', '%', '=', 'up', 'down', 'right', 'left', 'happy', 'unhappy', 'heart']

for i in upper_letter_list:
  uno.show_led_matrix(i)
  uno.wait(1)
  uno.show_led_matrix("clear")

for i in lower_letter_list:
  uno.show_led_matrix(i)
  uno.wait(1)
  uno.show_led_matrix("clear")

for i in number_list:
  uno.show_led_matrix(i)
  uno.wait(1)
  uno.show_led_matrix("clear")

for i in sign_list:
  uno.show_led_matrix(i)
  uno.wait(1)
  uno.show_led_matrix("clear")
Led Matrix connections are as follows.


from futurevision import raspberrypi
rpi=raspberrypi.RaspberryPi()
rpi.on(14)
rpi.wait(1)
rpi.off(14)
Colors you can display on RGB LED:
You can turn off your RGB led by entering one of these parameters: clear & off
from futurevision import raspberrypi
rpi=raspberrypi.RaspberryPi()
rpi.rgb_led("red",14,15,18)
rpi.wait(1)
rpi.rgb_led("yellow",14,15,18)
rpi.wait(1)
rpi.rgb_led("green",14,15,18)
rpi.wait(1)
rpi.rgb_led("blue",14,15,18)
rpi.wait(1)
rpi.rgb_led("purple",14,15,18)
rpi.wait(1)
rpi.rgb_led("white",14,15,18)
rpi.wait(1)
rpi.rgb_led("lightblue",14,15,18)
rpi.wait(1)
rpi.rgb_led("clear",14,15,18)
rpi.wait(1)
The button is set to PULL UP.
from futurevision import raspberrypi
rpi=raspberrypi.RaspberryPi()
while True:
    button=rpi.read_button(14)
    if(button):
     print("Button Pressed")
    rpi.wait(0.1)
Terminal Output
>>> %Run test.py
Button Pressed
from futurevision import raspberrypi
rpi=raspberrypi.RaspberryPi(sense_hat=True)
rpi.show_letter("A")
rpi.wait(1)
rpi.show_letter("1")
rpi.wait(1)
rpi.clear()
List of colors you can select in the Sense HAT LED matrix:
None White Red Green Blue Yellow Purple Orange Pink Cyan Brown Lime Teal Maroon
from futurevision import raspberrypi
rpi=raspberrypi.RaspberryPi(sense_hat=True)
rpi.show_letter("A",text_colour="red",back_colour="white")
rpi.wait(1)
rpi.clear()
from futurevision import raspberrypi
rpi=raspberrypi.RaspberryPi(sense_hat=True)
rpi.show_message("Future Vision")
from futurevision import raspberrypi
rpi=raspberrypi.RaspberryPi(sense_hat=True)
rpi.show_message("Future Vision",scroll_speed=0.2)
from futurevision import raspberrypi
rpi=raspberrypi.RaspberryPi(sense_hat=True)
rpi.fill("red")
rpi.wait(1)
rpi.clear()
Signs you can show up, down, right, left, happy, unhappy, heart
from futurevision import raspberrypi
rpi=raspberrypi.RaspberryPi(sense_hat=True)
sign_list=['up', 'down', 'right', 'left', 'happy', 'unhappy', 'heart']
for i in sign_list:
  rpi.show_sign(i)
  rpi.wait(1)
  rpi.clear()
from futurevision import raspberrypi
rpi=raspberrypi.RaspberryPi(sense_hat=True)
temperature=rpi.get_temperature()
humidity=rpi.get_humidity()
pressure=rpi.get_pressure()
gyroscope=rpi.get_gyroscope()
accelerometer=rpi.get_accelerometer()
compass=rpi.get_compass()

print(temperature)
print(humidity)
print(pressure)
print(gyroscope)
print(accelerometer)
print(compass)
Terminal Output
>>> %Run test.py
34.51753616333008
38.123626708984375
0
[-0.535936176776886, 0.06923675537109375, -0.25748658180236816]
[0.11419202387332916, 0.3673451840877533, 0.8629305362701416]
174.1544422493143
from futurevision import raspberrypi
rpi=raspberrypi.RaspberryPi(sense_hat=True)
while True:
  btn=rpi.joystick_button()
  print(btn)
  rpi.wait(0.1)
Terminal Output
>>> %Run test.py
False
False
True
False
from futurevision import raspberrypi
rpi=raspberrypi.RaspberryPi(sense_hat=True)
while True:
  btn=rpi.joystick()
  print(btn)
  rpi.wait(0.1)
Terminal Output
>>> %Run test.py
up
down
right
left
middle

from futurevision import vision
import cv2
vision=vision.Vision()
cap=cv2.VideoCapture(0)
while True:
    _,img=cap.read()
    img, fingers, status=vision.detect_hand(img)
    print("Finger List: ",fingers,"Hand Status: ",status)
    cv2.imshow("Future Vision",img)
    cv2.waitKey(1)
fingers returns a list with 0 for closed fingers and 1 for open fingers.
The status variable returns True if all fingers are open, False if all fingers are closed.
Terminal Output
>>> %Run test.py
Finger List:  [1, 1, 1, 1, 1] Hand Status:  True
Finger List:  [0, 0, 0, 0, 0] Hand Status:  False

from futurevision import vision
import cv2
vision=vision.Vision()
cap=cv2.VideoCapture(0)
while True:
    _,img=cap.read()
    img, fingers, status=vision.detect_hand(img,line_color="red",circle_color="green")
    cv2.imshow("Future Vision",img)
    cv2.waitKey(1)

from futurevision import vision
import cv2
vision=vision.Vision()
cap=cv2.VideoCapture(0)
while True:
    _,img=cap.read()
    img, fingers, status=vision.detect_hand(img,draw=False)
    cv2.imshow("Future Vision",img)
    cv2.waitKey(1)
The fingers represented by the indexes in the list are as in the picture below.

from futurevision import vision
import cv2
vision=vision.Vision()
cap=cv2.VideoCapture(0)
while True:
        _,img=cap.read()
        img,fingers,status=vision.detect_hand(img)
        if len(fingers) > 0:
               if(fingers==[0,0,0,0,0]):
                      print("off")
               if(fingers==[0,0,0,0,1]):
                      print("right")
               if(fingers==[1,1,0,0,0]):
                      print("left")
        cv2.imshow("Future Vision",img)
        cv2.waitKey(1)
from futurevision import vision
import cv2
vision=vision.Vision()
cap=cv2.VideoCapture(0)
while True:
    _,img=cap.read()
    img, emotion,th=vision.detect_emotion(img)
    print(emotion,th)
    cv2.imshow("Future Vision",img)
    cv2.waitKey(1)
emotion variable returns unhappy or happy depending on the happiness state. th variable returns the happiness rate.
Terminal Output
unhappy 0.025
happy 0.045
unhappy 0.025
happy 0.045
Happiness detection threshold is set at 0.035 You can change your happiness detection threshold according to your preferences and needs
Changing the Happiness Threshold
img, emotion,th=vision.detect_emotion(img,threshold=0.040)

from futurevision import vision
import cv2
vision=vision.Vision()
cap=cv2.VideoCapture(0)
while True:
    _,img=cap.read()
    img, emotion,th=vision.detect_emotion(img,line_color="green",text_color="green")
    cv2.imshow("Future Vision",img)
    cv2.waitKey(1)

from futurevision import vision
import cv2
vision=vision.Vision()
cap=cv2.VideoCapture(0)
while True:
    _,img=cap.read()
    img, emotion=vision.detect_emotion(img,draw=False,text=False)
    cv2.imshow("Future Vision",img)
    cv2.waitKey(1)
from futurevision import vision
import cv2
vision=vision.Vision()
cap=cv2.VideoCapture(0)
while True:
    _,img=cap.read()
    img, count=vision.count_faces(img)
    print(count)
    cv2.imshow("Future Vision",img)
    cv2.waitKey(1)
The count variable returns how many faces there are.
Terminal OutputInstant Face Counter
2
2
2
2

from futurevision import vision
import cv2
vision=vision.Vision()
cap=cv2.VideoCapture(0)
while True:
    _,img=cap.read()
    img, count=vision.count_faces(img,draw=False)
    print(count)
    cv2.imshow("Future Vision",img)
    cv2.waitKey(1)
Colors it can recognize Red, Green, Blue
from futurevision import vision
import cv2
vision=vision.Vision()
cap=cv2.VideoCapture(0)
while True:
    _,img=cap.read()
    img,name,list=vision.detect_colors(img)
    print(name,list)
    cv2.imshow("Future Vision",img)
    cv2.waitKey(1)
name variable returns the name of the detected color. The list variable returns the RGB ratios of the detected color in the order R G B.
blue [844.5, 415.5, 173812.0]
red [600.5, 311.0, 530.5]
green [0, 772.0, 0]
The Threshold value is set to 1000 by default. You can lower or raise this value according to your needs.
img,name,list=vision.detect_colors(img,threshold=500)

from futurevision import vision
import cv2
vision=vision.Vision()
cap=cv2.VideoCapture(0)
while True:
    _,img=cap.read()
    img,name,list=vision.detect_colors(img,rectangle_color="yellow")
    print(name,list)
    cv2.imshow("Future Vision",img)
    cv2.waitKey(1)

from futurevision import vision
import cv2
vision=vision.Vision()
cap=cv2.VideoCapture(0)
while True:
    _,img=cap.read()
    img,name,list=vision.detect_colors(img,draw=False)
    print(name,list)
    cv2.imshow("Future Vision",img)
    cv2.waitKey(1)
For face recognition to work you need to download the face recognition model.shape_predictor_68_face_landmarks.dat
from futurevision import vision
import cv2
vision=vision.Vision()
cap=cv2.VideoCapture(0)
vision.blink_setup(path="shape_predictor_68_face_landmarks.dat")
while True:
    _,img=cap.read()
    img,EAR,status,time=vision.detect_blink(img)
    print(EAR,status,time)

    cv2.imshow("Future Vision",img)
    cv2.waitKey(1)
EAR variable returns the eye closure rate. status returns the eye's closed and open status. time returns how many seconds the eye was closed.
0.2 False None
0.21 False None
0.22 False None
0.1 True None
0.1 True None
0.17 False 1.50
0.23 False None
0.23 False None
0.21 False None
The Threshold value is set to 0.15 by default. You can lower or raise this value according to your needs.
img,EAR,status,time=vision.detect_blink(img,threshold=0.20)

from futurevision import vision
import cv2
vision=vision.Vision()
vision.blink_setup(path="shape_predictor_68_face_landmarks.dat")
cap=cv2.VideoCapture(0)
while True:
    _,img=cap.read()
    img,EAR,status,time=vision.detect_blink(img)
    print(EAR,status,time)

    cv2.imshow("Future Vision",img)
    cv2.waitKey(1)
from futurevision import vision
import cv2
vision=vision.Vision()
cap=cv2.VideoCapture(0)
while True:
    _,img=cap.read()
    img,left,right=vision.detect_body(img)
    print(left,right)
    cv2.imshow("Future Vision",img)
    cv2.waitKey(1)
left variable returns the proximity of your left arm to your shoulder. right variable returns the proximity of your left arm to your shoulder.
175.43727322952194 186.38214534742016
159.12635745126173 181.2641703620141
0.8016276382526805 67.3130811726478
7.112369711132518 3.427382752073662
3.0965441578399973 3.4120390844959267
0.008587732984777094 1.7826284349542627
1.46573896432903 1.4118781257852226
5.318943889580121 1.1099510521746376
4.449516553979241 2.073257712440663
7.570394013983709 3.0725981509538887
16.59312469528359 22.83114476402925
20.703749065899352 95.33857084841868
168.733170676982 177.10299133508224
175.13547154106007 178.61997780496543

from futurevision import vision
import cv2
vision=vision.Vision()
cap=cv2.VideoCapture(0)
while True:
    _,img=cap.read()
    img,left,right=vision.detect_body(img,draw=False)
    print(left,right)
    cv2.imshow("Future Vision",img)
    cv2.waitKey(1)
from futurevision import vision
import cv2
vision=vision.Vision()
cap=cv2.VideoCapture(0)
while True:
    _,img=cap.read()
    img,name=vision.detect_objects(img)
    print(name)
    cv2.imshow("Future Vision",img)
    cv2.waitKey(1)
The name variable returns the name of the detected object.
person
person
person
person
person
person

For face recognition to work you need to download the face recognition model.shape_predictor_68_face_landmarks.dat
from futurevision import vision
import cv2
vision=vision.Vision()
cap=cv2.VideoCapture(0)
vision.face_recognizer_setup(["Ali_Edis.png","Carl_Sagan.png"],path="shape_predictor_68_face_landmarks.dat")
while True:
    _,img=cap.read()
    img,name=vision.face_recognizer(img)
    print(name)
    cv2.imshow("Future Vision",img)
    cv2.waitKey(1)
['unknown', 'Ali Edis']
['unknown', 'Ali Edis']
['unknown', 'Ali Edis']

from futurevision import vision
import cv2
vision=vision.Vision()
cap=cv2.VideoCapture(0)
vision.face_recognizer_setup(["Ali_Edis.png","Carl_Sagan.png"],path="shape_predictor_68_face_landmarks.dat")
while True:
    _,img=cap.read()
    img,name=vision.face_recognizer(img,draw=False)
    print(name)
    cv2.imshow("Future Vision",img)
    cv2.waitKey(1)
from futurevision import vision
vision=vision.Vision()
vision.press("a")
from futurevision import vision
vision=vision.Vision()
vision.write("future vision")
from futurevision import vision
vision=vision.Vision()
vision.speak("Future Vision")
from futurevision import vision
vision=vision.Vision()
vision.speak("Merhaba",lang="fr")
from futurevision import vision
vision=vision.Vision()
vision.speak("Future Vision",filename="test.mp3")
To run this code, you need to run this command in the terminal.
pip3 install pyaudio
from futurevision import vision
vision=vision.Vision ()
try:
    vision.start_stream()
    while True:
        sound= vision.detect_sound()
        print(sound)
except KeyboardInterrupt:
    vision.stop_stream ()

In the Settings section, you should save the IP address and port information that your Python code will give you so that the application can communicate with the Python code you will write.
In this section, the iPhone module of the Future Vision library allows you to control the observational hardware of your iPhone based on the code you write. It allows you to control the Flash with flash_on() and flash_off() functions, the Screen Brightness with screen_brightness(value) function, and the Speaker Volume with volume_intensity(value) function.
In this section, the iPhone module of the Future Vision library sends the observational hardware information of your iPhone to your python code as a list. You can read this list data with the read_data() function. The sample data list includes the screen brightness value, the volume value and the volume key pressed on your phone:
['25', '70', 'Down']
['25', '75', 'Up']
In this section, the iPhone module of the Future Vision library allows you to control the 5 led graphics in the application according to the codes you write with the iPhone module and you can change the colors of the 5 leds to green, blue and red. You can use led_on(pin) to turn on the leds in the application and led_off(pin) to turn them off.
In this section, according to the codes you will write with the iPhone module of the future vision library, you can send the data you will enter in the input in the application to your computer or send data from your computer to the mobile application. you can use send_data(data) functions to send data to the mobile application and read_data() functions to read the data sent by the mobile application.
from futurevision import iphone
iphone=iphone.iPhone()
while True:
    iphone.flash_on()
    iphone.wait(3)
    iphone.flash_off()
    iphone.wait(3)

from futurevision import iphone
iphone=iphone.iPhone()
while True:
    iphone.screen_brightness(100)
    iphone.wait(3)
    iphone.screen_brightness(0)
    iphone.wait(3)

from futurevision import iphone
iphone=iphone.iPhone()
while True:
    iphone.volume_intensity(100)
    iphone.wait(3)
    iphone.volume_intensity(0)
    iphone.wait(3)

from futurevision import iphone
iphone=iphone.iPhone()
while True:
    data=iphone.read_data()
    print(data)
Reading iPhone Observational Hardware DataThe first index in the index order of the list represents the screen brightness, the second index represents the volume, and the third index represents the volume up button pressed on the phone
['25', '70', 'Down']
['25', '75', 'Up']

from futurevision import iphone
iphone=iphone.iPhone()
while True:
    iphone.led_on(1)
    iphone.led_on(2)
    iphone.led_on(3)
    iphone.led_on(4)
    iphone.led_on(5)
    iphone.wait(3)
    iphone.led_off(1)
    iphone.led_off(2)
    iphone.led_off(3)
    iphone.led_off(4)
    iphone.led_off(5)
    iphone.wait(3)


from futurevision import iphone
iphone=iphone.iPhone()
while True:
    data=iphone.read_data()
    print(data)

from futurevision import iphone
iphone=iphone.iPhone()
while True:
    iphone.send_data("Future Vision")


FAQs
Library that combines Robotics Hardware, iPhone and AI for Everyone
We found that futurevision demonstrated a healthy version release cadence and project activity because the last version was released less than a year ago. It has 1 open source maintainer collaborating on the project.
Did you know?

Socket for GitHub automatically highlights issues in each pull request and monitors the health of all your open source dependencies. Discover the contents of your packages and block harmful activity before you install or update your dependencies.

Security News
Fluent Assertions is facing backlash after dropping the Apache license for a commercial model, leaving users blindsided and questioning contributor rights.

Research
Security News
Socket researchers uncover the risks of a malicious Python package targeting Discord developers.

Security News
The UK is proposing a bold ban on ransomware payments by public entities to disrupt cybercrime, protect critical services, and lead global cybersecurity efforts.