Security News
PyPI’s New Archival Feature Closes a Major Security Gap
PyPI now allows maintainers to archive projects, improving security and helping users make informed decisions about their dependencies.
Qwen-Agent: Enhancing LLMs with Agent Workflows, RAG, Function Calling, and Code Interpreter.
中文 | English

Qwen-Agent is a framework for developing LLM applications based on the instruction following, tool usage, planning, and memory capabilities of Qwen. It also comes with example applications such as Browser Assistant, Code Interpreter, and Custom Assistant.
pip install -U "qwen-agent[gui,rag,code_interpreter,python_executor]"
# Or use `pip install -U qwen-agent` for the minimal requirements.
# The optional requirements, specified in double brackets, are:
# [gui] for Gradio-based GUI support;
# [rag] for RAG support;
# [code_interpreter] for Code Interpreter support;
# [python_executor] for Tool-Integrated Reasoning with Qwen2.5-Math.
git clone https://github.com/QwenLM/Qwen-Agent.git
cd Qwen-Agent
pip install -e ./"[gui,rag,code_interpreter,python_executor]"
# Or `pip install -e ./` for minimal requirements.
You can either use the model service provided by Alibaba Cloud's DashScope, or deploy and use your own model service using the open-source Qwen models.
If you choose to use the model service offered by DashScope, please ensure that you set the environment
variable DASHSCOPE_API_KEY to your unique DashScope API key.
Alternatively, if you prefer to deploy and use your own model service, please follow the instructions provided in the README of Qwen2 for deploying an OpenAI-compatible API service. Specifically, consult the vLLM section for high-throughput GPU deployment or the Ollama section for local CPU (+GPU) deployment.
Qwen-Agent offers atomic components, such as LLMs (which inherit from class BaseChatModel and come with function calling) and Tools (which inherit
from class BaseTool), along with high-level components like Agents (derived from class Agent).
The following example illustrates the process of creating an agent capable of reading PDF files and utilizing tools, as well as incorporating a custom tool:
import pprint
import urllib.parse
import json5
from qwen_agent.agents import Assistant
from qwen_agent.tools.base import BaseTool, register_tool


# Step 1 (Optional): Add a custom tool named `my_image_gen`.
@register_tool('my_image_gen')
class MyImageGen(BaseTool):
    # The `description` tells the agent the functionality of this tool.
    description = 'AI painting (image generation) service, input text description, and return the image URL drawn based on text information.'
    # The `parameters` tell the agent what input parameters the tool has.
    parameters = [{
        'name': 'prompt',
        'type': 'string',
        'description': 'Detailed description of the desired image content, in English',
        'required': True
    }]

    def call(self, params: str, **kwargs) -> str:
        # `params` are the arguments generated by the LLM agent.
        prompt = json5.loads(params)['prompt']
        prompt = urllib.parse.quote(prompt)
        return json5.dumps(
            {'image_url': f'https://image.pollinations.ai/prompt/{prompt}'},
            ensure_ascii=False)


# Step 2: Configure the LLM you are using.
llm_cfg = {
    # Use the model service provided by DashScope:
    'model': 'qwen-max',
    'model_server': 'dashscope',
    # 'api_key': 'YOUR_DASHSCOPE_API_KEY',
    # It will use the `DASHSCOPE_API_KEY' environment variable if 'api_key' is not set here.

    # Use a model service compatible with the OpenAI API, such as vLLM or Ollama:
    # 'model': 'Qwen2-7B-Chat',
    # 'model_server': 'http://localhost:8000/v1',  # base_url, also known as api_base
    # 'api_key': 'EMPTY',

    # (Optional) LLM hyperparameters for generation:
    'generate_cfg': {
        'top_p': 0.8
    }
}

# Step 3: Create an agent. Here we use the `Assistant` agent as an example, which is capable of using tools and reading files.
system_instruction = '''You are a helpful assistant.
After receiving the user's request, you should:
- first draw an image and obtain the image url,
- then run code `request.get(image_url)` to download the image,
- and finally select an image operation from the given document to process the image.
Please show the image using `plt.show()`.'''
tools = ['my_image_gen', 'code_interpreter']  # `code_interpreter` is a built-in tool for executing code.
files = ['./examples/resource/doc.pdf']  # Give the bot a PDF file to read.
bot = Assistant(llm=llm_cfg,
                system_message=system_instruction,
                function_list=tools,
                files=files)

# Step 4: Run the agent as a chatbot.
messages = []  # This stores the chat history.
while True:
    # For example, enter the query "draw a dog and rotate it 90 degrees".
    query = input('user query: ')
    # Append the user query to the chat history.
    messages.append({'role': 'user', 'content': query})
    response = []
    for response in bot.run(messages=messages):
        # Streaming output.
        print('bot response:')
        pprint.pprint(response, indent=2)
    # Append the bot responses to the chat history.
    messages.extend(response)
In addition to using built-in agent implementations such as class Assistant, you can also develop your own agent implemetation by inheriting from class Agent.
The framework also provides a convenient GUI interface, supporting the rapid deployment of Gradio Demos for Agents. For example, in the case above, you can quickly launch a Gradio Demo using the following code:
from qwen_agent.gui import WebUI
WebUI(bot).run()  # bot is the agent defined in the above code, we do not repeat the definition here for saving space.
Now you can chat with the Agent in the web UI. Please refer to the examples directory for more usage examples.
Yes. The LLM classes provide function calling. Additionally, some Agent classes also are built upon the function calling capability, e.g., FnCallAgent and ReActChat.
We have released a fast RAG solution, as well as an expensive but competitive agent, for doing question-answering over super-long documents. They have managed to outperform native long-context models on two challenging benchmarks while being more efficient, and perform perfectly in the single-needle "needle-in-the-haystack" pressure test involving 1M-token contexts. See the blog for technical details.

BrowserQwen is a browser assistant built upon Qwen-Agent. Please refer to its documentation for details.
The code interpreter is not sandboxed, and it executes code in your own environment. Please do not ask Qwen to perform dangerous tasks, and do not directly use the code interpreter for production purposes.
FAQs
Qwen-Agent: Enhancing LLMs with Agent Workflows, RAG, Function Calling, and Code Interpreter.
We found that qwen-agent demonstrated a healthy version release cadence and project activity because the last version was released less than a year ago. It has 2 open source maintainers collaborating on the project.
Did you know?

Socket for GitHub automatically highlights issues in each pull request and monitors the health of all your open source dependencies. Discover the contents of your packages and block harmful activity before you install or update your dependencies.

Security News
PyPI now allows maintainers to archive projects, improving security and helping users make informed decisions about their dependencies.

Research
Security News
Malicious npm package postcss-optimizer delivers BeaverTail malware, targeting developer systems; similarities to past campaigns suggest a North Korean connection.

Security News
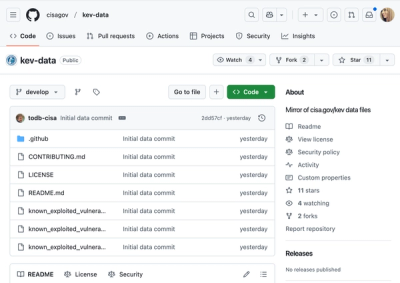
CISA's KEV data is now on GitHub, offering easier access, API integration, commit history tracking, and automated updates for security teams and researchers.