Suricata Language Server
Suricata Language Server is an implementation of the Language Server
Protocol for Suricata signatures. It adds syntax check and hints as well
as auto-completion to your preferred editor once it is configured.
Suricata Language Server requires Python and a Suricata binary.
The code is based on Chris Hansen's fortran language
server and
incorporate code from Stamus Networks'
scirius.
Features and architecture
Suricata Language Server currently supports auto-completion and advanced
syntax checking. Both features are using the capabilities of the
Suricata available on the system. This means that the list of keywords
(with documentation information) is coming for Suricata itself and it is
the same for the syntax checking. This comes at the cost to have
Suricata installed on your system but at the same time, it guarantees a
strict checking of signatures with respect to the Suricata version you
are running. Pushing signatures to production will not result in bad
surprise as the syntax has already been checked by the same engine.
Syntax checking is done when saving the files. A configuration test is
started using Suricata. This is providing errors to the diagnostic.
Warnings and hints are also provided by using a detection engine
analysis done by Suricata. This is returning warnings and hints about
the potential issues seen of the signatures.
Installation
You can use pip to install the Suricata language server :
pip install suricata-language-server
Run this command with sudo if you want to install it globally.
On system where PEP 704 is
implemented, the installation via PIP is done by default in a virtualenv
which is not convenient for our use case where the editor is running the
server. A workaround is to force the installation outside a virtualenv
by doing :
pip install --break-system-packages suricata-language-server
[!TIP]
It is also possible to install the server in a virtualenv and then
you can set up your editor to use the virtualenv. This is done by
specifying in the editor configuration the path to the
suricata-language-server in the virtualenv.
If you are a Microsoft Windows user and need to install Suricata, you
can use the MSI available on Suricata download
page. For Python, the installer from
Python website available on their Download
page is working well.
Manual Installation
After cloning the repository, you need to install first the server by
running in the root directory of the project :
pip install .
This will add a suricata-language-server command to the system that
will be invoked transparently by the editors that are configured to use
it. You can use sudo pip install . to install it system wide if
needed.
Editors Configuration
Neovim

One simple way is to use
nvim-lspconfig and add the
following snippet to your configuration :
local lspconfig = require 'lspconfig'
local configs = require 'lspconfig.configs'
if not configs.suricata_language_server then
configs.suricata_language_server = {
default_config = {
cmd = {'suricata-language-server'};
filetypes = {'suricata', 'hog'};
root_dir = function(fname)
return lspconfig.util.find_git_ancestor(fname)
end;
single_file_support = true;
settings = {};
};
}
end
If you want to setup a custom Suricata binary, you can use the following
trick: :
local suricata_ls_cmd = {'suricata-language-server', '--suricata-binary=/my/own/suricata'}
require'lspconfig'.suricata_language_server.setup{
  cmd = suricata_ls_cmd,
  on_attach = on_attach,
}
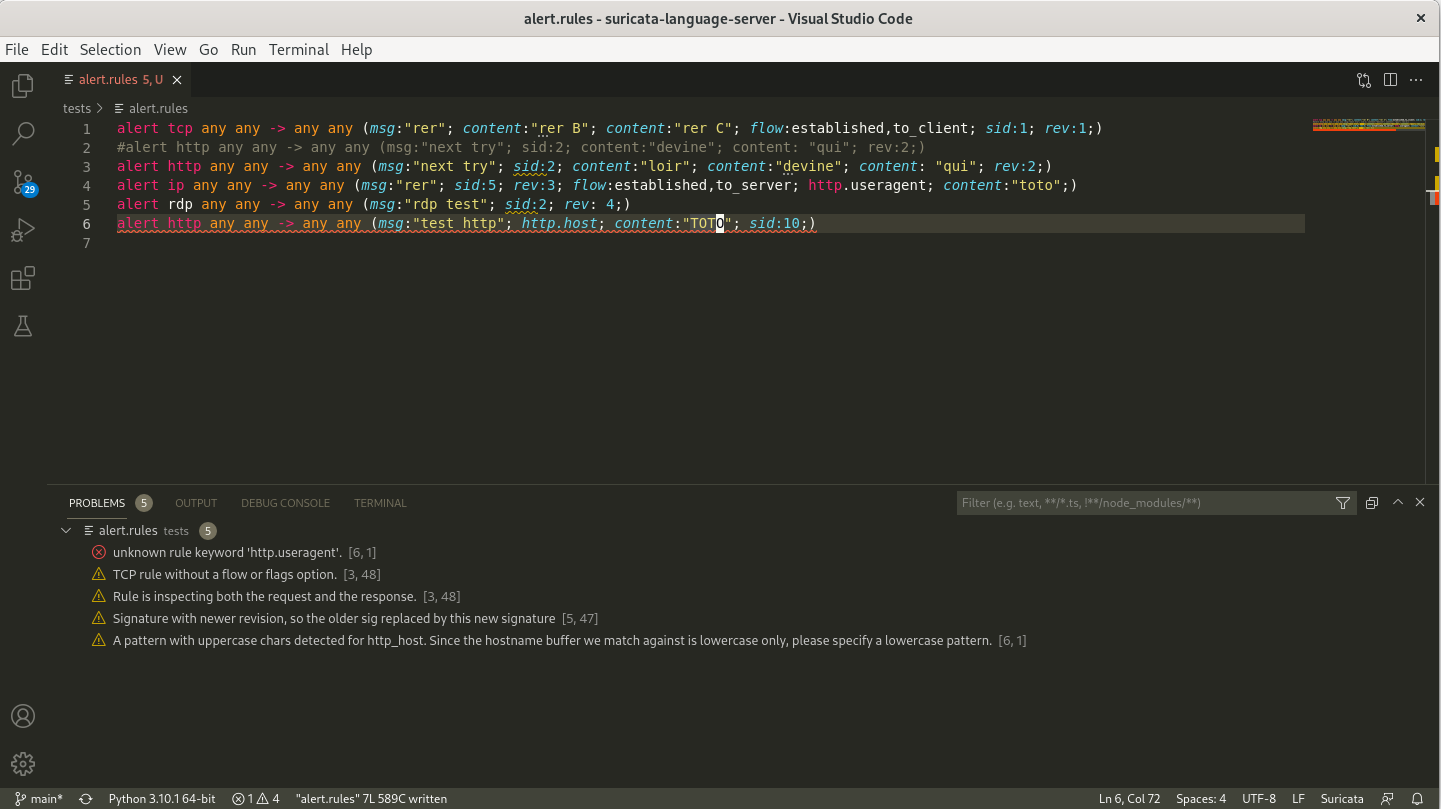
Visual Studio code
Download the Suricata IntelliSense extension published by Stamus
Networks from Visual studio
Marketplace
and install it into your Visual Studio Code instance. You can also
direcly install it from Visual Studio Code via the Extensions menu.
Then you can configure it via the settings. Main settings are the path
to the Suricata Language Server binary and the path to the Suricata
binary.
For the settings on Microsoft Windows, you will need to escape the
backslash in the paths you need to enter. With a standard Suricata msi
installation and a standard installation of the server with pip the
settings look like:
- Server Path:
C:\\Users\\User\\AppData\\Local\\Programs\\Python\\Python310\\Scripts\\suricata-language-server.exe
- Suricata Path:
C:\\Program Files\\Suricata\\suricata.exe
The Suricata IntelliSense extension is hosted on its own project on
GitHub.
Sublime Text 3
You can use the LSP Package to provide
support for LSP to Sublime Text 3.
To activate Suricata Language Server on .rules file, you need to create
a new syntax for Suricata file by using the content of Suricata Sublime
syntax from OzurieXV
To do so you can click on Tools > Developer > New Syntax then paste
the content of the file and modify the text text.suricata
to source.suricata. This will provide syntax highlighting
as well as a source.suricata Sublime selector that can be
used to trigger the Suricata Language Server activation.
To do that, you can setup the Suricata Language Server by following the
documentation for the LSP package on client
configuration.
You will need to open Preferences > Package Settings > LSP > Settings
and edit the configuration to add the Suricata Language Server.
The following configuration is known to work :
{
  "clients": {
    "suricatals": {
      "enabled": true,
      "command": ["/path/to/suricata-language-server", "--suricata-binary=/path/to/suricata"],
      "selector": "source.suricata",
    },
  },
}
Kate
You can use Suricata Language Server in Kate by activating the LSP
Client
Plugin.
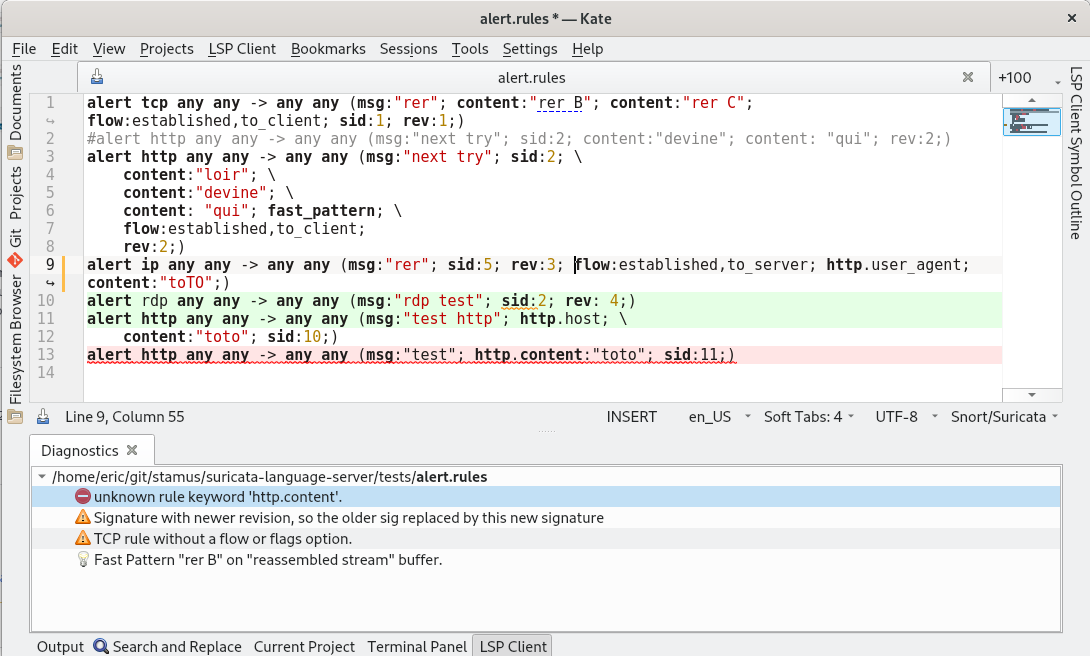
Once activated, you can go to Settings > Configure Kate > LSP Client
then open the User Server Settings tab and add the configuration for
the Language Server Protocol :
{
  "servers": {
      "suricata": {
          "command": ["/path/to/suricata-language-server", "--suricata-binary=/path/to/suricata"],
          "highlightingModeRegex": "^.*Suricata.*$"
        }
      }
}
The second option giving the path to Suricata binary is only necessary
if you have a binary in a custom location.
Server options
See suricata-language-server -h for complete and
up-to-date help.
--suricata-binary: path to the Suricata binary used for signatures
testing (optional)--suricata-config: path to the Suricata config used for signatures
testing (optional)--max-lines: don't run Suricata tests if file is bigger than this
limit (auto-completion only)--max-tracked-files: don't start Suricata analysis if workspace
file count is superior to this limit--batch-file: batch mode to parse only the file in argument and
return result on stdout
Passing options to Suricata
You can pass options to Suricata by adding a specific comment in a rules
file. This is done by adding the ## SLS suricata-options: prefix to
the comment. What is after this prefix is passed to Suricata as command
line options. For example, if you want to use custom address groups and
specific options, you can add the following line to your rules file :
## SLS suricata-options: --set vars.address-groups.SCANNERS="127.0.0.3" --set datasets.rules.allow-absolute-filenames: true
Dataset directory handling
As the system were the signature are developed is not the same as the
one where they are deployed, settings such as absolute path to files are
not working. The directory of dataset files is the main example of this.
The Suricata Language Server is allowing to fix analysis by using a
specific comment in the rules file. This is done by adding the
## SLS dataset-dir: prefix :
## SLS dataset-dir: /path/to/dataset/
With this line, a signature such as the following one will be correctly
parsed and evaluated :
alert http any any -> any any (msg:"test"; file_data; dataset:isset,fi,type string, load /path/to/dataset/dd.lst; sid:1;)
Modification of rules buffer
It is possible to modify the rules buffer by using the ## SLS replace:
prefix. This is done by adding a comment line with this prefix and the
text to replace. For example, if you want to replace the text foo by
bar in the rules buffer, you can add the following line to your rules
file :
## SLS replace: foo bar
Getting help
You can get help by:


