Security News
Fluent Assertions Faces Backlash After Abandoning Open Source Licensing
Fluent Assertions is facing backlash after dropping the Apache license for a commercial model, leaving users blindsided and questioning contributor rights.
github.com/GoogleCloudPlatform/cloud-foundation-toolkit/infra/blueprint-test
Integration testing has been instrumental in establishing a complete and functional CI pipeline. Similar to most quality software engineering modules and applications, GCP Blueprints employ an integration testing framework that is triggered as part of the CI process as well.
Apart from the necessity of including a testing framework as part of our GCP blueprints we took additional steps to ensure the following:
Considering the above, our test framework has been developed (details in the following sections) with backward compatibility to allow for current tests to keep functioning.
[!NOTE] If you have a question about the test framework, feel free to ask it on our user group. Feature requests can also be submitted as Issues.*
[!NOTE] The best reference documentation for the framework is the autogenerated documentation.
The test framework uses Golang with the testing package at its core to allow for creation and setup of GCP blueprints integration tests.
Primarily, there are two types of tests that are executed as part of the framework:
For the purpose of this user guide, the terraform-google-sql-db blueprint is used to demonstrate the usage of the framework.
├── ...
├── modules/submodules/*.tf
├── examples
│ ├── mssql-public/*.tf
│ ├── mysql-ha/*.tf
│ ├── mysql-private/*.tf
│ ├── mysql-public/*.tf
│ ├── postgresql-ha/*.tf
│ ├── postgresql-public/*.tf
│ └── postgresql-public-iam/*.tf
├── test
│ ├── fixtures
│ │ ├── mssql-ha/*.tf
│ │ ├── mysql-ha/*.tf
│ │ ├── mysql-private/*.tf
│ │ ├── mysql-public/*.tf
│ │ ├── postgresql-ha/*.tf
│ │ ├── postgresql-public/*.tf
│ │ └── postgresql-public-iam/*.tf
│ ├── integration
│ │ ├── testing.yaml
│ │ ├── discover_test.go
│ │ ├── mssql-ha/*
│ │ ├── mysql-ha/*
│ │ ├── mysql-public/*
│ │ │ └── mysql_public_test.go
│ │ ├── postgresql-ha/*
│ │ ├── postgresql-public/*
│ │ ├── postgresql-public-iam/*
│ └── setup/*.tf
└── ...
Let’s review how the blueprint directory is structured.
examples - this directory holds examples that may call the main blueprint or sub-blueprints (for Terraform, this is the main module or sub-modules within the modules directory).test/fixtures - this directory contains “fixture” configuration. In most cases, this should be configured to wrap examples that need additional inputs and unify the interface for testing. Usage of fixtures is discouraged unless necessary.test/integration - this directory is intended to hold integration tests that are responsible for running and asserting test values for a given fixture.test/setup - this directory holds configuration for creating the GCP project and initial resources that are a prerequisite for the blueprint tests to run.This section aims at explaining the process of developing a custom integration test which consists of the following steps:
The first step in the process is to create an example that leverages a TF module from the blueprint as illustrated in section 2.1. The example creation process consists of two steps:
In this step you will create an example directory under the examples directory that uses a module or submodule from the modules as the source as follows:
examples directorymysql-public for the example and create a new directory with that name and cd into itmain.tf with the following content// name for your example module
module "mysql-db" {
// set the source for the module being tested as part of the
// example
source = "../../modules/mysql"
...
}
variables.tf for organizing and defining variables that need to be passed into the example module as follows:...
variable "project_id" {
description = "The ID of the project in which resources will be provisioned."
type = string
}
variable "db_name" {
description = "The name of the SQL Database instance"
default = "example-mysql-public"
}
...
These variables are now available for access within the main.tf file and can be set in the example module. The following example shows how to reference the project_id variable in main.tf.
// name for your example module
module "mysql-db" {
 ...
 // variables required by the source module
 random_instance_name = true
 database_version     = "MYSQL_5_6"

 // variable being set from the example module variables configuration.
 project_id           = var.project_id
 ...
}
[!NOTE] Variables defined in the example module’s variables (normally variables.tf) configuration can be set 1) from wrapping modules calling the example module (e.g. fixtures) or 2) using environment variables by prefixing the environment variable with
TF_VAR.E.g. to set the project_id variable (above), setting the value in a
TF_VAR_project_idenvironment variable would automatically populate its value upon execution. This is illustrated the filetest/setup/outputs.tfwhere theproject_idis being exported as an env variable.
Upon successful execution of your example module, you will most likely need outputs for resources being provisioned to validate and assert in your test. This is done using outputs in Terraform.
examples/mysql-public directory create a file outputs.tf. The content for the file should be as follows:// The output value is set using the value attribute and is either computed in place or pulled from one of the recursive modules being called. In this case, it is being pulled from the mysql module that the example module is calling as its source.
...
output "mysql_user_pass" {
value = module.mysql-db.generated_user_password
description = "The password for the default user. If not set, a random one will be generated and available in the generated_user_password output variable."
}
...
Complete code files for the example module can be found here.
After creating the example configuration, your example will automatically be tested and no further action is required. However, if you need to make custom assertions regarding the resources the blueprint will create, you should create an integration test in Go using the testing package. Custom assertions will mostly involve making an API calls to GCP (via gcloud commands) to assert a resource is configured as expected. The entire integration test explained below can be found here.
The first step in writing the test is to wire it up with the required packages and methods signatures that the test framework expects as follows:
test/integration/mysql-public directory or create it if it's not present already in the blueprint and the cd into it.mysql_public_test.go with the following content:As a good practice use this convention to name your test files: <example_name>_test.go
// define test package name
package mysql_public

import (
  "fmt"
  "testing"

  // import the blueprints test framework modules for testing and assertions
  "github.com/GoogleCloudPlatform/cloud-foundation-toolkit/infra/blueprint-test/pkg/gcloud"
  "github.com/GoogleCloudPlatform/cloud-foundation-toolkit/infra/blueprint-test/pkg/tft"
  "github.com/stretchr/testify/assert"
)

// name the function as Test*
func TestMySqlPublicModule(t *testing.T) {
   ...
   // initialize Terraform test from the blueprint test framework
   mySqlT := tft.NewTFBlueprintTest(t)
   // define and write a custom verifier for this test case call the default verify for confirming no additional changes
   mySqlT.DefineVerify(func(assert *assert.Assertions) {
       // perform default verification ensuring Terraform reports no additional changes on an applied blueprint
       mySqlT.DefaultVerify(assert)
       // custom logic for the test continues below
       ...
   })
   // call the test function to execute the integration test
   mySqlT.Test()
}
The next step in the process is to write the logic for assertions.
// The tft struct can be used to pull output variables of the TF module being invoked by this test
op := gcloud.Run(t, fmt.Sprintf("sql instances describe %s --project %s", mySqlT.GetStringOutput("name"), mySqlT.GetStringOutput("project_id")))
Once you have retrieved values from GCP, use the assert package to perform custom validations with respect to the resources provisioned. Here are some common assertions that can be useful in most test scenarios.
// assert values that are supposed to be equal to the expected values
assert.Equal(databaseVersion, op.Get("databaseVersion").String(), "database versions is valid is set to "+databaseVersion)
// assert values that are contained in the expected output
assert.Contains(op.Get("gceZone").String(), region, "GCE region is valid")
// assert boolean values
assert.True(op.Get("settings.ipConfiguration.ipv4Enabled").Bool(), "ipv4 is enabled")
// assert values that are greater than or equal to the expected value
assert.GreaterOrEqual(op.Get("settings.dataDiskSizeGb").Float(), 10.0, "at least 5 backups are retained")
// assert values that are supposed to be empty or nil
assert.Empty(op.Get("settings.userLabels"), "no labels are set")
The entire integration test can be found here.
As mentioned in section 2 above, the blueprints test framework executes tests in two ways: auto-discovered and custom tests. Each type of test undergoes 4 stages of test execution:
terraform init and terraform validateterraform applyterraform plan to verify apply successful apply with no more resources to add/destroyterraform destroyBy default, tests go through 4 stages above. You can also explicitly run individual stages one at a time.
In order for the test to execute, certain prerequisite resources and components need to be in place. These can be set up using the TF modules under test/setup. Running terraform apply in this directory will set up all resources required for the test.
[!NOTE] Output values from
test/setupare automatically loaded as Terraform environment variables and are available to both auto discovered and custom/explicit tests as inputs. This is also illustrated in the Create the example configuration - Step 4 above where theproject_idvariable output by thetest/setupis consumed as a variable for the example.
test/integration directorygo test ORgo test -v (for verbose output)RUN_STAGE=<stage_name> go test
E.g. to run a test for just the init stage the use the following command:RUN_STAGE=init go testAll blueprints come pre-wired with an auto-discovered test located in the test/integration folder. Following are the contents of the test module and can be found here as well.
package test

import (
  // should be imported to enable testing for GO modules
  "testing"

  // should be imported to use terraform helpers in blueprints test framework
  "github.com/GoogleCloudPlatform/cloud-foundation-toolkit/infra/blueprint-test/pkg/tft"
)

// entry function for the test; can be named as Test*
func TestAll(t *testing.T) {
   // the helper to autodiscover and test blueprint examples
   tft.AutoDiscoverAndTest(t)
}
We’ll use the blueprint structure highlighted in section 2.1 for explaining how auto-discovered test execution works.
The auto-discovered test can be triggered as follow:
go test ORgo test -v (for verbose output)By default, this triggers the following steps:
test/fixtures directory and builds a list of tests that are only found under the test/fixtures directory and do not match any explicit tests (by directory name) under test/integration. For this example, the following tests will be queued:
test/fixtures/mysql-privateexamples directory and adds to the list any example modules that do not exist in either the test/fixtures directory or the test/integration directory (matched by directory name). For this example, one additional test is queued to the list:
examples/mssql-publicThis section shows the execution for auto-discovered tests and the output illustrating the execution of various stages of the test(s).
Beginning of test execution

This shows the mysql-private auto-discovered test has started executing and loading environment variables from the blueprint’s setup run.
Beginning of the init stage

This illustrates the start of init stage of the test execution. At this point TF init and plan is applied on the mysql-private example
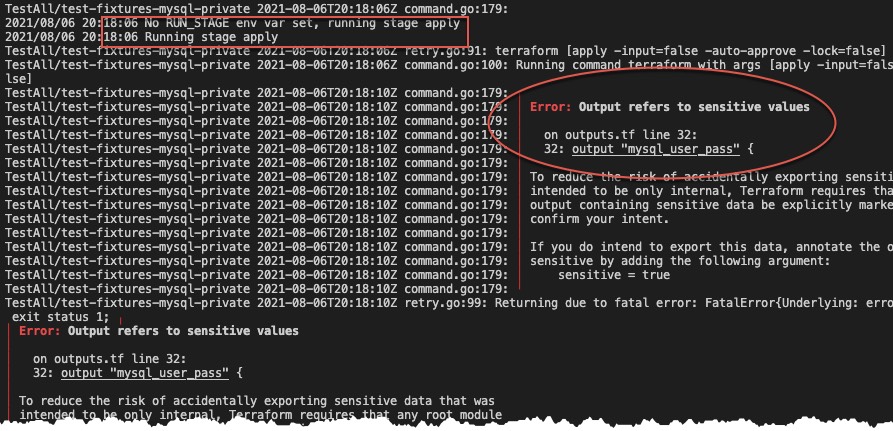
Beginning of apply stage

This illustrates the execution of the apply stage and also shows the simulated FAIL scenario where an output variable is not configured as “sensitive”. At this point, the test will be marked as failed.
Beginning of verify stage
[!NOTE] this illustration is from the 2nd test case (mssql-public) that made it through the apply stage successfully.
 This illustrates the execution of the verify stage where TF plan is executed to refresh the TF state and confirm no permadiffs occur and all resources were successfully provisioned.
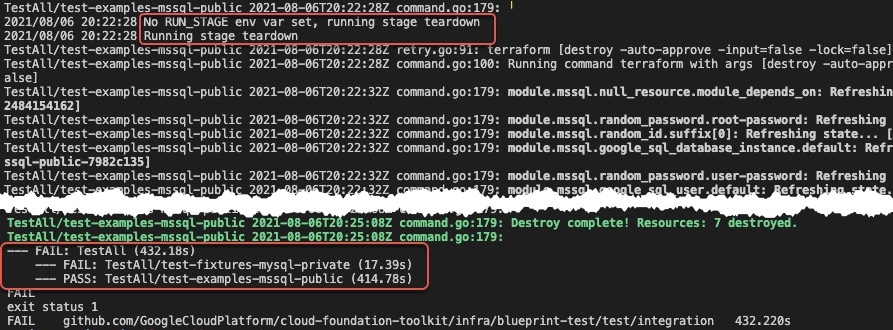
Beginning of destroy stage

This illustrates the execution of the destroy stage where terraform destroy is executed to teardown all resources provisioned by the example.
Lastly, a status of the complete test run is shown with a tally of all passed and failed tests and eventually showing the overall status of the test run which is FAIL in this case.
Unlike auto-discovered tests, custom tests are written specifically for examples that require custom assertions and validations. Even though custom tests are run as part of the default test run as explained in section 4.2, we can also execute them in isolation as explained below. In this section we will use the integration test created in section 3.3 and show how to execute it.
Cd into test/integration
Instead of running the whole test suite, we will target our custom test by name i.e. TestMySqlPublicModule in file test/integration/mysql-public/mysql_public_test.go
Run the one of the following commands for execution:
go test -run TestMySqlPublicModule ./... ORgo test -run TestMySqlPublicModule ./... -v (for verbose output)In the above commands the test module name is specified with the -run parameter. This name can also be in the form of a regular expression as explained in the tip below.
The usage of ./… in the above commands allows for golang to execute tests in subdirectories as well.
Tip: Targeting Specific Tests

Apart from running tests by default, specific or all tests can be targeted using RegEx expressions.

To run all tests regardless if they are custom or auto-discovered, use the following command:
`go test -v ./... -p 1 .`

To run a specific test or a set of tests using a regular expression, use the following command:
`go test -run TestAll/*`  - will target all tests that are supposed to be invoked as part of the auto-discovery process.
`go test -run MySql ./...`  - will target all tests that are written for MySql i.e. have ‘MySql’ as part of their test module name.

Furthermore, to run a specific stage of a test or a set of tests, set the RUN_STAGE environment variable:
This command specifically runs only the setup stage for all tests that are auto-discovered
`RUN_STAGE=setup go test -run TestAll/* .`
By default, a custom test also goes through 4 stages as auto-discovered tests do. However, depending on the custom test configuration, there can be additional test logic that is executed in one or more stages of the test(s).
E.g., in order to run only the verify stage for a custom test, run one of the following command:
RUN_STAGE=verify go test -run TestMySqlPublicModule ./...
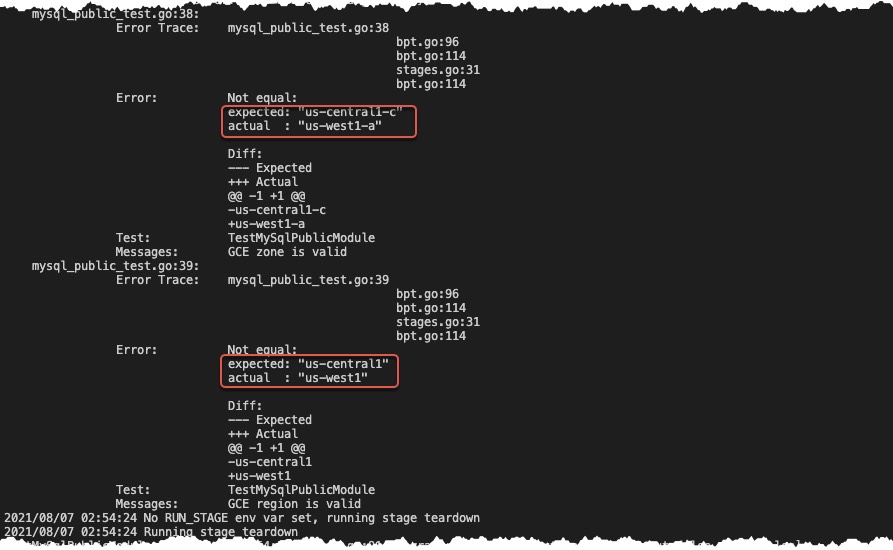
The following illustration shows how custom assertions as part of the verify stage are executed and simulated to fail.

Here, the custom assertion failed since the expected region and zone configured in the test was us-west1 and us-west1-a respectively. However, the actual values for the region and zone for the Cloud SQL resource were different.
Fixtures can also be used to test similar examples and modules when the only thing changing is the data. The following example illustrates the usage of the examples/mysql-public as the source and passing in the data required to execute the test.
test/fixtures directorymysql-public and cd into itmain.tf with the following content:module "mysql-fixture" {
// setup the source for the fixture as the example for the test
source = "../../../examples/mysql-public"
// set variables as required by the example module
db_name = var.db_name
project_id = var.project_id
authorized_networks = var.authorized_networks
}
Similar to the example module, outputs can be configured for the fixture module as well, especially for the generated values that need to be asserted in the test. Complete code files for the fixture module can be found here.
The plan stage can be used to perform additional assertions on planfiles. This can be useful for scenarios where additional validation is useful to fail fast before proceeding to more expensive stages like apply, or smoke testing configuration without performing an apply at all.
Currently a default plan function does not exist and cannot be used with auto generated tests. Plan stage can be activated by providing a custom plan function. Plan function recieves a parsed PlanStruct which contains the raw TF plan JSON representation as well as some additional processed data like map of resource changes.
networkBlueprint.DefinePlan(func(ps *terraform.PlanStruct, assert *assert.Assertions) {
      ...
	})
Additionally, the TFBlueprintTest also exposes a PlanAndShow method which can be used to perform ad-hoc plans (for example in verify stage).
FAQs
Unknown package
Did you know?

Socket for GitHub automatically highlights issues in each pull request and monitors the health of all your open source dependencies. Discover the contents of your packages and block harmful activity before you install or update your dependencies.

Security News
Fluent Assertions is facing backlash after dropping the Apache license for a commercial model, leaving users blindsided and questioning contributor rights.

Research
Security News
Socket researchers uncover the risks of a malicious Python package targeting Discord developers.

Security News
The UK is proposing a bold ban on ransomware payments by public entities to disrupt cybercrime, protect critical services, and lead global cybersecurity efforts.