Security News
Oracle Drags Its Feet in the JavaScript Trademark Dispute
Oracle seeks to dismiss fraud claims in the JavaScript trademark dispute, delaying the case and avoiding questions about its right to the name.
@atinux/nuxthub
Advanced tools
The Nuxt Toolkit to create full-stack applications on the Edge.
useAuth(event)useDatabase()useKV()useBlob()const blob = await useBlob().put('my-file.txt', 'Hello World!', {
contentType: 'text/plain' // optional, will be inferred from the file extension
addRandomSuffix: true // optional, will add a suffix to the filename to avoid collisions
})
/*
{
pathname: 'my-file-12345.txt',
contentType: 'text/plain',
size: 12,
uploadedAt: '2021-08-12T15:00:00.000Z'
}
*/
export default eventHandler(async (event) => {
  const form = await readFormData(event)
  const file = form.get('file')

  return useBlob().put(file.name, file)
})
// Get a blob object
const { blobs, cursor, hasMore } = await useBlob().list({
  limit: 10, // optional, default to 1000
  prefix: 'my-dir', // optional, will only list blobs starting with `my-dir`
})
const blob = useBlob()
let blobs = []
let hasMore = true
let cursor

while (hasMore) {
  const result = await blob.list({
    cursor,
  })
  blobs.push(...result.blobs)
  hasMore = result.hasMore
  cursor = result.cursor
}
const blob = await useBlob().head('my-file.txt')
await useBlob().delete('my-file.txt')
It returns a void response. A delete action is always successful if the blob url exists. A delete action won't throw if the blob url doesn't exists.
// server/routes/[...pathname].get.ts
export default eventHandler(event => {
  const pathname = event.context.params.pathname
  return useBlob().serve(event, pathname)
})
useKV() -> process.env.KV binding
useKV().setItem('public/')
const value = await useKV().get('my-key')
https://github.com/Atinux/nuxt-todos-edge/assets/904724/5f3bee55-dbae-4329-8057-7d0e16e92f81
Make sure to install the dependencies using pnpm:
pnpm i
Create a GitHub Oauth Application with:
http://localhost:3000http://localhost:3000/api/auth/githubAdd the variables in the .env file:
NUXT_OAUTH_GITHUB_CLIENT_ID="my-github-oauth-app-id"
NUXT_OAUTH_GITHUB_CLIENT_SECRET="my-github-oauth-app-secret"
To create sealed sessions, you also need to add NUXT_SESSION_SECRET in the .env with at least 32 characters:
NUXT_SESSION_SECRET=your-super-long-secret-for-session-encryption
Start the development server on http://localhost:3000
npm run dev
In the Nuxt DevTools, you can see your tables by clicking on the Drizzle Studio tab:
https://github.com/Atinux/nuxt-todos-edge/assets/904724/7ece3f10-aa6f-43d8-a941-7ca549bc208b
Create a CF pages deployment linked to your GitHub repository. Make sure to select Version 2 (Beta) as the build system version.
NUXT_OAUTH_GITHUB_CLIENT_ID=...
NUXT_OAUTH_GITHUB_CLIENT_SECRET=...
NUXT_SESSION_PASSWORD=...
Set the build command to:
npm run build
And the output directory to dist/
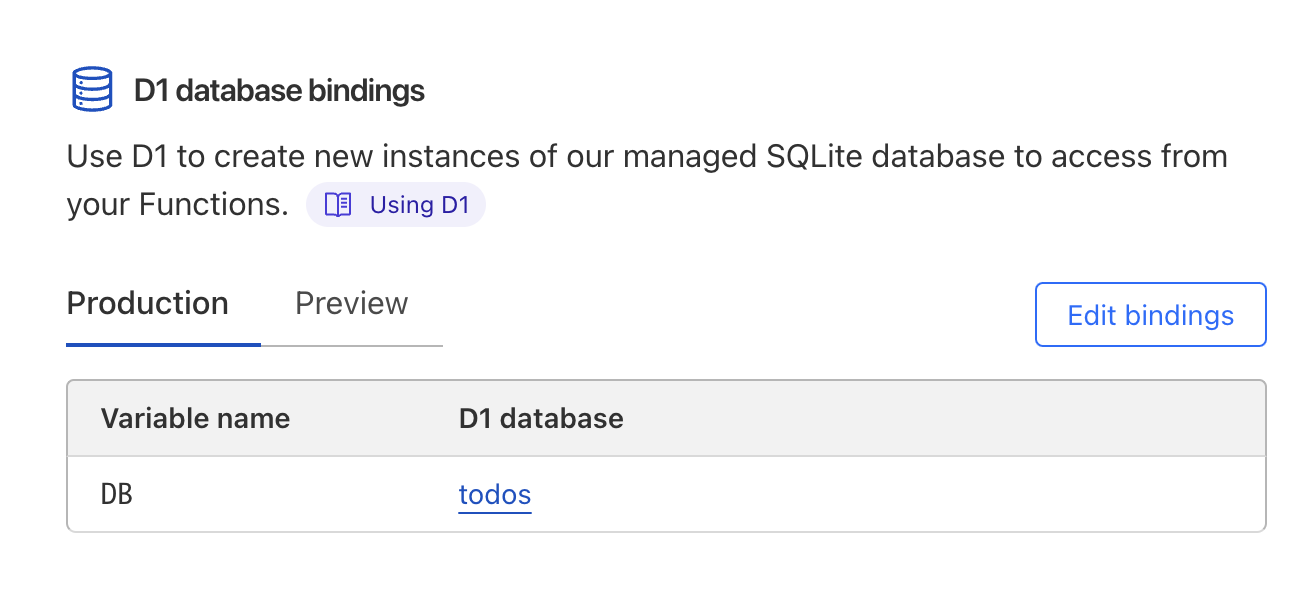
Lastly, in the project settings -> Functions, add the binding between your D1 database and the DB variable:

Copy the contents from server/database/migrations/0000_heavy_xorn.sql into the D1 console to seed the database.
You can also use Turso database instead of CloudFlare D1 by creating a database and adding the following env variables:
TURSO_DB_URL=...
TURSO_DB_TOKEN=...
You can see a live demo using Turso on https://nuxt-todos-turso.pages.dev
FAQs
The Nuxt Toolkit to create full-stack applications on the Edge.
The npm package @atinux/nuxthub receives a total of 0 weekly downloads. As such, @atinux/nuxthub popularity was classified as not popular.
We found that @atinux/nuxthub demonstrated a healthy version release cadence and project activity because the last version was released less than a year ago. It has 2 open source maintainers collaborating on the project.
Did you know?

Socket for GitHub automatically highlights issues in each pull request and monitors the health of all your open source dependencies. Discover the contents of your packages and block harmful activity before you install or update your dependencies.

Security News
Oracle seeks to dismiss fraud claims in the JavaScript trademark dispute, delaying the case and avoiding questions about its right to the name.

Security News
The Linux Foundation is warning open source developers that compliance with global sanctions is mandatory, highlighting legal risks and restrictions on contributions.

Security News
Maven Central now validates Sigstore signatures, making it easier for developers to verify the provenance of Java packages.